Frelander 2. Manual - part 726
 

  Index      Land Rover     Land Rover Frelander 2 - service repair manual 2006-2010 year


Search            


Content   ..  724  725  726  727   ..


Frelander 2. Manual - part 726


Wheels and tyres

182

L

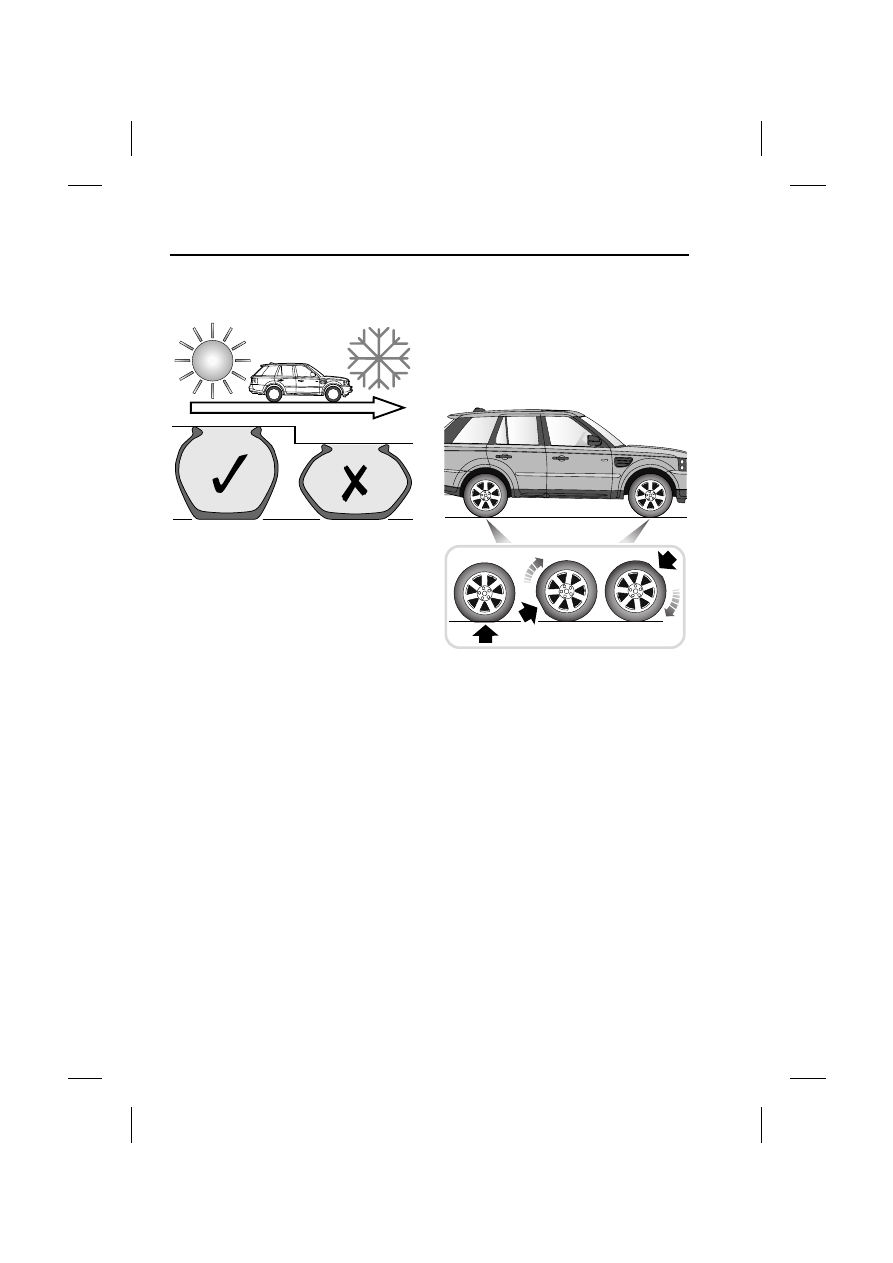
Pressure compensation for ambient 
temperature changes

If the ambient temperature drops, the tyre 
pressures will decrease, which may cause 
under inflation. This should be borne in mind 
when travelling to, or through, areas of lower 
temperature.

Under inflation causes the tyre side wall height 
to reduce, which in turn results in uneven tyre 
wear, and a risk of tyre failure.

Tyre pressures may be adjusted before setting 
off on a journey to, or through, areas of low 
temperature. Alternatively, the tyre pressures 
can be adjusted when low temperature areas 
are reached.

Note: If the tyre pressures are to be adjusted in 
the lower temperature area, the vehicle should 
be left standing for at least one hour prior to 
adjustment.

Tyre pressures should be increased by 0.14 
bar/14 kPa (2 lbf/in²) for each 10 °C (20 °F) 
temperature decrease.

Flat spots

If the vehicle is stationary for a long period 
when the ambient temperature is high, the 
tyres may form flat spots. When the vehicle is 
driven these flat spots will cause a vibration 
which will steadily disappear as the tyres warm 
up and regain their original shape.

In order to minimise flat spotting, the tyre 
pressures can be increased. 

Tyre pressures should be increased by 0.14 
bar/14 kPa (2 lbf/in²) for each 10 °C (20 °F) 
temperature increase above 20 °C (68 °F).

Long term storage

Flat spotting can be minimised during long 
term storage by increasing the tyre pressures 
to the maximum indicated on the tyre sidewall.

Note: The tyre pressures should be reduced to 
the correct pressure before the vehicle is 
driven.

E80321

E80322

183

Wheels and tyres

R

USING WINTER TYRES

If winter tyres are fitted to the vehicle, the tyre 
manufacturers instructions should be 
followed. Pay particular attention to 
instructions regarding the maximum speed 
that the vehicle can be driven, and the correct 
pressures for the tyres.

CHANGING A ROAD WHEEL

To access the spare wheel and tool kit :-

1. Lift the floor panel.

2. Pull the floor panel towards the rear of the 

vehicle and remove it from the vehicle.

3. Slacken the spare wheel locking ring.

4. Undo and remove the retaining bolt.

5. Remove the spare wheel.

6. Remove the tool kit.

Note: When replacing the spare wheel ensure 
that the retaining bolt is screwed fully home 
before tightening the clamping ring.

3

4

1

2

5

E80161

WARNINGS

The spare wheel is heavy and if handled 
incorrectly may cause injury. Use 

extreme caution when lifting or manoeuvring 
the wheels.

Always secure the spare wheel, or the 
removed wheel, in the correct position 

using the retaining bolt. Failure to do so may 
cause the spare wheel to move in the event of 
a sudden manouevre or accident, leading to 
death or serious injury.

Ensure that the floor panel is placed 
where it cannot fall and cause injury 

when it is removed from the vehicle.

When removing or replacing the floor 
panel ensure that fingers and hands are 

kept clear. Failure to do so may result in crush 
injuries.

Wheels and tyres

184

L

Wheel changing safety

Before raising the vehicle, or changing a wheel 
ensure that you read, and comply with the 
following warnings.

WARNINGS

Always find a safe place to stop, off of 
the highway and away from traffic.

Ensure that the vehicle is on firm level 
ground.

Disconnect trailer/caravan from 
vehicle.

Switch on the hazard warning lamps.

Ensure that all passengers, and 
animals, are out of the vehicle, and in a 

safe place away from the highway.

Place a warning triangle at a suitable 
distance behind the vehicle, facing 

towards oncoming traffic.

Ensure that the front wheels are in the 
straight ahead position, and engage the 

steering lock.

Apply the parking brake, and engage 
Park in vehicles fitted with an automatic 

transmission.

Apply the parking brake, and engage 
1st or reverse gear in vehicles fitted 

with a manual transmission.

Ensure that the jack is on firm level 
ground.

Never place anything between the jack 
and the ground, or the jack and the 

vehicle.

Always chock the wheels using suitable 
wheel chocks. Place the chocks on both 

sides of the wheel diagonally opposite the 
wheel to be changed.

If jacking the vehicle on a slight slope is 
unavoidable, place the chocks on the 

downhill side of the two opposite wheels.

Take care when lifting the spare wheel, 
and removing the punctured wheel. The 

wheels are heavy, and can cause injuries if not 
handled correctly.

Remove the spare wheel prior to 
jacking the vehicle. To avoid 

destabilising the vehicle when raised.

Take care when loosening the wheel 
nuts. The wheel brace may slip off if not 

properly attached, and the wheel nuts may 
give way suddenly. Either unexpected 
movement may cause an injury.

WARNINGS

185

Wheels and tyres

R

Positioning the jack

1. Read and observe the warnings in Wheel 

changing safety.

2. Loosen the wheel nuts half a turn 

(anti-clockwise).

3. Position the jack beneath the relevant 

jacking point.

4. Raise the vehicle using the jack with a slow 

steady operation. Avoid rapid, jerky 
actions as they may cause the vehicle/jack 
to become unstable.

5. Remove the wheel nuts and place them 

together where they cannot roll away.

6. Remove the wheel and place to one side. 

Do not lay the wheel on it's face, as this 
may damage the finish.

7. Re-fit the wheel nuts, and lightly tighten 

them. Ensure that the wheel is making 
contact with the hub evenly.

8. Ensure that the space under the vehicle is 

clear of obstructions, and lower the vehicle 
slowly and smoothly.

9. With all wheels on the ground and the jack 

removed, fully tighten the wheel nuts. The 
wheel nuts should be tightened in 
sequence to the correct torque of 133 Nm 
(98 lb.ft).

10. If an alloy spare wheel is to be fitted, using 

a suitable blunt tool, knock the centre cap 
out of the removed wheel. Using hand 
pressure only, press the centre cap into the 
newly fitted spare.

11. Check and adjust the tyre pressure as soon 

as possible.

WARNINGS

Never work beneath the vehicle, or 
place any part of your body beneath the 

vehicle with the jack as the only means of 
support. Always use suitable vehicle support 
stands which are approved for the weight of 
the vehicle.

Ensure that the jack is correctly located 
onto the jacking point.

E80178


Content   ..  724  725  726  727   ..