Frelander 2. Manual - part 226


  Index      Land Rover     Land Rover Frelander 2 - service repair manual 2006-2010 year


Search            


Content   ..  224  225  226  227   ..


Frelander 2. Manual - part 226


37. 

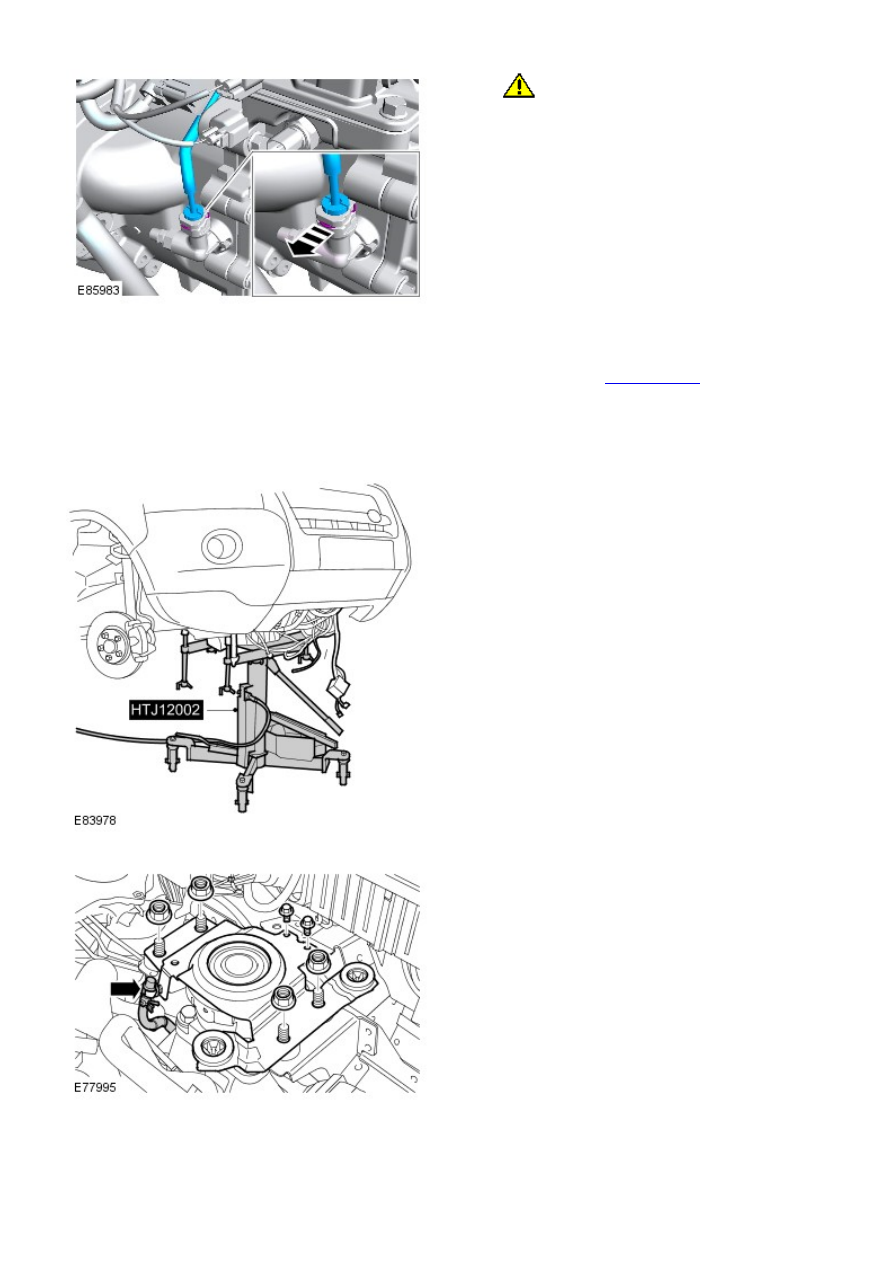
CAUTION: If brake fluid is spilt on the

paintwork, the affected area must be immediately
washed down with cold water.

Disconnect the clutch fluid hose.

37.

Support the engine.

General Equipment: 

Powertrain Jack

38.

Remove the LH engine mount bracket.

39.

Remove the LH engine mount.

40.

RH side: Release the engine mount.

41.

W ith assistance, carefully remove the engine and
transmission.

42.

Engine - TD4 2.2L Diesel - Engine

Installation

General Equipment

Powertrain Jack

W ith assistance, carefully install the engine and
transmission.

General Equipment: 

Powertrain Jack

1.

RH side: Install the engine mount.

Torque: 80 Nm

2.

Install the LH engine mount.

Torque: 175 Nm

3.

Install the bracket.

Torque:

M12 80 Nm
M8 25 Nm

4.

Remove the engine support.

5.

Connect the clutch fluid hose.

6.

Connect the bulkhead heater hoses.

7.

8. CAUTIONS:

 Make sure that the component is clean, free of foreign

material and lubricant.

8.

Stage 1:
Stage 2:

 Make sure that new bolts are installed.

Install the driveshaft.

Torque: 40 Nm

Install the coolant expansion tank.

Torque: 10 Nm

9.

Secure the engine wiring harness.

Torque: 10 Nm

10.

11. 

CAUTION: Extreme cleanliness must be exercised when

handling these components.

Connect the fuel lines.

11.

Connect the coolant top hose.

12.

Connect the coolant bottom hose.

13.

Connect the cooling fan electrical connector.

14.

Install the RH halfshaft and support bracket.

Torque: 25 Nm

15.

Install the LH halfshaft.

16.

W ith assistance, install the halfshaft to the hub.

17.

Install the halfshafts.

Torque:

45 Nm
80°

18.

19. 

CAUTION: A new O-ring seal is to be installed.

• NOTE: Lubricate the O-ring seals with clean refrigerant oil.

Connect the A/C compressor high-pressure refrigerant line.

Torque: 24 Nm

19.

20. 

CAUTION: A new O-ring seal is to be installed.

• NOTE: Lubricate the O-ring seals with clean refrigerant oil.

Connect the A/C compressor low-pressure refrigerant line.

Torque: 24 Nm

20.

Connect the low pressure line to the power steering pump.

21.


Content   ..  224  225  226  227   ..