Freelander 1. Manual - part 195
 

  Index      Land Rover     Freelander 1 - service manual 2002 year


Search            


Content   ..  193  194  195  196   ..


Freelander 1. Manual - part 195


BRAKES

REPAIRS

70-29

Modulator unit

$% 70.65.49

Remove

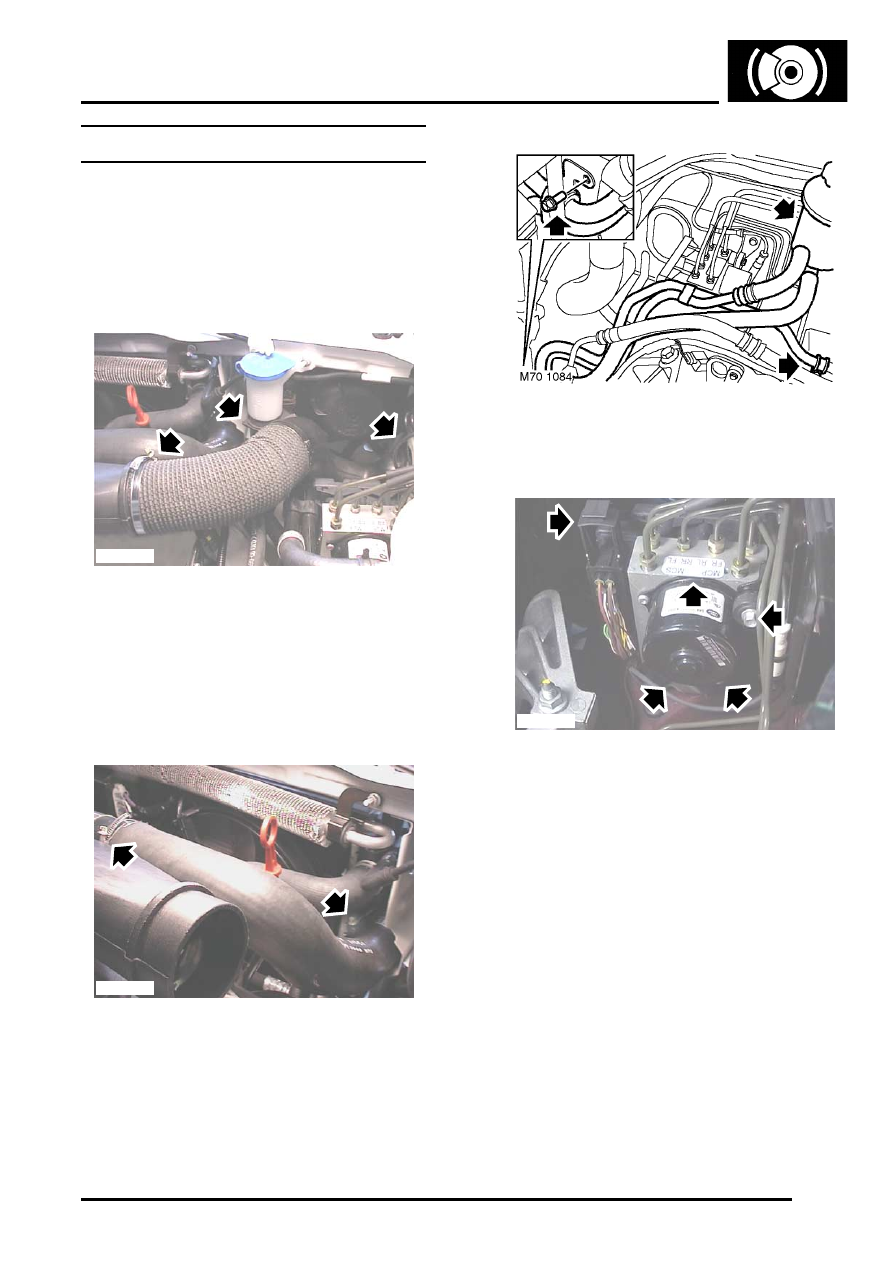
1. Td4 and KV6 models: Remove engine 

accoustic cover.
 

 + 

 ENGINE - Td4, REPAIRS, Cover - 

engine acoustic.

2. Td4 and KV6 models: Release and remove air 

intake hose.

3. Td4 and KV6 models: Release clip securing 

harness and intake duct to body.

4. Td4 and KV6 models: Lift duct from body, 

release clip from washer reservoir filler hose.

5. Td4 and KV6 models: Release and remove air 

intake duct.

6. Td4 models: Loosen 2 clips and remove 

intercooler outlet hose.

7. Remove 2 bolts securing PAS oil cooler pipes.
8. Release PAS reservoir from mounting bracket 

and position aside.

9. Release catch and disconnect  ABS modulator 

multiplug.

10. Position cloth under modulator to absorb fluid 

spillage.

CAUTION: Brake fluid will damage paint 
finished surfaces. If spilled, immediately 
remove fluid and clean area with water.

11. Disconnect 2 inlet brake pipes unions from ABS 

modulator.

12. Disconnect 4 outlet brake pipes unions from 

ABS modulator.

CAUTION: Always fit plugs to open 
connections to prevent contamination.

13. Remove 3 bolts securing ABS modulator to 

mounting bracket.

14. Release and remove ABS modulator from 

mounting bracket.

M70 1085

M70 1083

M70 1088

BRAKES

70-30

REPAIRS

Refit

1. Position modulator to mounting bracket fit bolts 

and tighten to 9 Nm (7 lbf.ft).

2. Clean brake pipe unions.
3. Connect brake pipe unions to modulator 

ensuring pipes are connected to their correct 
ports.

4. Tighten unions to 17 Nm (12 lbf.ft). 
5. Connect ABS modulator multiplug and secure 

catch.

6. Td4 and KV6 models: Position air intake duct 

to body.

7. Td4 and KV6 models: Secure intake duct to 

washer bottle filler neck and harness clip.

8. Td4 and KV6 models: Fit air intake hose.
9. Fit PAS reservoir to mounting bracket.

10. Fit bolts securing  PAS oil cooler pipes and 

tighten to 10 Nm (7.5 lbf.ft).

11. Td4 models: Fit intercooler outlet hose and 

tighten clips.

12. Td4 and KV6 models: Fit engine accoustic 

cover.
 

 + 

 ENGINE - Td4, REPAIRS, Cover - 

engine acoustic.

13. Bleed brakes.


 + 

 BRAKES, ADJUSTMENTS, Brake 

bleed.

14. To ensure correct operation, the ABS system 

MUST be tested using TestBook.

Switch - hill descent 

$% 70.70.13

Remove

1. Remove gear lever knob.
2. Release gaiter from hill descent control switch.
3. Disconnect multiplug from switch.
4. Remove bolt and hill descent switch.

Refit

1. Fit hill descent switch and tighten bolt to 5 Nm 

(3.5 lbf.ft).

2. Connect multiplug.
3. Fit gaiter.
4. Fit gear lever knob.

RESTRAINT SYSTEMS

REPAIRS

75-1

RESTRAINT SYSTEMS

REPAIRS

Automatic belt assembly - front - 3 door

$% 76.73.13

Remove

1. Remove seat base finisher.


 + 

 SEATS, REPAIRS, Finisher - seat 

base - front - each.

2. Remove body side rear trim casing.


 + 

 INTERIOR TRIM COMPONENTS, 

REPAIRS, Trim casing - body side - rear - 
LH.

3. Remove 2 Torx bolts securing seat belt lower 

mounting and remove mounting from seat belt.

4. Release seat belt retaining strap.
5. Remove cover from upper mounting.
6. Remove Torx bolt from upper mounting.
7. Remove bolt from seat belt reel and remove 

reel.

Refit

NOTE: If the SRS component is to be replaced, 
the bar code of the new unit must be recorded.

1. Position reel and tighten bolt to 31 Nm (23 

lbf.ft).

2. Extend belt, position top mounting and tighten 

Torx bolt to 31 Nm (23 lbf.ft).

3. Fit top mounting cover.
4. Secure belt retaining strap.
5. Fit lower mounting to seat belt, position 

mounting, fit and tighten Torx bolts to 40 Nm 
(29 lbf.ft).

6. Fit body rear side trim casing.


 + 

 INTERIOR TRIM COMPONENTS, 

REPAIRS, Trim casing - body side - rear - 
LH.

7. Fit seat base finisher.


 + 

 SEATS, REPAIRS, Finisher - seat 

base - front - each.

RESTRAINT SYSTEMS

75-2

REPAIRS

Automatic belt assembly - front - 5 door

$% 76.73.13

Remove

1. Remove seat base finisher.


 + 

 SEATS, REPAIRS, Finisher - seat 

base - front - each.

2. Remove 'B/C' post upper finisher.


 + 

 INTERIOR TRIM COMPONENTS, 

REPAIRS, Trim finisher - 'B/C' post - upper - 
renew.

3. Release seat belt retaining strap.
4. Remove nut securing seat belt upper 

anchorage to mounting.

5. Remove bolt from seat belt reel and remove 

reel.

Refit

NOTE: If the SRS component is to be replaced, 
the bar code of the new unit must be recorded.

1. Position reel and tighten bolt to 31 Nm (23 

lbf.ft).

2. Extend belt, position top mounting and tighten 

nut to 31 Nm (23 lbf.ft).

3. Secure belt retaining strap.
4. Fit 'B/C' post upper finisher.


 + 

 INTERIOR TRIM COMPONENTS, 

REPAIRS, Trim finisher - 'B/C' post - upper - 
renew.

5. Fit seat base finisher.


 + 

 SEATS, REPAIRS, Finisher - seat 

base - front - each.


Content   ..  193  194  195  196   ..