Discovery 2. Manual - part 342


  Index      Land Rover     Land Rover Discovery 2 - service manual 1999 year


Search            


Content   ..  340  341  342  343   ..


Discovery 2. Manual - part 342


IN CAR ENTERTAINMENT

DESCRIPTION AND OPERATION 86-6-29

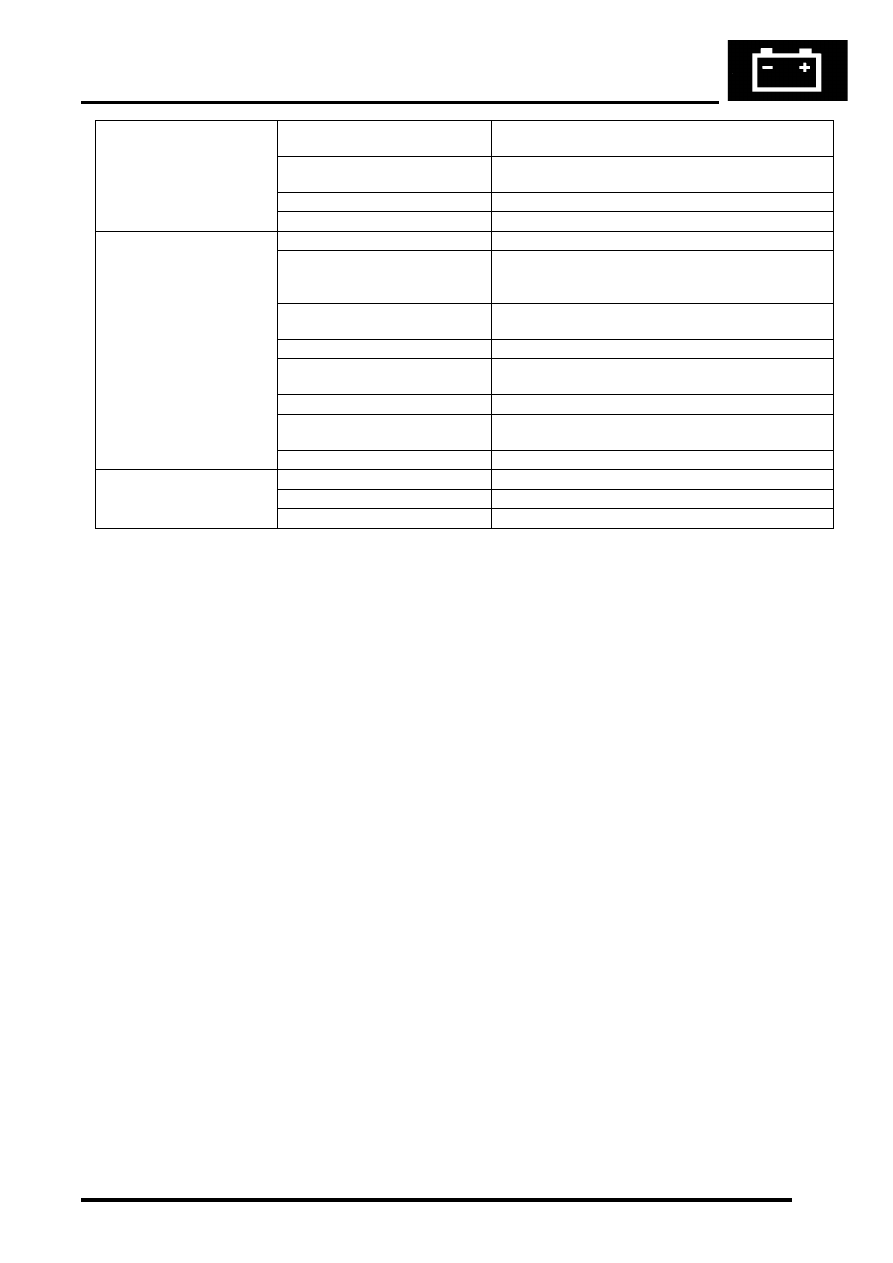
Audio through headphones 

but not through vehicle 

speakers

Faulty connections a CD switch 

box

Check DVD harnesses and connectors into and out of 

the CD switch box

CD switch box internal switches 

incorrectly set

Check internal switches on CD switch box for correct 

settings for vehicle audio head unit

Faulty CD autochanger (if fitted)

Check and if necessary replace CD autochanger

Faulty CD switch box

Check and replace CD switch box

Audio CD autochanger does 

not operate

Missing or blown fuse

Check both fuses in passenger compartment fusebox

DVD system speaker setting 

incorrect

Press speaker button on overhead console or remote 

control handset to switch from DVD audio to head unit 

CD audio

Faulty audio connections

Check all connectors from the audio head unit to the CD 

autochanger

Faulty CD autochanger

Replace CD autochanger

Faulty CD switch box connections

Check CD switch box connectors for security and 

correct location of pins

Faulty CD switch box

Replace CD switch box

Faulty main DVD harness

Check main DVD harness for damage and repair or 

replace as necessary

Faulty overhead console

Replace overhead console

Overhead console DVD 

player will not accept discs

Missing or blown fuse

Check both fuses in passenger compartment fusebox

Faulty or damaged disc

check disc and try a known operational disc

Faulty overhead console

Replace overhead console

IN CAR ENTERTAINMENT

86-6-30 DESCRIPTION AND OPERATION

IN CAR ENTERTAINMENT

REPAIRS 86-6-31

REPAIRS

 Radio 

$% 86.50.03

Remove

1. High line models only : Fit tool 86-006 with 

cutouts facing outwards into slots at top of 
radio, ensure that cutouts locate correctly with 
retaining clips (arrowed) and pull radio cassette 
player from fascia.

2. Disconnect 3 multiplugs and 2 coax cables and 

remove radio cassette player.

3. Mid line models only : Fit tool SMD 4091 to 

release retaining clips and pull radio cassette 
player from fascia.

4. Disconnect 3 multiplugs and 2 coax cables and 

remove radio cassette player.

5. Low line models only : Using 2.5 mm Allen 

key, loosen bolts and release radio cassette 
player from fascia.

6. Disconnect multiplug and aerial and remove 

radio cassette player.

Refit

1. Position radio cassette player to fascia aperture 

and connect multiplugs and coax cable(s).

2. Slide radio into fascia until retaining clips 

engage.

3. Low line models only :Tighten Allen bolts.
4. Enter security code and check radio cassette 

player for correct operation.

IN CAR ENTERTAINMENT

86-6-32 REPAIRS

Speaker - low/full range - front door  

$% 86.50.10 

Remove

1. Remove front door trim casing.  


 + 

 DOORS, REPAIRS, Trim casing - 

front door.

2. Remove 10 Torx screws securing front  door 

pocket to door trim casing. 

3. Remove 3 screws securing speaker to door  

trim casing. 

4. Remove front door speaker. 

Refit

1. Position speaker and secure to door  trim 

casing with screws. 

2. Position front door pocket to trim  casing and 

secure with Torx screws. 

3. Fit front door trim casing.  


 + 

 DOORS, REPAIRS, Trim casing - 

front door.

Speaker - low range - rear door 

$% 86.50.12 

Remove

1. Carefully release 6 clips securing  speaker 

grille to door trim casing. 

2. Remove speaker grille. 
3. Remove 3 screws securing rear door  speaker 

to rear door trim casing. 

4. Disconnect multiplug from rear of  speaker. 
5. Remove speaker. 

Refit

1. Position rear door speaker and connect  

multiplug. 

2. Secure speaker to rear door trim casing  with 

screws. 

3. Position grille to trim casing and  secure with 

clips. 


Content   ..  340  341  342  343   ..