Land Rover Discovery. Manual - part 180
 

  Index      Land Rover     Land Rover Discovery - service 1995-1996 year


Search            


Content   ..  178  179  180  181   ..


Land Rover Discovery. Manual - part 180


76

CHASSIS AND BODY

52

REPAIR

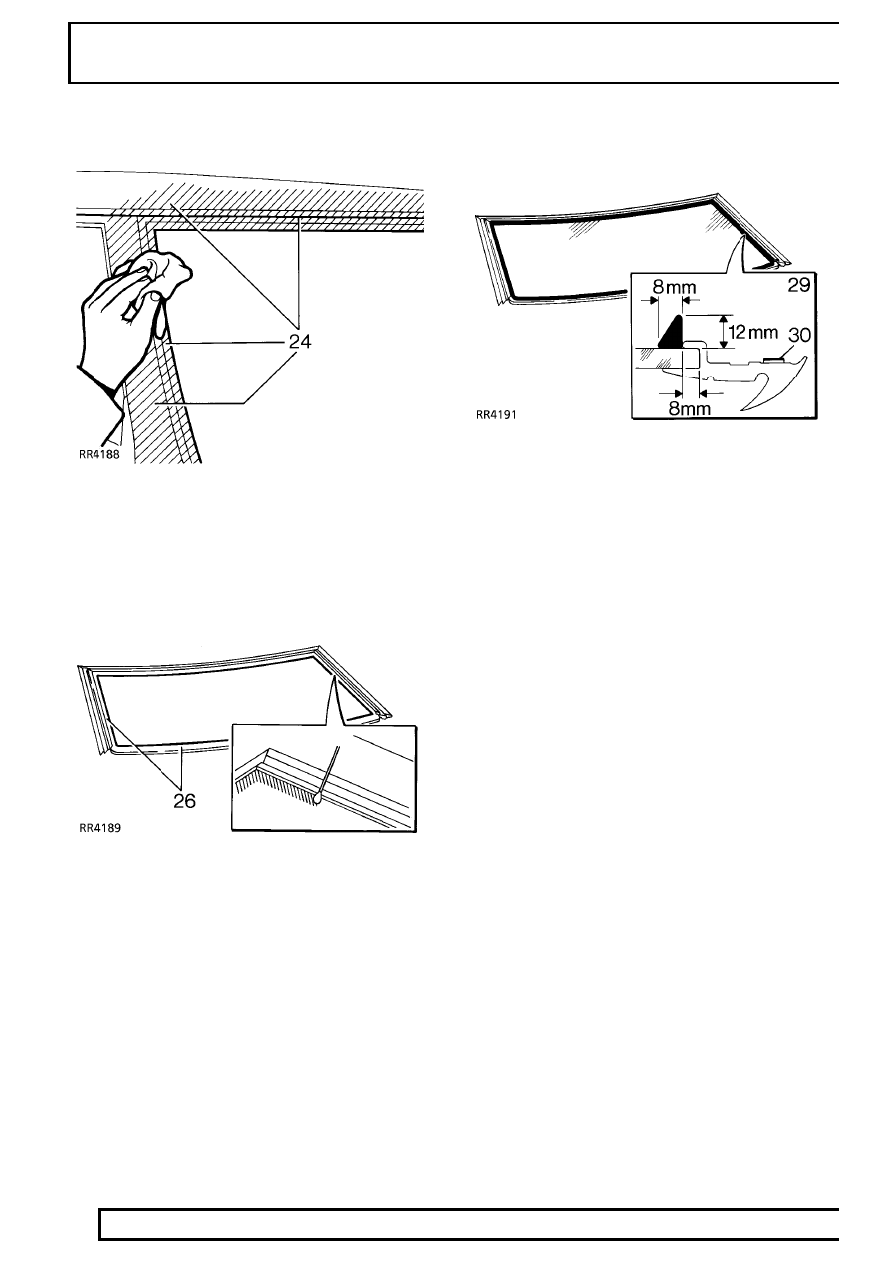
24. Ensure body flanges and surfaces covered by

the finishers are clean.

25. Shake the primer container for at least 30

seconds.

26. Using a cotton bud, apply Glass Primer (green

cap) to inside face of glass, 20mm (13/16 in)
strip around inside of finishers and 30mm (1 1/8
in) wide along bottom edge. This must be touch
dry before applying adhesive.

27. Remove protective coverings and tape.

28. Pierce top and pre-cut nozzle to sealer cartridge,

remove lid and shake out crystals and install
cartridge in applicator gun.

29. Apply a continuous bead of adhesive sealant

around the glass as shown. Vertical edge of
sealer to abut finishers and to be 8mm (5/16 in)
from bottom edge of glass.

30. Remove protective covering (RED) from side

finisher sealing strip.

CHASSIS AND BODY

53

REPAIR

31. With assistance: Attach suction cups to glass

and lift into position, carefully align the indicators
on the obscuration band with the supports.
Lower screen onto body flange, check alignment
and firmly press to seat glass in the aperture.

NOTE: The finisher on later vehicles will
not have cutouts, or supports fitted, as
shown.

32. Align cut outs with the supports and push

finisher fully onto the glass. Use a wooden block
to ensure fit.

33. Refit ’A’ post finishers and interior mirror.
34. Refit wiper arms.

FRONT SEAT - ELECTRIC

Service repair no - 76.77.01

Remove

1. Operate controls to adjust seat fully backwards

and remove 2 bolts securing seat slides.

2. Operate controls to adjust seat fully forwards.

3. Remove 3 studs securing seat side valance.
4. Remove side valance.

76

CHASSIS AND BODY

54

REPAIR

5. Remove Torx screw securing seat belt.
6. Remove 2 Torx screws securing seat.
7. Disconnect multiplug.
8. Remove seat.

Refit

9. Reverse removal procedure.

10. Tighten Torx screws securing seat to

29 Nm (21

lbf ft) .

11. Tighten bolts securing seat slides to

22 Nm (16

lbf ft) .

12. Tighten Torx screw securing seat belt to

32 Nm

(24 lbf ft) .

FRONT SEAT - MANUAL - 5 DOOR (96 MODELS)

Service repair no - 76.70.01

Remove

1. Raise adjusting bar and slide seat fully

backwards.

2. Remove 2 bolts securing seat slides.
3. Raise adjusting bar and slide seat fully forwards.

4. Remove Torx screw securing seat belt.
5. Remove 2 Torx screws securing seat.
6. Remove seat.

CHASSIS AND BODY

55

REPAIR

Refit

7. Reverse removal procedure.
8. Tighten Torx screws securing seat to

29 Nm (21

lbf ft) .

9. Tighten bolts securing seat slides to

22 Nm (16

lbf ft) .

10. Tighten Torx screw securing seat belt to

32 Nm

(24 lbf ft) .

INTERIOR MIRROR (96 MODELS)

Service repair no - 76.10.51 - Manual
Service repair no - 76.10.54 - Auto dimming

Remove

NOTE: To remove manual mirror, follow
step 8 only.

1. Remove headlining front pocket.
2. Release left hand sun visor from clip and move

aside.

3. Release sun visor clip screw cover.
4. Remove clip securing screw and remove clip.
5. Remove 2 screws securing sunroof ECU and

move ECU aside.

6. Locate mirror multiplug, remove clip and

disconnect multiplug.

7. Remove tape securing harness (behind

headlining).

8. Release mirror from screen by applying sharp

downward pressure to the base.

CAUTION: Do not use tools to assist
removal. Mirror base should be moved in
direction of arrow, parallel to windscreen.

9. Release harness from behind headlining and

remove mirror.


Content   ..  178  179  180  181   ..