Defender. Manual - part 277


  Index      Land Rover     Land Rover Defender - service manual 2007 year


Search            


Content   ..  275  276  277  278   ..


Defender. Manual - part 277


Roof Opening Panel - Roof Opening Panel

Removal and Installation

Removal

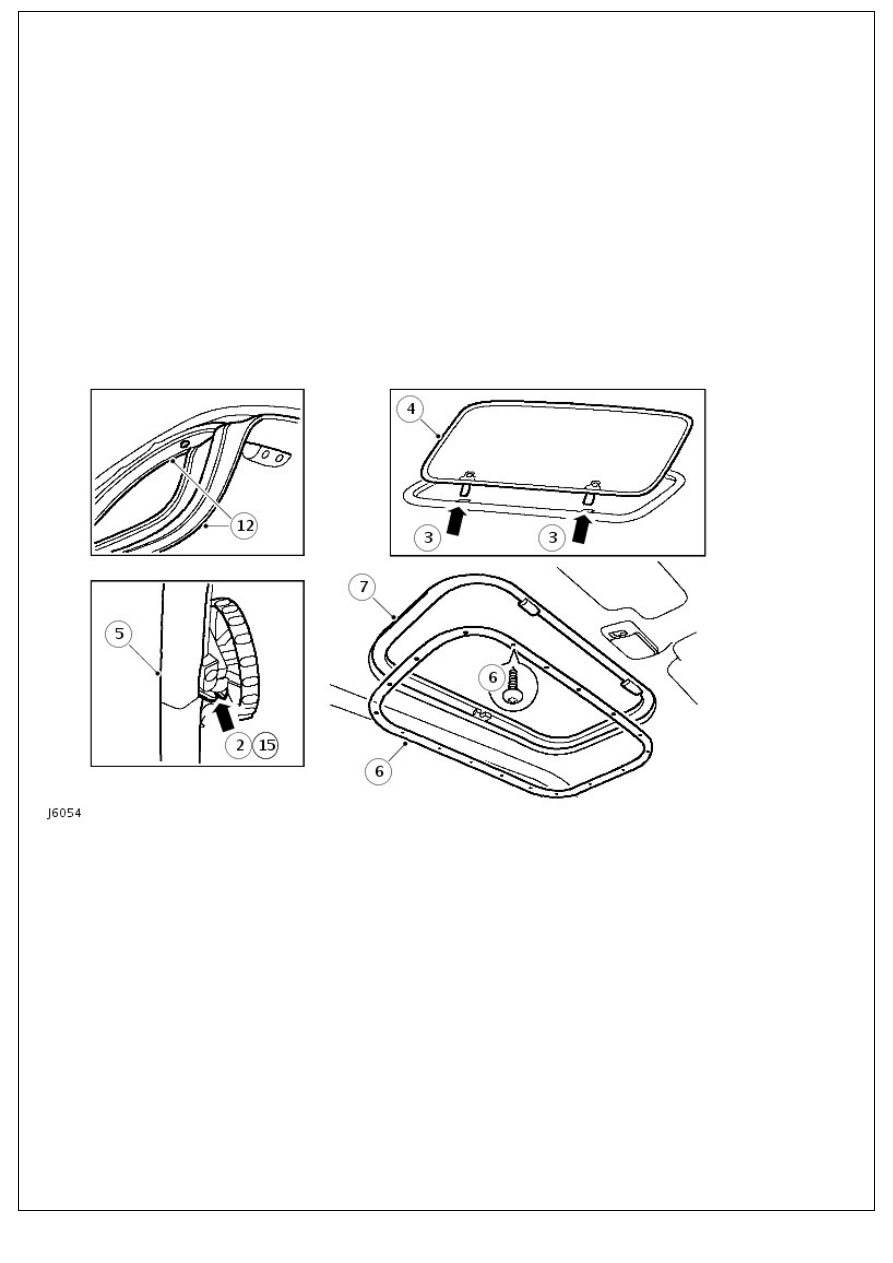
1. Open roof opening panel fully.
2. Disengage spring lock from operating handle catch.
3. Holding roof opening panel at both sides, release hinges from

locating brackets at front of outer frame.

4. Remove roof opening panel.
5. Starting from centre rear, peel headlining finisher from inner

frame.

6. Remove 18 screws securing inner frame to outer frame and

detach inner frame.

7. NOTE: Assistance may be required to remove the sun roof

assembly.

Lift outer frame from roof.

Installation

1. Clean roof area around outer frame seating.
2. Position outer frame on roof.
3. Instal inner frame to headlining and secure to outer frame

with 18 screws but do not fully tighten.

4. Check alignment of inner and outer frames with roof

mounting and headlining, adjust as necessary, and fully

tighten fixing screws to 10 Nm (7 lbf.ft).

5. Starting from centre rear, instal headlining finisher lip into

locating channel of inner frame.

6. Press finisher firmly over inner frame and continue around

complete frame, ensuring finisher lies flat on headlining.

7. Fit roof opening panel hinges fully into locating brackets on

outer frame and lower the glass panel.

8. Engage operating handle catch with spring lock of outer

frame and close roof opening panel.

Convertible Top - Convertible Top

Description and Operation

SVX (60th ANNIVERSARY) MODEL - CONVERTIBLE TOP

OVERVIEW

The convertible top is new for the SVX 90 model. The top has removable side windows and rear window which are

secured with zips.

DESCRIPTION

The convertible top is manufactured from canvas panels stitched together, to form a taught, waterproof covering over

the cab and load area of the vehicle.

Convertible Top Attachment - Sheet 1

Item

Part

Number

Description

1

-

Location of leading edge into locating channel above the windscreen

2

-

Location of outer edges into locating channel above doors

3

-

Velcro strap attachment to support frame where the support frame protrudes from the hood

4

-

Rear part of flap extension pull over support frame

5

-

Three fixing straps located over forward frame bar and tension applied using buckles

6

-

Velcro fixing at rear of convertible top to hinged frame section

7

-

Side window zip attachment

8

-

Attachment to the rail on the body at each side of the load area

9

-

Forward vertical edge of window panel ,elastic strap plate located between frame and vertical body

channel

10

-

Plate positioned across gap between frame and vertical body section

Convertible Top Attachment - Sheet 2

Item

Part

Number

Description

1

-

Metal spring loaded rod through the bottom edge stitched section of the window panel

2

-

Rear section to rear support frame attachment

3

-

Five velcro fixings on each side of the convertible top to frame and hinged frame

4

-

Metal spring loaded rod location in right-hand (RH) receiver tube

5

-

Metal spring loaded rod location in left-hand (LH) receiver tube

6

-

Rear corner section location in rail on rear body

7

-

Velcro strap to support frame above safety belt anchor point

8

-

Location into interior locating channel in rail above door door and velcro strap location to door

frame

It is recommended that fitting and removal of the convertible top is performed by two people.

The rear pivoting support frame is secured with a velcro strap which must removed to allow the frame to be extended

to its support position.

The leading edge of the top is located in channels at the top of the windshield. Channels above each door also provide

location for the outer edge of the top and once installed are secured in position with further location in an inner channel.

Velcro straps near to the seat belt upper anchor point secure the top to the support frame. Three additional velcro

straps secure the top onto the door frame.


Content   ..  275  276  277  278   ..