Jeep Wrangler (2023 year). Manual in english - page 1
 

  Index      Manuals     Jeep Wrangler (2023 year). Manual in english


Search            copyright infringement  


Content      ..      1       2         ..


Jeep Wrangler (2023 year). Manual in english - page 1


9

SYMBOL GLOSSARY

Some car components have colored labels with symbols indicating precautions to be 

observed when using this component. It is important to follow all warnings when operating 

your vehicle. See below for the definition of each symbol  

Ú

page 116.

NOTE:

Warning and Indicator lights are different based upon equipment options and current 

vehicle status. Some telltales are optional and may not appear.

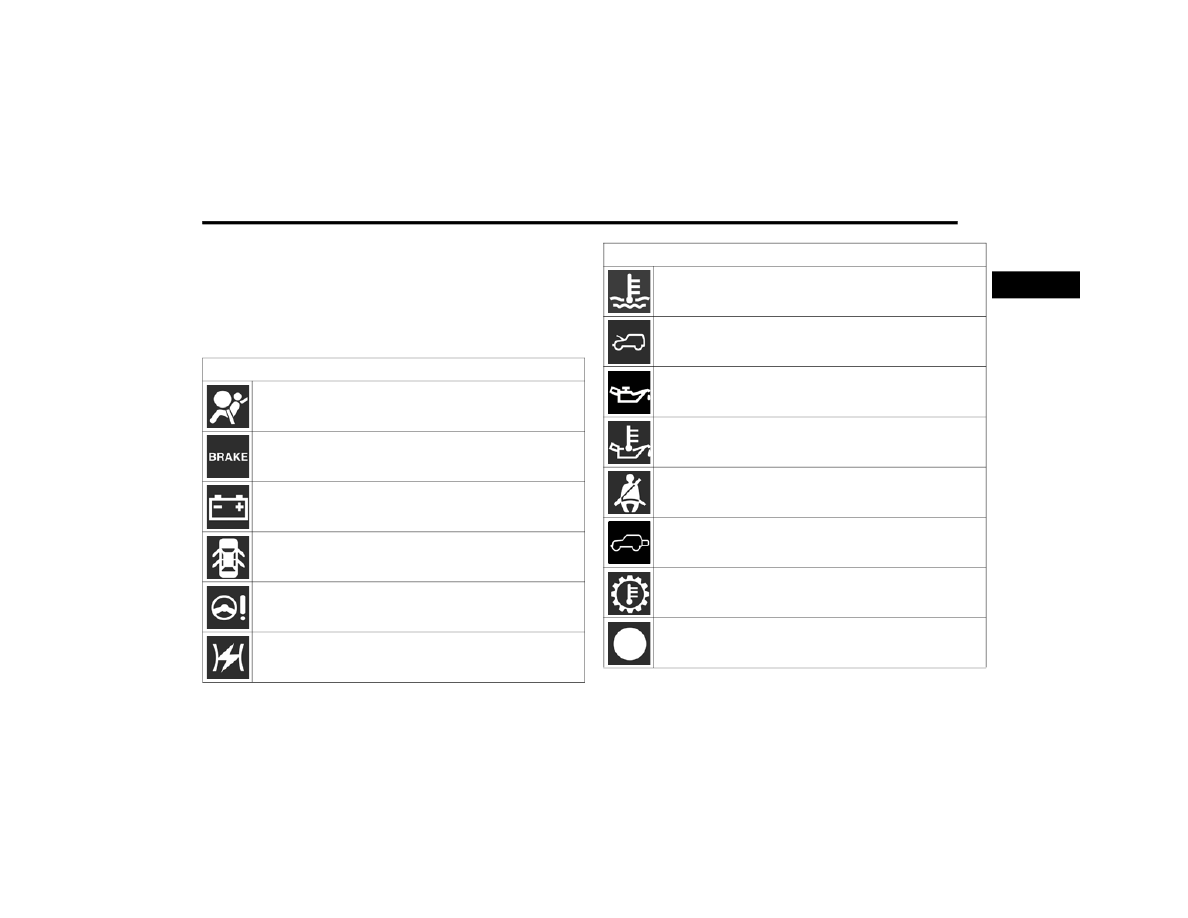
Red Warning Lights

Air Bag Warning Light


Ú

page 117

Brake Warning Light


Ú

page 117

Battery Charge Warning Light


Ú

page 117

Door Open Warning Light


Ú

page 117

Electric Power Steering (EPS) Fault Warning Light


Ú

page 118

Electronic Throttle Control (ETC) Warning Light


Ú

page 118

Engine Coolant Temperature Warning Light


Ú

page 118

Hood Open Warning Light


Ú

page 118

Oil Pressure Warning Light


Ú

page 118

Oil Temperature Warning Light


Ú

page 118

Seat Belt Reminder Warning Light


Ú

page 118

Swing Gate Open Warning Light


Ú

page 119

Transmission Temperature Warning Light


Ú

page 119

Vehicle Security Warning Light


Ú

page 119

Red Warning Lights

1

10  

Yellow Warning Lights

Anti-Lock Brake System (ABS) Warning Light


Ú

page 119

Electronic Stability Control (ESC) Active Warning Light


Ú

page 119

Electronic Stability Control (ESC) OFF Warning Light


Ú

page 120

Loose Fuel Filler Cap Warning Light


Ú

page 120

Low Fuel Warning Light


Ú

page 120

Low Washer Fluid Warning Light


Ú

page 120

Engine Check/Malfunction Indicator Warning Light (MIL)


Ú

page 120

AdBlue® (UREA) Injection System Failure Warning Light


Ú

page 120

Service 4WD Warning Light


Ú

page 120

Service Adaptive Cruise Control Warning Light


Ú

page 120

Service Forward Collision Warning (FCW) Light


Ú

page 121

Service Stop/Start System Warning Light


Ú

page 121

Cruise Control Fault Warning Light


Ú

page 121

Sway Bar Fault Warning Light


Ú

page 121

Tire Pressure Monitoring System (TPMS) Warning Light


Ú

page 121

Yellow Warning Lights

11

Yellow Indicator Lights

4WD Indicator Light


Ú

page 122

4WD Low Indicator Light


Ú

page 122

4WD Part Time Indicator Light


Ú

page 122

Axle Locker Fault Indicator Light


Ú

page 122

Forward Collision Warning (FCW) OFF Indicator Light


Ú

page 122

Front And Rear Axle Lock Indicator Light


Ú

page 122

Neutral Indicator Light


Ú

page 122

Rear Axle Lock Indicator Light


Ú

page 122

Sway Bar Indicator Light


Ú

page 122

Wait To Start Indicator Light


Ú

page 122

Low Diesel Emissions Additive AdBlue® (UREA) Indicator Light


Ú

page 122

Water In Fuel Indicator Light


Ú

page 122

Green Indicator Lights

Adaptive Cruise Control (ACC) Set With No Target Detected Indicator Light


Ú

page 123

Adaptive Cruise Control (ACC) Set With Target Indicator Light


Ú

page 123

4WD Auto Indicator Light


Ú

page 123

Yellow Indicator Lights

1

12  

Cruise Control SET Indicator Light


Ú

page 123

Front Fog Indicator Light


Ú

page 123

Parking/Headlights On Indicator Light


Ú

page 123

Stop/Start Active Indicator Light


Ú

page 123

Turn Signal Indicator Lights


Ú

page 123

White Indicator Lights

Adaptive Cruise Control (ACC) Ready Indicator Light


Ú

page 123

2WD High Indicator Light


Ú

page 123

Green Indicator Lights

Hill Descent Control (HDC) Indicator Light


Ú

page 123

Selec-Speed Control Indicator Light


Ú

page 124

Cruise Control Ready Indicator Light


Ú

page 124

Cruise Control SET Indicator Light


Ú

page 124

Blue Indicator Lights

High Beam Indicator Light


Ú

page 124

Gray Indicator Lights

Cruise Control Ready Indicator Light


Ú

page 124

White Indicator Lights

13

GETTING TO KNOW YOUR VEHICLE

KEYS 

K

EY

 F

OB

Your vehicle is equipped with a key fob which supports 

Passive Entry, Remote Keyless Entry (RKE), Keyless 

Enter ‘n Go™ (if equipped), and Remote Start (if 

equipped). The key fob allows you to lock or unlock the 

doors and swing gate from distances up to approximately 

66 ft (20 m). The key fob does not need to be pointed at 

the vehicle to activate the system. The key fob also 

contains a mechanical key.

NOTE:

The key fob’s wireless signal may be blocked if the key 

fob is located next to a mobile phone, laptop, or other 

electronic device. This may result in poor performance.

With the ignition on and the vehicle moving at 2 mph 

(4 km/h), all RKE commands are disabled.

Key Fob

NOTE:

In case the ignition switch does not change with the 

push of a button, the key fob may have a low or fully 

depleted battery. A low key fob battery condition may 

be indicated by a message in the instrument cluster 

display, or by the LED light on the key fob. If the LED key 

fob light no longer illuminates from key fob button 

pushes, then the key fob battery requires replacement.

Improper disposal of key fob batteries may be harmful 

to the environment. Please see an authorized dealer 

for proper battery disposal  

Ú

page 381.

To Lock/Unlock The Doors And Swing Gate

Push and release the unlock button on the key fob once to 

unlock the driver’s door, or twice to unlock all the doors 

and swing gate. To lock all the doors, push the lock button 

once.
When the doors are unlocked, the turn signals will flash. 

When the doors are locked, the turn signals will flash and 

the horn will chirp.

NOTE:

All doors can be programmed to unlock on the first push 

of the unlock button through the Uconnect Settings  

Ú

page 184.

WARNING!

Push the Mechanical Key Release Button only with the 

key fob facing away from your body, especially your eyes 

and objects that may be damaged, such as clothing.

CAUTION!

The electrical components inside of the key fob may be 

damaged if the key fob is subjected to strong electrical 

shocks. In order to ensure complete efficiency of the 

electronic devices inside of the key fob, avoid exposing 

the key fob to direct sunlight.

1 — Mechanical Key Release Button
2 — LED Indicator
3 — Unlock Button

4 — Lock Button
5 — Remote Start Button
6 — Panic Button

2

14

GETTING TO KNOW YOUR VEHICLE


Key Left Vehicle Feature

If a valid key fob is no longer detected inside the vehicle 

while the vehicle’s ignition system is in the ON/RUN or 

START position, the message “Key Fob Has Left The 

Vehicle” will be shown in the instrument cluster display 

along with an interior chime. An exterior audible and visual 

alert will also be activated to warn the driver.
The vehicle’s horn will rapidly chirp three times along with 

a single flash of the vehicle’s exterior lights.

NOTE:

The doors have to be open and then closed in order for 

the vehicle to check for the presence of a key fob; the 

Key Left Vehicle feature will not activate until all of the 

doors are closed.

These alerts will not be activated in situations where 

the vehicle’s engine is left running with the key fob 

inside.

Replacing The Battery In The Key Fob

The recommended replacement battery is CR2450.

NOTE:

Customers are recommended to use a battery 

obtained from Mopar®. Aftermarket coin battery 

dimensions may not meet the original OEM coin battery 

dimensions.

Perchlorate Material — special handling may apply. See 

www.dtsc.ca.gov/hazardouswaste/perchlorate for 

further information.

Do not touch the battery terminals that are on the back 

housing or the printed circuit board.

When a key fob battery is low, a warning will be indi

-

cated on the vehicle’s instrument cluster, and the fob 

LED will no longer illuminate with a button press.

1. Remove the back cover of the fob by inserting a 

flat-blade screwdriver into the slot on the bottom of 

the fob. Pry until the cover unsnaps being careful not 

to damage the seal. Proceed counterclockwise to 

pry the remaining snaps until the battery cover can 

be removed.

1-3 – Back Cover Pry Points

2. Remove the depleted battery by inserting a small 

flat-blade screwdriver into the battery removal slot 

and sliding the battery forward and up being careful 

not to damage the electronic board underneath.

Battery Replacement

3. Install the new battery into the key fob, making sure 

the positive (+) side is facing up. Slide the battery 

until it is seated securely below the tabs.

4. Reassemble the back cover making sure it is properly 

aligned before snapping it back in place.

WARNING!

The integrated key fob contains a coin cell battery. 

Do not ingest the battery; there is a chemical burn 

hazard. If the coin cell battery is swallowed, it can 

cause severe internal burns in just two hours and 

can lead to death.

If you think a battery may have been swallowed or 

placed inside any part of the body, seek immediate 

medical attention.

Keep new and used batteries away from children. If 

the battery compartment does not close securely, 

stop using the product and keep it away from chil

-

dren.

GETTING TO KNOW YOUR VEHICLE

15

Programming And Requesting Additional 

Key Fobs   

Programming the key fob may be performed by an 

authorized dealer.

NOTE:

Once a key fob is programmed to a vehicle, it cannot be 

repurposed and reprogrammed to another vehicle.

Only key fobs that are programmed to the vehicle elec

-

tronics can be used to start and operate the vehicle. 

Once a key fob is programmed to a vehicle, it cannot be 

programmed to any other vehicle.

Duplication of key fobs may be performed at an authorized 

dealer. This procedure consists of programming a blank 

key fob to the vehicle electronics. A blank key fob is one 

that has never been programmed.

NOTE:

When having the Sentry Key Immobilizer system 

serviced, bring all vehicle keys with you to an autho

-

rized dealer.

Keys must be ordered to the correct key cut to match 

the vehicle locks.

SENTRY KEY

The Sentry Key Immobilizer system prevents unauthorized 

vehicle operation by disabling the engine. The system 

does not need to be armed or activated. Operation is 

automatic, regardless of whether the vehicle is locked or 

unlocked.
The system uses a key fob, keyless push button ignition 

and a Radio Frequency (RF) receiver to prevent 

unauthorized vehicle operation. Therefore, only key fobs 

that are programmed to the vehicle can be used to start 

and operate the vehicle. The system cannot reprogram a 

key fob obtained from another vehicle.
After placing the ignition in the ON/RUN position, the 

Vehicle Security Light will turn on for three seconds for a 

bulb check. If the light remains on after the bulb check, it 

indicates that there is a problem with the electronics. In 

addition, if the light begins to flash after the bulb check, it 

indicates that someone attempted to start the engine with 

an invalid key fob. In the event that a valid key fob is used 

to start the engine but there is an issue with the vehicle 

electronics, the engine will start and shut off after two 

seconds.
If the Vehicle Security Light turns on during normal vehicle 

operation (vehicle running for longer than 10 seconds), it 

indicates that there is a fault in the electronics. Should 

this occur, have the vehicle serviced as soon as possible 

by an authorized dealer.

All of the key fobs provided with your new vehicle have 

been programmed to the vehicle electronics  

Ú

page 381.

NOTE:

A key fob that has not been programmed is also 

considered an invalid key.

IGNITION SWITCH  

K

EYLESS

 E

NTER

 ‘

N

 G

O

™ I

GNITION

If applicable, refer to the “Hybrid Supplement” for 

additional information.
This feature allows the driver to operate the ignition switch 

with the push of a button as long as the key fob is in the 

passenger compartment.
The START/STOP ignition button has several operating 

modes that are labeled and will illuminate when in 

position. These modes are OFF, ACC, RUN, and START.

WARNING!

Always remove the key fobs from the vehicle and lock 

all doors when leaving the vehicle unattended.

For vehicles equipped with Keyless Enter ‘n Go™ Igni

-

tion, always remember to place the ignition in the 

OFF position when exiting the vehicle.

CAUTION!

The Sentry Key Immobilizer system is not compatible 

with some aftermarket Remote Start systems. Use of 

these systems may result in vehicle starting problems 

and loss of security protection.

2

16

GETTING TO KNOW YOUR VEHICLE


START/STOP Ignition Button

The push button ignition can be placed in the following 

modes:
OFF 

The engine is stopped.

Some electrical devices (e.g. power locks, alarm, etc.) 

are available.

ACC

Engine is not started.

Some electrical devices (e.g. climate controls, heated 

seats, etc.) are available.

RUN 

Driving position.

All electrical devices are available.

START 

The engine will start.

NOTE:

In case the ignition switch does not change with the push 

of the START/STOP ignition button, the key fob may have 

a low or depleted battery. In this situation, a backup 

method can be used to operate the ignition switch. Put the 

nose side of the key fob (side with the mechanical flip key) 

against the START/STOP ignition button and push to 

operate the ignition switch.

Backup Starting Method

Do Not Use Mechanical Key

1 — OFF
2 — ACC
3 — RUN

CAUTION!

Do not press the mechanical key against the START/

STOP ignition button.

Do not use sharp metal objects (e.g. screwdriver etc.) 

to pry the button out of the ignition switch. This 

button comes as an assembly, and is not removable. 

This can damage the silicone shield.

WARNING!

When exiting the vehicle, always remove the key fob 

from the vehicle and lock your vehicle.

Never leave children alone in a vehicle, or with 

access to an unlocked vehicle.

Allowing children to be in a vehicle unattended is 

dangerous for a number of reasons. A child or others 

could be seriously or fatally injured. Children should 

be warned not to touch the parking brake, brake 

pedal or the gear selector.

Do not leave the key fob in or near the vehicle, or in 

a location accessible to children, and do not leave 

the Keyless Enter ‘n Go™ Ignition in the ON/RUN 

position. A child could operate power windows, other 

controls, or move the vehicle.

Do not leave children or animals inside parked vehi

-

cles in hot weather. Interior heat buildup may cause 

serious injury or death.

GETTING TO KNOW YOUR VEHICLE

17

NOTE:

For more information on normal starting, see  

Ú

page 126.

When opening the driver's door with the ignition in the 

ON/RUN position (engine not running), a chime will 

sound to remind you to place the ignition in the OFF 

position. In addition to the chime, the message will 

display “Ignition Or Accessory On” in the cluster.

REMOTE START — IF EQUIPPED 

(GASOLINE)   

If applicable, refer to the “Hybrid Supplement” for 

additional information.

This system uses the key fob to start the engine 

conveniently from outside the vehicle while still 

maintaining security. The system has a range 

of 328 ft (100 m).

Remote Start is used to defrost windows in cold weather, 

and to reach a comfortable climate in all ambient 

conditions before the driver enters the vehicle.

NOTE:

The vehicle must be equipped with an automatic trans

-

mission to be equipped with Remote Start.

Obstructions between the vehicle and key fob may 

reduce this range  

Ú

page 381.

H

OW

 T

O

 U

SE

 R

EMOTE

 S

TART

Push and release the Remote Start button on the key fob 

twice within five seconds. The vehicle doors and swing 

gate will lock, the turn signals will flash twice, and the horn 

will chirp twice. Pushing the Remote Start button again will 

shut the engine off.

NOTE:

With Remote Start, the engine will only run for 

15 minutes.

Remote Start can only be used twice.

If an engine fault is present or fuel level is low, the 

vehicle will start and then shut down in 10 seconds.

The park lamps will turn on and remain on during 

Remote Start mode.

For security, power window operation is disabled when 

the vehicle is in the Remote Start mode.

The ignition must be placed in the ON/RUN position 

before the Remote Start sequence can be repeated for 

a third cycle.

All of the following conditions must be met before the 

engine will remote start:

Gear selector in PARK

Doors closed

Hood closed

Swing gate closed

Hazard switch off

Brake switch inactive (brake pedal not pressed)

Battery at an acceptable charge level

Panic button not pushed

System not disabled from previous Remote Start event

Vehicle Security system indicator flashing

Ignition in OFF position

Fuel level meets minimum requirement

All removable doors must not be removed

Malfunction Indicator Light (MIL) not illuminated

CAUTION!

An unlocked vehicle is an invitation for thieves. Always 

remove key fob from the vehicle and lock all doors 

when leaving the vehicle unattended.

WARNING!

Do not start or run an engine in a closed garage or 

confined area. Exhaust gas contains carbon 

monoxide (CO) which is odorless and colorless. 

Carbon monoxide is poisonous and can cause 

serious injury or death when inhaled.

Keep key fobs away from children. Operation of the 

Remote Start system, windows, door locks or other 

controls could cause serious injury or death.

WARNING!

Do not start or run an engine in a closed garage or 

confined area. Exhaust gas contains carbon 

monoxide (CO) which is odorless and colorless. 

Carbon monoxide is poisonous and can cause 

serious injury or death when inhaled.

Keep key fobs away from children. Operation of the 

Remote Start system, windows, door locks or other 

controls could cause serious injury or death.

2

18

GETTING TO KNOW YOUR VEHICLE


T

O

 E

XIT

 R

EMOTE

 S

TART

 M

ODE

To drive the vehicle after starting the Remote Start 

system, either push and release the unlock button on the 

key fob to unlock the doors, or unlock the vehicle using 

Keyless Enter ‘n Go™ — Passive Entry via the door 

handles, and disarm the Vehicle Security system (if 

equipped). Then, prior to the end of the 15 minute cycle, 

push and release the START/STOP ignition button.
The Remote Start system will turn the engine off if the 

Remote Start button on the key fob is pushed again, or if 

the engine is allowed to run for the entire 15 minute cycle. 

Once the ignition is placed in the ON/RUN position, the 

climate controls will resume previously set operations 

(temperature, blower control, etc.).

NOTE:

To avoid unintentional shutdowns, the system will 

disable for two seconds after receiving a valid Remote 

Start request.

For vehicles equipped with the Keyless Enter ‘n Go™ — 

Passive Entry feature, the message “Remote Start 

Active — Push Start Button” will display in the instru

-

ment cluster display until you push the START/STOP 

ignition button.

R

EMOTE

 S

TART

 F

RONT

 D

EFROST


A

CTIVATION

 — I

F

 E

QUIPPED

When Remote Start is active, and the outside ambient 

temperature is 40°F (4.5°C) or below, the system will 

automatically activate front defrost for 15 minutes or less. 

The time is dependent on the ambient temperature. Once 

the timer expires, the system will automatically adjust the 

settings depending on ambient conditions. See “Remote 

Start Comfort Systems — If Equipped” in the next section 

for detailed operation.

R

EMOTE

 S

TART

 C

OMFORT

 S

YSTEMS

 — 

I

F

 E

QUIPPED


When Remote Start is activated, the front and rear defrost 

will automatically turn on in cold weather. The heated 

steering wheel and driver heated seat feature will turn on if 

programmed in the Comfort menu screen within Uconnect 

Settings  

Ú

page 184. In warm weather, the driver vented 

seat feature will automatically turn on when the Remote 

Start is activated, if programmed in the Comfort menu 

screen. The vehicle will adjust the climate control settings 

depending on the outside ambient temperature.
Automatic Temperature Control (ATC) — If Equipped
The climate controls automatically adjust to an optimal 

temperature and mode, dependent on the outside 

ambient temperature. When the ignition is placed in the 

ON/RUN position, the climate controls will resume their 

previous settings.
Manual Temperature Control (MTC) — If Equipped

In ambient temperatures of 40°F (4.5°C) or below, the 

climate settings will default to maximum heat, with 

fresh air entering the cabin. If the front defrost timer 

expires, the vehicle will enter Mix mode.

In ambient temperatures from 40°F (4.5°C) to 78°F 

(26°C), the climate settings will be based on the last 

settings selected by the driver.

In ambient temperatures of 78°F (26°C) or above, the 

climate settings will default to MAX A/C, Bi-Level mode, 

with Recirculation on.

For more information on ATC, MTC, and climate control 

settings, see  

Ú

page 54.

NOTE:

These features will stay on through the duration of Remote 

Start, or until the ignition is placed in the ON/RUN 

position. The climate control settings will change, and exit 

the automatic defaults, if manually adjusted by the driver 

while the vehicle is in Remote Start mode. This includes 

turning the climate controls off using the OFF button.

R

EMOTE

 S

TART

 W

INDSHIELD

 W

IPER


D

E

-I

CER

 A

CTIVATION

 — I

F

 E

QUIPPED

When Remote Start is active and the outside ambient 

temperature is less than 33°F (0.6°C), the Windshield 

Wiper De-Icer will activate. Exiting Remote Start will 

resume its previous operation. If the Windshield Wiper 

De-Icer was active, the timer and operation will continue.

R

EMOTE

 S

TART

 C

ANCEL

 M

ESSAGE

One of the following messages will display in the 

instrument cluster if the vehicle fails to remote start or 

exits Remote Start prematurely:

Remote Start Canceled — Door Open

Remote Start Canceled — Hood Open

Remote Start Canceled — Fuel Low

Remote Start Canceled — Swing Gate Open

Remote Start Canceled — Time Expired

Remote Start Disabled — Start Vehicle To Reset

The message will stay active until the ignition is placed in 

the ON/RUN position.

GETTING TO KNOW YOUR VEHICLE

19

REMOTE START — IF EQUIPPED (DIESEL) 

This system uses the key fob to start the engine 

conveniently from outside the vehicle while still 

maintaining security. The system has a range 

of approximately 300 ft (91 m).

Remote Start is used to defrost windows in cold weather, 

and to reach a comfortable climate in all ambient 

conditions before the driver enters the vehicle.

NOTE:

The vehicle must be equipped with an automatic trans

-

mission to be equipped with Remote Start.

Obstructions between the vehicle and the key fob may 

reduce this range.

The Remote Start system will wait for the Wait To Start 

Indicator Light  

Ú

page 116 to extinguish before 

cranking the engine. This allows time for the engine 

preheat cycle to heat the cylinder air, and is normal in 

cold weather.

H

OW

 T

O

 U

SE

 R

EMOTE

 S

TART

Push and release the Remote Start button on the key fob 

twice within five seconds. The vehicle doors and swing 

gate will lock, the turn signals will flash twice, and the horn 

will chirp twice. Pushing the Remote Start button again will 

shut the engine off.

NOTE:

With Remote Start, the engine will only run for 

15 minutes.

Remote Start can only be used twice.

If an engine fault is present or fuel level is low, the 

vehicle will start and then shut down in 10 seconds.

The park lamps will turn on and remain on during 

Remote Start mode.

For security, power window operation is disabled when 

the vehicle is in the Remote Start mode.

The ignition must be placed in the ON/RUN position 

before the Remote Start sequence can be repeated for 

a third cycle.

All of the following conditions must be met before the 

engine will remote start:

Gear selector in PARK

Doors closed

Hood closed

Swing gate closed

Hazard switch off

Brake switch inactive (brake pedal not pressed)

Battery at an acceptable charge level

Panic button not pushed

Fuel meets minimum requirement

System not disabled from previous Remote Start event

Vehicle Security system not active

Malfunction Indicator Light (MIL) is not illuminated

Water In Fuel Indicator Light is not illuminated

Wait To Start Indicator Light is not illuminated

For additional Remote Start information, see  

Ú

page 18.

VEHICLE SECURITY SYSTEM — IF EQUIPPED 

The Vehicle Security system monitors the vehicle doors for 

unauthorized entry and the ignition switch for 

unauthorized operation. When the alarm is activated, the 

interior switches for door locks are disabled. The Vehicle 

Security system provides both audible and visible signals. 

If something triggers the alarm, the Vehicle Security 

system will provide the following audible and visible 

signals: the horn will pulse, the park lamps and/or turn 

signals will flash, and the Vehicle Security Light in the 

instrument cluster will flash.

WARNING!

Do not start or run an engine in a closed garage or 

confined area. Exhaust gas contains carbon 

monoxide (CO) which is odorless and colorless. 

Carbon monoxide is poisonous and can cause 

serious injury or death when inhaled.

Keep key fobs away from children. Operation of the 

Remote Start system, windows, door locks or other 

controls could cause serious injury or death.

WARNING!

Do not start or run an engine in a closed garage or 

confined area. Exhaust gas contains carbon 

monoxide (CO) which is odorless and colorless. 

Carbon monoxide is poisonous and can cause 

serious injury or death when inhaled.

Keep key fobs away from children. Operation of the 

Remote Start system, windows, door locks or other 

controls could cause serious injury or death.

2

20

GETTING TO KNOW YOUR VEHICLE


T

O

 A

RM

 T

HE

 S

YSTEM


Follow these steps to arm the Vehicle Security system:
1. Make sure the vehicle’s ignition is placed in the OFF 

position.

2. Perform one of the following methods to lock the 

vehicle:

Push lock on the interior power door lock switch 

with the driver and/or passenger door open.

Push the lock button on the exterior Passive Entry 

door handle with a valid key fob available in the 

same exterior zone  

Ú

page 21.

Push the lock button on the key fob.

3. If any doors are open, close them.

NOTE:

The Vehicle Security system will not arm if you lock the 

doors using the manual door lock.

T

O

 D

ISARM

 T

HE

 S

YSTEM


The Vehicle Security system can be disarmed using any of 

the following methods:

Push the unlock button on the key fob.

Grab the Passive Entry door handle (if equipped)  

Ú

page 21.

Cycle the vehicle ignition system out of the OFF posi

-

tion.

NOTE:

The driver's door key cylinder cannot arm or disarm the 

Vehicle Security system.

When the Vehicle Security system is armed, the interior 

power door lock switches will not unlock the doors.

The Vehicle Security system is designed to protect your 

vehicle. However, you can create conditions where the 

system will give you a false alarm. If one of the previously 

described arming sequences has occurred, the Vehicle 

Security system will arm regardless of whether you are in 

the vehicle or not. If you remain in the vehicle and open a 

door, the alarm will sound. If this occurs, disarm the 

Vehicle Security system.
If the Vehicle Security system is armed and the battery 

becomes disconnected, the Vehicle Security system will 

remain armed when the battery is reconnected; the 

exterior lights will flash, and the horn will sound. If this 

occurs, disarm the Vehicle Security system.

R

EARMING

 O

F

 T

HE

 S

YSTEM

If something triggers the alarm and no action is taken to 

disarm it, the Vehicle Security system will turn the horn off 

after a 29 second cycle (with five seconds between cycles 

and up to eight cycles if the trigger remains active) and 

then rearm itself.

DOORS 

M

ANUAL

 D

OOR

 L

OCKS

All doors are equipped with an interior rocker-type door 

lock lever. To lock a door when leaving your vehicle, push 

the rocker lever forward to the lock position and close the 

door. To unlock the door, push the rocker lever rearward.

Manual Door Lock

CAUTION!

Careless handling and storage of the removable door 

panels may damage the seals, causing water to leak 

into the vehicle’s interior.

GETTING TO KNOW YOUR VEHICLE

21

(Continued)

NOTE:

The mechanical key can be used to lock or unlock the 

doors, swing gate (if equipped with a lock), glove 

compartment, and console storage.

P

OWER

 D

OOR

 L

OCKS

 — I

F

 E

QUIPPED


The power door lock switch is located on each front door 

panel. Push the switch forward to unlock the doors, and 

rearward to lock the doors.

Power Door Lock Switch

K

EYLESS

 E

NTER

 ‘

N

 G

O

™ — P

ASSIVE


E

NTRY

 (I

F

 E

QUIPPED

The Passive Entry system is a feature that allows you to 

lock and unlock the vehicle’s door(s) and swing gate 

without having to push the key fob lock or unlock buttons.

NOTE:

Passive Entry may be programmed on/off within the 

Uconnect Settings  

Ú

page 184.

The key fob may not be detected by the vehicle Passive 

Entry system if it is located next to a mobile phone, 

laptop, or other electronic device; these devices may 

interfere with the key fob’s wireless signal and prevent 

the Passive Entry system from locking/unlocking the 

vehicle.

Passive Entry Unlock initiates illuminated approach 

(low beams, license plate lamp, position lamps) for 

whichever duration is set between 0, 30, 60 or 

90 seconds. Passive Entry Unlock also initiates two 

flashes of the turn signals.

WARNING!

For personal security reasons and safety in a colli

-

sion, lock the vehicle doors when you drive, as well as 

when you park and exit the vehicle.

When exiting the vehicle, always switch off the igni

-

tion and remove the key from the vehicle. Unsuper

-

vised use of vehicle equipment may cause severe 

personal injuries and death.

Never leave children alone in a vehicle, or with 

access to an unlocked vehicle.

Allowing children to be in a vehicle unattended is 

dangerous for a number of reasons. A child or others 

could be seriously or fatally injured. Children should 

be warned not to touch the parking brake, brake 

pedal or the gear selector.

Do not leave the key fob in or near the vehicle or in a 

location accessible to children. A child could operate 

power windows, other controls, or move the vehicle.

WARNING!

For personal security reasons and safety in a colli

-

sion, lock the vehicle doors when you drive, as well as 

when you park and exit the vehicle.

When exiting the vehicle, always switch off the igni

-

tion and remove the key from the vehicle. Unsuper

-

vised use of vehicle equipment may cause severe 

personal injuries and death.

Never leave children alone in a vehicle, or with 

access to an unlocked vehicle.

Allowing children to be in a vehicle unattended is 

dangerous for a number of reasons. A child or others 

could be seriously or fatally injured. Children should 

be warned not to touch the parking brake, brake 

pedal or the gear selector.

Do not leave the key fob in or near the vehicle or in a 

location accessible to children. A child could operate 

power windows, other controls, or move the vehicle.

WARNING!

2

22

GETTING TO KNOW YOUR VEHICLE


If wearing gloves, or if it has been raining/snowing, or 

there is salt/dirt covering the Passive Entry door 

handle, the unlock sensitivity can be affected, resulting 

in a slower response time.

If the vehicle is unlocked by Passive Entry and no door 

is opened within 60 seconds, the vehicle will relock 

and, if equipped, will arm the Vehicle Security system.

To Unlock From The Driver or Passenger Side
With a valid Passive Entry key fob within 5 ft (1.5 m) of the 

door handle, grab the handle to unlock the vehicle. 

Grabbing the driver’s door handle will unlock the driver 

door automatically. Grabbing the passenger door handle 

will unlock all doors and the swing gate automatically.

Grab The Door Handle To Unlock

NOTE:

Either the driver door only or all doors will unlock when you 

grab hold of the front driver’s door handle, depending on 

the selected setting in the Uconnect system  

Ú

page 184.

Frequency Operated Button Integrated Key (FOBIK-Safe)
To minimize the possibility of unintentionally locking a 

Passive Entry key fob inside your vehicle, the Passive Entry 

system is equipped with an automatic door unlock feature 

which will function only if the ignition switch is in the OFF 

position.
FOBIK-Safe only executes in vehicles with a START/STOP 

ignition. There are three situations that trigger a 

FOBIK-Safe search in any Passive Entry vehicle:

A lock request is made by a valid Passive Entry key fob 

while a door is open.

A lock request is made by the Passive Entry door 

handle while a door is open.

A lock request is made by the door panel switch while 

the door is open.

When any of these situations occur, after all open doors 

are shut, the FOBIK-Safe search will be executed. If it 

detects a Passive Entry key fob inside the vehicle, the 

vehicle will unlock and alert the customer. If Passive Entry 

is disabled using Uconnect system, the key fob protection 

described in this section remains active/functional.

NOTE:

The vehicle will only unlock the doors during a FOBIK-Safe 

operation when a valid Passive Entry key fob is detected 

inside the vehicle. The vehicle will not unlock the doors 

when any of the following conditions are true: 

A second valid Passive Entry key fob is detected 

outside of the vehicle (within 5 ft (1.5 m) of a Passive 

Entry door handle).

The doors are manually locked using the door lock 

knobs.

Three attempts are made to lock the doors using the 

door panel switch, and then the doors are closed.

To Lock The Vehicle’s Doors And Swing Gate
With one of the vehicle’s Passive Entry key fobs within 5 ft 

(1.5 m) of the driver or passenger front door handles, 

pushing the Passive Entry lock button will lock the vehicle 

doors and the swing gate.

Push The Door Handle Button To Lock

GETTING TO KNOW YOUR VEHICLE

23

NOTE:

DO NOT grab the door handle when pushing the door 

handle lock button. This could unlock the door(s).

DO NOT Grab The Door Handle When Locking

The vehicle doors can also be locked by using the lock 

button located on the vehicle’s interior door panel.
To Unlock/Enter The Swing Gate
The swing gate Passive Entry unlock feature is built into 

the swing gate handle. With a valid Passive Entry key fob 

within 5 ft (1.5 m) of the swing gate handle, grab the swing 

gate handle to unlock the swing gate automatically, and 

pull the swing gate to open.

Swing Gate Passive Entry Lock Button

To Lock The Swing Gate
With a valid Passive Entry key fob within 5 ft (1.5 m) of the 

swing gate handle, pushing the Passive Entry lock button 

will lock the vehicle doors and the swing gate.

NOTE:

After pushing the door handle button, you must wait 

two seconds before you can lock or unlock the doors, 

using any Passive Entry door handle. This is done to 

allow you to check if the vehicle is locked by pulling the 

door handle without the vehicle unlocking.

If Passive Entry is disabled using the Uconnect 

Settings, the key fob protection described in 

"Frequency Operated Button Integrated Key 

(FOBIK-Safe)" remains active/functional.

The Passive Entry system will not operate if the key fob 

battery is depleted  

Ú

page 381.

A

UTOMATIC

 D

OOR

 L

OCKS

 — 

I

F

 E

QUIPPED


The Automatic Door Lock feature default condition is 

enabled. When enabled, the door locks will lock 

automatically when the vehicle's speed exceeds 15 mph 

(24 km/h). The Automatic Door Lock feature can be 

enabled or disabled by an authorized dealer per written 

request of the customer. Please see an authorized dealer 

for service.

C

HILD

-P

ROTECTION

 D

OOR

 L

OCK


S

YSTEM

 — R

EAR

 D

OORS

To provide a safer environment for small children riding in 

the rear seats, the rear doors are equipped with a 

Child-Protection Door Lock system.
To use the system, open each rear door, use a flat-blade 

screwdriver (or mechanical key) and rotate the dial to the 

lock or unlock position.

Child-Protection Door Lock Function

2

24

GETTING TO KNOW YOUR VEHICLE


NOTE:

When the Child-Protection Door Lock system is 

engaged, the door can be opened only by using the 

outside door handle even though the inside door lock 

is in the unlocked position.

After disengaging the Child-Protection Door Lock 

system, always test the door from the inside to make 

certain it is in the unlocked position.

After engaging the Child-Protection Door Lock system, 

always test the door from the inside to make certain it 

is in the locked position.

For emergency exit with the system engaged, move the 

lock lever rearward (located on the door trim panel), 

lower the window and open the door with the outside 

door handle.

NOTE:

Always use this device when carrying children. After 

engaging the child lock on both rear doors, check for 

effective engagement by trying to open a door with the 

internal handle. Once the Child-Protection Door Lock 

system is engaged, it is impossible to open the doors from 

inside the vehicle. Before getting out of the car, be sure to 

check that there is no one left inside.

F

RONT

 D

OOR

 R

EMOVAL


Door Removal Warning Label

Outside rearview mirrors are mounted on the doors. If you 

choose to remove the doors, see an authorized dealer for 

a replacement cowl-mounted outside mirror. Federal law 

requires outside mirrors on vehicles for on-road use.

NOTE:

Doors are heavy; use caution when removing them.

Hinge pin can break if overtightened during door rein

-

stall (Max Torque: 7.5 ft· lb / 10 N·m). For off-road 

driving tips, see  

Ú

page 178.

When front doors are removed, the message “Blind 

Spot Alert Temporarily Unavailable” will display in the 

instrument cluster display. Power Mirrors and Power 

Door Locks will also be unavailable.

To remove the front doors, proceed as follows:
1. Roll down the glass window to prevent any damage.
2. Remove the hinge pin screws from the upper and 

lower outside hinges (using a #T50 Torx head driver).

WARNING!

Avoid trapping anyone in a vehicle in a collision. 

Remember that the rear doors can only be opened from 

the outside when the Child-Protection locks are 

engaged (locked).

WARNING!

Do not drive your vehicle on public roads with the doors 

removed as you will lose the protection they can 

provide. This procedure is furnished for use during 

off-road operation only. Failure to follow this warning 

can result in death or serious personal injury.

WARNING!

All occupants must wear seat belts during off-road 

operation with doors removed. For off-road driving 

tips, see  

Ú

page 178.

Do not store detached doors inside of the vehicle, as 

they may cause personal injury in the event of an 

accident.


Content      ..      1       2         ..


///////////////////////////////////////