Jeep Grand Cherokee (2022 year). Manual in english - page 15
 

  Index      Manuals     Jeep Grand Cherokee (2022 year). Manual in english


Search            copyright infringement  


Content      ..     13      14      15      16     ..


Jeep Grand Cherokee (2022 year). Manual in english - page 15


236

MULTIMEDIA


G

ETTING

 S

TARTED

Rear Screen Entertainment for Uconnect 5/5 NAV

There are four different ways to operate the 

features of Rear Seat Entertainment:

Rear Seat Entertainment remote control

Front radio screen

Passenger screen

Individual Rear Seat Entertainment touch

-

screens

For information on the front media hub USB/AUX 

port

Ú

page 77.

A

CCESSING

 R

EAR

 S

EAT


E

NTERTAINMENT


WITH

 A

MAZON

 F

IRE

TV 

B

UILT

-

IN


FROM


THE

 R

ADIO

You can access your Rear Seat Entertainment 

system by following the steps below:
Option 1
1. Press the Media button.
2. Press the Rear Seat button icon.

Option 2
1. Press the Apps button on the bottom of the 

touchscreen.

2. Press the Rear Seat Entertainment with 

Amazon FireTV Built-in button on the 

touchscreen. You may need to navigate to 

different pages in the Apps drawer to find the 

Rear Seat Entertainment with Amazon FireTV 

Built-in button.

A

CCESSING

 R

EAR

 S

EAT


E

NTERTAINMENT


WITH

 A

MAZON

 F

IRE

TV 

B

UILT

-

IN


FROM


THE

 R

EAR

 S

CREENS

You can also access your Rear Seat Entertainment 

system by choosing one of the following options:
Option 1

Pushing the power button on the Rear Seat 

Entertainment remote.

Option 2

Swiping on either of the Rear Seat Entertain

-

ment touchscreens.

NOTE:

While accessing on the rear screens, the system 

will launch with the integrated Amazon FireTV.

A

CCESSING

 R

EAR

 S

EAT


E

NTERTAINMENT


WITH

 A

MAZON

 F

IRE

TV 

B

UILT

-

IN


FROM


THE

 P

ASSENGER


S

CREEN

 — I

F

 E

QUIPPED

You can also access Rear Seat Entertainment 

content from the Passenger Screen.
Follow the steps below:
1. Access the Home screen for the Passenger 

Screen.

2. Cycle between the features on the Home 

screen and select Rear Seat Entertainment.

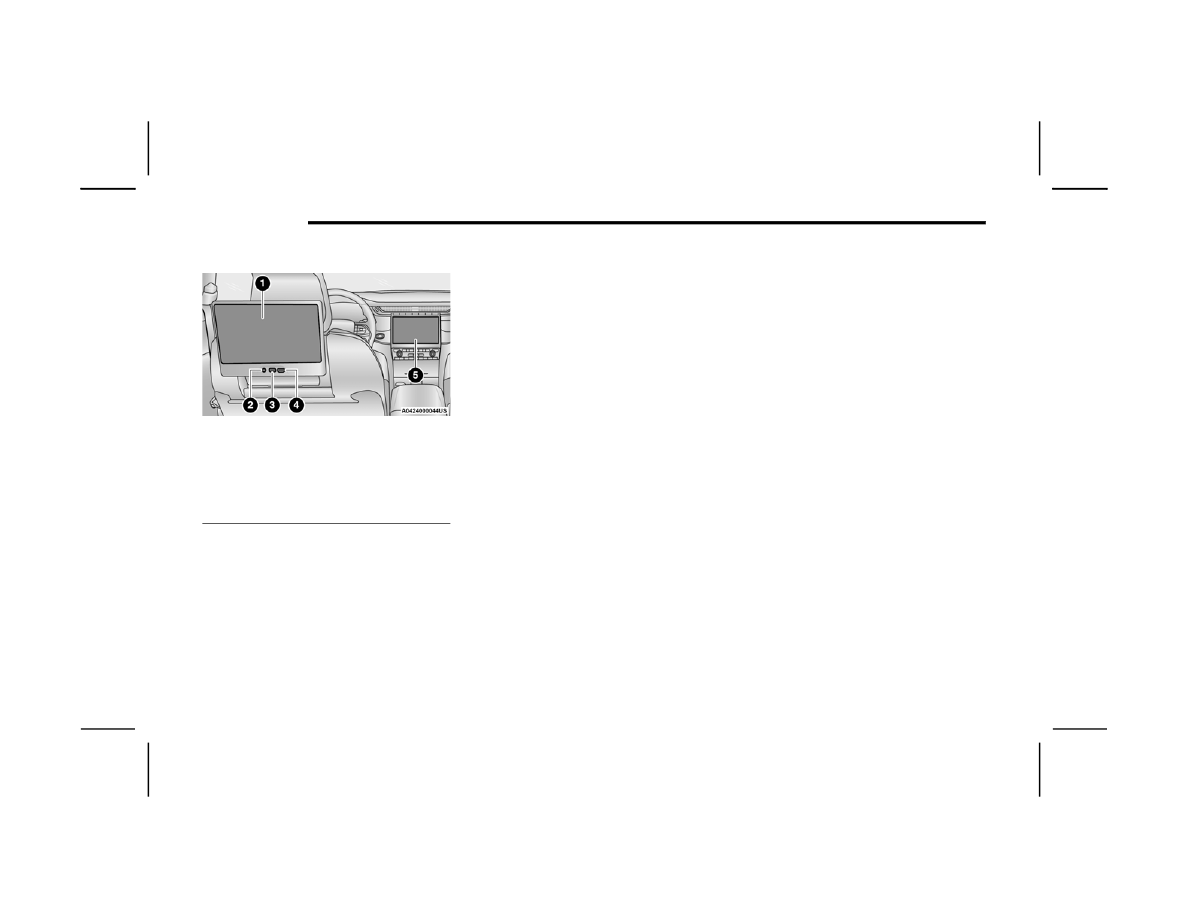
1 — Rear Seat Entertainment (Rear Touchscreen)
2 — Headphone Jack
3 — USB C Charging Port
4 — HDMI Port
5 — Uconnect System (Front Touchscreen)

MULTIMEDIA

237

F

IRST

 T

IME

 S

TARTING

 U

P

 (U

SING


THE


R

EAR

 S

CREENS

)

Boot Up Screen
When turning on the system for the first time from 

the rear screens, a boot up screen will appear on 

the system displaying the Amazon FireTV logo.
During this boot up sequence, language options 

will be available for the system.
Remote Pairing
After the boot up sequence is complete, the 

system will then give the option to pair the Rear 

Seat Entertainment remote (included with the 

system).
Follow the on-screen instructions for how to pair 

the remote with the system.
NOTE:

If remote pairing fails, on-screen instructions will 

appear for trying to pair the remote again.
Connecting to a Network
During the start-up process, the system will need to 

be connected to a network. Multiple network 

sources can be options for the system and one will 

need to be selected for the system to function.

Some options for a network connection are:

Wi-Fi Hotspot using a capable smartphone (if 

activated, it will show as a possible network for 

the system on the screen).

Outside connection like a home Wi-Fi network.

In-vehicle Wi-Fi.

NOTE:

When a network is connected to the system for the 

first time, an over-the-air software update will take 

place using the Wi-Fi connection. After this 

first-time update, updates will only accrue when 

one is available. It is recommended that you 

connect your RSE/Amazon Fire OS to a Wi-Fi 

Hotspot with unlimited data and a good signal 

(such as a home Wi-Fi network) in order to check 

for future Fire OS updates.
Account Sign-in
The next step will be the option to sign in to your 

Amazon account.
There are two options to sign into the system:

I already have an Amazon account: Sign in with 

an already existing Amazon account

I am new to Amazon: Create a new Amazon 

Account

If “I am new to Amazon” is selected, follow the 

on-screen steps to set up an Amazon account with 

the system.

App Content
During the process, streaming services and TV 

services can be selected to focus on what you plan 

to watch the most. These streaming services and 

TV services will show in the Apps and Channels 

categories on the Rear Seat Entertainment Home 

screen.
Parental Controls
Another feature that will appear during this first 

time set up is parental controls.
When the parental controls page appears, it will 

give the options to “Enable Parental Controls” and 

“No Parental Controls”. If “Enable Parental 

Controls” is selected, follow the on-screen steps to 

set up parental controls for the system.

R

EAR

 S

CREEN

 F

LY

-

OUT

 M

ENU

Accessing the rear screen fly-out menu will give 

more options for Rear Seat Entertainment.
To access the rear screen fly-out menu, swipe up or 

down on the screen. The menu can also be 

accessed by pushing the Gear/Settings button on 

the Rear Seat Entertainment remote.

5

238

MULTIMEDIA


Some options in the fly-out menu are listed below:

Power — This will power the screen off.

On-Screen Remote — This will bring up the 

on-screen remote to use with the system.

Back — This will let you go back a page.

Home — This will take you to the Home screen.

Gear/Settings — This will let you access certain 

settings in the system. For more setting options, 

select “Settings” within the on-screen Gear/

Settings menu.

Car — This will bring up the car menu. From here 

you can adjust rear climate controls and the Are 

We There Yet? app.

P

ARENTAL

 C

ONTROLS

 (U

SING


THE

 R

EAR


S

CREENS

)

If parental controls were not set during the first 

time start up of the system, they can be set by 

following these steps:
1. Push the Gear/Settings button on the remote 

or swipe up or down on the screen.

2. Select the “Gear/Settings” icon on the screen.
3. Select “Settings” on the screen

4. While in the Settings, select “Preferences”.
5. Select “Parental Controls”, from here you can 

turn Parental Controls on or off and set up a 

PIN for the controls using the remote.

P

AIRING

 T

HE

 R

EMOTE

 (U

SING


THE

 R

EAR


S

CREENS

)

If a Rear Seat Entertainment remote needs to be 

paired and was not paired during the start-up 

sequence, follow this procedure:
1. Install batteries into the remote.
2. Push the Gear/Settings button on the remote 

or swipe up or down on the screen.

3. Select the “Gear/Settings” icon on the screen.
4. Select “Settings” on the screen
5. In the Settings, select “Controllers & 

Bluetooth® Devices”.

6. From this menu, select “Add New Remote”.
7. Follow the on-screen steps for remote pairing.

M

EDIA

 S

OURCES

 I

NPUT

 (U

SING


THE


R

ADIO


AND

 R

EAR

 S

CREENS

)

Front Radio Screen
Users can select inputs for each rear screen from 

the front radio touchscreen by selecting the Rear 

Seat Tab and choosing the desired content by 

selecting “Launch Source” on the Screen 1 or 

Screen 2 tab.
Inputs available within Launch Source under 

“Inputs” are “FireTV”, “HDMI”, and “USB”.
Rear Screens
To select inputs on the rear screen, scroll down on 

the Rear Seat Entertainment Home screen and 

select your desired input under “Input”.
Inputs can also be selected from the Brand tab in 

the top menu. While in this tab, scroll down to 

“Inputs” for selection.
NOTE:

The Brand tab naming in the top menu will depend 

on the naming of the vehicle’s brand.

MULTIMEDIA

239

R

EAR

 S

EAT

 E

NTERTAINMENT

 R

EMOTE


C

ONTROL

Remote Control

1. Power Button — Turns the screen for the 

selected channel on or off.

2. 5-way Navigation Control — This control has 

options by pressing the Circle button Up, 

Down, Left, or Right to navigate on-screen for 

selections and pushing the center button to 

confirm selections.

3. Back — Push to exit out of menus or return to 

the previous screen.

4. Home — Push to return to the Amazon FireTV 

Built-in Home screen.

5. Seek Backward/Rewind Button

 — Push 

and hold to fast rewind through the current 

audio track or video chapter. Push once to 

revert back to the previous track.

6. Volume — Push the - button to decrease the 

volume and + button to increase the volume.

7. Channel Guide — Push to access the channel 

guide for the system.

8. Mute — Mutes headphone audio.
9. Amazon Prime — Push to navigate to Amazon 

Prime Home screen.

10. Partner 1 — Push to navigate to Partner 1 

Home screen.

11. Alexa — Push to activate Alexa.
12. Menu — Push to access the FireTV menu.
13. Seek Forward Button 

 — Push and hold to 

fast forward through the current audio track or 

video chapter. Push once to skip to the next 

track.

14. Play/Pause Button   

?

 — Begin/resume or 

pause disc play.

15. Channel +/- — Push the up or down arrow 

button on the Channel button to browse 

channels available in FireTV.

16. Recent — Push to access recently viewed 

content on FireTV.

17. Gear/Settings — Push to bring up setting 

options for FireTV.

18. Partner 2 — Push to navigate to Partner 2 

Home screen.

19. Car Button — Push to activate the Car menu

5

240

MULTIMEDIA


Replacing The Remote Control Batteries

Each remote control requires two AAA batteries for 

operation.
To replace the batteries:
1. Locate the battery compartment on the back 

of the remote, then slide the battery cover 

downward.

2. Remove the old batteries and follow battery 

recycling procedures for your area.

3. Install new batteries, making sure to orient 

them according to the polarity diagram shown 

inside the battery compartment.

4. Slide the battery compartment cover back on.

R

EAR

 S

EAT

 E

NTERTAINMENT


WITH


A

MAZON

 F

IRE

TV B

UILT

-

IN

 S

TREAMING


(U

SING


THE

 R

ADIO


AND

 R

EAR


S

CREENS

)

Access Using Launch Source
To access streaming options with Rear Seat 

Entertainment on the front screen, press the 

Media tab located on the bottom menu bar. Then 

select the Rear Seat option located on the top 

menu bar. Then select “Launch Source”, and then 

select under inputs “FireTV Home”.

Access Using Browse Media
Selecting Browse Media on the front radio screen 

will give access to different media within Rear Seat 

Entertainment.
These options will be in the top menu of Browse 

Media and are listed below:

FireTV — Selecting FireTV will give options to 

view streaming options for categories like “For 

Kids” and to select other streaming app options 

like “Prime Video”, etc. This option will be select

-

able on the left slider menu in “Browse Media”. 

While in “Browse Media” under FireTV, it will 

display recent activity under “Recent”. This will 

display recent videos viewed from FireTV to 

recent downloads as well.

USB Video — Under “USB Videos”, videos will 

appear that are options with a USB device 

connected to Rear Seat Entertainment.

USB Music — Under “USB Music”, music will 

appear that are options with a USB device 

connected to Rear Seat Entertainment.

Access Using Rear Seat Entertainment Remote 

and Rear Screens
Rear passengers will be able to access Rear Seat 

Entertainment Streaming by pressing the “Amazon 

Prime”, “Partner 1”, or “Partner 2” button on the 

Rear Seat Entertainment remote. Selecting one of 

those buttons on the remote will take you to the 

home page for that respective streaming service. 

Turning on either of the rear screens will launch 

Rear Seat Entertainment. By default, the rear 

screens will always launch in Amazon FireTV.

Amazon FireTV Built-In 

The main source to access online streaming for 

Rear Seat Entertainment is Amazon FireTV Built-in.
NOTE:

4G Wi-Fi Hot Spot needs to be activated on the 

vehicle for streaming to be accessible. This can be 

set up when Rear Seat Entertainment is turned on 

for the first time from the rear screens. A mobile 

device can also be used as the Wi-Fi Hot Spot for 

the vehicle. A 4G source needs to be either an 

in-vehicle Wi-Fi plan or through a 4G device.
To access Amazon FireTV Built-in on the front 

screen, select “Launch Source” on the front radio 

rear seat screen. Then “FireTV Home” under the 

Inputs selection.
The top menu bar for Amazon FireTV will have the 

options for “Home”, “Library”, “Brand”, “Live”, and 

“Apps”.
Below the top menu bar will be streaming options 

linked to your Amazon Prime account like “Prime 

Video”.
Depending on the streaming option selected in 

FireTV, they will have a similar home page.

MULTIMEDIA

241

The front radio screen offers some options:

Power — This will turn Amazon FireTV Built-in on 

or off.

Screen 1 and Screen 2 Toggle — This toggles 

between the Rear Screens (for use with front 

radio screen only).

Collapse — While viewing on the front radio 

screen, this will collapse the screen to dash

-

board view.

Source Drawer — This will open the “Source 

Drawer” and the source logo will be displayed 

on the icon.

Browse Media — This will open the “Browse 

Media” pop-up.

Back — This will let you go back the previous 

page.

FireTV Home — This will take you back to the 

Amazon FireTV home page.

Menu — This will open the Amazon FireTV menu.

Remote icon — This will display the on-screen 

remote.

NOTE:

Front screen viewing and watching can only be 

done when the vehicle is in PARK.
The rear screens will always launch with Amazon 

FireTV.

R

EAR

 S

CREEN

 E

NTERTAINMENT


WITH


A

MAZON

 F

IRE

TV B

UILT

-

IN

 A

PPS

/

G

AMES

 (U

SING


THE

 R

EAR

 S

CREENS

)

Apps and games can be accessed using Rear Seat 

Entertainment.
NOTE:

No preloaded games are included with Rear Seat 

Entertainment.
To access Apps on the rear screen, turn on the 

system and select “Apps” in the top menu. Within 

the Apps menu you can purchase apps and games. 

From here you can also select all the apps and 

games that have been purchased.

A

RE

 W

E

 T

HERE

 Y

ET

?

When a navigation route has been set from the 

Uconnect system, the second-row passengers can 

use “Are We There Yet?” for an animated screen 

showing distance and time remaining on 

navigation routes, as well as the estimated time of 

arrival with pop-up notifications.
Some screen information includes:

Decrease Timing Between Notifications Button

Notifications ON/OFF Button

Increase Timing Between Notifications Button

Arrival Time

Time Remaining Until Destination Is Reached

Distance Remaining

To access “Are We There Yet?” from the rear 

screens, follow the steps below:
1. Swipe up or down on one of the rear screens 

and select the Car icon or push the “Car” 

button on the Rear Seat Entertainment 

remote.

2. Select “Are We There Yet?” near the bottom of 

the menu on the first page of options.

R

EAR

 S

EAT

 E

NTERTAINMENT


WITH


A

MAZON

 F

IRE

TV B

UILT

-

IN

 3

RD

 P

ARTY


A

PPS

 — I

F

 E

QUIPPED

If available, Rear Seat Entertainment can work 

with 3rd party apps downloaded from the Google 

Play Store or the App Store.
VOXX EVOLVE
VOXX EVOLVE is a 3rd party app that can offer 

more casting options for mobile devices with Rear 

Seat Entertainment.

5

242

MULTIMEDIA


U

SING

 T

HE

 V

IDEO

 USB P

ORT

Plug in a USB drive or mass storage device and 

play your favorite music or movies.
NOTE:

To view USB media on the rear screens, insert a 

USB drive into the port. The USB drive port is 

located under the radio controls in the instrument 

panel.
On the rear screen you can browse the content of 

the USB device by going to the USB source in the 

inputs. Use the search feature to find your media 

faster.

P

LAY

 V

IDEO

 G

AMES

Connect the video game console to the either 

HDMI ports located behind the first row seat.

Headphone Jack/HDMI/USB

NOTE:

Certain high-end video games may exceed the 

power limit of the vehicle's Power Inverter  

Ú

page 81.

H

EADPHONES

 O

PERATION

Rear Seat Entertainment does not come equipped 

with headphones. Customers will need to provide 

their own wireless headphones that can be paired 

with the system using Bluetooth®. Customers can 

also use their own wired headphones and plug 

them into a Headphone Jack located under one of 

the rear screens.
Wireless Headphones Pairing
To pair wireless headphones with Rear Seat 

Entertainment using the rear screens, follow these 

steps:
1. Push the Gear/Settings button on the remote 

or swipe up or down on the screen.

2. Select the “Gear/Settings” icon on the screen.
3. Select “Settings” on the screen
4. While in the Settings, select “Controllers & 

Bluetooth® Devices”.

5. Select “Other Bluetooth® Devices” and follow 

the on-screen steps for pairing.

Multiple headphones can be paired with the 

system at once.

1 — Headphone Jack (Headphone Output Only)
2 — USB Port (Charge Only)
3 — HDMI Port

MULTIMEDIA

243

R

EAR

 C

LIMATE

 C

ONTROLS

The Rear Climate Controls can also be controlled using Rear Seat Entertainment  

Ú

page 67.

Rear Climate Controls can be accessed by using the Car menu. Swipe up or down on either rear screen and select the Car icon or press the “Car” button on the 

Rear Seat Entertainment remote. Then select the Rear Climate Controls option.
Options within Rear Climate Controls are listed below:

Icon

Description

ON

Climate Control ON Button
Press and release this button to turn the Rear Climate Controls on.

OFF

Climate Control OFF Button
Press and release this button to turn the Rear Climate Controls off.

SYNC

SYNC Button
Pressing this button will sync both sides of the Rear Climate Controls.
AUTO Button
Automatically controls the rear interior cabin temperature by adjusting airflow distribution and amount. Toggling this function will cause the 

system to switch between Manual mode and Automatic mode.

Rear Passenger Temperature Up and Down Buttons
Provides the rear passengers with independent temperature control. Press the button on the touchscreen to increase or decrease the 

temperature. The temperature will get warmer as you move up toward the red arrow and colder as you move down toward the blue arrow.

5

244

MULTIMEDIA


Headliner 

Mode

Headliner Mode
Air comes from the outlets in the headliner. Each of these outlets can be individually adjusted to direct the flow of air. Moving the air vanes of 

the outlets to one side will shut off the airflow.

Bi-Level 

Mode

Bi-Level Mode
Air comes from both the headliner outlets and the floor outlets.
NOTE:

In many temperature positions, the Bi-Level mode is designed to provide cooler air out of the headliner outlets and warmer air from the floor 

outlets.

Floor 

Mode

Floor Mode
Air comes from the floor outlets.

1,2,3, etc.

Blower Control
Blower Control is used to regulate the amount of air forced through the Climate system. There are seven blower speeds available. Adjusting 

the blower will cause Automatic mode to switch to Manual operation.

Icon

Description

MULTIMEDIA

245

L

EGAL

 N

OTICE

To access Legal and Compliance information 

about Rear Seat Entertainment from the rear 

screens, follow these steps:
1. Push the Gear/Settings button on the remote 

or swipe up or down on the screen.

2. Select the “Gear/Settings” icon on the screen.
3. Select “Settings” on the screen
4. While in the Settings menu, select “Device & 

Software”.

5. From this menu, select “Legal Notices”. From 

this menu you an also select “Terms of Use” 

and “Privacy”.

OFF-ROAD PAGES — IF EQUIPPED  

Your vehicle may be equipped with Off-Road 

Pages, which provides the vehicle status 

information while operating on off-road conditions. 

It supplies information relating to the vehicle ride 

height, the status of the transfer case, the pitch 

and roll of the vehicle, and the active Selec-Terrain 

mode.
To access Off-Road Pages, press the Off Road 

button on the touchscreen from the Vehicle menu, 

and then press “Launch Off-Road”.

Off-Road Pages has the following selectable pages:

Vehicle Dynamics

Accessory Gauges

Pitch & Roll

Selec-Terrain — If Equipped

Suspension — If Equipped

Forward Facing Camera — If Equipped

NOTE:

With a Connected Services subscription, you can 

record your Off-Road data and send it directly to 

the mobile app. Press the Record button to begin.

O

FF

-R

OAD

 P

AGES

 S

TATUS

 B

AR


The Off-Road Pages Status Bar is located along the 

bottom of Off-Road Pages and is present in each of 

the five selectable page options. It provides 

continually updating information for the following 

items:

Current Transfer Case Status

Current Selec-Terrain mode

Current Latitude/Longitude

Current Altitude of the vehicle

Status of Hill Descent

Hill Descent Control or Selec-Speed Control 

Selected Speed in MPH (km/h).

Current Terrain Mode

Status Bar

1 — Transfer Case Status
2 — Current Latitude/Longitude
3 — Current Altitude
4 — Hill Descent Control
5 — Current Terrain Mode

5

246

MULTIMEDIA


V

EHICLE

 D

YNAMICS


The Vehicle Dynamics page displays information 

concerning the vehicle’s drivetrain.
The following information is displayed:

Steering angle in degrees

Status of Transfer Case

Status of the Rear Axle Locker — If Equipped

Vehicle Dynamics Menu

A

CCESSORY

 G

AUGES


The Accessory Gauges page displays the current 

status of the vehicle’s Coolant Temperature, Oil 

Temperature, Oil Pressure, Transmission 

Temperature, and Battery Voltage.

Accessory Gauges Menu

P

ITCH

 & R

OLL


The Pitch & Roll page displays the vehicle’s current 

pitch (angle up and down) and roll (angle side to 

side) in degrees. The Pitch & Roll gauges provide a 

visualization of the current vehicle angle.

Pitch & Roll Menu

1 — Vehicle Dynamics
2 — Steering Angle
3 — Rear Axle Status

1 — Coolant Temperature
2 — Oil Temperature
3 — Oil Pressure
4 — Transmission Temperature
5 — Battery Voltage

1 — Current Pitch
2 — Current Roll

MULTIMEDIA

247

S

ELEC

-T

ERRAIN

 — I

F

 E

QUIPPED


The Selec-Terrain page displays the current 

Selec-Terrain mode through a high resolution 

image. Adjusting the Selec-Terrain mode will alter 

the image on the screen. The vehicle must be in 

the ON/RUN position to display Selec-Terrain 

information.
The selectable modes are as follows:

Rock — Vehicle Must Be In 4WD Low

Sand/Mud

Snow

Auto — Default

Sport

NOTE:

The Off-Road Pages Status Bar will also display the 

current Selec-Terrain mode.

S

USPENSION

 — I

F

 E

QUIPPED

The Suspension page displays information 

concerning the vehicle’s suspension.
The following information is displayed:

Wheel Articulation

Current Ride Height Status

Off-Road 2

Off-Road 1

Normal

Aero

Entry/Exit

NOTE:

The wheel articulation will be represented by a 

yellow color in the Wheel Articulation. If Ride Height 

is adjusted, the Ride Height indicator on the screen 

will switch to the appropriate height and the Wheel 

Articulation will show the movement and change in 

height.

Suspension Menu

1 — Wheel Articulation
2 — Current Ride Height

5

248

MULTIMEDIA


RADIO OPERATION AND MOBILE PHONES  

Under certain conditions, the mobile phone being 

on in your vehicle can cause erratic or noisy 

performance from your radio. This condition may 

be lessened or eliminated by repositioning the 

mobile phone within the vehicle. This condition is 

not harmful to the radio. If your radio performance 

does not satisfactorily improve from repositioning 

the mobile phone, it is recommended that the 

volume be turned down or off during mobile phone 

operation when not using the Uconnect system.

R

EGULATORY

 A

ND

 S

AFETY


I

NFORMATION

US/CANADA
Exposure to Radio Frequency Radiation
The radiated output power of the internal wireless 

radio is far below the FCC and IC radio frequency 

exposure limits. Nevertheless, the wireless radio 

will be used in such a manner that the radio is 8 in 

(20 cm) or further from the human body.
The internal wireless radio operates within 

guidelines found in radio frequency safety 

standards and recommendations, which reflect 

the consensus of the scientific community.

The radio manufacturer believes the internal 

wireless radio is safe for use by consumers. The 

level of energy emitted is far less than the 

electromagnetic energy emitted by wireless 

devices such as mobile phones. However, the use 

of wireless radios may be restricted in some 

situations or environments, such as aboard 

airplanes. If you are unsure of restrictions, you are 

encouraged to ask for authorization before turning 

on the wireless radio  

Ú

page 410.

249

(Continued)

SAFETY

SAFETY FEATURES

A

NTI

-L

OCK

 B

RAKE

 S

YSTEM

 (ABS) 

The ABS provides increased vehicle stability and 

brake performance under most braking conditions. 

The system automatically prevents wheel lock and 

enhances vehicle control during braking.
The ABS performs a self-check cycle to ensure that 

the ABS is working properly each time the vehicle 

is started and driven. During this self-check, you 

may hear a slight clicking sound as well as some 

related motor noises.
The ABS is activated during braking when the 

system detects one or more wheels are beginning 

to lock. Road conditions such as ice, snow, gravel, 

bumps, railroad tracks, loose debris, or panic stops 

may increase the likelihood of ABS activation(s).
You also may experience the following normal 

characteristics when the ABS activates:

ABS motor noise or clicking sounds (you may 

continue to hear for a short time after the stop)

Brake pedal pulsations

A slight drop of the brake pedal at the end of the 

stop

The ABS is designed to function with the Original 

Equipment Manufacturer (OEM) tires. Modification 

may result in degraded ABS performance.

Anti-Lock Brake System (ABS) Warning 

Light

The yellow ABS Warning Light will turn on when the 

ignition is placed in the ON/RUN mode and may 

stay on for as long as four seconds.
If the ABS Warning Light remains on or comes on 

while driving, it indicates that the anti-lock portion 

of the brake system is not functioning and that 

service is required. However, the conventional 

brake system will continue to operate normally if 

the ABS Warning Light is on.

WARNING!

The ABS contains sophisticated electronic 

equipment that may be susceptible to interfer

-

ence caused by improperly installed or high 

output radio transmitting equipment. This 

interference can cause possible loss of 

anti-lock braking capability. Installation of 

such equipment should be performed by qual

-

ified professionals.

Pumping of the Anti-Lock Brakes will diminish 

their effectiveness and may lead to a collision. 

Pumping makes the stopping distance longer. 

Just press firmly on your brake pedal when you 

need to slow down or stop.

The ABS cannot prevent the natural laws of 

physics from acting on the vehicle, nor can it 

increase braking or steering efficiency beyond 

that afforded by the condition of the vehicle 

brakes and tires or the traction afforded.

The ABS cannot prevent collisions, including 

those resulting from excessive speed in turns, 

following another vehicle too closely, or hydro

-

planing.

The capabilities of an ABS equipped vehicle 

must never be exploited in a reckless or 

dangerous manner that could jeopardize the 

user’s safety or the safety of others.

WARNING!

6

250

SAFETY


If the ABS Warning Light is on, the brake system 

should be serviced as soon as possible to restore 

the benefits of Anti-Lock Brakes. If the ABS 

Warning Light does not come on when the ignition 

is placed in the ON/RUN mode, have the light 

repaired as soon as possible.

D

ROWSY

 D

RIVER

 D

ETECTION

 (DDD) — 

I

F

 E

QUIPPED

DDD detects when the driver is feeling fatigued 

and warns the driver to pull over and take a break.

To Activate/Deactivate

DDD can be activated and deactivated through the 

Uconnect system by selecting the following in 

order:
1. “Safety & Driving Assistance”
2. “Drowsy Driver Detection”

System Intervention

Using feedback obtained from the driver’s steering 

patterns, any buttons/switches that are pressed, 

and from the front camera, the system implements 

two operating logics:

The first operating logic takes the driving style 

into account, observing the road and detecting 

to what extent the driver can continue driving 

with few lane crossing events.

The second operating logic measures the time 

spent behind the wheel with the vehicle speed 

above 40 mph (60 km/h) and below 110 mph 

(180 km/h).

NOTE:

If the conditions described above are not detected 

continuously during the entire driving period, the 

“Drowsy Driver” message may be displayed later 

than two or three hours. If the driving style indi

-

cates that the driver is unable to follow the road 

trajectory and respect the horizontal lane 

markings, the red symbol will appear on the 

instrument cluster display to suggest that the 

driver should stop for a break. An audible signal 

will also sound.

If the driver accepts the suggestion provided by the 

system by pushing the “OK” button on the left side 

of the steering wheel, the message will disappear 

from the display.
If the driver does not acknowledge the warning, it 

will be displayed for 60 seconds and then 

disappear.
NOTE:

In the event of a DDD system failure, a dedicated 

message will appear in the instrument cluster 

display.

DDD Warning Message

WARNING!

The DDD system is an aid for driving and does 

not relieve the driver of the responsibility of 

driving the vehicle. If you experience fatigue 

while driving, pull over safely for a break without 

waiting for the DDD to intervene. Only return to 

the road when you are in the right physical and 

mental condition to prevent endangering 

yourself and other drivers.

SAFETY

251

R

EAR

 S

EAT

 R

EMINDER

 A

LERT

 (RSRA)

RSRA will consider the presence of an object in the 

rear seat when a rear entry/exit door is opened at 

the beginning of each key cycle. To activate, the 

rear door must be open for more than one second 

and the vehicle must be placed in the ON/RUN 

position within 10 minutes. When the potential 

presence of an object is determined and/or 

otherwise inferred, a message will appear in the 

instrument cluster display reminding driver to 

check the rear seat(s) immediately after key off 

accompanied by an alert upon exiting the vehicle.

E

LECTRONIC

 B

RAKE

 C

ONTROL

 (EBC) 

S

YSTEM


If applicable, refer to the “Hybrid Supplement” for 

additional information.
Your vehicle is equipped with an advanced EBC 

system. This system includes the Anti-Lock Brake 

System (ABS), Brake Assist System (BAS), 

Electronic Brake Force Distribution (EBD), 

Electronic Roll Mitigation (ERM), Electronic 

Stability Control (ESC), Hill Start Assist (HSA), and 

Traction Control System (TCS). These systems work 

together to enhance both vehicle stability and 

control in various driving conditions.

Your vehicle may also be equipped with Dynamic 

Steering Torque (DST), Rain Brake Support (RBS), 

Ready Alert Braking (RAB), and Trailer Sway 

Control (TSC).

Brake Assist System (BAS) 

The BAS is designed to optimize the vehicle’s 

braking capability during emergency braking 

maneuvers. The system detects an emergency 

braking situation by sensing the rate and amount 

of brake application and then applies optimum 

pressure to the brakes. This can help reduce 

braking distances. The BAS complements the 

Anti-Lock Brake System (ABS). Applying the brakes 

very quickly results in the best BAS assistance. To 

receive the benefit of the system, you must apply 

continuous braking pressure during the stopping 

sequence (do not “pump” the brakes). Do not 

reduce brake pedal pressure unless braking is no 

longer desired. Once the brake pedal is released, 

the BAS is deactivated.

Brake System Warning Light

The red Brake System Warning Light will turn on 

when the ignition is placed in the ON/RUN mode 

and may stay on for as long as four seconds.
If the Brake System Warning Light remains on or 

comes on while driving, it indicates that the brake 

system is not functioning properly and that 

immediate service is required. If the Brake System 

Warning Light does not come on when the ignition 

is placed in the ON/RUN mode, have the light 

repaired as soon as possible.

WARNING!

The Brake Assist System (BAS) cannot prevent 

the natural laws of physics from acting on the 

vehicle, nor can it increase the traction afforded 

by prevailing road conditions. BAS cannot 

prevent collisions, including those resulting from 

excessive speed in turns, driving on very slippery 

surfaces, or hydroplaning. The capabilities of a 

BAS-equipped vehicle must never be exploited in 

a reckless or dangerous manner, which could 

jeopardize the user's safety or the safety of 

others.

6


Content      ..     13      14      15      16     ..