Jeep Wrangler JK (2018 year). Instruction - part 4


  Index      Jeep     Jeep Wrangler JK - instruction 2018 year in english


Search            


Content   ..  2  3  4  5   ..


Jeep Wrangler JK (2018 year). Instruction - part 4


WARNING!

Vehicles and other objects seen in the passenger side
convex mirror will look smaller and farther away than
they really are. Relying too much on your passenger
side mirror could cause you to collide with another
vehicle or other object. Use your inside mirror when
judging the size or distance of a vehicle seen in the
passenger side mirror.

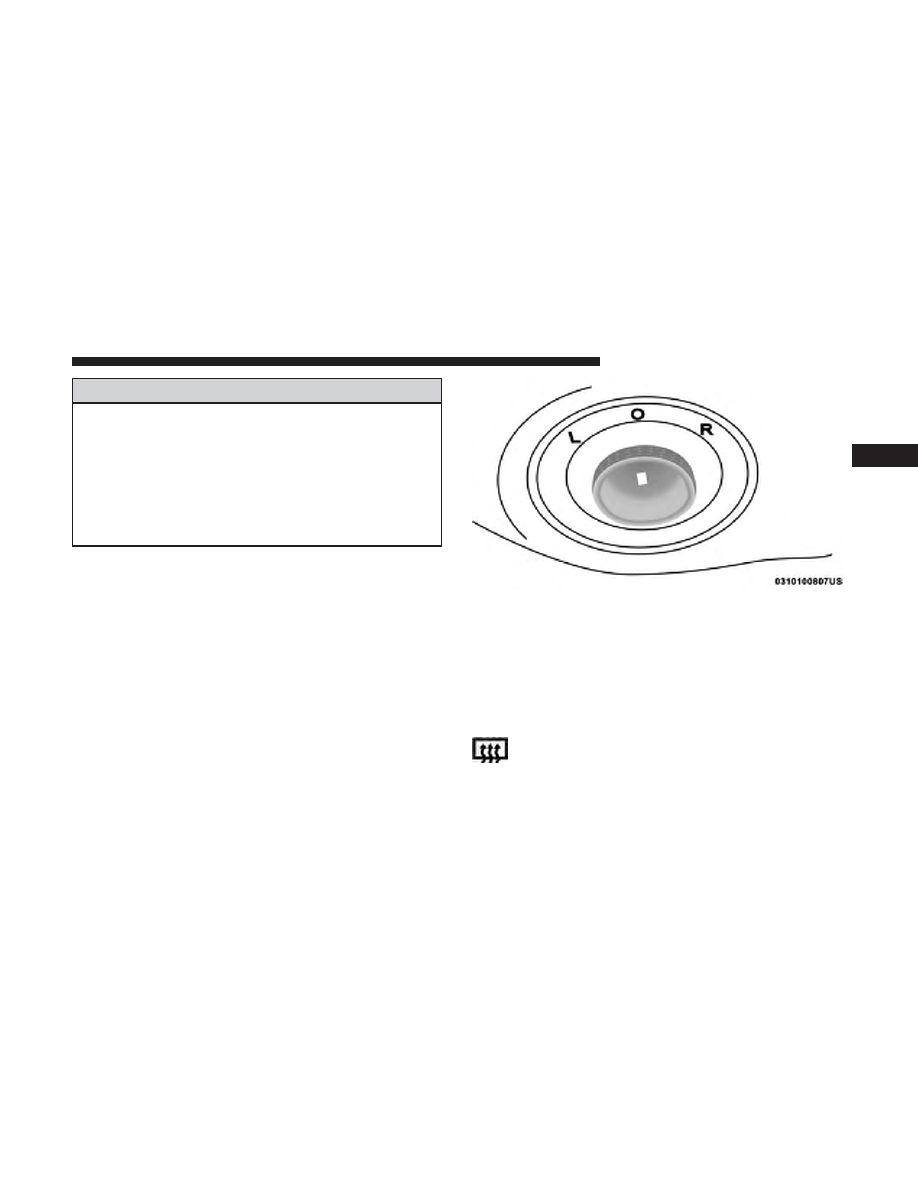
Power Mirrors — If Equipped

The power mirror switch is located on the center of the
instrument panel, below the climate controls. A rotary knob
selects the left mirror, right mirror or off position.

After selecting a mirror, move the knob in the same
direction you want the mirror to move. Use the center off
position to guard against accidentally moving a mirror
position.

Heated Mirrors — If Equipped

These mirrors are heated to melt frost or ice. This
feature will be activated whenever you turn on the

rear window defroster (if equipped). Refer to “Climate
Controls” in “Getting To Know Your Vehicle” for further
information.

Power Mirror Switch

3

GETTING TO KNOW YOUR VEHICLE

51

Vanity Mirrors

Vanity mirrors are located on the sun visors. To use the
mirrors, rotate the sun visor down and swing the mirror
cover upward.

EXTERIOR LIGHTS

Headlights And Parking Lights

Turn the end of the multifunction lever to the first detent
for parking light operation. Turn to the second detent for
headlight operation.

Daytime Running Lights — If Equipped

The headlights come on at a low intensity level when
shifted into any position other than PARK (auto transmis-
sion) or when the vehicle begins to move (manual trans-
mission).

NOTE:

The Daytime Running Light, on the same side of

the vehicle as the active turn signal, will turn off automati-
cally when a turn signal is in operation and turn on again
when the turn signal is not operating.

Vanity Mirror

Headlight Switch

52

GETTING TO KNOW YOUR VEHICLE

High/Low Beam Switch

Push the multifunction lever toward the instrument panel
to switch the headlights to high beams. Pulling the multi-
function lever back toward the steering wheel will return
the lights to low beams.

Flash-To-Pass

You can signal another vehicle with your headlights by
lightly pulling the multifunction lever toward you. This
will cause the high beam headlights to turn on, and remain
on, until the lever is released.

Automatic Headlights — If Equipped

This system automatically turns the headlights on or off
according to ambient light levels. To turn the system on,
turn the end of the multifunction lever to the AUTO
position (third detent). When the system is on, the Head-
light Time Delay feature is also on. This means the head-
lights will stay on for up to 90 seconds after you turn the
ignition switch to the LOCK position. To turn the Auto-
matic System off, turn the end of the multifunction lever
out of the AUTO position.

NOTE:

The engine must be running before the headlights

will turn on in the Automatic mode.

Front Fog Lights

The front fog light switch is located on the multi-
function lever. To activate the front fog lights, turn

on the parking or low beam headlights and pull out the
end of the lever.

NOTE:

The fog lights will only operate with the parking

lights or the headlights on low beam. Selecting high beam
headlights will turn off the fog lights.

Headlight Switch

3

GETTING TO KNOW YOUR VEHICLE

53

Turn Signals

Move the multifunction lever up or down and the arrows
on each side of the instrument cluster flash to show proper
operation of the front and rear turn signal lights.

NOTE:
• If either light remains on and does not flash, or there is

a very fast flash rate, check for a defective outside light
bulb. If an indicator fails to light when the lever is
moved, it would suggest that the indicator bulb is
defective.

• A tone will chime if the turn signals are left on for more

than 1 mile (2 km).

Lane Change Assist — If Equipped

Tap the lever up or down once, without moving beyond
the detent, and the turn signal (right or left) will flash three
times then automatically turn off.

Lights-On Reminder

If the headlights, parking lights or cargo lights are left on
after the ignition is turned OFF, a chime will sound when
the driver’s door is opened.

Turn Signal Operation

54

GETTING TO KNOW YOUR VEHICLE

INTERIOR LIGHTS

Courtesy/Reading Lights

Two courtesy/reading lights are located in the bottom of
the rearview mirror. You can turn these lights on and off
from the switches in the mirror or from the dimmer control
in the multifunction lever. These lights are also controlled
automatically by the Illuminated Entry System.

A courtesy light is also found in the rear of the center
console. You can turn this light on and off from the dimmer
control in the multifunction lever. This light is also con-
trolled automatically by the Illuminated Entry System.

Instrument Panel Dimmer

Rotate the center portion of the lever to the extreme bottom
position to fully dim the instrument panel lights and
prevent the interior lights from illuminating when a door is
opened.

Rotate the center portion of the lever up to increase the
brightness of the instrument panel lights when the parking
lights or headlights are on.

Rotate the center portion of the lever upward to the next
detent position to brighten the odometer and radio when
the parking lights or headlights are on.

Rotate the center portion of the lever upward to the last
detent to turn on the interior lighting.

Courtesy/Reading Light Switches

3

GETTING TO KNOW YOUR VEHICLE

55

Cargo Lamp

The courtesy and dome lights will turn on when the front
doors are opened, by rotating the control for the dimmer
switch on the multifunction lever fully upward, or if
equipped, when the unlock button is pushed on the
Remote Keyless Entry key fob.

The sports bar reading lights (available on four-door
models) can be turned on by pushing the switches, located
on either side of the lens. Push a switch a second time to
turn the light off.

Dimmer Control

Sports Bar Reading Light

56

GETTING TO KNOW YOUR VEHICLE

The rear cargo light may be turned on by pushing the lens.
Push the lens a second time to turn the light off.

When a door is open and the interior lights are on, rotating
the dimmer control to the extreme bottom position will
cause all the interior lights to turn off. This is also known
as the “Party” mode because it allows the doors to stay
open for extended periods of time without discharging the
vehicle’s battery.

WINDSHIELD WIPERS AND WASHERS

The windshield wiper/washer control lever is located on
the right side of the steering column. The front wipers are
operated by rotating a switch, located at the end of the
lever. For information on using the rear window wiper/
washer, refer to “Rear Window Wiper/Washer” in this
section for more information.

Windshield Wiper Operation

Rotate the end of the lever upward to the second detent past
the intermittent settings for low-speed wiper operation.

Rear Cargo Light

Windshield Wiper/Washer Lever

3

GETTING TO KNOW YOUR VEHICLE

57

Rotate the end of the lever upward to the third detent past the
intermittent settings for high-speed wiper operation.

CAUTION!

In cold weather, always turn off the wiper switch and
allow the wipers to return to the park position before
turning off the engine. If the wiper switch is left on
and the wipers freeze to the windshield, damage to the
wiper motor may occur when the vehicle is restarted.

Intermittent Wiper System

Use the intermittent wiper when weather conditions make
a single wiping cycle, with a variable pause between cycles,
desirable. Rotate the end of the lever to the first detent
position for one of five intermittent settings. The delay
cycle can be set anywhere between 1 to 18 seconds.

NOTE:

The wiper delay times depend on vehicle speed. If

the vehicle is moving less than 10 mph (16 km/h), delay
times will be doubled.

Front Wiper Control

Front Wiper Control

58

GETTING TO KNOW YOUR VEHICLE

Windshield Washers

To use the washer, pull the lever toward you and hold
while spray is desired. If the lever is pulled while in the
delay range, the wiper will start and continue to operate
for two or three wipe cycles after the lever is released.
Then, the intermittent interval previously selected will
resume.

If the lever is pulled while in the off position, the wipers
will operate for two or three wipe cycles. Then, the wipers
will turn off.

WARNING!

Sudden loss of visibility through the windshield could
lead to a collision. You might not see other vehicles or
other obstacles. To avoid sudden icing of the wind-
shield during freezing weather, warm the windshield
with the defroster before and during windshield
washer use.

Mist Feature

Push down on the wiper lever to activate a single wipe to
clear off road mist or spray from a passing vehicle. As long
as the lever is held down, the wipers will continue to
operate.

NOTE:

The mist feature does not activate the washer

pump; therefore, no washer fluid will be sprayed on the
windshield. The wash function must be used in order to
spray the windshield with washer fluid.

Rear Window Wiper/Washer — If Equipped

A rotary switch on the center portion of the control lever
(located on the right side of the steering column) controls
the operation of the rear wiper/washer function.

Mist Control

3

GETTING TO KNOW YOUR VEHICLE

59

Rotate the switch upward to the first detent position
for rear wiper operation.

Rotate the switch upward past the first detent to
activate the rear washer. The washer pump and
the wiper will continue to operate as long as the
switch is held. Upon release, the wiper will cycle

two to three times before returning to the set position.

If the rear wiper is operating when the ignition is turned to
the LOCK position, the wiper will automatically return to

the “park” position. When the vehicle is restarted, the
wiper will resume function at whichever position the
switch is set at.

CLIMATE CONTROLS

Manual Climate Control Overview

The air conditioning and heating system is designed to
make you comfortable in all types of weather.

Rear Wiper/Washer Control

Manual Temperature Controls

60

GETTING TO KNOW YOUR VEHICLE

Manual Climate Control Descriptions

Icon

Description

A/C Button
Push the A/C button to engage the Air Conditioning (A/C). An LED will illuminate when the
A/C system is engaged.

Recirculation Button
Push and release this button to change the system between recirculation mode and outside air
mode. Recirculation can be used when outside conditions such as smoke, odors, dust, or high
humidity are present.

NOTE:

• Continuous use of the Recirculation mode may make the inside air stuffy and window fog-

ging may occur. Extended use of this mode is not recommended.

• The use of the Recirculation mode in cold or damp weather could cause windows to fog on

the inside, because of moisture buildup inside the vehicle. Select the outside air position for
maximum defogging.

• Recirculation can be used in all modes except for Defrost.

• The A/C can be deselected manually without disturbing the mode control selection.
Front Defrost Mode
Turn the Knob to the Front Defrost position. Air comes from the windshield and side window
demist outlets. When the defrost mode is selected, the blower level will increase. Use Defrost
mode with maximum temperature settings for best windshield and side window defrosting and
defogging.

3

GETTING TO KNOW YOUR VEHICLE

61

Icon

Description

Rear Defrost Button
Push and release the Rear Defrost Control button to turn on the rear window defroster and the
heated outside mirrors (if equipped). An indicator will illuminate when the rear window de-
froster is on. The rear window defroster automatically turns off after ten minutes.
Temperature Control
Use this control to regulate the temperature of the air inside the passenger compartment. Rotat-
ing the knob counterclockwise, from top center into the blue area of the scale, indicates cooler
temperatures. Rotating the knob clockwise, into the red area, indicates warmer temperatures.
Blower Control
There are seven blower speeds. Use this control to regulate the amount of air forced through the
system in any mode you select. The blower speed increases as you move the control clockwise
from the off position.

NOTE:

Depending on the configuration, your vehicle may be equipped with four blower

speeds.
Modes Control
Turn the knob to adjust airflow distribution. The airflow distribution mode can be adjusted so
air comes from the instrument panel outlets, floor outlets, defrost outlets and demist outlets.

Panel Mode

Panel Mode
Air comes from the outlets in the instrument panel. Each of these outlets can be individually
adjusted to direct the flow of air. The air vanes of the center outlets and outboard outlets can be
moved up and down or side to side to regulate airflow direction.

62

GETTING TO KNOW YOUR VEHICLE

Icon

Description

Bi-Level Mode

Bi-Level Mode
Air comes from the instrument panel outlets and floor outlets. A slight amount of air is directed
through the defrost and side window demister outlets.

NOTE:

Bi-Level mode is designed under comfort conditions to provide cooler air out of the

panel outlets and warmer air from the floor outlets.

Floor Mode

Floor Mode
Air comes from the floor outlets. A slight amount of air is directed through the defrost and side
window demister outlets.

Mix Mode

Mix Mode
Air is directed through the floor, defrost, and side window demister outlets. This setting works
best in cold or snowy conditions that require extra heat to the windshield. This setting is good
for maintaining comfort while reducing moisture on the windshield.

3

GETTING TO KNOW YOUR VEHICLE

63

CAUTION!

Failure to follow these cautions can cause damage to
the heating elements:
• Use care when washing the inside of the rear win-

dow. Do not use abrasive window cleaners on the
interior surface of the window. Use a soft cloth and a
mild washing solution, wiping parallel to the heat-
ing elements. Labels can be peeled off after soaking
with warm water.

• Do not use scrapers, sharp instruments, or abrasive

window cleaners on the interior surface of the win-
dow.

• Keep all objects a safe distance from the window.

Automatic Climate Control Overview

Automatic Climate Control Descriptions

Icon

Description

A/C Button
Push the A/C button to engage the Air Conditioning (A/C). An LED will illuminate when the
A/C system is engaged.

Automatic Temperature Controls

64

GETTING TO KNOW YOUR VEHICLE

Icon

Description

Automatic Operation
The Automatic Temperature Control system automatically maintains the climate in the cabin of
the vehicle at the comfort levels desired by the driver and passenger. Operation of the system is
quite simple.
Turn the Mode Control knob (on the right) and the Blower Control knob (on the left) to AUTO.

NOTE:

The AUTO position performs best for front seat occupants only.

Recirculation Button
Push and release this button to change the system between recirculation mode and outside air
mode. Recirculation can be used when outside conditions such as smoke, odors, dust, or high
humidity are present.

NOTE:

• Continuous use of the Recirculation mode may make the inside air stuffy and window fog-

ging may occur. Extended use of this mode is not recommended.

• The use of the Recirculation mode in cold or damp weather could cause windows to fog on

the inside, because of moisture buildup inside the vehicle. Select the outside air position for
maximum defogging.

• Recirculation can be used in all modes except for Defrost.

• The A/C can be deselected manually without disturbing the mode control selection.
Rear Defrost Button
Push and release the Rear Defrost Control button to turn on the rear window defroster and the
heated outside mirrors (if equipped). An indicator will illuminate when the rear window de-
froster is on. The rear window defroster automatically turns off after ten minutes.

3

GETTING TO KNOW YOUR VEHICLE

65

Icon

Description

Temperature Control
Use this control to regulate the temperature of the air inside the passenger compartment. Rotat-
ing the knob counterclockwise, from top center into the blue area of the scale, indicates cooler
temperatures. Rotating the knob clockwise, into the red area, indicates warmer temperatures.
Blower Control
There are seven blower speeds. Use this control to regulate the amount of air forced through the
system in any mode you select. The blower speed increases as you move the control clockwise
from the off position.

NOTE:

Depending on the configuration, your vehicle may be equipped with four blower

speeds.
Modes Control
Turn the knob to adjust airflow distribution. The airflow distribution mode can be adjusted so
air comes from the instrument panel outlets, floor outlets, defrost outlets and demist outlets.
The Mode settings are as follows:

Panel Mode

Panel Mode
Air comes from the outlets in the instrument panel. Each of these outlets can be individually
adjusted to direct the flow of air. The air vanes of the center outlets and outboard outlets can be
moved up and down or side to side to regulate airflow direction.

66

GETTING TO KNOW YOUR VEHICLE


Content   ..  2  3  4  5   ..