Jeep Grand Cherokee (2019 year). Instruction - part 16


  Index      Jeep     Jeep Grand Cherokee - instruction 2019 year in english


Search            


Content   ..  14  15  16  17   ..


Jeep Grand Cherokee (2019 year). Instruction - part 16


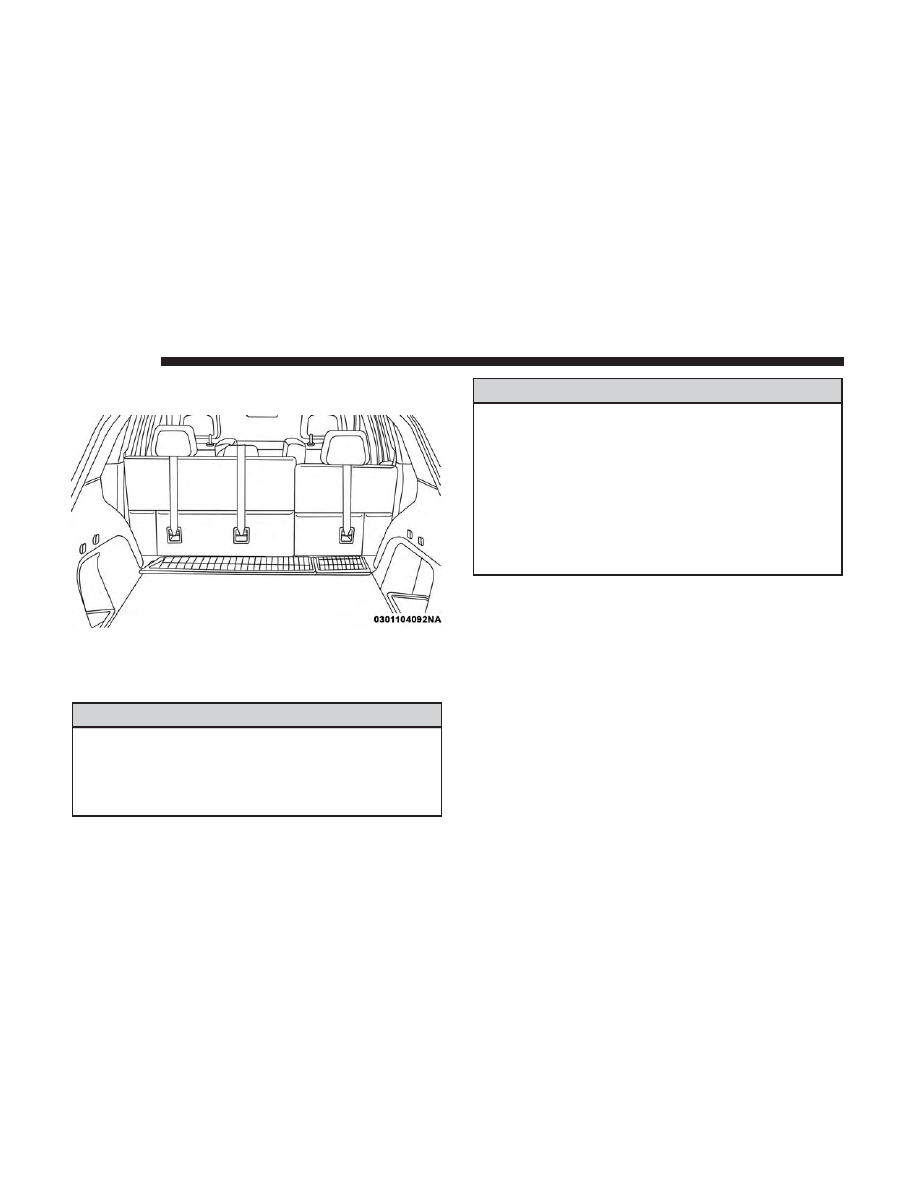
5. Attach the tether strap hook of the child restraint to the

top tether anchorage as shown in the diagram.

6. Remove slack in the tether strap according to the child

restraint manufacturer’s instructions.

WARNING!

• The top tether anchorages are not visible until the

gap panel is folded down. Do not use the visible
cargo tie down hooks, located on the floor behind the
seats, to attach a child restraint tether anchor.

(Continued)

WARNING! (Continued)

• An incorrectly anchored tether strap could lead to

increased head motion and possible injury to the
child. Use only the anchorage position directly be-
hind the child seat to secure a child restraint top
tether strap.

• If your vehicle is equipped with a split rear seat,

make sure the tether strap does not slip into the
opening between the seatbacks as you remove slack
in the strap.

Transporting Pets

Air Bags deploying in the front seat could harm your pet.
An unrestrained pet will be thrown about and possibly
injured, or injure a passenger during panic braking or in a
collision.

Pets should be restrained in the rear seat (if equipped) in
pet harnesses or pet carriers that are secured by seat belts.

Top Tether Strap Mounting

244

SAFETY

SAFETY TIPS

Transporting Passengers

NEVER TRANSPORT PASSENGERS IN THE CARGO
AREA.

WARNING!

• Do not leave children or animals inside parked

vehicles in hot weather. Interior heat build-up may
cause serious injury or death.

• It is extremely dangerous to ride in a cargo area,

inside or outside of a vehicle. In a collision, people
riding in these areas are more likely to be seriously
injured or killed.

• Do not allow people to ride in any area of your

vehicle that is not equipped with seats and seat belts.

• Be sure everyone in your vehicle is in a seat and

using a seat belt properly.

Exhaust Gas

WARNING!

Exhaust gases can injure or kill. They contain carbon
monoxide (CO), which is colorless and odorless.
Breathing it can make you unconscious and can even-
tually poison you. To avoid breathing (CO), follow
these safety tips:
• Do not run the engine in a closed garage or in

confined areas any longer than needed to move your
vehicle in or out of the area.

• If you are required to drive with the trunk/liftgate/

rear doors open, make sure that all windows are
closed and the climate control BLOWER switch is set
at high speed. DO NOT use the recirculation mode.

• If it is necessary to sit in a parked vehicle with the

engine running, adjust your heating or cooling con-
trols to force outside air into the vehicle. Set the
blower at high speed.

The best protection against carbon monoxide entry into the
vehicle body is a properly maintained engine exhaust
system.

5

SAFETY

245

Whenever a change is noticed in the sound of the exhaust
system, when exhaust fumes can be detected inside the
vehicle, or when the underside or rear of the vehicle is
damaged, have a competent mechanic inspect the complete
exhaust system and adjacent body areas for broken, dam-
aged, deteriorated, or mispositioned parts. Open seams or
loose connections could permit exhaust fumes to seep into
the passenger compartment. In addition, inspect the ex-
haust system each time the vehicle is raised for lubrication
or oil change. Replace as required.

Safety Checks You Should Make Inside The Vehicle

Seat Belts

Inspect the seat belt system periodically, checking for cuts,
frays, and loose parts. Damaged parts must be replaced
immediately. Do not disassemble or modify the system.

Front seat belt assemblies must be replaced after a collision.
Rear seat belt assemblies must be replaced after a collision
if they have been damaged (i.e., bent retractor, torn web-
bing, etc.). If there is any question regarding seat belt or
retractor condition, replace the seat belt.

Air Bag Warning Light

The Air Bag warning light

will turn on for four to

eight seconds as a bulb check when the ignition switch

is first turned to ON/RUN. If the light is either not on
during starting, stays on, or turns on while driving,
have the system inspected at an authorized dealer as
soon as possible. After the bulb check, this light will
illuminate with a single chime when a fault with the Air
Bag System has been detected. It will stay on until the
fault is removed. If the light comes on intermittently or
remains on while driving, have an authorized dealer
service the vehicle immediately.
Refer to “Occupant Restraint Systems” in “Safety” for
further information.

Defroster
Check operation by selecting the defrost mode and place
the blower control on high speed. You should be able to
feel the air directed against the windshield. See an autho-
rized dealer for service if your defroster is inoperable.

Floor Mat Safety Information
Always use floor mats designed to fit your vehicle. Only
use a floor mat that does not interfere with the operation of
the accelerator, brake or clutch pedals. Only use a floor mat
that is securely attached using the floor mat fasteners so it
cannot slip out of position and interfere with the accelera-
tor, brake or clutch pedals or impair safe operation of your
vehicle in other ways.

246

SAFETY

WARNING!

An improperly attached, damaged, folded, or stacked
floor mat, or damaged floor mat fasteners may cause
your floor mat to interfere with the accelerator, brake,
or clutch pedals and cause a loss of vehicle control. To
prevent SERIOUS INJURY or DEATH:
• ALWAYS securely attach

your floor mat using the

floor mat fasteners. DO NOT install your floor mat
upside down or turn your floor mat over. Lightly pull
to confirm mat is secured using the floor mat fasten-
ers on a regular basis.

• ALWAYS REMOVE THE EXISTING FLOOR MAT

FROM THE VEHICLE

before installing any other

floor mat. NEVER install or stack an additional floor
mat on top of an existing floor mat.

• ONLY install floor mats designed to fit your vehicle.

NEVER install a floor mat that cannot be properly
attached and secured to your vehicle. If a floor mat
needs to be replaced, only use a FCA approved floor
mat for the specific make, model, and year of your
vehicle.

(Continued)

WARNING! (Continued)

• ONLY use the driver’s side floor mat on the driver’s

side floor area. To check for interference, with the
vehicle properly parked with the engine off, fully
depress the accelerator, the brake, and the clutch
pedal (if present) to check for interference. If your
floor mat interferes with the operation of any pedal,
or is not secure to the floor, remove the floor mat
from the vehicle and place the floor mat in your
trunk.

• ONLY use the passenger’s side floor mat on the

passenger’s side floor area.

• ALWAYS make sure objects cannot fall or slide into

the driver’s side floor area when the vehicle is
moving. Objects can become trapped under accelera-
tor, brake, or clutch pedals and could cause a loss of
vehicle control.

• NEVER place any objects under the floor mat (e.g.,

towels, keys, etc.). These objects could change the
position of the floor mat and may cause interference
with the accelerator, brake, or clutch pedals.

(Continued)

5

SAFETY

247

WARNING! (Continued)

• If the vehicle carpet has been removed and re-

installed, always properly attach carpet to the floor
and check the floor mat fasteners are secure to the
vehicle carpet. Fully depress each pedal to check for
interference with the accelerator, brake, or clutch
pedals then re-install the floor mats.

• It is recommended to only use mild soap and water

to clean your floor mats. After cleaning, always check
your floor mat has been properly installed and is
secured to your vehicle using the floor mat fasteners
by lightly pulling mat.

Periodic Safety Checks You Should Make Outside
The Vehicle

Tires

Examine tires for excessive tread wear and uneven wear
patterns. Check for stones, nails, glass, or other objects
lodged in the tread or sidewall. Inspect the tread for cuts
and cracks. Inspect sidewalls for cuts, cracks, and bulges.
Check the wheel nuts for tightness. Check the tires (includ-
ing spare) for proper cold inflation pressure.

Lights

Have someone observe the operation of brake lights and
exterior lights while you work the controls. Check turn
signal and high beam indicator lights on the instrument
panel.

Door Latches

Check for proper closing, latching, and locking.

Fluid Leaks

Check area under the vehicle after overnight parking for
fuel, coolant, oil, or other fluid leaks. Also, if gasoline
fumes are detected or if fuel, or brake fluid leaks are
suspected. The cause should be located and corrected
immediately.

248

SAFETY

STARTING AND OPERATING

CONTENTS

䡵 STARTING THE ENGINE — GAS . . . . . . . . . . . .253

▫ Automatic Transmission . . . . . . . . . . . . . . . . . .253
▫ Normal Starting . . . . . . . . . . . . . . . . . . . . . . . .254
▫ If Engine Fails To Start . . . . . . . . . . . . . . . . . .257
▫ Cold Weather Operation (Below –22°F Or

−30°C) . . . . . . . . . . . . . . . . . . . . . . . . . . . . . .258

▫ After Starting. . . . . . . . . . . . . . . . . . . . . . . . . .258

䡵 ENGINE BLOCK HEATER — IF EQUIPPED . . . .258
䡵 ENGINE BREAK-IN RECOMMENDATIONS

— 3.6L & 5.7L ENGINES . . . . . . . . . . . . . . . . . .259

䡵 PARKING BRAKE . . . . . . . . . . . . . . . . . . . . . . .260
䡵 AUTOMATIC TRANSMISSION . . . . . . . . . . . . . .262

▫ Ignition Park Interlock . . . . . . . . . . . . . . . . . . .263
▫ Brake/Transmission Shift Interlock System . . . .263
▫ Fuel Economy (ECO) Mode . . . . . . . . . . . . . . .264

▫ Eight–Speed Automatic Transmission . . . . . . . .264

䡵 SPORT MODE — IF EQUIPPED . . . . . . . . . . . . .272
䡵 FOUR WHEEL DRIVE OPERATION . . . . . . . . . .273

▫ Quadra-Trac I Operating Instructions/Precautions

— If Equipped . . . . . . . . . . . . . . . . . . . . . . . .273

▫ Quadra-Trac II Operating Instructions/Precautions

— If Equipped . . . . . . . . . . . . . . . . . . . . . . . .273

▫ Shift Positions . . . . . . . . . . . . . . . . . . . . . . . . .274
▫ Shifting Procedures . . . . . . . . . . . . . . . . . . . . .275
▫ Quadra-Drive II System — If Equipped . . . . . . .279

䡵 QUADRA-LIFT — IF EQUIPPED . . . . . . . . . . . .279

▫ Description . . . . . . . . . . . . . . . . . . . . . . . . . . .279
▫ Air Suspension Modes . . . . . . . . . . . . . . . . . . .282
▫ Instrument Cluster Display Messages. . . . . . . . .283
▫ Operation . . . . . . . . . . . . . . . . . . . . . . . . . . . .283

6

䡵 SELEC-TERRAIN — IF EQUIPPED . . . . . . . . . . .285

▫ Selec-Terrain Mode Selection . . . . . . . . . . . . . . .285
▫ Instrument Cluster Display Messages. . . . . . . . .286

䡵 FUEL SAVER TECHNOLOGY 5.7L ONLY — IF

EQUIPPED . . . . . . . . . . . . . . . . . . . . . . . . . . . . .286

䡵 POWER STEERING . . . . . . . . . . . . . . . . . . . . . .286
䡵 STOP/START SYSTEM — IF EQUIPPED. . . . . . . .287

▫ Automatic Mode . . . . . . . . . . . . . . . . . . . . . . .287
▫ Possible Reasons The Engine Does Not

Autostop . . . . . . . . . . . . . . . . . . . . . . . . . . . .288

▫ To Start The Engine While In Autostop Mode . .289
▫ To Manually Turn Off The Stop/Start System . .289
▫ To Manually Turn On The Stop/Start System . . .290
▫ System Malfunction . . . . . . . . . . . . . . . . . . . . .290

䡵 SPEED CONTROL — IF EQUIPPED . . . . . . . . . .290

▫ To Activate . . . . . . . . . . . . . . . . . . . . . . . . . . .291
▫ To Set A Desired Speed . . . . . . . . . . . . . . . . . .291
▫ To Vary The Speed Setting . . . . . . . . . . . . . . . .291

▫ To Accelerate For Passing . . . . . . . . . . . . . . . . .292
▫ To Resume Speed . . . . . . . . . . . . . . . . . . . . . .293
▫ To Deactivate . . . . . . . . . . . . . . . . . . . . . . . . .293

䡵 ADAPTIVE CRUISE CONTROL (ACC) — IF

EQUIPPED . . . . . . . . . . . . . . . . . . . . . . . . . . . .293

▫ Adaptive Cruise Control (ACC) Operation . . . . .295
▫ Activating Adaptive Cruise Control (ACC) . . . . .296
▫ To Activate/Deactivate . . . . . . . . . . . . . . . . . . .296
▫ To Set A Desired ACC Speed. . . . . . . . . . . . . . .297
▫ To Cancel . . . . . . . . . . . . . . . . . . . . . . . . . . . .297
▫ To Turn Off . . . . . . . . . . . . . . . . . . . . . . . . . . .298
▫ To Resume . . . . . . . . . . . . . . . . . . . . . . . . . . .298
▫ To Vary The Speed Setting . . . . . . . . . . . . . . . .299
▫ Setting The Following Distance In ACC . . . . . . .301
▫ Overtake Aid. . . . . . . . . . . . . . . . . . . . . . . . . .303
▫ ACC Operation At Stop . . . . . . . . . . . . . . . . . .304
▫ Adaptive Cruise Control (ACC) Menu . . . . . . . .304

250

STARTING AND OPERATING

▫ Display Warnings And Maintenance . . . . . . . . .305
▫ Precautions While Driving With ACC. . . . . . . . .307
▫ General Information . . . . . . . . . . . . . . . . . . . . .310
▫ Normal (Fixed Speed) Cruise Control Mode . . . .311

䡵 PARKSENSE REAR PARK ASSIST

— IF EQUIPPED . . . . . . . . . . . . . . . . . . . . . . . .313

▫ ParkSense Sensors . . . . . . . . . . . . . . . . . . . . . .315
▫ ParkSense Display . . . . . . . . . . . . . . . . . . . . . .315
▫ ParkSense Warning Display. . . . . . . . . . . . . . . .319
▫ Enabling And Disabling ParkSense . . . . . . . . . .319
▫ Service The ParkSense Rear Park Assist System. .320
▫ Cleaning The ParkSense System. . . . . . . . . . . . .320
▫ ParkSense System Usage Precautions . . . . . . . . .320

䡵 PARKSENSE FRONT AND REAR PARK ASSIST — IF

EQUIPPED . . . . . . . . . . . . . . . . . . . . . . . . . . . . .322

▫ ParkSense Sensors . . . . . . . . . . . . . . . . . . . . . .323
▫ ParkSense Display . . . . . . . . . . . . . . . . . . . . . .324
▫ ParkSense Warning Display. . . . . . . . . . . . . . . .328

▫ Enabling And Disabling ParkSense . . . . . . . . . .329
▫ Service The ParkSense Park Assist System . . . . .329
▫ Cleaning The ParkSense System. . . . . . . . . . . . .330
▫ ParkSense System Usage Precautions . . . . . . . . .330

䡵 PARKSENSE ACTIVE PARK ASSIST SYSTEM

— IF EQUIPPED . . . . . . . . . . . . . . . . . . . . . . . .332

▫ Enabling And Disabling The ParkSense Active

Park Assist System . . . . . . . . . . . . . . . . . . . . . .333

▫ Parallel Parking Space Assistance

Operation/Display . . . . . . . . . . . . . . . . . . . . . .334

▫ Perpendicular Parking Space Assistance

Operation/Display . . . . . . . . . . . . . . . . . . . . . .343

䡵 LANESENSE — IF EQUIPPED . . . . . . . . . . . . . .352

▫ LaneSense Operation . . . . . . . . . . . . . . . . . . . .352
▫ Turning LaneSense On Or Off . . . . . . . . . . . . . .353
▫ LaneSense Warning Message . . . . . . . . . . . . . . .354
▫ Changing LaneSense Status. . . . . . . . . . . . . . . .357

䡵 PARKVIEW REAR BACK UP CAMERA . . . . . . . .357

6

STARTING AND OPERATING

251

䡵 REFUELING THE VEHICLE — GASOLINE

ENGINE . . . . . . . . . . . . . . . . . . . . . . . . . . . . . .359

▫ Emergency Fuel Filler Door Release . . . . . . . . . .361

䡵 VEHICLE LOADING . . . . . . . . . . . . . . . . . . . . .362

▫ Certification Label . . . . . . . . . . . . . . . . . . . . . .362

䡵 TRAILER TOWING . . . . . . . . . . . . . . . . . . . . . .364

▫ Common Towing Definitions. . . . . . . . . . . . . . .364
▫ Trailer Hitch Classification . . . . . . . . . . . . . . . .366
▫ Trailer Towing Weights (Maximum Trailer Weight

Ratings) . . . . . . . . . . . . . . . . . . . . . . . . . . . . .367

▫ Trailer Hitch Receiver Cover Removal (Summit

Models) — If Equipped . . . . . . . . . . . . . . . . . .368

▫ Trailer And Tongue Weight . . . . . . . . . . . . . . .369
▫ Towing Requirements . . . . . . . . . . . . . . . . . . .370

▫ Towing Tips . . . . . . . . . . . . . . . . . . . . . . . . . .374

䡵 SNOW PLOW . . . . . . . . . . . . . . . . . . . . . . . . . .375
䡵 RECREATIONAL TOWING (BEHIND

MOTORHOME, ETC.) . . . . . . . . . . . . . . . . . . . .376

▫ Towing This Vehicle Behind Another Vehicle. . . .376
▫ Recreational Towing — Two Wheel Drive

Models . . . . . . . . . . . . . . . . . . . . . . . . . . . . . .377

▫ Recreational Towing — Quadra-Trac I (Single-Speed

Transfer Case) Four-Wheel Drive Models . . . . . .378

▫ Recreational Towing — Quadra–Trac II/Quadra–

Drive II Four-Wheel Drive Models . . . . . . . . . . .378

䡵 DRIVING TIPS . . . . . . . . . . . . . . . . . . . . . . . . . .382

▫ On-Road Driving Tips . . . . . . . . . . . . . . . . . . .382
▫ Off-Road Driving Tips . . . . . . . . . . . . . . . . . . .383

252

STARTING AND OPERATING

STARTING THE ENGINE — GAS

Before starting your vehicle, adjust your seat, adjust the
inside and outside mirrors, fasten your seat belt, and if
present, instruct all other occupants to buckle their seat
belts.

WARNING!

• Before exiting a vehicle, always come to a complete

stop, then shift the automatic transmission into
PARK and apply the parking brake.

• Always make sure the keyless ignition node is in the

OFF mode, key fob is removed from the vehicle and
vehicle is locked.

• Never leave children alone in a vehicle, or with

access to an unlocked vehicle. Leaving children in a
vehicle unattended is dangerous for a number of
reasons. A child or others could be seriously or
fatally injured. Children should be warned not to
touch the parking brake, brake pedal or the gear
selector.

(Continued)

WARNING! (Continued)

• Do not leave the key fob in or near the vehicle, or in

a location accessible to children, and do not leave the
ignition of a vehicle equipped with Keyless Enter-
N-Go in the ACC or ON/RUN mode. A child could
operate power windows, other controls, or move the
vehicle.

• Do not leave children or animals inside parked

vehicles in hot weather. Interior heat build-up may
cause serious injury or death.

Automatic Transmission

The gear selector must be in the NEUTRAL or PARK
position before you can start the engine. Apply the brakes
before shifting into any driving gear.

CAUTION!

Damage to the transmission may occur if the following
precautions are not observed:
• Do not shift from REVERSE, PARK, or NEUTRAL

into any forward gear when the engine is above idle
speed.

(Continued)

6

STARTING AND OPERATING

253

CAUTION! (Continued)

• Shift into PARK only after the vehicle has come to a

complete stop.

• Shift into or out of REVERSE only after the vehicle

has come to a complete stop and the engine is at idle
speed.

• Before shifting into any gear, make sure your foot is

firmly on the brake pedal.

Normal Starting

To Turn On The Engine Using The ENGINE START/
STOP Button

1. The transmission must be in PARK or NEUTRAL.

2. Press and hold the brake pedal while pushing the

ENGINE START/STOP button once.

3. The system takes over and attempts to start the vehicle.

If the vehicle fails to start, the starter will disengage
automatically after 10 seconds.

4. If you wish to stop the cranking of the engine prior to

the engine starting, push the button again.

NOTE:

Normal starting of either a cold or a warm engine

is obtained without pumping or pressing the accelerator
pedal.

To Turn Off The Engine Using ENGINE START/STOP
Button

1. Place the gear selector in PARK, then push and release

the ENGINE START/STOP button.

2. The ignition will return to the OFF mode.

3. If the gear selector is not in PARK (with vehicle stopped)

and the ENGINE START/STOP button is pushed once,
the transmission will automatically select PARK and the
engine will turn off, however the ignition will remain in
the ACC mode (NOT the OFF mode). Never leave a
vehicle out of the PARK position, or it could roll.

4. If the gear selector is in NEUTRAL, and the vehicle

speed is below 5 mph (8 km/h), pushing the START/
STOP button once will turn the engine off. The ignition
will remain in the ACC mode.

254

STARTING AND OPERATING

5. If the vehicle speed is above 5 mph (8 km/h), the

ENGINE START/STOP button must be held for two
seconds (or three short pushes in a row) to turn the
engine off. The ignition will remain in the ACC mode
(NOT the OFF mode) if the engine is turned off when
the transmission is not in PARK.

NOTE:

The system will automatically time out and the

ignition will cycle to the OFF mode after 30 minutes of
inactivity if the ignition is left in the ACC or RUN (engine
not running) mode and the transmission is in PARK.

ENGINE START/STOP Button Functions — With Driv-
er’s Foot OFF The Brake Pedal (In PARK Or NEUTRAL
Position)

The ENGINE START/STOP button operates similar to an
ignition switch. It has three modes: OFF, ACC, and RUN.
To change the ignition modes without starting the vehicle
and use the accessories, follow these steps:

1. Starting with the ignition in the OFF mode,

2. Push the ENGINE START/STOP button once to place

the ignition to the ACC mode (instrument cluster will
display “ACC”),

3. Push the ENGINE START/STOP button a second time

to place the ignition to the RUN mode (instrument
cluster will display “ON/RUN”),

4. Push the ENGINE START/STOP button a third time to

return the ignition to the OFF mode (instrument cluster
will display “OFF”).

NOTE:

Only press one pedal at a time while driving the

vehicle. Torque performance of the vehicle could be re-
duced if both pedals are pressed at the same time. If
pressure is detected on both pedals simultaneously, a
warning message will display in the instrument cluster. For
further information, refer to “Instrument Cluster Display”
in “Getting To Know Your Instrument Panel”.

AutoPark

AutoPark is a supplemental feature to assist in placing the
vehicle in PARK should the situations on the following
pages occur. It is a back up system and should not be relied
upon as the primary method by which the driver shifts the
vehicle into PARK.

The conditions under which AutoPark will engage are
outlined on the following pages.

6

STARTING AND OPERATING

255

WARNING!

• Driver inattention could lead to failure to place the

vehicle in PARK. ALWAYS DO A VISUAL CHECK
that your vehicle is in PARK by verifying that a solid
(not blinking) “P” is indicated in the instrument
cluster display and on the gear selector. If the

P

indicator is blinking, your vehicle is not in PARK. As
an added precaution, always apply the parking brake
when exiting the vehicle.

• AutoPark is a supplemental feature. It is not de-

signed to replace the need to shift your vehicle into
PARK. It is a back up system and should not be
relied upon as the primary method by which the
driver shifts the vehicle into PARK.

If the vehicle is not in PARK and the driver turns off the
engine, the vehicle may AutoPark.

AutoPark will engage when all of these conditions are met:
• Vehicle is equipped with an 8-speed transmission
• Vehicle is not in PARK
• Vehicle Speed is 1.2 MPH (1.9 km/h) or less
• Ignition switched from RUN to ACC

NOTE:

For Keyless Go equipped vehicles, The engine will

turn off and the ignition switch will change to ACC mode.
After 30 minutes the ignition switches to OFF automati-
cally, unless the driver turns the ignition switch OFF.

If the vehicle is not in PARK and the driver exits the
vehicle with the engine running, the vehicle may Au-
toPark.

AutoPark will engage when all of these conditions are met:
• Vehicle is equipped with an 8-speed transmission
• Vehicle is not in PARK
• Vehicle Speed is 1.2 MPH (1.9 km/h) or less
• Driver’s seat belt is unbuckled
• Driver’s door is ajar
• Brake Pedal is not depressed

The MESSAGE “ AutoPark Engaged Shift to P then Shift
to Gear

”will display in the instrument cluster.

NOTE:

In some cases the ParkSense graphic will be

displayed in the instrument cluster. In these cases, the
shifter must be returned to “P” to select desired gear.

256

STARTING AND OPERATING

If the driver shifts into PARK while moving, the vehicle
may AutoPark.

AutoPark will engage ONLY when vehicle speed is
1.2 MPH (1.9 km/h) or less.

The MESSAGE “ Vehicle Speed is Too High to Shift to
P

”will be displayed in the instrument cluster if vehicle

speed is above 1.2 MPH (1.9 km/h).

WARNING!

If vehicle speed is above 1.2 MPH (1.9 km/h), the
transmission will default to NEUTRAL until the ve-
hicle speed drops below 1.2 MPH (1.9 km). A vehicle
left in the NEUTRAL position can roll. As an added
precaution, always apply the parking brake when
exiting the vehicle.

4WD LOW — If Equipped

AutoPark will be disabled when operating the vehicle in
4WD LOW.

The MESSAGE “ AutoPark Disabled” will be displayed in
the instrument cluster.

Additional customer warnings will be given when both
of these conditions are met:
• Vehicle is not in PARK
• Driver’s Door is ajar

The MESSAGE “ AutoPark Not Engaged” will be dis-
played in the instrument cluster. A warning chime will
continue until you shift the vehicle into PARK or the
Driver’s Door is closed.

ALWAYS DO A VISUAL CHECK

that your vehicle is in

PARK by looking for the

⬙P⬙ in the instrument cluster

display and on the shifter. As an added precaution, always
apply the parking brake when exiting the vehicle.

If Engine Fails To Start

If the engine fails to start after you have followed the

⬙Normal Starting⬙ or ⬙Extreme Cold Weather⬙ procedure it
may be flooded. Push the accelerator pedal all the way to
the floor and hold it there. Crank the engine for no more
than 15 seconds. This should clear any excess fuel in case
the engine is flooded. Leave the ignition key in the RUN
position, release the accelerator pedal and repeat the “Nor-
mal Starting” procedure.

6

STARTING AND OPERATING

257

WARNING!

• Never pour fuel or other flammable liquid into the

throttle body air inlet opening in an attempt to start
the vehicle. This could result in flash fire causing
serious personal injury.

• Do not attempt to push or tow your vehicle to get it

started. Vehicles equipped with an automatic trans-
mission cannot be started this way. Unburned fuel
could enter the catalytic converter and once the
engine has started, ignite and damage the converter
and vehicle.

• If the vehicle has a discharged battery, booster cables

may be used to obtain a start from a booster battery
or the battery in another vehicle. This type of start
can be dangerous if done improperly. Refer to “Jump
Starting Procedure” in “In Case Of Emergency” for
further information.

CAUTION!

To prevent damage to the starter, do not continuously
crank the engine for more than 25 seconds at a time.
Wait 60 seconds before trying again.

Cold Weather Operation (Below –22°F Or −30°C)

To ensure reliable starting at these temperatures, use of an
externally powered electric engine block heater (available
from your authorized dealer) is recommended.

After Starting

The idle speed is controlled automatically, and it will
decrease as the engine warms up.

ENGINE BLOCK HEATER — IF EQUIPPED

The engine block heater warms the engine, and permits
quicker starts in cold weather. Connect the cord to a
standard 110-115 Volt AC electrical outlet with a grounded,
three-wire extension cord.

The engine block heater must be plugged in at least one
hour to have an adequate warming effect on the engine.

The engine block heater cord is located:
• 3.6L Engine — Coiled and strapped to the engine oil

dipstick tube.

• 5.7L Engine — Bundled and fastened to the injector

harness.

258

STARTING AND OPERATING

WARNING!

Remember to disconnect the engine block heater cord
before driving. Damage to the 110-115 Volt electrical
cord could cause electrocution.

ENGINE BREAK-IN RECOMMENDATIONS — 3.6L &
5.7L ENGINES

A long break-in period is not required for the drivetrain
(engine, transmission, clutch, and rear axle) in your new
vehicle.

Drive moderately during the first 300 miles (500 km). After
the initial 60 miles (100 km), speeds up to 50 or 55 mph (80
or 90 km/h) are desirable.

While cruising, brief full-throttle acceleration within the
limits of local traffic laws contributes to a good break-in.
However, wide-open throttle acceleration in low gear can
be detrimental and should be avoided.

The engine oil, transmission fluid, and axle lubricant
installed at the factory is high-quality and energy-
conserving. Oil, fluid, and lubricant changes should be
consistent with anticipated climate and conditions under
which vehicle operations will occur. For the recommended
viscosity and quality grades, refer to “Fluids And Lubri-
cants” in

⬙Technical Specifications”.

CAUTION!

Never use Non-Detergent Oil or Straight Mineral Oil
in the engine or damage may result.

NOTE:

A new engine may consume some oil during its

first few thousand miles (kilometers) of operation. This
should be considered a normal part of the break-in and not
interpreted as an indication of difficulty. Please check your
oil level with the engine oil indicator often during the
break in period. Add oil as required.

6

STARTING AND OPERATING

259


Content   ..  14  15  16  17   ..