Jeep Grand Cherokee WJ. Manual - part 68
(5) Remove the mounting bolts form the shroud
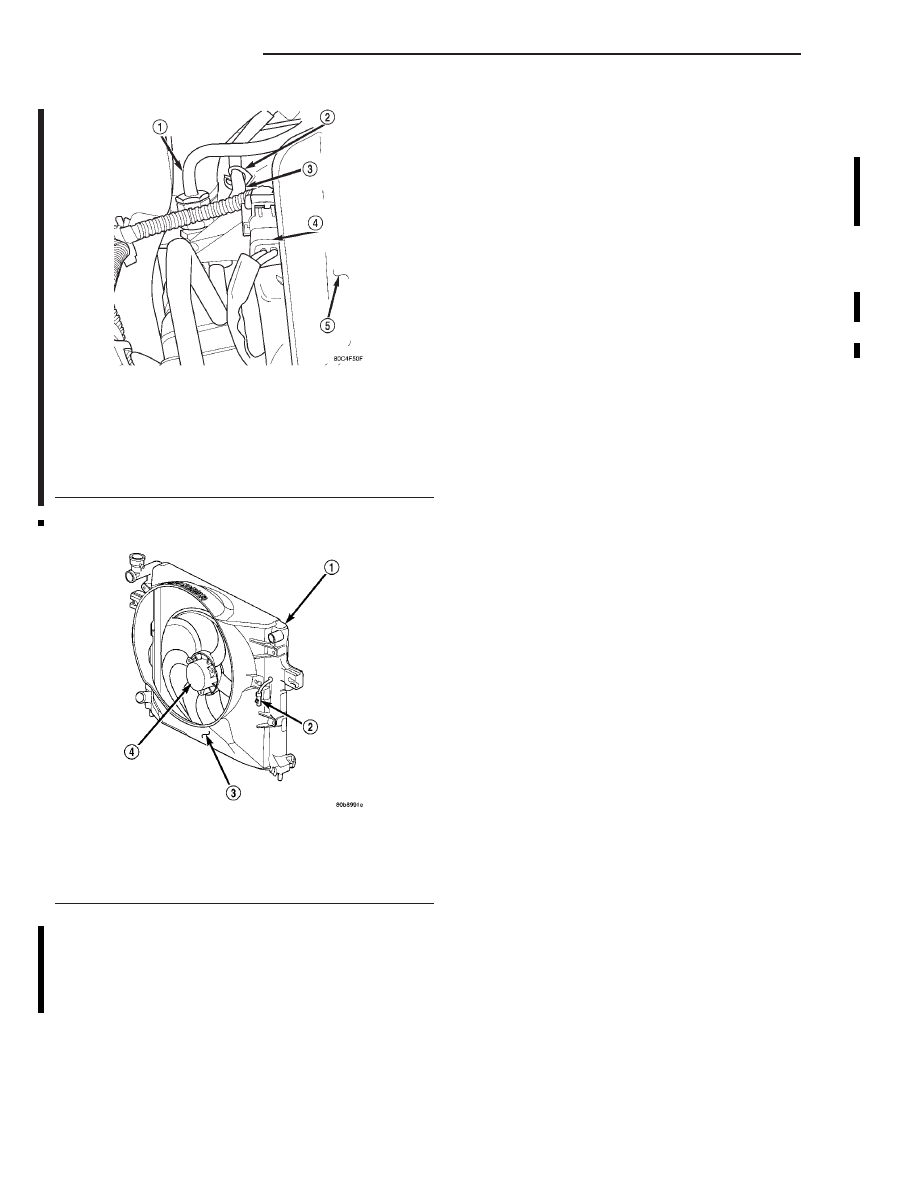
(Fig. 41).
(6) Remove the radiator core support.
(7) Remove the radiator mounting bolts.
(8) Gently pull radiator toward front of vehicle to
provide clearance to remove fan shroud.
(9) Remove the shroud and fan from vehicle.
INSTALLATION
NOTE: The fan can not be installed seperate from
the shroud. Both fan and shroud must be installed
together.
(1) Carefully position the viscous fan into the
shroud, then position the shroud and fan into the
vehicle.
(2) Install radiator mounting bolts.
(3) Reconnect transmission oil cooler line to retain-
ing clip (Fig. 40A).
(4) Install radiator core support.
NOTE: The lower left side mounting bolt can only
be accessed from under vehicle.
(5) Install the mounting bolts into the shroud
(6) Attach the electrical connector onto the shroud,
then connect the connector to the electric fan connector.
(7) Install the viscous fan onto the water pump.
Using special tool 6958 Spanner Wrench and 8346
Adapters, tighten the viscous fan onto the water
pump (Fig. 40).
RADIATOR
REMOVAL
WARNING: DO
NOT
REMOVE
THE
CYLINDER
BLOCK DRAIN PLUGS OR LOOSEN THE RADIATOR
DRAINCOCK WITH THE SYSTEM HOT AND UNDER
PRESSURE. SERIOUS BURNS FROM COOLANT
CAN OCCUR. REFER TO COOLING SYSTEM DRAIN-
ING IN THIS GROUP.
Do not waste reusable coolant. If the solution is
clean, drain the coolant into a clean container for reuse.
WARNING: CONSTANT TENSION HOSE CLAMPS
ARE USED ON MOST COOLING SYSTEM HOSES.
WHEN REMOVING OR INSTALLING, USE ONLY
TOOLS DESIGNED FOR SERVICING THIS TYPE OF
CLAMP, SUCH AS SPECIAL CLAMP TOOL (NUMBER
6094) (Fig. 42). SNAP-ON CLAMP TOOL (NUMBER
HPC-20) MAY BE USED FOR LARGER CLAMPS.
ALWAYS WEAR SAFETY GLASSES WHEN SERVIC-
ING CONSTANT TENSION CLAMPS.
CAUTION: A number or letter is stamped into the
tongue of constant tension clamps (Fig. 43). If
replacement is necessary, use only an original
equipment clamp with matching number or letter.
CAUTION: When removing the radiator or A/C con-
denser for any reason, note the location of all radi-
ator-to-body and radiator-to-A/C condenser rubber
air seals (Fig. 44). These are used at the top, bot-
tom and sides of the radiator and A/C condenser.
To
prevent
overheating,
these
seals
must
be
installed to their original positions.
(1) Disconnect the negative battery cable at bat-
tery.
Fig. 40A Transmission Oil Cooler Line Retaining
Clip and Electric Fan Electrical Connector
1 – TRANSMISSION OIL COOLER LINE
2 – CLIP
3 – TRANSMISSION OIL COOLER LINE
4 – ELECTRIC FAN ELECTRICAL CONNECTOR
5 – FAN SHROUD
Fig. 41 Fan Shroud and Electric Fan 4.7L Engine
1 – RADIATOR
2 – ELECTRIC COOLING FAN CONNECTOR
3 – FAN SHROUD
4 – ELECTRIC COOLING FAN
7 - 34
COOLING SYSTEM
WJ
REMOVAL AND INSTALLATION (Continued)
2000 WJ Service Manual
Publication No. 81-370-0047
TSB 26-03-00
March, 2000