Jaguar X-Type Sedan and Estate (Wagon). Manual - part 379
 

  Index      Jaguar     Jaguar X-Type Sedan and Estate (Wagon) (2.0 L, 2.5 L and 3.0 L Gasoline; 2.0 L and 2.2 L, Diesel) - manual 2001-2009 year


Search            


Content   ..  377  378  379  380   ..


Jaguar X-Type Sedan and Estate (Wagon). Manual - part 379


Published: 11-May-2011

Automatic Transmission/Transaxle - Vehicles With: 6-Speed Automatic Transaxle -
AWF21 - Transmission Fluid Drain and Refill

General Procedures

WARNING: Observe due care when draining, as the fluid can be very hot.

1. Ensure that the automatic transmission is in 'P' and the handbrake is

fully applied.

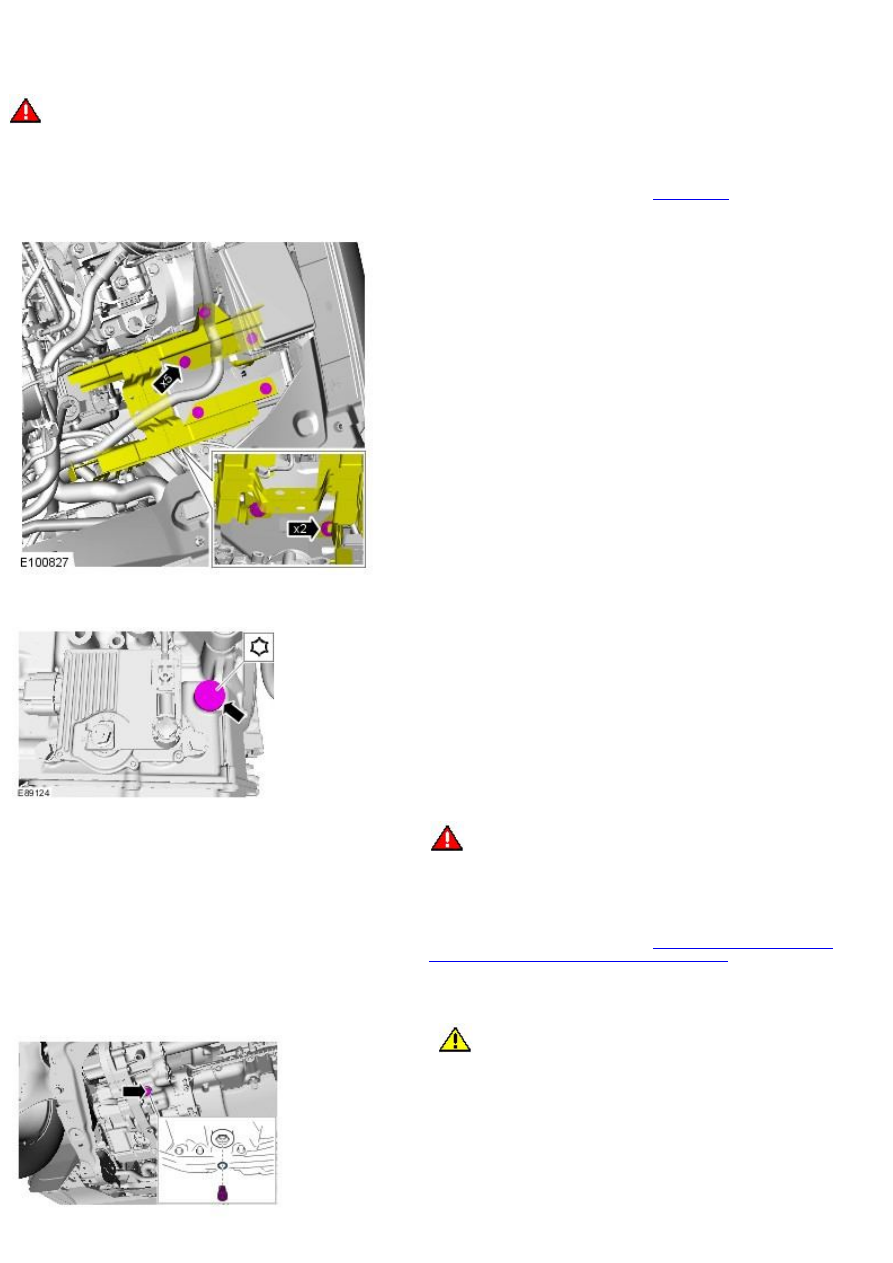
2. Remove the battery tray.

For additional information, refer to: 

Battery Tray

 (414-01 Battery,

Mounting and Cables, Removal and Installation).

3. Release the battery carrier bracket and position aside.

4. Clean the area around the transmission fluid filler plug.

5. Remove the transmission fluid filler plug.

6. 

W ARNING: Do not work on or under a vehicle supported only by a

jack. Always support the vehicle on safety stands.

• NOTE: Make sure that the vehicle is standing on a level surface.

Raise and support the vehicle.

7. Remove the air deflector.

For additional information, refer to: 

Air Deflector - 2.0L Duratorq-

TDCi/2.2L Duratorq-TDCi (110kW /150PS) - Puma

 (501-02 Front End Body

Panels, Removal and Installation).

8. Clean the area around the transmission fluid level and drain plugs.

9. Place a container under the transmission.

10. 

CAUTION: The fluid level plug and drain plug both use the same

point on the transmission. The inner plug is for level indication and the
outer plug is to drain the fluid.

Remove the transmission fluid level plug.

11. Remove the transmission fluid drain plug.

Allow the transmission fluid to drain.

12. NOTE: Install a new gasket.

Install the transmission fluid drain plug.

Tighten to 47 Nm.

13. Lower the vehicle.

14. Fill the transmission with the correct fluid until it runs from the level

plug.

15. Install the transmission fluid level plug.

Tighten to 7 Nm.

16. Add an additional 0.5 litres of transmission fluid.

17. 

CAUTION: A new O-ring seal is to be installed.

Install the transmission fluid filler plug.

Tighten to 40 Nm.

18. Secure the battery carrier bracket.

Tighten to 25 Nm.

19. Install the battery tray.

For additional information, refer to: 

Battery Tray

 (414-01 Battery,

Mounting and Cables, Removal and Installation).

20. Connect the Jaguar approved diagnostic equipment. Start and run the

engine.

21. Using the diagnostic equipment to monitor the transmission fluid

temperature, allow the temperature to reach 60 degrees C.

22. Move the selector lever from 'P' through all the gear positions, pausing

in each gear position for 2-3 seconds and return to the 'P' position.

23. Raise the vehicle.

24. Remove the transmission fluid level plug.

25. With the engine running a small amount of fluid should drip out of the

level plug.

26. 

CAUTION: A new O-ring seal is to be installed.

Install the transmission fluid level plug.

Tighten to 7 Nm.

27. Install the air deflector.

For additional information, refer to: 

Air Deflector - 2.0L Duratorq-

TDCi/2.2L Duratorq-TDCi (110kW /150PS) - Puma

 (501-02 Front End Body

Panels, Removal and Installation).

Published: 11-May-2011

Automatic Transmission/Transaxle - Vehicles With: 6-Speed Automatic Transaxle -
AWF21 - Transmission Fluid Level Check

General Procedures

WARNING: Observe due care when draining, as the fluid can be very hot.

1. Ensure that the automatic transmission is in 'P' and the handbrake is

fully applied.

2. Remove the battery tray.

For additional information, refer to: 

Battery Tray

 (414-01 Battery,

Mounting and Cables, Removal and Installation).

3. Release the battery carrier bracket and position aside.

4. Clean the area around the transmission fluid filler plug.

5. 

CAUTION: The fluid level plug and drain plug both use the same

point on the transmission. The inner plug is for level indication and the
outer plug is to drain the fluid.

Remove the transmission fluid filler plug.

6. 

W ARNING: Do not work on or under a vehicle supported only by a

jack. Always support the vehicle on safety stands.

• NOTE: Make sure that the vehicle is standing on a level surface.

Raise and support the vehicle.

7. Remove the air deflector.

For additional information, refer to: 

Air Deflector - 2.0L Duratorq-

TDCi/2.2L Duratorq-TDCi (110kW /150PS) - Puma

 (501-02 Front End Body

Panels, Removal and Installation).

8. Clean the area around the transmission fluid level plug.

9. Place a container under the transmission.

10. Lower the vehicle.

11. Add 0.5 litres of transmission fluid.

12. 

CAUTION: A new O-ring seal is to be installed.

Install the transmission fluid filler plug.

Tighten to 40 Nm.


Content   ..  377  378  379  380   ..