Engine JAC HFC4DA1-2C. Manual - part 168
 

  Index      JAC     Engine JAC HFC4DA1-2C - service repair manual


Search            


Content   ..  166  167  168  169   ..


Engine JAC HFC4DA1-2C. Manual - part 168


BG

BG

BG

BG Body

Body

Body

Body Glass

Glass

Glass

Glass

- 5 -

Removal/Installation

Removal/Installation

Removal/Installation

Removal/Installation (Continued)

(Continued)

(Continued)

(Continued)

Front

Front

Front

Front windshield

windshield

windshield

windshield

5.

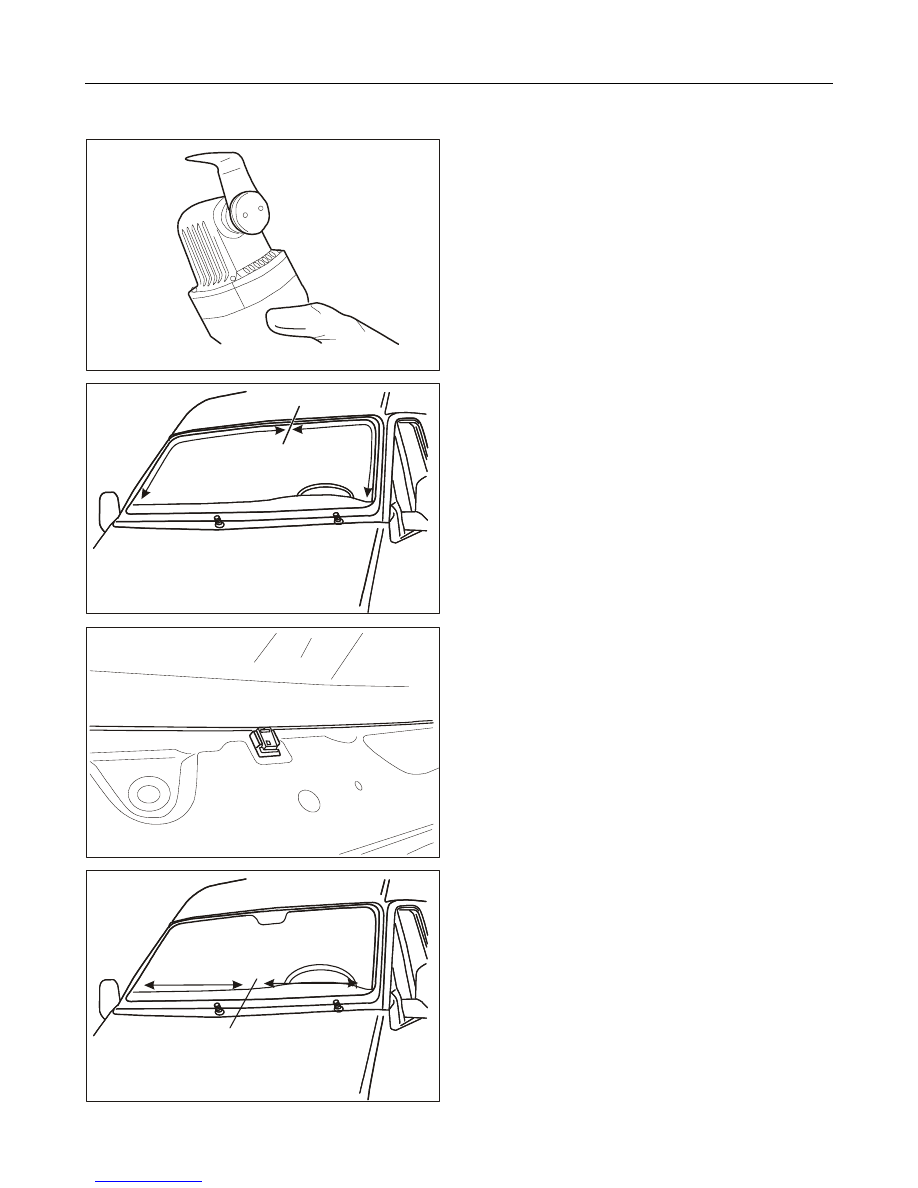
Install the precise cutting blade (24mm hook type
blade) onto the cutter.

Warning:

Warning:

Warning:

Warning:

When using tools for cutting glasses, please wear
gloves and goggles to avoid possible injury caused by
glass fragments generated during cutting.
Attention:

Attention:

Attention:

Attention:

In case of the windshield to be reused, it is prohibited to
use cutter or electric cutting tools.

6.

Cut one side and top side of glass sealant.
Cut the polyurethane sealant on the outside of
windshield from the left lower corner to the left
upper part and then from the upper part to the right
lower corner.

Note:

Note:

Note:

Note:

The windshield is positioned by two height adjustable
pieces installed on the bottom, which should be leveled
before cutting.

7.

Cut the glass sealant at the bottom part.

8.

Cut the glass sealant at the bottom part (continued).

Cut the sealant from the outside midpoint to both
sides.

9.

Take the windshield down carefully.

BG

BG

BG

BG Body

Body

Body

Body Glass

Glass

Glass

Glass

- 6 -

Removal/Installation

Removal/Installation

Removal/Installation

Removal/Installation (Continued)

(Continued)

(Continued)

(Continued)

Front

Front

Front

Front windshield

windshield

windshield

windshield

Installation
Note:

Note:

Note:

Note:

Don’t contact the already trimmed surface, otherwise,
bonding effect of new sealant may be influenced.
1.

Trim the side grooves.

Install the precise cutting blade.

Trim the polyurethane sealant remained on
grooves carefully, with polyurethane sealant
in thickness of 1mm left on the body for side
trimming.

2.

Wipe the glass clean.
Trim the polyurethane sealant remained on window
carefully, with polyurethane sealant in thickness of
1mm left on the glass for side trimming.

Caution:

Caution:

Caution:

Caution:

Glass primer contains solvent that can make the primer
hardened after volatilization but also can soften the
surface

coat

of

synthetic

paint,

therefore,

“ZK”

polypropylene surface paint mixed with hardener should
be applied around the window.

3.

Install the new height adjusting brackets onto the
bottom part of windshield.

Clamp the mark position of windshield center
groove.

Rotate two adjusting screws to lift the glass to
the uppermost.

Place the glass into window groove and
check if the clearance between glass top and
window groove is 2~4mm. Adjust when
necessary.

4.

Install the glass.

Mount the glass in place with center aligned.

Adjust glass based on window groove height
to ensure proper alignment. Adjust when
necessary.

Press the glass tightly into the sealant from
center part gradually to both sides.

Note:

Note:

Note:

Note:

Park the vehicle in the place with ambient temperature
of zero degree and don’t drive it 24h before complete
curing of carbamic acid ethyl ester adhesive. The curing
time is determined by temperature and humidity, which
shall be prolonged in case of low temperature and
humidity.

5.

Install remaining parts in reverse order of removal.

BG

BG

BG

BG Body

Body

Body

Body Glass

Glass

Glass

Glass

- 7 -

Removal/Installation

Removal/Installation

Removal/Installation

Removal/Installation

Front

Front

Front

Front triangle

triangle

triangle

triangle glass

glass

glass

glass

Removal
1.

Remove the rear-view mirror from the window.

2.

Remove the glass.
Compress the glass continuously and forcibly from
the inside upper corner.

3.

Peel off the seal.

Installation
1.

Insert a high strength cable into seal and window
groove to determine the end position of cable and
make it lapped at the corner part.

BG

BG

BG

BG Body

Body

Body

Body Glass

Glass

Glass

Glass

- 8 -

Removal/Installation

Removal/Installation

Removal/Installation

Removal/Installation (Continued)

(Continued)

(Continued)

(Continued)

Front

Front

Front

Front triangle

triangle

triangle

triangle glass

glass

glass

glass

2.

Reinstall the window.

Pass the cable through the window groove
and stick the lower edge of seal along the
edge of window groove.

Compress the outside of glass continuously
and forcibly and meanwhile draw one end of
the cable to press the seal onto the window
groove.

Repeat those action until the window is
properly installed and then check if the seal is
sealed properly.


Content   ..  166  167  168  169   ..