Iveco EuroCargo (12 to 26 t). Manual - part 187
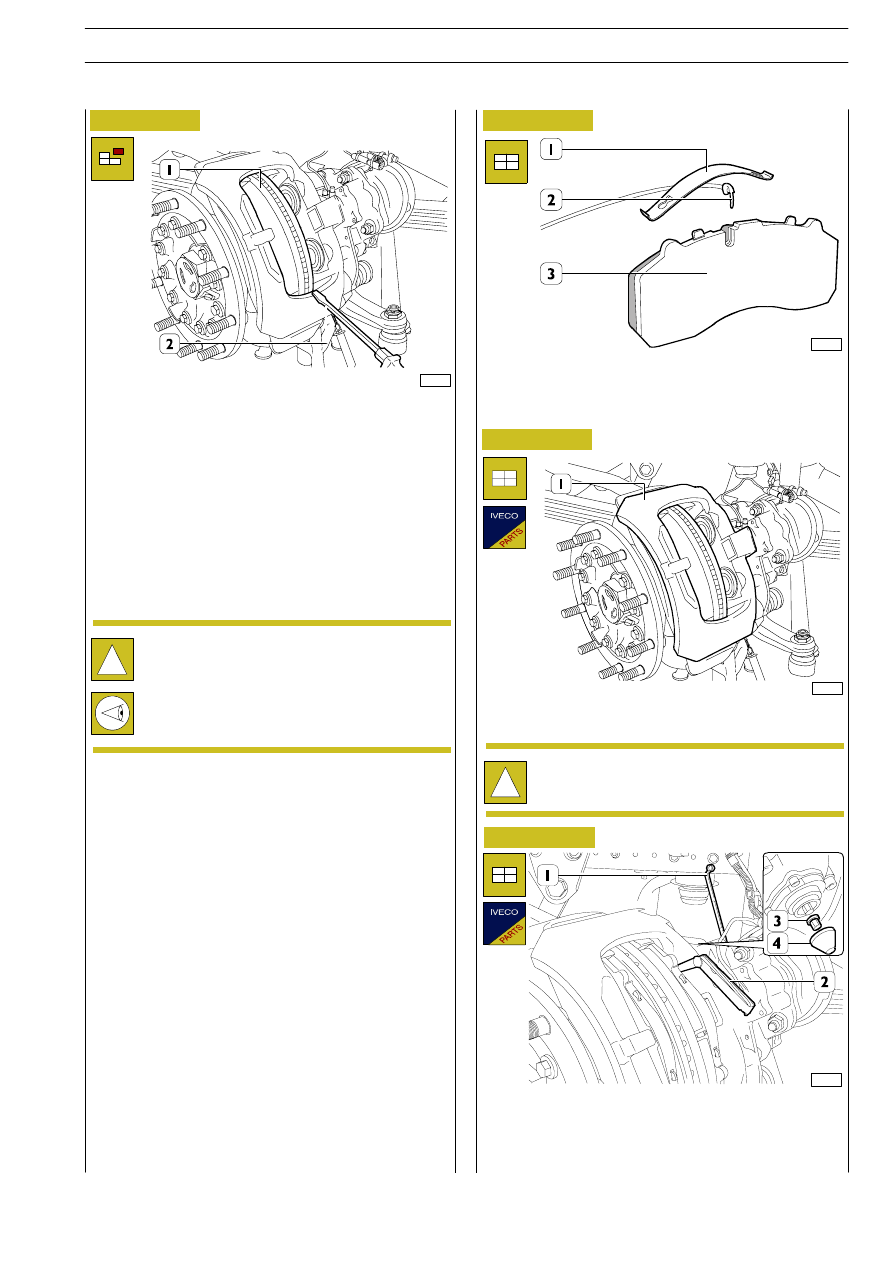
Insert wear sensor (2) into its suitable seat on braking gasket
(3).
Assemble spring (1) proceeding in reverse with respect to
disassembling.
49161
49162
49163
Figure 103
Figure 104
Figure 105
Figure 106
Remove dirt and rust around the braking disc edge with a
scraper or an old screwdriver (2), resting on the caliper body,
making disk (1) rotate.
End the work with abrasive cloth. Remove residuals by using
a suction device or with canvasses and brush.
Do not use petrol or other petroleum derivatives that could
create brake failures.
Use only denatured alcohol with methanol or isopropyl
alcohol.
Accurately clean brake disc braking area surfaces.
!
Visually check dust-guarding casings conditions; if they
show distortions or breakages, it is necessary to
replace them; such operation implies the need of
disassembling the brake caliper, so that it is advisable
to detach the brake caliper body completed with
carrier plate for the complete revision.
Verify that the caliper freely rotates on its guides.
If anomalies are detected on one brake caliper only, it is
advisable to proceed with the complete revision of both brake
calipers.
Remove dirt from brake caliper using a metal brush and
avoiding to damage dust-guarding casings.
Clean braking gaskets sliding surfaces.
Check brake disc conditions and make sure that it is not
corroded, scored or grooved. Slight surface cracks are
acceptable, but it is necessary to go on grinding the brake disc
as described in the related chapter, otherwise if worn, replace
the brake disc.
If there occurs the need of replacing, it is advisable to replace
both brake discs.
Check springs and wear sensors conditions, if necessary
replace them.
Insert new gaskets in brake caliper (1) and check that they
freely slide into their own seats.
!
If it is necessary to replace the pair of braking gaskets,
always replace a complete series of them for every
axle.
78624
Using the wrench (1), act on the adaptator retriever pin to get
a play not lower than 0.7 mm between brake lining and brake
disk, which can be measured using the thickness gauge (2).
Replace the cover (4) and lubricate it with white grease
RENOLIT HLT2.
E
URO
C
ARGO
T
ECTOR
12-26 t
PNEUMATIC SYSTEM - BRAKES
93
Base - February 2003