Isuzu Amigo / Axiom / Trooper / Rodeo / VehiCross. Manual - part 1679


  Index      Isuzu     Isuzu Amigo / Axiom / Trooper / Rodeo / VehiCross - service repair manual 1999-2002 year


Search            


Content   ..  1677  1678  1679  1680   ..


Isuzu Amigo / Axiom / Trooper / Rodeo / VehiCross. Manual - part 1679


EXTERIOR/INTERIOR TRIM

8J–23

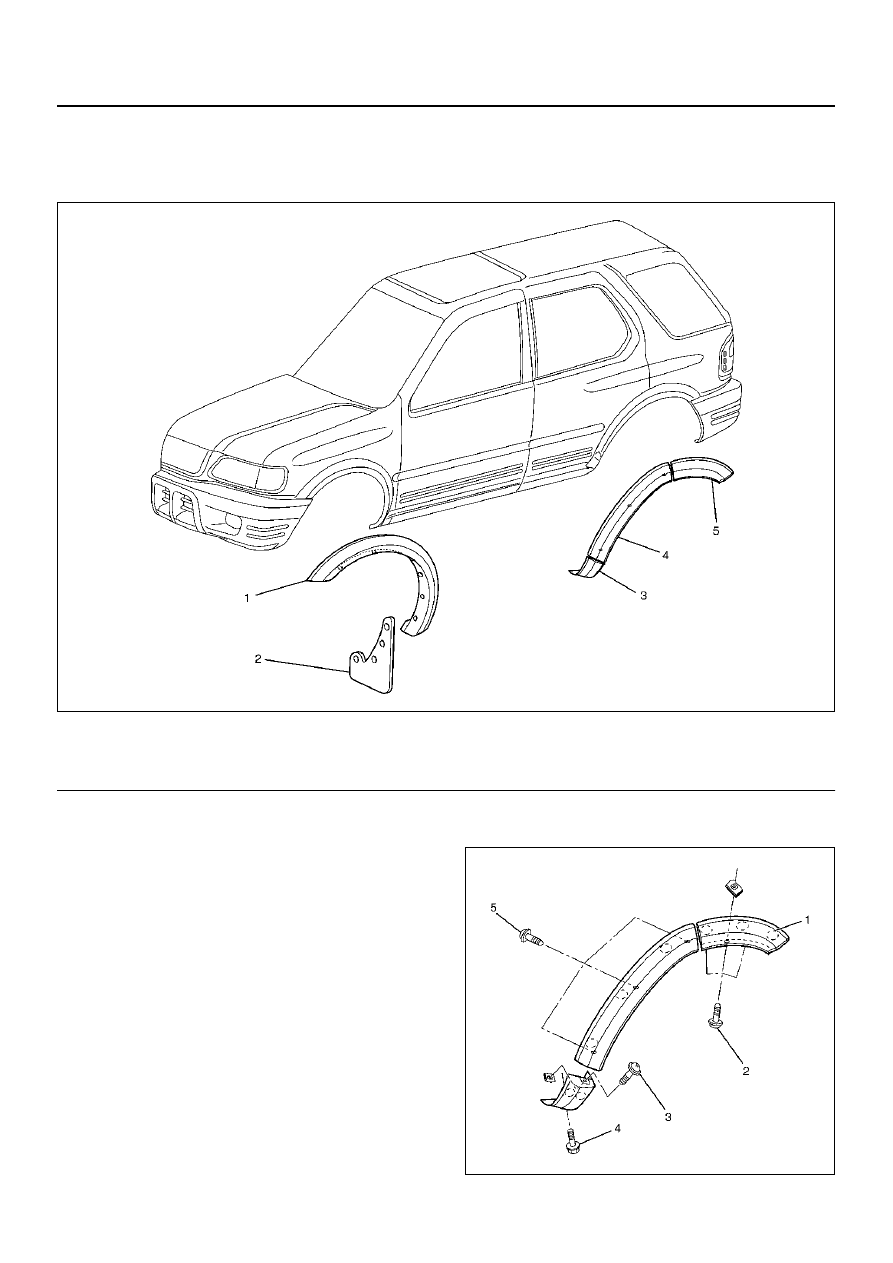
Wheel Arch Molding (LWB)

Wheel Arch Molding and Associated Parts

620RY00005

EndOFCallout

Removal

1. Remove the front mud flap and front wheel arch

molding.

• Refer to Wheel Arch Molding (SWB) in this

section.

2. Remove the rocker wheel arch extension.

• Remove the fixing bolt (4) and screw (3). Pull out

the extension with the two clips (1) from the
rocker outer panel.

3. Remove the quarter panel wheel arch molding.

• Remove the three fixing screws (2) and pull out

the molding with the three clips (1) from the
quarter outer panel.

4. Remove the rear wheel arch molding.

• Remove the three fixing screws (5) of the back of

the door panel and pull out the molding with the
three clips (1) from the door outer panel.

620RY00003

Legend

(1) Front Wheel Arch Molding
(2) Front Mud Flap

(3) Rocker Wheel Arch Extension
(4) Rear Wheel Arch Molding
(5) Quarter Panel Wheel Arch Molding

8J–24

EXTERIOR/INTERIOR TRIM

Installation

To install, follow the removal steps in the reverse order.

Fuel Filler Door

Parts Location

686RW010

EndOFCallout

Removal

1. Open the fuel filler door.

2. Remove the fuel filler door.

• Remove the two fixing screws.

3. Pull out the fuel filler door buffer.

4. Pull out the fuel filler hinge buffer.

Installation

To install, follow the removal steps in the reverse order,
noting the following points.

1. Install the fuel filler door to match the basic hole.

2. Adjust the clearance between outer quarter panel

(1) and fuel filler door (2).

686RX003

Legend

(1) Fuel Filler Door Fixing Screw
(2) Basic Hole
(3) Fuel Filler Door Buffer
(4) Fuel Filler Door
(5) Fuel Filler Door Hinge Buffer

EXTERIOR/INTERIOR TRIM

8J–25

Roof Rail

Parts Location

660R100001

EndOFCallout

Removal

1. Remove the front and rear roof rail cover.

• Pry the roof rail covers.

2. Remove the roof rail sub assembly.

• Remove the four fixing bolts at each roof rail.

Installation

To install, follow the removal steps in the reverse order,
noting the following points.

1. Tighten the roof rail sub assembly fixing bolts to the

specified torque.

Torque 8 N·m (69 lb in)

Legend

(1) Roof Rail Fixing Bolt
(2) Rear Roof Rail Cover

(3) Roof Rail Sub Assembly
(4) Front Roof Rail Cover

8J–26

EXTERIOR/INTERIOR TRIM

License Plate Garnish

Parts Location

803RY00004

EndOFCallout

Removal

1. Disconnect the battery ground cable.

2. Remove the license plate light.

• Remove the left and right license plate light fixing

screws. Disconnect the harness connectors.

3. Remove the tailgate trim cover assembly (3).

• Remove the two screws (2) holding the hatchgate

lock assembly (1) first and the two screws fixing
the trim cover assembly. Pull up the trim cover
while detaching the clips from tailgate panel.

683RW001

Legend

(1) Tailgate Trim Cover Assembly
(2) Tailgate Assembly
(3) Clip

(4) License Plate Garnish Assembly
(5) License Plate Light Assembly
(6) License Plate Light Harness Connector


Content   ..  1677  1678  1679  1680   ..