Isuzu KB P190. Manual - part 130
 

  Index      Isuzu     Isuzu KB P190 - service repair manual 2007 year


Search            


Content   ..  128  129  130  131   ..


Isuzu KB P190. Manual - part 130


4C1-16  FRONT WHEEL DRIVE 


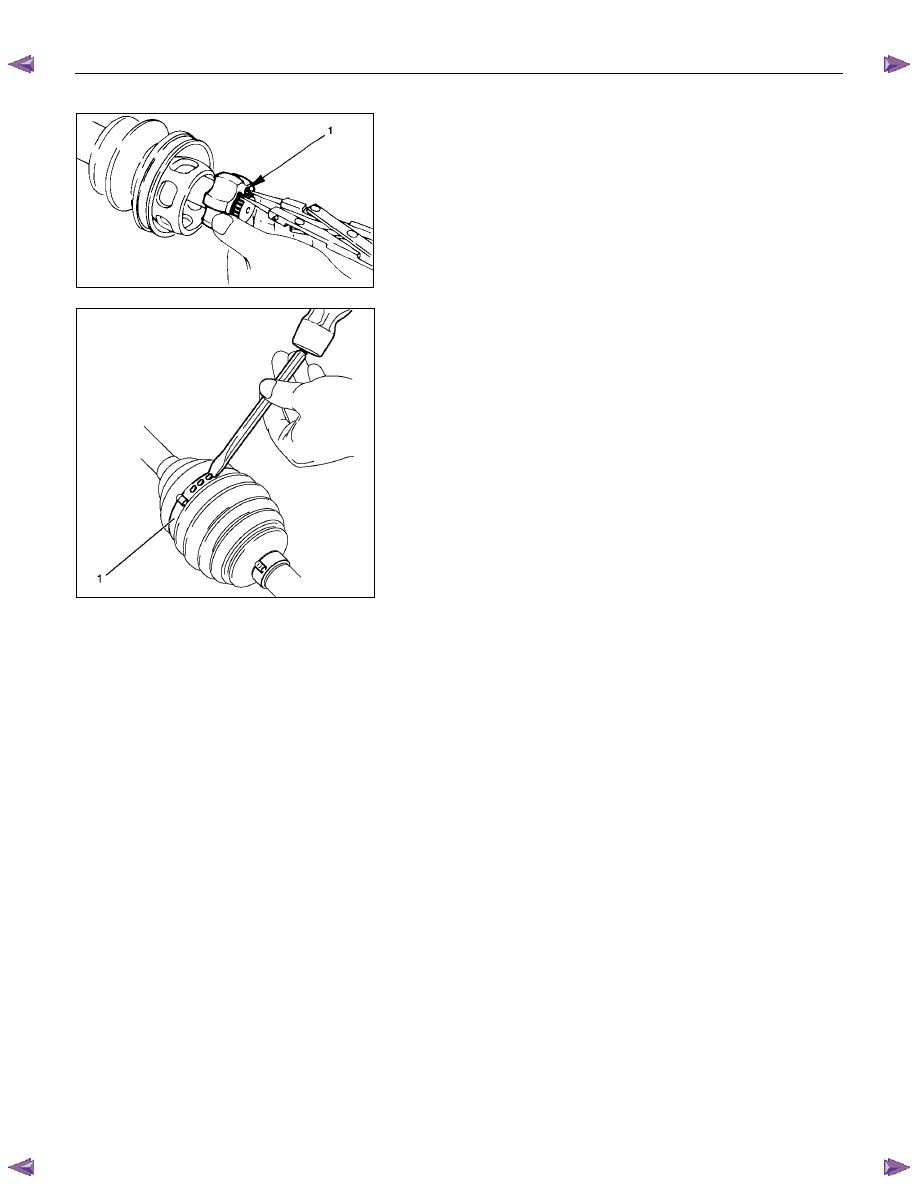
6.  Using snap ring pliers, remove the snap ring (1) fastening 

the ball retainer to the center shaft. 

7.  Remove ball retainer, ball guide and bellows. 


8.  Use a hammer and chisel to remove the 3 pawls (above 

the large and small boot bands on the UJ side). 

CAUTION :  

Take care not to damage the bellows during band removal.


9.  Remove band (1). 

10. Remove bellows. 

11. Remove dust seal from UJ. 

12. Remove UJ shaft assembly. 

13. Remove the mounting bracket fixing bolts, and then 

remove DOJ case assembly from the axle case. 

14. Remove snap ring and bearing. 

15. Remove snap ring and oil seal. 

16. Remove bracket. 


Inspection and Repair 

Make necessary correction or parts replacement if wear, 
damage, corrosion or any other abnormal condition are found 
through inspection. 

Check the following parts. 

1.  Drive shaft joint assembly 

2.  DOJ case, ball, ball guide, ball retainer 

3. Bellows 

4. Bearing 

5.  Dust seal, oil seal 


FRONT WHEEL DRIVE  4C1-17 


Bushing Replacement 

•  Remove the bushings using a remover 5-8840-2309-0 and 

hammer. 


•  By using installer and base 5-8840-2309-0, press fit the 

bushings into the bracket. 


Reassembly 

1.  Install DOJ case to bracket. 

2.  Install oil seal and fix snap ring. 


Discard the used oil seal, snap ring and install a new one. 

3.  Install bearing and fix snap ring. 


Discard the used snap ring and install a new one. 

4.  Install bracket to axle case. Tighten the bracket bolt to the

specified torque. 


Torque : 116 N·m (11.8kgf·m/85 lb·ft) 

5.  Apply 135g of the specified grease in UJ. 

6.  Install dust seal for UJ. 


Discard the used dust seal and install a new one. 


Legend 


1. 

Bellows 


2. 

Shaft 


7.  Apply a thin coat of grease to the shaft for smooth

installation then install bellows. 

CAUTION :  

During bellows assembly, be sure to insert both ends of 
the bellows into the case and shaft grooves. 


4C1-18  FRONT WHEEL DRIVE 


Legend 

    1. UJ Case 


2. 

Bellows 


8. Install band. Note the setting direction. After installation,

check Standard Caulk Measure. 


Discard the used band and install a new one. 


Use the special tool pliers 5-8840-2745-0 to caulk the band 

to the specified value. 


For both sides on UJ bellows. 


Standard Caulk Measure 


•  1.2mm (0.05in) <= (1), (2) <= 4.0mm (0.16in) 


•   (1) - (2) or (2) - (1) <= 0.4mm (0.016in) 

9.  Install another bellows and fix band. 


Discard the used band and install a new one. 

10. Install the ball guide with the smaller diameter side ahead

onto the shaft. 

11. Install ball retainer. 


12. Using snap ring pliers, install the snap ring (1) securing the 

ball retainer to the shaft. 


Discard the used snap ring and install a new one. 


FRONT WHEEL DRIVE  4C1-19 


13. Align the track on the ball (1) retainer with the window in 

the cage, and install the six balls into position. 


14. Pack 150g (5.3 oz) of the specified grease in DOJ case, 

then install drive shaft joint assembly. After reassembly, 
move the DOJ longitudinally several times to get to fit. 


15. Install the circlip (1) so that open ends are positioned away 

from the ball groove. 


Discard the used circlip and install a new one. 


Legend 

    1. Outer Case 


2. 

Circlip 

    3. Open Ends 


16. Install band. After installation, check that the bellows is free 

from distortion. 


Discard the used band and install a new one. 


Use the special tool pliers 5-8840-2745-0 to caulk the band 
to the specified valve. 


For both sides on UJ bellows. 


Content   ..  128  129  130  131   ..