Infiniti QX80 (2018 year). Manual - part 2


  Index      Infiniti     Infiniti QX80 (2018 year) - manual in english


Search            copyright infringement  


Content      ..      1      2      3      ..


Infiniti QX80 (2018 year). Manual - part 2


1-4

Safety — seats, seat belts and supplemental restraint system

FRONT SEATS

Front power seat adjustment

Operating tips:
. The power seat motor has an auto-reset

overload protection circuit. If the motor
stops during operation, wait 30 seconds,
then reactivate the switch.

. Do not operate the power seat switch for

a long period of time when the engine is
off. This will discharge the battery.

See “Automatic drive positioner” (P.3-39)
for the seat position memory function.

CAUTION

When adjusting the seat positions, be
sure not to contact any moving parts to
avoid possible injuries and/or damages.

SSS1051

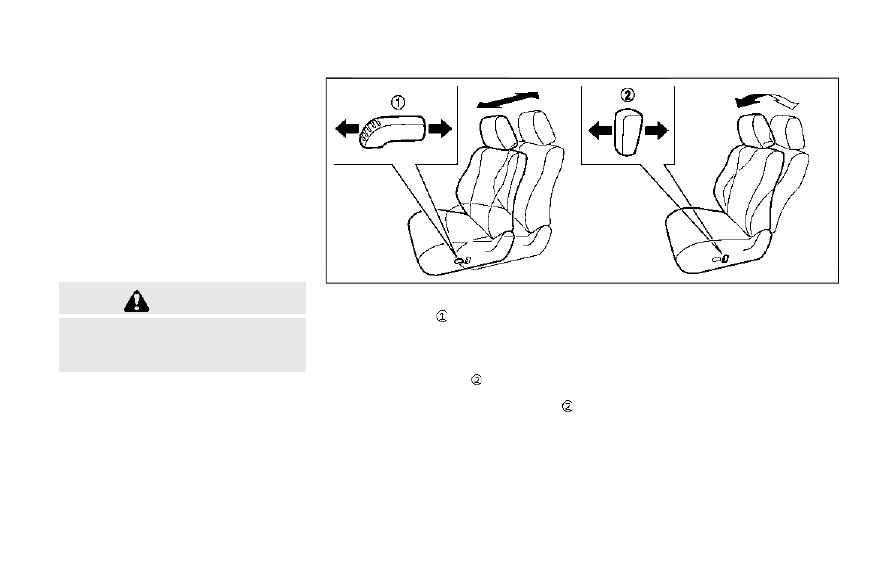
Forward and backward:
Moving the switch

forward or backward

will slide the seat forward or backward to
the desired position.

Reclining:
Move the recline switch

backward until

the desired angle is obtained. To bring the
seatback forward again, move the switch
forward.
The reclining feature allows adjustment of
the seatback for occupants of different sizes
for added comfort and to help obtain proper
seat belt fit. (See “Precautions on seat belt
usage” (P.1-18).) Also, the seatback can be
reclined to allow occupants to rest when the

vehicle is stopped and the transmission is in
the P (Park) position.

-------------------------------------------------------------------------------------------------------------------------------------------------------------

SSS1052

Seat lifter:
1. Pull up or push down the adjusting

switch to adjust the seat height until
the desired position is achieved.

2. Tilt up or down the adjusting switch to

adjust the front angle of the seat until
the desired position is achieved (for
driver’s seat).

SSS1053

Lumbar support:
The lumbar support feature provides lower
back support to the occupants.
Push the front or back end of the switch to
adjust the seatback lumbar area.

2ND ROW SEATS

WARNING

Never allow anyone to ride in the

cargo area or on the rear seat when it
is in the fold-down position. Use of
these areas by passengers without
proper restraints could result in ser-
ious injury in an accident or sudden
stop.

When returning the seatbacks to the

upright position, be certain they are
completely secured in the latched
position. If they are not completely
secured, passengers may be injured in
an accident or sudden stop.

Properly secure all cargo to help

prevent it from sliding or shifting.
Do not place cargo higher than the
seatbacks. In a sudden stop or colli-
sion, unsecured cargo could cause
personal injury.

Safety — seats, seat belts and supplemental restraint system

1-5

-------------------------------------------------------------------------------------------------------------------------------------------------------------

1-6

Safety — seats, seat belts and supplemental restraint system

SSS1081

Captain’s seat

SSS1065

Bench seat

Reclining

Pull the reclining lever

and position the

seatback at the desired angle. Release the
reclining lever after positioning the seat at
the desired angle.
To return the seatback, pull the lever.
The reclining feature allows adjustment of
the seatback for occupants of different sizes
to help obtain proper seat belt fit. (See
“Precautions on seat belt usage” (P.1-18).)
The seatback may also be reclined to allow
occupants to rest when the vehicle is parked.

WARNING

Do not ride in a moving vehicle when

the seatback is reclined. This can be
dangerous. The shoulder belt will not
be against your body. In an accident,
you could be thrown into it and
receive neck or other serious injuries.
You could also slide under the lap belt
and receive serious internal injuries.

For the most effective protection

when the vehicle is in motion, the
seat should be upright. Always sit
well back and upright in the seat with
both feet on the floor and adjust the
seat belt properly. See “Precautions
on seat belt usage” (P.1-18).

After adjustment, check to be sure

the seat is securely locked.

Entry to 3rd row seat

CAUTION

Do not drive with the 2nd row seat

tipped up.

Be careful not to allow the 2nd row

seat to pinch, hit any part of your
body or other people when operating
the 2nd row seat. Make sure the seat
path is clear of all objects before
moving the seat.

The 2nd row seat can be tipped forward for
easy entry to or exit from the 3rd row seat.

-------------------------------------------------------------------------------------------------------------------------------------------------------------

SSS1066

For manual type:
To enter the 3rd row seat, pull the lever

or

located on the 2nd row seat and fold the

seatback forward

at an angle over the

seat base. Then lift up the seat base and tip
the 2nd row seat forward

. This will release

the back of the seat so it may be tipped

forward.
To exit the 3rd row seat, pull the lever

or

and fold the seatback forward onto the seat
base. Then lift up on the seat base and tip it
forward.

SSS1094

For remote release type (if so equipped):
Push and hold the switch located on the
instrument panel. The seatback will fold
down and tip forward.
The lower corner of the seat base will lift and
the 2nd row seat will tip forward.

Safety — seats, seat belts and supplemental restraint system

1-7

-------------------------------------------------------------------------------------------------------------------------------------------------------------

1-8

Safety — seats, seat belts and supplemental restraint system

SSS1116

3RD ROW SEATS

The 3rd row power folding seat controls are
located behind the 2nd row seat (both the
driver’s and passenger’s side) on the 3rd row
cup holder console

. There are also controls

located on the rear quarter trim panel behind
the 3rd row seats (passenger’s side)

.

Before operating the 3rd row seats:
. Make sure the 2nd row seatback is not

reclined.

. Lower the 3rd row head restraint to the

full down position.

. Disconnect and secure the center seat

belt and tongues into the retractor base.
See “3rd row center seat belt” (P.1-25).

— Always reconnect the center seat belt

when the seat is returned to the
upright position

. Make sure that there are no objects on

the seatback cushion.

SSS1095

Power reclining

Push and hold the rear side of the switch
beside the 3rd row cup holders until the
desired seatback angle (up to 20 degrees) is
obtained. To move the seatback forward
again, push and hold the front side of the
switch

until the desired angle is obtained.

WARNING

After adjustment, check to be sure

the seat is securely locked.

Do not ride in a moving vehicle when

the seatback is reclined. This can be
dangerous. The shoulder belt will not

-------------------------------------------------------------------------------------------------------------------------------------------------------------

be against your body. In an accident,
you could be thrown into it and
receive neck or other serious injuries.
You could also slide under the lap belt
and receive serious internal injuries.

For the most effective protection

when the vehicle is in motion, the
seat should be upright. Always sit
well back and upright in the seat with
both feet on the floor and adjust the
seat belt properly. See “Precautions
on seat belt usage” (P.1-18).

SSS1118

Power folding

Push and hold the front side of the switch
located on the passenger side of the cargo
room. The corresponding seatback (R: right
side, L: left side) will be folded down
automatically.

Push and hold the rear side of the switch

.

The seatback will be returned automatically.
The seatback will rise up while holding the
switch.

NOTE:
Operating the power folding seats can
discharge the vehicle battery if the vehicle
is not running.

CAUTION

When operating the rear power seat-
back return, make sure that the vehicle is
stopped and the transmission is in the P
(Park) position.

WARNING

Never allow anyone to ride in the

cargo area or on the rear seat when it
is in the fold-down position. Use of
these areas by passengers without
proper restraints could result in ser-
ious injury in an accident or sudden
stop.

When returning the seatbacks to the

upright position, be certain they are
completely secured in the latched
position. If they are not completely

Safety — seats, seat belts and supplemental restraint system

1-9

-------------------------------------------------------------------------------------------------------------------------------------------------------------

1-10

Safety — seats, seat belts and supplemental restraint system

secured, passengers may be injured in
an accident or sudden stop.

Properly secure all cargo to help

prevent it from sliding or shifting.
Do not place cargo higher than the
seatbacks. In a sudden stop or colli-
sion, unsecured cargo could cause
personal injury.

JVR0557X

Front seats

ARMREST (if so equipped)

Front seats

The console box lid can be used as an
armrest.

SSS1070

2nd row seat

2nd row seat

Pull and draw the armrest forward until it is
horizontal.

-------------------------------------------------------------------------------------------------------------------------------------------------------------

FLEXIBLE SEATING

WARNING

Never allow anyone to ride in the

cargo area or on the rear seats when
they are in the fold-down position. In
a collision, people riding in these
areas without proper restraints are
more likely to be seriously injured or
killed.

Do not allow people to ride in any

area of your vehicle that is not
equipped with seats and seat belts.
Be sure everyone in your vehicle is in
a seat and using a seat belt properly.

Do not fold down the rear seats when

occupants are in the rear seat area or
any cargo is on the rear seats.

Head restraints should be adjusted

properly as they may provide signifi-
cant protection against injury in an
accident. Always replace and adjust
them properly if they have been
removed for any reason.

If the head restraints are removed for

any reason, they should be securely
stored to prevent them from causing
injury to passengers or damage to the
vehicle in case of sudden braking or

an accident.

When returning the seatbacks to the

upright position, be certain they are
completely secured in the latched
position. If they are not completely
secured, passengers may be injured in
an accident or sudden stop.

Properly secure all cargo to help

prevent it from sliding or shifting.
Do not place cargo higher than the
seatbacks. In a sudden stop or colli-
sion, unsecured cargo could cause
personal injury.

When folding the bench seat seat-

back down for maximum storage,
make sure the seat base is in the
latched position by rocking the seat
base. If the seat base is not properly
secured, cargo stored on top of a
folded seatback may become a pro-
jectile causing personal injury or
vehicle damage.

CAUTION

When folding the 2nd row seat for

maximum cargo hauling, be sure that
cargo does not contact the center
console of the captain’s seat (if so

equipped) to avoid possible damage
to the console.

When folding or returning the seat(s)

to the upright position, to avoid
injury to yourself and others:

— Make sure that the seat path is

clear before moving the seat.

— Be careful not to allow hands or

feet to get caught or pinched in
the seat.

Stowing 2nd and 3rd row seats

To stow 2nd and 3rd row seats for maximum
cargo capacity:
Manual Operation:

Safety — seats, seat belts and supplemental restraint system

1-11

-------------------------------------------------------------------------------------------------------------------------------------------------------------

1-12

Safety — seats, seat belts and supplemental restraint system

SSS1119

1. Pull lever located on the 2nd row seat.

The seatback folds down and the seat
base will tip forward. See “Entry to 3rd
row seat” (P.1-6).

Power Operation:
1. Push and hold the corresponding switch

located on the instrument panel below
the audio system. The seatback will fold
down and tip forward. See “Entry to 3rd
row seat” (P.1-6).

SSS1120

2. Push the folded seat down until it locks

in position.

SSS1121

3. Fold the 3rd row seat flat using the

switches located in the cargo area. See
“Power folding ” (P.1-9).

4. Return 3rd row seats to seating posi-

tions by raising the 3rd row seatbacks to
an upright position using the switches.
Make sure the seatback is locked in
position. See “Power folding ” (P.1-9).

5. Return the 2nd row seat to a seating

position by raising the 2nd row seat-
backs to an upright position. Make sure
the seatback is locked in position.

-------------------------------------------------------------------------------------------------------------------------------------------------------------

CAUTION

When folding the 2nd row seat for
maximum cargo hauling, be sure that
cargo does not contact the center con-
sole of the captain’s seat (if so equipped)
to avoid possible damage to the console.

WARNING

Head restraint/headrest supplement the
other vehicle safety systems. They may
provide additional protection against
injury in certain rear end collisions.
Adjustable head restraints/headrests
must be adjusted properly, as specified
in this section. Check the adjustment
after someone else uses the seat. Do not
attach anything to the head restraint/
headrest stalks or remove the head
restraint/headrest. Do not use the seat
if the head restraint/headrest has been
removed. If the head restraint/headrest
was removed, reinstall and properly
adjust the head restraint/headrest be-
fore an occupant uses the seating posi-
tion. Failure to follow these instructions
can reduce the effectiveness of the head
restraint/headrest. This may increase
the risk of serious injury or death in a
collision.

Safety — seats, seat belts and supplemental restraint system

1-13

HEAD RESTRAINTS/HEADRESTS

-------------------------------------------------------------------------------------------------------------------------------------------------------------

1-14

Safety — seats, seat belts and supplemental restraint system

JVR0403X

The illustration shows the seating positions
equipped with head restraint/headrest.

Indicates the seating position is

equipped with a head restraint.

Indicates the seating position is

equipped with a headrest.
. Your vehicle is equipped with a head

restraint/headrest that may be inte-
grated, adjustable or non-adjustable.

. Adjustable head restraints/headrests

have multiple notches along the stalk to
lock them in a desired adjustment posi-
tion.

. The non-adjustable head restraints/

headrests have a single locking notch to
secure them to the seat frame.

. Proper Adjustment:

— For the adjustable type, align the head

restraint/headrest so the center of
your ear is approximately level with
the center of the head restraint/
headrest.

— If your ear position is still higher than

the recommended alignment, place
the head restraint/headrest at the
highest position.

. If the head restraint/headrest has been

removed, ensure that it is reinstalled and
locked in place before riding in that
designated seating position.

SSS0992

ADJUSTABLE HEAD RESTRAINT/
HEADREST COMPONENTS

1. Removable head restraint/headrest
2. Multiple notches
3. Lock knob
4. Stalks

-------------------------------------------------------------------------------------------------------------------------------------------------------------

JVR0203X

NON-ADJUSTABLE HEAD RE-
STRAINT/HEADREST COMPO-
NENTS

1. Removable head restraint/headrest
2. Single notch
3. Lock knob
4. Stalks

SSS1037

REMOVE

CAUTION

The front head restraints with a rear
display are not designed to be pulled out.
The rear display may be damaged if the
head restraint is forcibly pulled out.

Use the following procedure to remove the
head restraint/headrest.
1. Pull the head restraint/headrest up to

the highest position.

2. Push and hold the lock knob.

3. Remove the head restraint/headrest

from the seat.

4. Store the head restraint/headrest prop-

erly in a secure place so it is not loose in
the vehicle.

5. Reinstall and properly adjust the head

restraint/headrest before an occupant
uses the seating position.

Safety — seats, seat belts and supplemental restraint system

1-15

-------------------------------------------------------------------------------------------------------------------------------------------------------------

1-16

Safety — seats, seat belts and supplemental restraint system

SSS0996

INSTALL

1. Align the head restraint/headrest stalks

with the holes in the seat. Make sure that
the head restraint/headrest is facing the
correct direction. The stalk with the
adjustment notch

must be installed in

the hole with the lock knob

.

2. Push and hold the lock knob and push the

head restraint/headrest down.

3. Properly adjust the head restraint/head-

rest before an occupant uses the seating
position.

SSS0997

ADJUST

For adjustable head restraint/headrest
Adjust the head restraint/headrest so the
center is level with the center of your ears. If
your ear position is still higher than the
recommended alignment, place the head
restraint/headrest at the highest position.

JVR0259X

For non-adjustable head restraint/head-
rest
Make sure the head restraint/headrest is
positioned so the lock knob is engaged in the
notch before riding in that designated seat-
ing position.

-------------------------------------------------------------------------------------------------------------------------------------------------------------

SSS1035

Raise

To raise the head restraint/headrest, pull it
up.
Make sure the head restraint/headrest is
positioned so the lock knob is engaged in the
notch before riding in that designated seat-
ing position.

SSS1036

Lower

To lower, push and hold the lock knob and
push the head restraint/headrest down.
Make sure the head restraint/headrest is
positioned so the lock knob is engaged in the
notch before riding in that designated seat-
ing position.

SSS0508

FRONT-SEAT ACTIVE HEAD RE-
STRAINT

The Active Head Restraint moves forward
utilizing the force that the seatback receives
from the occupant in a rear-end collision.
The movement of the head restraint helps
support the occupant’s head by reducing its
backward movement and helping absorb
some of the forces that may lead to
whiplash-type injuries.
Active Head Restraints are effective for
collisions at low to medium speeds in which
it is said that whiplash injury occurs most.
Active Head Restraints operate only in
certain rear-end collisions. After the colli-

Safety — seats, seat belts and supplemental restraint system

1-17

-------------------------------------------------------------------------------------------------------------------------------------------------------------

1-18

Safety — seats, seat belts and supplemental restraint system

sion, the head restraints return to their
original position.
Adjust the Active Head Restraints properly
as described earlier in this section.

PRECAUTIONS ON SEAT BELT
USAGE

If you are wearing your seat belt properly
adjusted, and you are sitting upright and well
back in your seat with both feet on the floor,
your chances of being injured or killed in an
accident and/or the severity of injury may be
greatly reduced. INFINITI strongly en-
courages you and all of your passengers to
buckle up every time you drive, even if your
seating position includes a supplemental air
bag.
Most U.S. states and Canadian provinces or
territories specify that seat belts be worn at
all times when a vehicle is being driven.

SEAT BELTS

-------------------------------------------------------------------------------------------------------------------------------------------------------------

SSS0136A

SSS0134A

WARNING

Every person who drives or rides in

this vehicle should use a seat belt at
all times. Children should be properly
restrained in the rear seat and, if
appropriate, in a child restraint.

The seat belt should be properly

adjusted to a snug fit. Failure to do
so may reduce the effectiveness of
the entire restraint system and in-
crease the chance or severity of injury
in an accident. Serious injury or death
can occur if the seat belt is not worn
properly.

Always route the shoulder belt over

your shoulder and across your chest.
Never put the belt behind your back,
under your arm or across your neck.
The belt should be away from your
face and neck, but not falling off your
shoulder.

Position the lap belt as low and snug

as possible AROUND THE HIPS, NOT
THE WAIST. A lap belt worn too high
could increase the risk of internal
injuries in an accident.

Be sure the seat belt tongue is

securely fastened to the proper
buckle.

Safety — seats, seat belts and supplemental restraint system

1-19

-------------------------------------------------------------------------------------------------------------------------------------------------------------


Content      ..      1      2      3      ..