2017 Infiniti QX60/JX (2017 year). Manual - part 24


  Index      Infiniti     2017 Infiniti QX60/JX (2017 year) - manual in english


Search            copyright infringement  


Content      ..     22      23      24      25     ..


2017 Infiniti QX60/JX (2017 year). Manual - part 24


OPERATING RANGE

The Intelligent Key functions can only be used
when the Intelligent Key is within the specified
operating range.

When the Intelligent Key battery is almost dis-
charged or strong radio waves are present near
the operating location, the Intelligent Key sys-
tem’s operating range becomes narrower and
may not function properly.

If the Intelligent Key is within the operating range,
it is possible for anyone, even someone who does
not carry the Intelligent Key, to push the ignition
switch to start the engine.

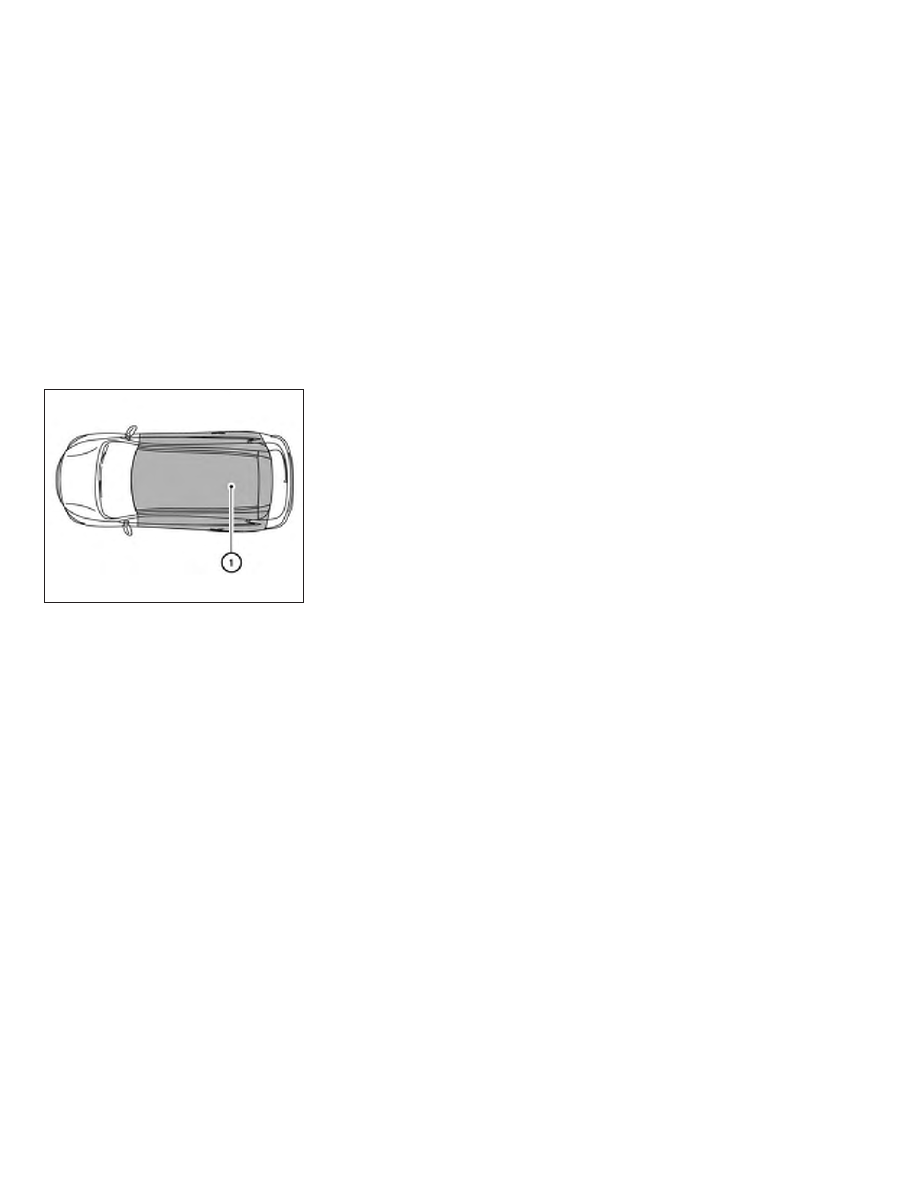
The operating range of the engine start function
is inside of the vehicle

1

.

● The luggage area is not included in the op-

erating range, but the Intelligent Key may
function.

● If the Intelligent Key is placed on the instru-

ment panel, inside the glove box, storage bin
or door pocket, the Intelligent Key may not
function.

● If the Intelligent Key is placed near the door

or window outside the vehicle, the Intelligent
Key may function.

PUSH-BUTTON IGNITION SWITCH
POSITIONS

LOCK (Normal parking position)

The ignition switch can only be locked in this
position.

The ignition switch will be unlocked when it is
pushed to the ACC position while carrying the
Intelligent Key.

The ignition switch will lock when any door is
opened or closed with the ignition switched off.

ACC (Accessories)

This position activates electrical accessories,
such as the radio, when the engine is not running.

ACC has a battery saver feature that will turn the
ignition switch to the OFF position after a period
of time under the following conditions:

● All doors are closed.
● Shift lever is in P (Park).

The battery saver feature will be canceled if any of
the following occur:

● Any door is opened.
● Shift lever is moved out of P (Park).
● Ignition switch changes position.

ON (Normal operating position)

This position turns on the ignition system and
electrical accessories.

ON has a battery saver feature that will turn the
ignition switch to the OFF position, if the vehicle
is not running, after some time under the follow-
ing conditions:

● All doors are closed.
● Shift lever is in P (Park).

The battery saver feature will be canceled if any of
the following occur:

● Any door is opened.
● Shift lever is moved out of the P (Park)

position.

● Ignition switch changes position.

LSD2020

5-14

Starting and driving

-------------------------------------------------------------------------------------------------------------------------------------------------------------

CAUTION

Do not leave the vehicle with the ignition
switch in ACC or ON positions when the
engine is not running for an extended pe-
riod. This can discharge the battery.

OFF

The ignition switch is in the OFF position when
the engine is turned off using the ignition switch.
No lights will illuminate on the ignition switch.

EMERGENCY ENGINE SHUT OFF

To shut off the engine in an emergency situation
while driving, perform the following procedure:

– Rapidly push the push-button ignition switch

three consecutive times in less than 1.5 sec-
onds, or

– Push and hold the push-button ignition switch

for more than 2 seconds.

INFINITI INTELLIGENT KEY BATTERY
DISCHARGE

If the battery of the Intelligent Key is discharged,
or environmental conditions interfere with the
Intelligent Key operation, start the engine accord-
ing to the following procedure:

1. Place the shift lever in the P (Park) position.

2. Firmly apply the foot brake.

3. Touch the ignition switch with the Intelligent

Key as illustrated. (A chime will sound.)

4. Push the ignition switch while depressing

the brake pedal within 10 seconds after the
chime sounds. The engine will start.

After Step 3 is performed, when the ignition
switch is pushed without depressing the brake
pedal, the ignition switch position will change to
ACC.

NOTE:

● When the ignition switch is pushed to the

ACC or ON position or the engine is started
by the above procedure, the Intelligent Key
battery discharge indicator appears in the
vehicle information display even when the
Intelligent Key is inside the vehicle. This is
not a malfunction. To turn off the Intelligent
Key battery discharge indicator, touch the
ignition switch with the Intelligent Key again.

● If the Intelligent Key battery discharge indi-

cator appears, replace the battery as soon
as possible. For additional information, refer
to “Battery replacement” in the “Do-it-
yourself” section of this manual.

SSD0860

Starting and driving

5-15

-------------------------------------------------------------------------------------------------------------------------------------------------------------

INFINITI VEHICLE IMMOBILIZER
SYSTEM

The INFINITI Vehicle Immobilizer System will not
allow the engine to start without the use of the
registered key.

If the engine fails to start using the registered key,
it may be due to interference caused by another
registered key, an automated toll road device or
automated payment device on the key ring. Re-
start the engine using the following procedures:

1. Leave the ignition switch in the ON position

for approximately 5 seconds.

2. Turn the ignition switch to the OFF or LOCK

position and wait approximately 5 seconds.

3. Repeat Step 1 and 2 again.

4. Restart the engine while holding the device

(which may have caused the interference)
separate from the registered key.

If the no start condition re-occurs, INFINITI rec-
ommends placing the registered key on a sepa-
rate key ring to avoid interference from other
devices.

● Make sure the area around the vehicle is

clear.

● Check fluid levels such as engine oil, cool-

ant, brake fluid, and windshield-washer fluid
as frequently as possible, or at least when-
ever you refuel.

● Check that all windows and lights are clean.
● Visually inspect tires for their appearance

and condition. Also check tires for proper
inflation.

● Check that all doors are closed.
● Position

seat

and

adjust

head

restraints/headrests.

● Adjust inside and outside mirrors.
● Fasten seat belts and ask all passengers to

do likewise.

● Check the operation of warning lights when

the ignition switch is placed in the ON posi-
tion. For additional information, refer to
“Warning lights, indicator lights and audible
reminders” in the “Instruments and controls”
section of this manual.

1. Apply the parking brake.

2. Move the shift lever to P (Park) or N (Neu-

tral). P (Park) is recommended.

The starter is designed not to operate if
the shift lever is in any of the driving
positions.

3. Push the ignition switch to the ON position.

Depress the brake pedal and push the igni-
tion switch to start the engine.

To start the engine immediately, push and
release the ignition switch while depressing
the brake pedal with the ignition switch in
any position.

● If the engine is very hard to start in ex-

tremely cold weather or when restarting,
depress the accelerator pedal a little (ap-
proximately 1/3 to the floor) and while
holding, crank the engine. Release the
accelerator pedal when the engine starts.

● If the engine is very hard to start because

it is flooded, depress the accelerator
pedal all the way to the floor and hold it.
Push the ignition switch to the ON posi-
tion to start cranking the engine. After 5 or
6 seconds, stop cranking by pushing the
ignition switch to LOCK. After cranking
the engine, release the accelerator pedal.
Crank the engine with your foot off the

BEFORE STARTING THE ENGINE

STARTING THE ENGINE

5-16

Starting and driving

-------------------------------------------------------------------------------------------------------------------------------------------------------------

accelerator pedal by depressing the
brake pedal and pushing the push-button
ignition switch to start the engine. If the
engine starts, but fails to run, repeat the
above procedure.

CAUTION

Do not operate the starter for more than
15 seconds at a time. If the engine does
not start, push the ignition switch to the
OFF position and wait 10 seconds before
cranking again, otherwise the starter
could be damaged.

4. Warm-up

Allow the engine to idle for at least 30 sec-
onds after starting. Do not race the engine
while warming it up. Drive at moderate
speed for a short distance first, especially in
cold weather. In cold weather, keep the en-
gine running for a minimum of 2 - 3 minutes
before shutting it off. Starting and stopping
the engine over a short period of time may
make the vehicle more difficult to start.

5. To stop the engine, place the shift lever into

the P (Park) position and push the ignition
switch to the OFF position.

NOTE:

Care should be taken to avoid situations
that can lead to potential battery discharge
and potential no-start conditions such as:

1. Installation or extended use of electronic

accessories that consume battery power
when the engine is not running (Phone char-
gers, GPS, DVD players, etc.)

2. Vehicle is not driven regularly and/or only

driven short distances. In these cases, the
battery may need to be charged to maintain
battery health.

REMOTE START (if so equipped)

Vehicles started with the remote start require the
ignition switch to be placed in the ON position
before the shift lever can be moved from the P
(Park) position. To place the ignition switch to the
ON position, follow the steps:

1. Make sure that the Intelligent Key is on you.

2. Apply the brake.

3. Press the ignition switch once to the ON

position.

For additional information, refer to “INFINITI Intel-
ligent Key” in the “Pre-driving checks and adjust-
ments” section of this manual.

CONTINUOUSLY VARIABLE
TRANSMISSION (CVT)

WARNING

● Do not depress the accelerator pedal

while shifting from P (Park) or N (Neu-
tral) to R (Reverse), D (Drive), or M
(Manual shift mode). Always depress
the brake pedal until shifting is com-
pleted. Failure to do so could cause you
to lose control and have an accident.

● Cold engine idle speed is high, so use

caution when shifting into a forward or
reverse gear before the engine has
warmed up.

● Do not downshift abruptly on slippery

roads. this may cause a loss of control.

● Never shift to either the P (Park) or R

(Reverse) position while the vehicle is
moving forward and P (Park) or D
(Drive) position while the vehicle is re-
versing. This could cause an accident or
damage the transmission.

● Except in an emergency, do not shift to

the N (Neutral) position while driving.
Coasting with the transmission in the N
(Neutral) position may cause serious
damage to the transmission.

DRIVING THE VEHICLE

Starting and driving

5-17

-------------------------------------------------------------------------------------------------------------------------------------------------------------

CAUTION

To avoid possible damage to your vehicle;
when stopping the vehicle on an uphill
grade, do not hold the vehicle by depress-
ing the accelerator pedal. The foot brake
should be used for this purpose.

The CVT in your vehicle is electronically con-
trolled to produce maximum power and smooth
operation.

The recommended operating procedures for this
transmission are shown on the following pages.
Follow these procedures for maximum vehicle
performance and driving enjoyment.

Engine power may be automatically re-
duced to protect the CVT if the engine
speed increases quickly when driving on
slippery roads or while being tested on
some dynamometers.

Starting the vehicle

1. After starting the engine, fully depress the

foot brake pedal before moving the shift
lever out of the P (Park) position.
This CVT is designed so that the foot
brake pedal must be depressed before
shifting from P (Park) to any driving
position while the ignition switch is in
the ON position.

The shift lever cannot be moved out of
the P (Park) position and into any of
the other positions if the ignition
switch is placed in the LOCK, OFF or
ACC position while the ready light illu-
minates.

2. Keep the foot brake pedal depressed and

move the shift lever to a driving position.

3. Release the parking brake and foot brake

pedal and then gradually start the vehicle in
motion.

WARNING

● Do not depress the accelerator pedal

while shifting from P (Park) or N (Neu-
tral) to R (Reverse) or D (Drive) position.
Always depress the brake pedal until
shifting is completed. Failure to do so
could cause you to lose control and
have an accident.

● Cold engine idle speed is high, so use

caution when shifting into a forward or
reverse gear before the engine has
warmed up.

● Do not downshift abruptly on slippery

roads. This may cause a loss of control.

● Never shift to either the P (Park) or R

(Reverse) position while the vehicle is
moving forward and P (Park) or D
(Drive) position while the vehicle is re-
versing. This could cause an accident or
damage the transmission.

CAUTION

● To avoid possible damage to your ve-

hicle, when stopping the vehicle on an
uphill grade, do not hold the vehicle by
depressing the accelerator pedal. The
foot brake should be used for this
purpose.

● Except in an emergency, do not shift to

the N (Neutral) position while driving.
Coasting with the transmission in the N
(Neutral) position may cause serious
damage to the transmission.

5-18

Starting and driving

-------------------------------------------------------------------------------------------------------------------------------------------------------------

Shifting

Push the button while depressing the brake
pedal

Push the button to shift

Shift without pushing button

After starting the engine, fully depress the brake
pedal, push the shift lever button and move the
shift lever from the P (Park) position to any of the
desired shift positions.

WARNING

Apply the parking brake if the shift lever is
in any position while the engine is not
running. Failure to do so could cause the
vehicle to move unexpectedly or roll away
and result in serious personal injury or
property damage.

CAUTION

Use the P (Park) or R (Reverse) position
only when the vehicle is completely
stopped.

P (Park)

CAUTION

To prevent transmission damage, use the
P (Park) position only when the vehicle is
completely stopped

Use the P (Park) shift lever position when the
vehicle is parked or when starting the engine.
Make sure the vehicle is completely stopped.
The brake pedal must be depressed and
the shift lever button pushed in to move the
shift lever from N (Neutral) or any drive
position to P (Park). 
Apply the parking brake.
When parking on a hill, apply the parking brake
first, then move the shift lever into the P (Park)
position.

R (Reverse)

CAUTION

To prevent transmission damage, use the
R (Reverse) position only when the vehicle
is completely stopped.

Use the R (Reverse) position to back up. Make
sure the vehicle is completely stopped before
selecting the R (Reverse) position. The brake
pedal must be depressed and the shift lever
button pushed in to move the shift lever
from P (Park), N (Neutral) or any drive po-
sition to R (Reverse).

N (Neutral)

Neither forward nor reverse gear is engaged. The
engine can be started in this position. You may
shift to N (Neutral) and restart a stalled engine
while the vehicle is moving.

D (Drive)

Use this position for all normal forward driving.

Manual shift mode

When the shift lever is in the manual shift gate,
the transmission is ready for the manual shift
mode. Shift ranges can be selected manually by
moving the shift lever up or down. To cancel

LSD2358

Starting and driving

5-19

-------------------------------------------------------------------------------------------------------------------------------------------------------------

manual shift mode, return the shift lever to the D
(Drive) position. The transmission returns to au-
tomatic driving mode.

When the shift lever is shifted from D (Drive) to
the manual shift gate with the vehicle stopped or
while driving, the transmission enters the manual
shift mode. Shift ranges can be selected manu-
ally. In the manual shift mode, the shift range is
displayed on the position indicator in the meter.
When shifting the shift lever to the manual shift
gate, the position indicator displays 1 (1st) up to
7 (7th) depending on vehicle speed.

Shift ranges up or down one by one as follows:

1

⇔ 2 ⇔ 3 ⇔ 4 ⇔ 5 ⇔ 6 ⇔ 7

7 (7th)

Use this position for all normal forward driving at
highway speeds.

6 (6th) and 5 (5th)

Use this position when driving up long slopes, or
for engine braking when driving down long
slopes.

4 (4th), 3 (3rd) and 2 (2nd)

Use these positions for hill climbing or engine
braking on downhill grades.

1 (1st)

Use this position when climbing steep hills slowly
or when driving slowly, or for maximum engine
braking on steep downhill grades.

● Remember not to drive at high speeds for

extended periods of time in lower than 7th
gear. This reduces fuel economy.

When shifting up

Move the shift lever to the + (up) side. (Shifts to
higher range.)

When shifting down

Move the shift lever to the

⫺ (down) side. (Shifts

to lower range.)

● The transmission will automatically down-

shift the gears. (For example, if you select the
3rd range, the transmission will shift down
between the 3rd and 1st gears.)

● Moving the shift lever rapidly to the same

side twice will shift the ranges in succession.

When canceling the manual shift mode

Return the shift lever to the D (Drive) position to
return the transmission to the normal driving
mode.

● In the manual shift mode, the transmis-

sion may not shift to the selected gear.
This helps maintain driving perfor-
mance and reduces the chance of ve-
hicle damage or loss of control.

● When this situation occurs, the CVT

position indicator light will blink and
the chime will sound.

● In the manual shift mode, the transmis-

sion may shift up automatically to a
higher range than selected if the en-
gine speed is too high. When the ve-
hicle speed decreases, the transmis-
sion automatically shifts down and
shifts to 1st gear before the vehicle
comes to a stop.

● CVT operation is limited to automatic drive

mode when CVT fluid temperature is ex-
tremely low even if manual shift mode is
selected. This is not a malfunction. When
CVT fluid warms up, manual mode can be
selected.

● When the CVT fluid temperature is high, the

shift range may upshift in lower rpm than
usual. This is not a malfunction.

5-20

Starting and driving

-------------------------------------------------------------------------------------------------------------------------------------------------------------

Shift lock release

If the battery charge is low or discharged, the
shift lever may not be moved from the P (Park)
position even with the brake pedal depressed
and the shift lever button pushed. To move the
shift lever, perform the following procedure:

1. Push the ignition switch to the OFF or LOCK

position.

2. Apply the parking brake.

3. Remove the shift lock release cover using a

suitable tool.

4. Push down the shift lock release using a

suitable tool.

5. Push the shift lever button and move the shift

lever to the N (Neutral) position while hold-
ing down the shift lock release. The vehicle
may be moved to the desired location. Re-
place the removed shift lock release cover
after the operation.

If the shift lever cannot be moved out of the P
(Park) position, have the CVT system checked as
soon as possible. It is recommended that you visit
an INFINITI retailer for this service.

WARNING

If the shift lever cannot be moved from the
P (Park) position while the engine is run-
ning and the brake pedal is depressed, the
stop lights may not work. Malfunctioning
stop lights could cause an accident injur-
ing yourself and others.

Accelerator downshift
— in D (Drive) position —

For passing or hill climbing, depress the accel-
erator pedal to the floor. This shifts the transmis-
sion down into a lower gear, depending on the
vehicle speed.

High fluid temperature protection
mode

This transmission has a high fluid temperature
protection mode. If the fluid temperature be-
comes too high (for example, when climbing
steep grades in high temperatures with heavy
loads, such as when towing a trailer), engine
power and, under some conditions, vehicle
speed will be decreased automatically to reduce
the chance of transmission damage. Vehicle
speed can be controlled with the accelerator
pedal, but the engine and vehicle speed may be
limited.

Fail-safe

When the fail-safe operation occurs, the CVT will
not be shifted into the selected driving position.

If the vehicle is driven under extreme con-
ditions, such as excessive wheel spinning
and subsequent hard braking, the fail-safe
system may be activated. The Malfunction
Indicator Light (MIL) may come on to indi-
cate the fail-safe mode is activated. For
additional information, refer to “Malfunc-
tion Indicator Light (MIL)” in the “Instru-
ments and controls” section of this manual.
This will occur even if all electrical circuits
are functioning properly. In this case, place
the ignition switch in the OFF position and

LSD2360

Starting and driving

5-21

-------------------------------------------------------------------------------------------------------------------------------------------------------------

wait for 10 seconds. Then place the ignition
switch back in the ON position. The vehicle
should return to its normal operating con-
dition. If it does not return to its normal
operating condition, have the transmission
checked and repaired, if necessary. It is
recommended that you visit an INFINITI
retailer for this service.

WARNING

When the high fluid temperature protec-
tion mode or fail-safe operation occurs,
vehicle speed may be gradually reduced.
The reduced speed may be lower than
other traffic, which could increase the
chance of a collision. Be especially careful
when driving. If necessary, pull to the side
of the road at a safe place and allow the
transmission to return to normal opera-
tion, or have it repaired if necessary.

WARNING

● Be sure the parking brake is fully re-

leased before driving. Failure to do so
can cause brake failure and lead to an
accident.

● Do not release the parking brake from

outside the vehicle.

● Do not use the shift lever in place of the

parking brake. When parking, be sure
the parking brake is fully engaged.

● To help avoid risk of injury or death

through unintended operation of the
vehicle and /or its systems, do not leave
children, people who require the assis-
tance of others or pets unattended in
your vehicle. Additionally, the tempera-
ture inside a closed vehicle on a warm
day can quickly become high enough to
cause a significant risk of injury or
death to people and pets.

To engage: Firmly depress the parking brake.

To release:

1. Firmly apply the foot brake.

2. Move the shift lever to the P (Park) position.

3. Firmly depress the parking brake pedal and it

will release.

4. Before driving, be sure the brake warning

light goes out.

LSD0158

PARKING BRAKE

5-22

Starting and driving

-------------------------------------------------------------------------------------------------------------------------------------------------------------

Four driving modes can be selected by using the
drive

mode

selector

switch,

STANDARD,

SPORT, ECO and SNOW.

NOTE:

● When the drive mode select switch selects a

mode, the mode may not switch quickly. This
is not a malfunction.

● Select the STANDARD mode center for nor-

mal driving.

STANDARD MODE

STANDARD MODE is recommended for normal
driving. Turn the drive mode select switch to the
center position. “STANDARD” appears in the ve-
hicle information display for 2 seconds.

SPORT MODE

The SPORT mode adjusts the engine and trans-
mission to enhance performance. Turn the drive
mode select switch to the SPORT position.
“SPORT” appears in the vehicle information dis-
play for 2 seconds.

NOTE:

In the SPORT mode, fuel economy may be
reduced.

SNOW MODE

SNOW mode is used on snowy roads or slippery
areas. When the SNOW mode is activated, en-
gine output is controlled to avoid wheel spin. Turn
the SNOW mode off for normal driving. Turn the
drive mode select switch to the SNOW position.
“SNOW” appears in the vehicle information dis-
play for 2 seconds.

ECO MODE

The ECO mode adjusts the engine and transmis-
sion to enhance fuel economy.

NOTE:

Selecting this drive mode will not necessar-
ily improve fuel economy as many driving
factors influence its effectiveness.

Operation

Turn the drive mode select switch to the ECO
position. “ECO” appears in the vehicle informa-
tion display for 2 seconds and the ECO drive
indicator light illuminates on the instrument panel.

When the accelerator pedal is depressed within
the range of economy drive, the ECO drive indi-
cator light illuminates in green. When the accel-
erator pedal is depressed above the range of
economy drive, the color of the ECO drive indi-
cator light changes to orange. For ECO pedal
system equipped models, refer to “ECO pedal
system” in this section.

The ECO drive indicator light will not illuminate in
the following cases:

● When the shift lever is in the R (Reverse)

position.

Drive mode select switch

LSD2671

INFINITI DRIVE MODE SELECTOR

Starting and driving

5-23

-------------------------------------------------------------------------------------------------------------------------------------------------------------

● When the vehicle speed is below 3 mph

(4.8 km/h) or over 90 mph (144 km/h).

● When the Intelligent Cruise Control (ICC)

system (if so equipped) is operated.

ECO pedal system (if so equipped)

The ECO pedal system helps assist the driver to
improve fuel economy by increasing the reaction
force of the accelerator pedal. When the ECO
drive indicator light is blinking or turns off, the
ECO pedal system increases the reaction force
of the accelerator pedal.

ECO drive indicator

Illuminate or blink

when

Illuminate
(green)

When the pedal is

depressed within

range of economy

drive

Blinks
(green)

When the pedal

is depressed

likely over the

range of

economy drive

When the ECO drive indicator illuminates in
green, the accelerator reaction force is normal.
When the ECO drive indicator light is blinking or
turns off, the ECO pedal system increases the
reaction force of the accelerator pedal.
The ECO pedal system may not vary accelerator
reaction force under the following conditions:

● When the shift lever is in the N (Neutral) or

R (Reverse) position.

● When ICC (if so equipped) is being oper-

ated.

If the ECO pedal system malfunctions, it will
cancel automatically. The ECO pedal system will
not vary the reaction force of the accelerator
pedal.

When the drive mode select switch is rotated
from the ECO mode to another mode (STAN-
DARD, SPORT or SNOW) while the ECO pedal
system is operating, the ECO pedal system con-
tinues to operate until the pedal is released.

If the accelerator pedal is depressed quickly, the
ECO pedal system will not increase the reaction
force of the acceleration pedal. The ECO pedal
system is not designed to prevent the vehicle
from accelerating.

Adjusting the ECO pedal system reaction
force

The ECO pedal system reaction force can be
adjusted. The reaction force setting will be main-
tained until the setting is changed even if the
engine is turned off.

5-24

Starting and driving

-------------------------------------------------------------------------------------------------------------------------------------------------------------

Setting ECO pedal reaction force

1. Press the SETTING

1

button and select

“Drive Mode Enhancement” on the display
using the INFINITI controller. Then press the
ENTER

2

button.

2. Press the ENTER

2

button to turn the ECO

pedal system on or off. When the ECO
pedal system is turned off, the accelerator
will operate normally.

LSD2672

LSD2695

LSD2696

Starting and driving

5-25

-------------------------------------------------------------------------------------------------------------------------------------------------------------

WARNING

Failure to follow the warnings and instruc-
tions for proper use of the LDW system
could result in serious injury or death.

The LDW system will operate when the vehicle is
driven at speeds of approximately 45 mph
(70 km/h) and above, and only when the lane
markings are clearly visible on the road.

The LDW system warns the driver with a warning
light and chime that the vehicle is beginning to
leave the driving lane.

The LDW system monitors the lane markers on
the traveling lane using the camera unit

1

lo-

cated above the inside mirror. When the camera
unit detects that the vehicle is traveling close to
either the left or the right of the traveling lane, the
LDW indicator light on the instrument panel
blinks in orange and a warning chime sounds.

LSD2701

LANE DEPARTURE WARNING (LDW)
(if so equipped)

5-26

Starting and driving

-------------------------------------------------------------------------------------------------------------------------------------------------------------

LDW SYSTEM OPERATION

The LDW system provides a lane departure
warning function when the vehicle is driven at
speeds of approximately 45 mph (70 km/h) and
above and the lane markings are clear. When the
vehicle approaches either the left or the right side
of the traveling lane, a warning chime will sound
and the LDW indicator light on the instrument
panel will blink to alert the driver.

The warning function will stop when the vehicle
returns inside of the lane markers.

The LDW system is not designed to warn under
the following conditions.

● When you operate the lane change signal

and change traveling lanes in the direction of
the signal. (The LDW system will become
operable again approximately 2 seconds af-
ter the lane change signal is turned off.)

● When the vehicle speed lowers to less than

approximately 45 mph (70 km/h).

● When the BSI activates an audible warning

or when the brakes are automatically applied
by the system.

After the above conditions have finished and the
necessary operating conditions are satisfied, the
LDW functions will resume.

LSD2550

Starting and driving

5-27

-------------------------------------------------------------------------------------------------------------------------------------------------------------

HOW TO ENABLE/DISABLE THE
LDW SYSTEM

When the LDW system is enabled in the vehicle
information display, the system can be turned off
temporarily by pushing the warning systems
switch. For additional information, refer to “Warn-
ing systems switch” in the “Instruments and con-
trols” section of this manual.

Perform the following steps to enable or disable
the LDW system.

1. Press the

button until “Settings” dis-

plays in the vehicle information display. Use
the

button to select “Driver Assis-

tance”. Then press the ENTER button.

2. Select “Driving Aids” and press the ENTER

button.

3. To set the LDW system to on or off, use

the

buttons to navigate in the menu

and use the ENTER button to select or
change an item:

● Select “Lane” and press the ENTER but-

ton.

– To turn on the warning, use the ENTER

button to check box for “Lane”

LSD2551

5-28

Starting and driving

-------------------------------------------------------------------------------------------------------------------------------------------------------------

LDW SYSTEM LIMITATIONS

WARNING

Listed below are the system limitations for
the LDW system. Failure to follow the
warnings and instructions for proper use
of the LDW system could result in serious
injury or death.

● This system is only a warning device to

inform the driver of a potential unin-
tended lane departure. It will not steer
the vehicle or prevent loss of control. It
is the driver’s responsibility to stay
alert, drive safely, keep the vehicle in
the traveling lane, and be in control of
the vehicle at all times.

● The system will not operate at speeds

below approximately 45 mph (70 km/h)
or if it cannot detect lane markers.

● If the LDW system malfunctions, it will

cancel automatically, and “Malfunction:
See Owner’s Manual” will appear in the
vehicle information display. If

Malfunc-

tion: See Owner’s Manual” appears in
the vehicle information display, pull off
the road to a safe location and stop the
vehicle. Place shift lever to the P (Park)
position and the ignition switch to the
OFF position and restart the engine. If
“Malfunction: See Owner’s Manual”
continues to appear in the vehicle infor-
mation

display,

have

the

system

checked. It is recommended that you
visit an INFINITI retailer for this service.

● Excessive noise will interfere with the

warning chime sound, and the chime
may not be heard.

● Do not use the LDW system under the

following conditions as it may not func-
tion properly:

– During bad weather (rain, fog, snow,

etc.).

– When driving on slippery roads, such

as on ice or snow.

– When driving on winding or uneven

roads.

– When there is a lane closure due to

road repairs.

– When driving in a makeshift or tem-

porary lane.

– When driving on roads where the

lane width is too narrow.

– When driving without normal tire

conditions (for example, tire wear,
low tire pressure, installation of
spare tire, tire chains, nonstandard
wheels).

– When the vehicle is equipped with

non-original brake parts or suspen-
sion parts.

– When you are towing a trailer or

other vehicle.

The system may not function properly under the
following conditions:

● On roads where there are multiple parallel

lane markers; lane markers that are faded or
not painted clearly; yellow painted lane
markers; non-standard lane markers; or lane
markers covered with water, dirt, snow, etc.

● On roads where the discontinued lane mark-

ers are still detectable.

● On roads where there are sharp curves.

Starting and driving

5-29

-------------------------------------------------------------------------------------------------------------------------------------------------------------


Content      ..     22      23      24      25     ..