Infiniti I30 (A33). Manual - part 158
Removal and Installation
NHBT0004
I
When removing or installing hood, place a cloth or other padding on hood. This prevents vehicle body from
being scratched.
I
Bumper fascia is made of plastic. Do not use excessive force and be sure to keep oil away from it.
I
Hood adjustment: Adjust at hinge portion.
I
Hood lock adjustment: After adjusting, check hood lock control operation. Apply a coat of grease to hood
locks engaging mechanism.
I
Hood opener: Do not attempt to bend cable forcibly. Doing so increases effort required to unlock hood.
WARNING:
I
Be careful not to scratch hood stay when installing hood. A scratched stay may cause gas leak-
age.
I
The contents of the hood stay are under pressure. Do not take apart, puncture, apply heat or allow
fire near it.
FRONT BUMPER ASSEMBLY
NHBT0004S01
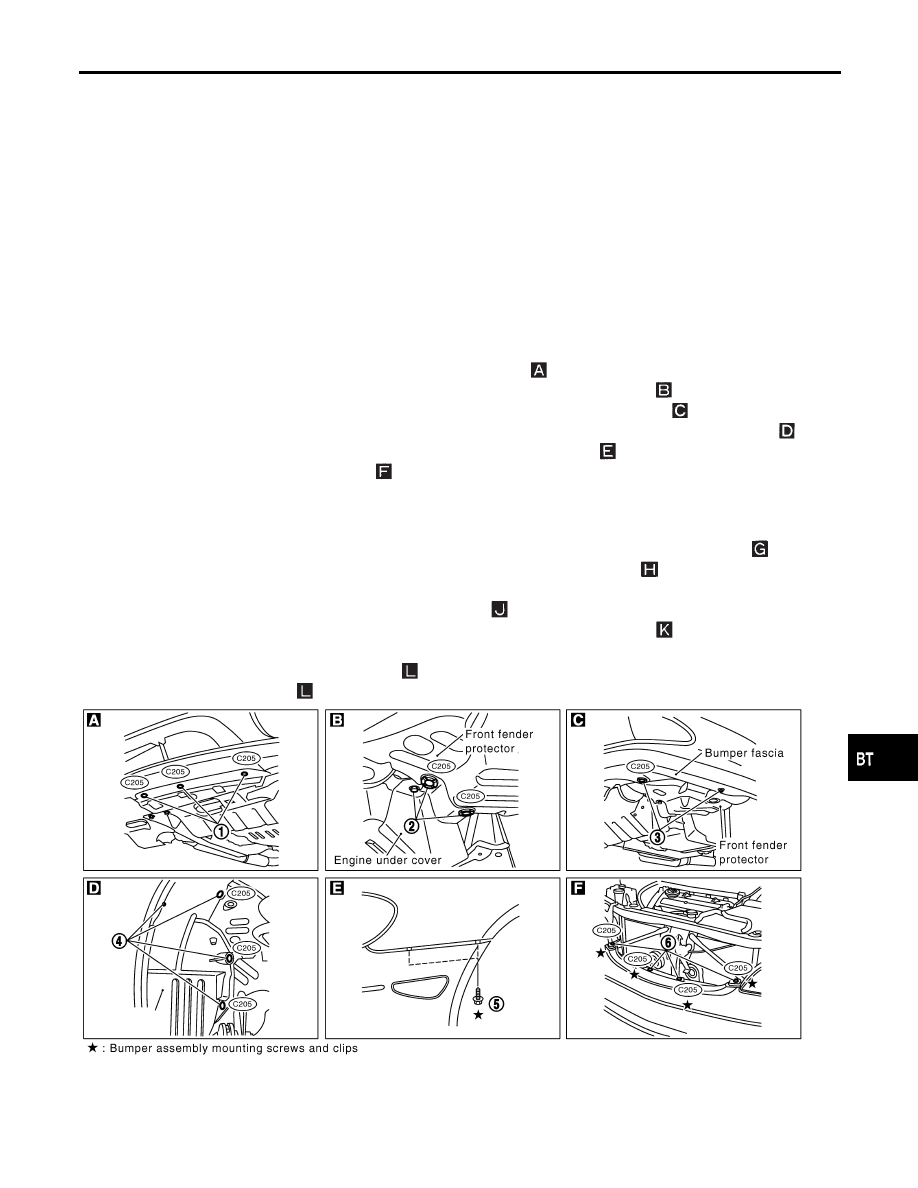
1. Remove clips securing engine undercover to bumper fascia.
2. Remove clips and bolts securing left and right sides of front fender protectors.
3. Remove screws and clips securing left and right sides of front fender protectors.
4. Remove clips and screws securing left and right sides of front fender protectors in wheelhouse.
5. Remove screws securing left and right front fenders to bumper fascia.
6. Remove clips securing bumper fascia.
7. Extract bumper fascia assembly, then disconnect fog lamp assembly and side marker lamp harness con-
nectors.
8. Remove energy absorber.
9. Remove bolts and hook securing headlamp assembly, then disconnect harness connectors.
10. Remove nuts securing bumper reinforcement to left and right bumper stays.
11. Extract bumper reinforcement.
12. Remove bolts and nuts securing front bumper bracket.
13. Remove bolts and nut securing bumper stays, then remove the bumper stays.
Fog lamp assembly
14. Remove bolt securing fog lamp assembly.
15. Extract fog lamp assembly.
SBT861
GI
MA
EM
LC
EC
FE
AT
AX
SU
BR
ST
RS
HA
SC
EL
IDX
BODY FRONT END
Removal and Installation
BT-13