Hyundai Sonata Plug-in Hybrid (2017 year). Instruction - part 41

Instrument panel fuse
7-61
K
Instrument panel overview
1-5
Interior care
7-99
Keys
3-3
Interior features
3-156
Smart key
3-3
Clock
3-159
Clothes hanger
3-160
L
Cup holder
3-156
Floor mat anchor(s)
3-161
Label
Power outlet
3-157
Air bag warning labels
2-70
Side curtain
3-162
Label
Sunvisor
3-157
Tire sidewall labeling
7-50
Interior lamp AUTO cut
3-124
Label
Interior light bulb replacement
7-92
Tire specification and pressure label
8-9
Interior lights
3-124
Vehicle certification label
8-8
Door courtesy lamp
3-126
Lane departure warnings system (LDWS)
5-56
Front lamp
3-124
LCD display
3-95
Glove box lamp
3-124
A/V mode
3-98
Interior lamp AUTO cut
3-124
Information Mode
3-98
Rear lamp
3-126
LCD modes
3-95
Room lamp
3-125
Trip computer modes
3-96
Trunk room lamp
3-126
Turn by turn (TBT) mode
3-97
Vanity mirror lamp
3-127
User settings mode
3-100
Interior overview
1-4
Warning Messages
3-80
LCD Display Control
3-96
J
LCD modes
3-95
License plate light bulb replacement
7-92
Jump starting
6-4
I
I-7

Index
Light
3-115
M
Auto light position
3-115
Battery saver function
3-121
Main fuse
7-63
Daytime running light
3-122
Maintenance
Headlamp delay function
3-121
Explanation of scheduled maintenance items
7-24
Headlamp position
3-116
Maintenance services
7-4
High - beam operation
3-117
Owner maintenance
7-5
Interior lights
3-124
Tire maintenance
7-50
Parking lamp position
3-116
Maintenance schedule
7-8
Smart high beam
3-117
Maintenance under severe usage conditions
7-22
Turn signals
3-120
Normal maintenance schedule
7-9
Welcome system
3-123
Maintenance services
7-4
Light bulbs
7-80
Mirrors
3-19
Lubricants and capacities
8-6
Day/night rearview mirror
3-19
Luggage net holder
3-162
Electric chromic mirror (ECM)
3-20
Folding the side view mirror
3-36
Inside rearview mirror
3-19
Reverse parking aid function
3-37
Side view mirror
3-34
Moonroof, see panoramic sunroof
3-42
Multi box
3-155
Multi fuse
7-63
Multimedia system
Antenna
4-2
Audio/Video/Navigation system (AVN)
4-4
AUX, USB and iPod® port
4-2
Bluetooth® Wireless Technology Hands-Free
4-4
Steering wheel audio control
4-3
I-8

O
R
Odometer
3-65
Rear combination light bulb replacement
7-87
Oil (Engine)
7-27
Rear lamp
3-126
Outside temperature gauge
3-65
Rear parking assist system (RPAS)
3-131
Owner maintenance
7-5
Rear seats
2-12
Rear view camera
3-130
P
Recommended cold tire inflation pressures
7-45
Recommended lubricants and capacities
8-6
Panoramic sunroof
3-42
Recommended SAE viscosity number
8-7
Parking brake
7-34
Replacement light bulb
7-81
Parking lamp position
3-116
Back-up lamp
7-91
Passenger’s front air bag
2-49
High mounted stop lamp
7-92
PHEV (Plug-in electric vehicle) system
H-3
Interior light bulb replacement
7-92
Plug-in hybrid mode indicator
3-63
License plate light bulb replacement
7-92
Power brakes
5-19
Reporting safety defects
8-10
Power outlet
3-157
Reverse parking aid function
3-37
Power window lock button
3-41
Rocking the vehicle
5-81
Room lamp
3-125
Rotation (Tire)
7-47
I
I-9

Index
Shift lock system
5-16
S
Shift-lock release
5-16
Side air bags
2-50
Safety messages
F-6
Side curtain
3-162
Safety precautions for hybrid system
H-42
Side view mirror
3-34
Scheduled maintenance service
7-8
Smart cruise control system
5-65
Seat belts
2-24
Smart high beam
3-117
Additional seat belt safety precautions
2-32
Smart key
3-3
Care of seat belts
2-35
Smart trunk
3-50
Height adjustment
2-26
Smooth cornering
5-82
Pre-tensioner seat belt
2-29
Snow tires
5-85
Rear center seat belt
2-32
Special driving conditions
5-81
Seat belt restraint system
2-26
Driving at night
5-82
Seat belt safety precautions
2-24
Driving in flooded areas
5-83
Seat belt warning light
2-25
Driving in the rain
5-83
Seat warmers
2-20
Hazardous driving conditions
5-81
Seats
2-4
Highway driving
5-84
Air ventilation seats
2-22
Rocking the vehicle
5-81
Armrest
2-14
Smooth cornering
5-82
Backseat pocket
2-11
Speedometer
3-62
Folding rear seats
2-12
Sports mode
5-15
Front seats
2-6
Starting difficulties, see engine will not start
6-3
Head restraints
2-16
Rear seats
2-12
Safety precautions
2-5
Seat warmers
2-20
I-10

Steering wheel
3-16
Tires and wheels
7-44
Electric power steering (EPS)
3-16
Checking tire inflation pressure
7-46
Heated steering wheel
3-17
Low aspect ratio tires
7-58
Horn
3-18
Recommended cold tire inflation pressures
7-45
Telescope steering
3-17
Tire care
7-44
Tilt steering
3-17
Tire maintenance
7-50
Steering wheel audio control
4-3
Tire replacement
7-48
Storage compartment
3-154
Tire rotation
7-47
Center console storage
3-154
Tire sidewall labeling
7-50
Glove box
3-154
Tire traction
7-49
Multi box
3-155
Wheel alignment and tire balance
7-48
Sunglass holder
3-155
Wheel replacement
7-48
Sunglass holder
3-155
Towing
6-22
Sunroof, see panoramic sunroof
3-42
Trailer towing
5-95
Sunvisor
3-158
Transmission
Automatic transmission
5-12
T
Shift lock system
5-16
Shift-lock release
5-16
Telescope steering
3-17
Trip A/B
3-106
Theft-alarm system
3-13
Trip computer
3-105
Tilt steering
3-17
Trip A/B
3-106
Tire chains
5-86
Fuel Economy
3-107
Tire Mobility kit
6-15
Digital speedometer
3-109
Tire pressure monitoring system (TPMS)
6-9
Trunk
3-47
Tire rotation
7-47
Smart trunk
3-50
Tire specification and pressure label
8-9
Trunk room lamp
3-126
I
Turn by turn (TBT) mode
3-97
Turn signals
3-120
I-11
Index
U
W
User settings mode
3-100
Warning lights (Instrument cluster)
3-67
Warning Messages (LCD display)
3-80
V
Washer fluid
7-34
Welcome system
3-123
Vanity mirror lamp
3-127
Wheel alignment and tire balance
7-48
Vehicle break-in process
F-9
Wheel replacement
7-48
Vehicle certification label
8-8
Windows
3-38
Vehicle data collection and event data recorders
F-10
Power window lock button
3-41
Vehicle identification number (VIN)
8-8
Windshield defrosting and defogging
3-150
Vehicle load limit
5-90
Windshield washers
3-129
Vehicle Stability Management
5-38
Windshield wipers
3-128
Volume and weight
8-5
Winter driving
5-85
Snow tires
5-85
Tire chains
5-86
Winter precautions
5-84
Winter precautions
5-84
Wiper blades
7-39
Wipers and washers
3-128
Windshield washers
3-129
Windshield wipers
3-128
I-12

Hybrid system quick reference
HEV (Hybrid electric vehicle) system
2
Driving the hybrid/plug-in hybrid vehicle . . 22
Hybrid Vehicle
2
Starting the vehicle
22
PHEV (Plug-in electric vehicle) system
3
Special features
23
Plug-in Hybrid Vehicle
3
Hybrid system gauge
24
Changing plug-in hybrid mode
26
Charging the plug-in hybrid vehicle
4
Warning and indicator lights
27
Charging Information
4
Warning messages
28
Charging Types
4
Energy flow
37
Charging Time
4
Charging Status
5
Safety precautions for hybrid system
41
Scheduled Charging
5
High Voltage Battery System
41
Charging Precautions
6
Safety Plug
44
Normal Charge
9
High Voltage Battery Air Intake
45
Charging Status
11
If an accident occurs
46
Trickle Charger (Stage-1 type)
13
When the hybrid vehicle shuts off
47
Starting the vehicle
22
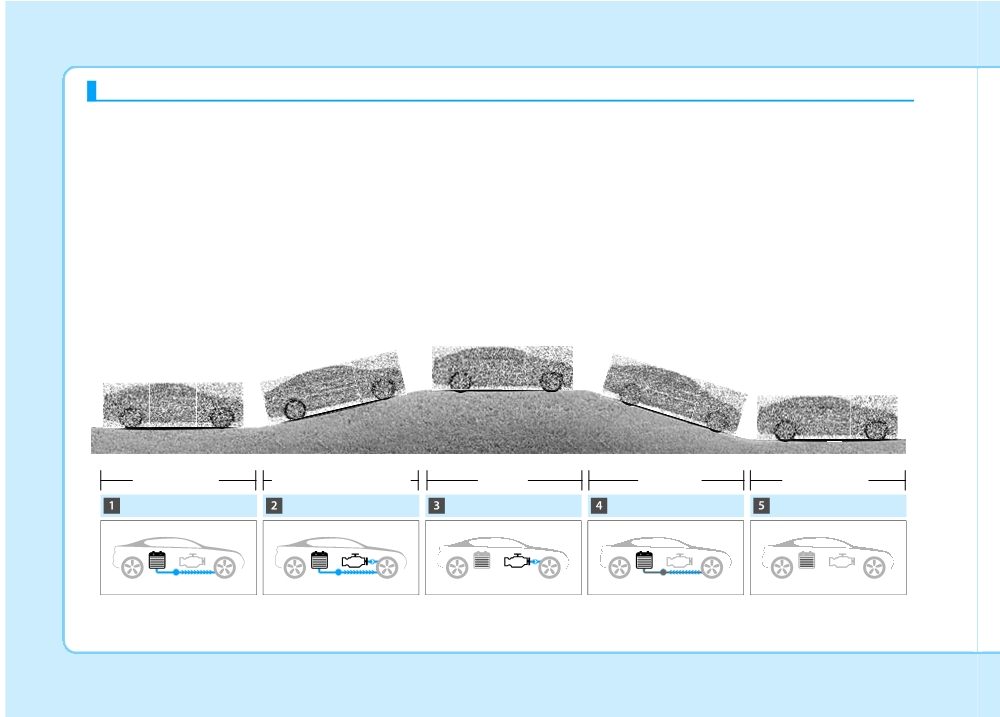
HEV (HYBRID ELECTRIC VEHICLE) SYSTEM
Hybrid Vehicle
The HYUNDAI Hybrid Electric Vehicle (HEV) uses both the gasoline engine and the electric motor for power. The elec-
tric motor is run by a high-voltage HEV battery.
Depending on the driving conditions, the HEV computer selectively operates between the engine and the electric motor
or even both at the same time.
Fuel efficiency increases when the engine is off at idle, or when the vehicle is driven by the electric motor with the HEV
battery.
The HEV battery charge must be maintained, so at times the engine will come on even at idle to act as a generator.
Charging also occurs when decelerating or by regenerative braking.
Electric motor
Electric motor + Engine
Engine
Charging
Engine OFF
Startup/Low speed cruise
Acceleration
High speed cruise
Deceleration
Stop
OLFH054001
H2
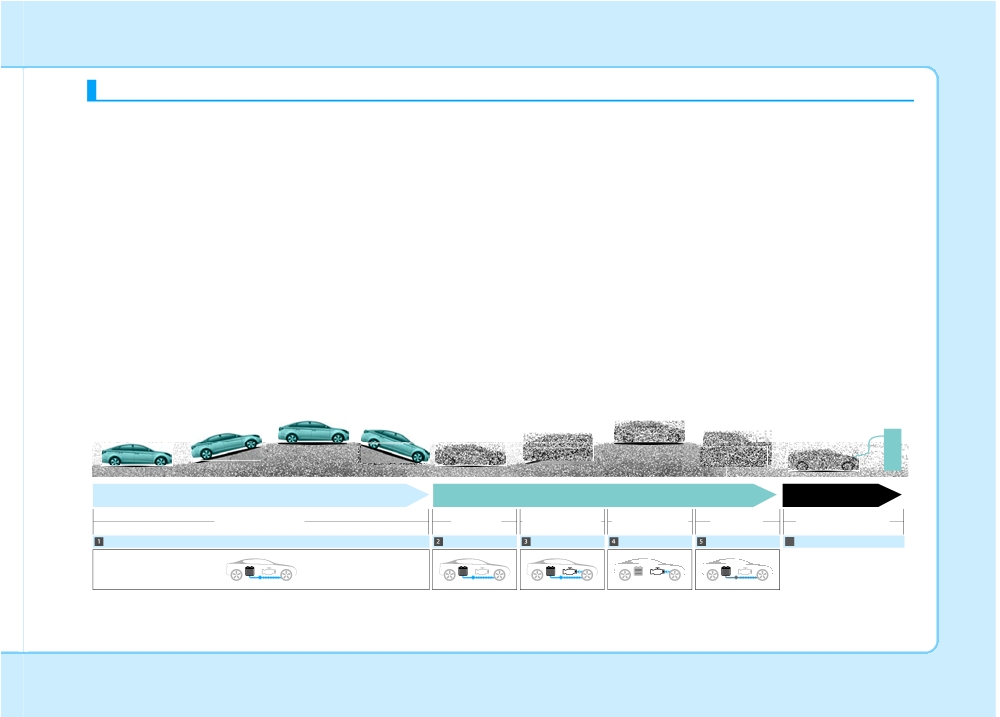
PHEV (PLUG-IN ELECTRIC VEHICLE) SYSTEM
Plug-in Hybrid Vehicle
The HYUNDAI Plug-in Hybrid Electric Vehicle (PHEV) shares the characteristics of both a conventional hybrid elec-
tric vehicle and an all-electric vehicle.
When used as a conventional hybrid electric vehicle, the HEV computer selectively operates between the engine and
the electric motor or even both at the same time.
When it is operating in the electric vehicle mode, the vehicle is driven only using the electric motor over a certain dis-
tance until the hybrid battery becomes low. The driving distance in EV mode depends on customer driving style and
road conditions. Aggressive driving maneuvers may at times temporarily enable the engine to operate for maximum
power.
The hybrid battery can be fully charged by connecting a plug to an external electric power source.
CD (Charge Depleting) Mode
CS (Charge Sustaining) Mode
Charging
Electric motor
Motor
Engine+Motor
Engine+Motor
Charging
Battery charging
Electric Vehicle Mode
Startup/Low speed Acceleration
High speed
Deceleration
6
External charging
OLFP055001
H3
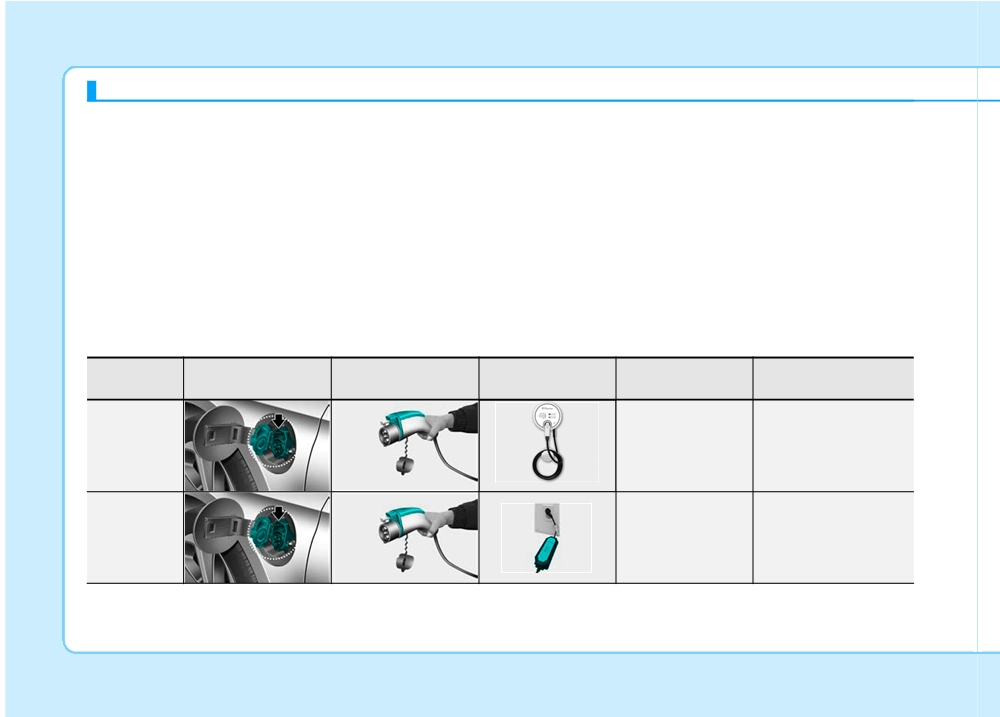
CHARGING THE PLUG-IN HYBRID VEHICLE
Charging Information
• Trickle Charger (Stage-1 type): The
Charging Time
plug-in hybrid vehicle can be
• Normal Charger (Stage-2 type): The
• Normal Charger (Stage-2 type):
charged by using household elec-
plug-in hybrid vehicle is charged by
Takes about 2-3 hours at room tem-
tricity.
plugging into a normal charger
perature (Can be charged to 100%.).
installed in your home or a public
The electrical outlet in your home
Depending on the condition and
charging station. (For further details,
must comply with regulations and
durability of the high-voltage battery,
refer to the 'Normal Charge'.)
can safely accommodate the
charger specifications, and ambient
Voltage / Current (Amps) / Power
temperature, the time required for
(Watts) ratings specified on the
charging the high-voltage battery
trickle charge.
may vary.
Charging Types
Charging Inlet
Category
Charging Connector
Charging Outlet
Charging Method
Charging Time
(Vehicle)
Normal charger
Approximately 2-3
Normal
installed in homes
hours (to fully charge
Charger
or public charging
the plug-in hybrid vehi-
(Stage-2 type)
stations
cle, 100%)
OLFP0Q5005K
OLFP0Q5006K
OLFP0Q4057N
Trickle
Charger
Household current
(Stage-1 type)
OLFP0Q5005K
OLFP0Q5006K
OLFP0Q5008K
An actual charger image and a charging method may vary in accordance with the charger manufacturers.
H4
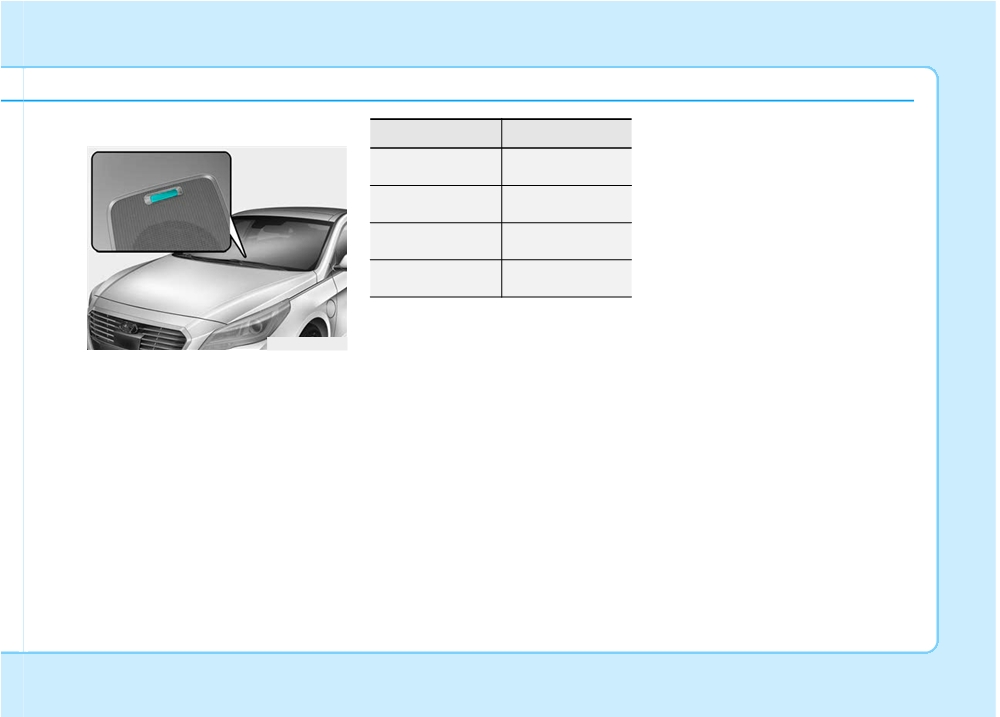
Charging Status
Scheduled Charging
Charging Status
Indicator
(if equipped)
Charging in
Illuminates (green)
• You can set-up a charging sched-
progress
ule for your vehicle through the
Fully charged
Off
Blue Link AVN control unit.
Refer to the Multimedia manual or
Blinks (green) and
Scheduled charging
the Blue Link manual for detailed
then turns off
information about setting sched-
Malfunction
Blinks (red)
uled charging.
• Scheduled charging can only be
done when using a normal charger
or the portable charging cable
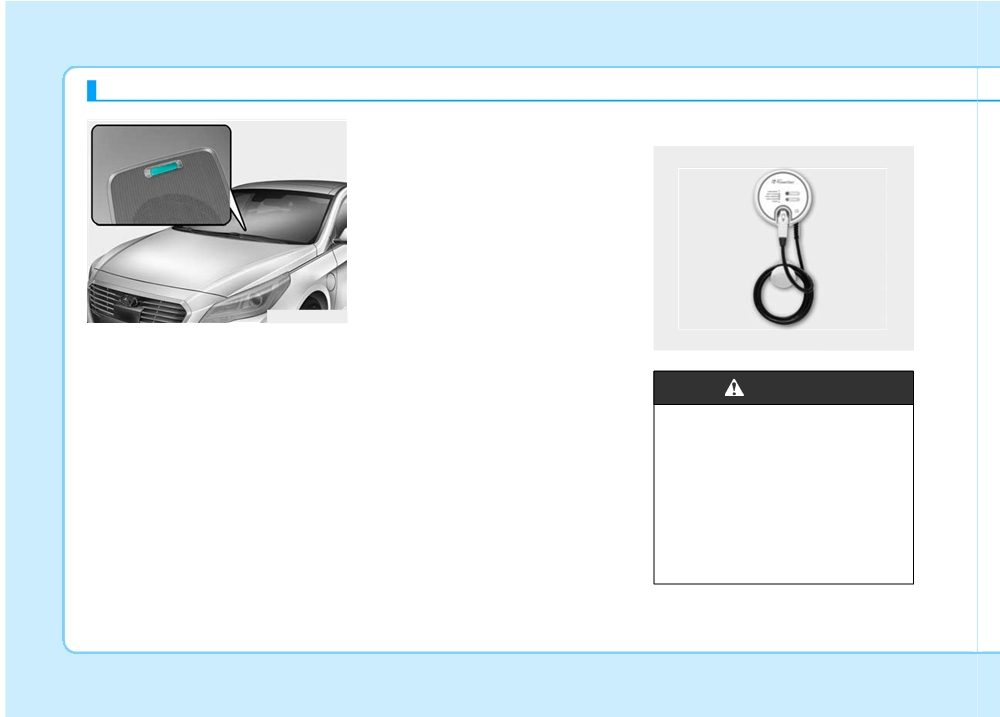
OLFP0Q5009K
(ICCB: In-Cable Control Box).
You can monitor the charging status
outside of the vehicle when charging
the high-voltage battery.
H5
CHARGING THE PLUG-IN HYBRID VEHICLE (CONT.)
• When scheduled charging is set,
Charging Precautions
charging is not initiated immediate-
ly when the normal charger or
■ Normal Charger (Stage-2 type)
portable charging cable (ICCB: In-
Cable Control Box) is connected.
When immediate charging is
required, use the AVN to deacti-
vate the scheduled charge setting.
OLFP0Q5009K
• When scheduled charging is set
OLFP0Q4057N
and the normal charger or the
portable charging cable (ICCB: In-
Cable Control Box) is connected
WARNING
for charging, the indicator lamp
blinks
(for
3 minutes) to indicate
Fires caused by dust or water
that scheduled charging is set.
Do not connect the charging
cable connector plug to the vehi-
cle if there is water or dust on the
charging inlet. Connecting while
there is water or dust on the
charging cable connector and
plug may cause a fire or electric
shock.
H6
•
Comply with the following in order
WARNING
WARNING
to prevent electrical shock when
charging:
Touching the charging connec-
Interference with electronic med-
- Use a waterproof charger
ical devices
tor
- Make sure to not touch the
Do not to touch the charging con-
When using medical electric
charging connector and charging
devices such as an implantable
nector, charging plug, and the
plug when your hand is wet
cardiac pacemaker, make sure to
charging inlet when connecting
- Do not charge when there is
ask the medical team and manu-
the cable to the charger and the
charging inlet on the vehicle.
lightning
facturer whether charging your
electric vehicle will impact the
Doing so may result in electrocu-
- Do not charge when the charging
operation of the medical devices.
tion.
connector and plug is wet
In some instances, electromag-
netic waves that are generated
from the charger can seriously
impact medical electric devices
such as an implantable cardiac
pacemaker.
H7
CHARGING THE PLUG-IN HYBRID VEHICLE (CONT.)
•
Always keep the charging connec-
WARNING
WARNING
tor and charging plug in clean and
dry condition. Be sure to keep the
Charging cable
Cooling fan
charging cable in a condition
•
Immediately stop charging
Do not touch the cooling fan
where there is no water or mois-
when you find abnormal
while vehicle is charging. When
ture.
symptoms (smell, smoke).
the vehicle is switched OFF
•
Make sure to use the designated
•
Replace the charging cable if
while charging, the cooling fan
charger for charging the vehicle.
inside the motor compartment
the cable coating is damaged
Using any other charger may
to prevent electrical shock.
may automatically operate.
cause failure.
•
When connecting or removing
•
Before charging the battery, turn
the charging cable, make sure
the vehicle OFF.
to hold the charging connec-
•
Be careful not to drop the charging
tor handle and charging plug.
connector. The charging connector
If you pull the cable itself
can be damaged.
(without using the handle), the
internal wires may disconnect
or get damaged. This may lead
to electric shock or fire.
H8
Normal Charge
How to Connect Normal
Charger
■ Normal Charger (Stage-2 type)
OLFP0Q5014K
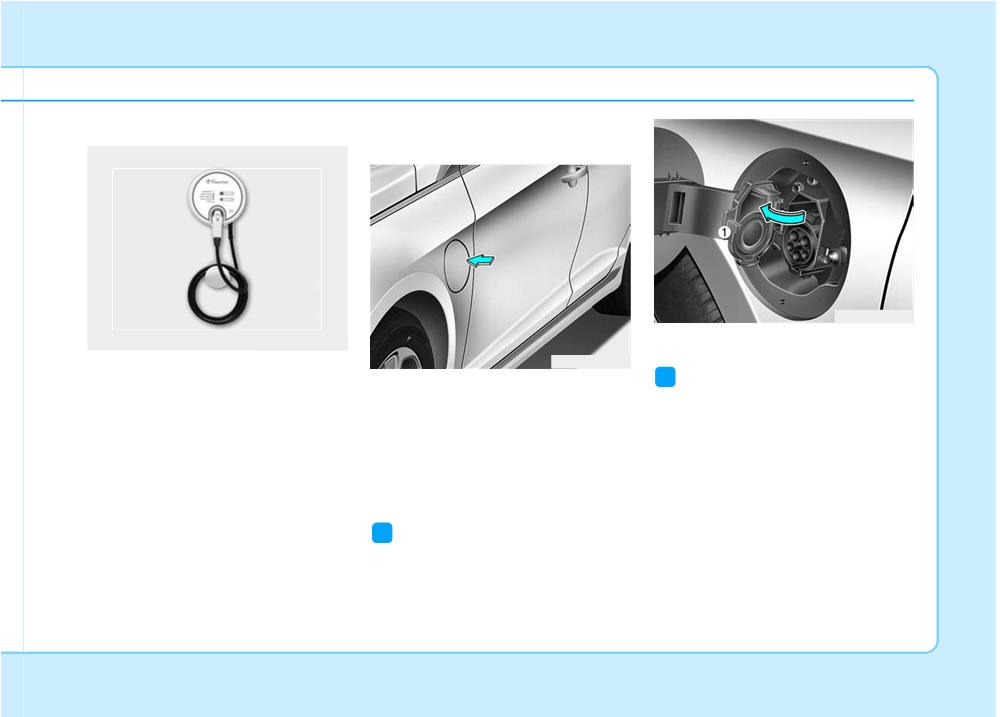
4. Open the charging inlet cover (1).
OLFP0Q4057N
OLFP0Q5012K
You can charge your vehicle by plug-
i
Information
ging into a public charger at a charg-
1. Depress the brake pedal and
ing station.
apply the parking brake.
To open the charging inlet cover, all
vehicle doors must be unlocked. When
2. Turn OFF all switches, move the
the doors are locked, the charging
shift lever to P
(Park), and turn
inlet cover will not open.
OFF the vehicle.
3. Open the charging door by press-
ing it.
i
Information
The charging door does not open
when the theft alarm system is armed.
H9
CHARGING THE PLUG-IN HYBRID VEHICLE (CONT.)
i
Information
•
The charging is in progress only
with the shift lever is in P (Park).
Charging the battery with the
Engine Start/Stop button in the
ACC position is possible. However,
it may discharge the 12-V battery.
Thus, if possible, charge the battery
with the Engine Start/Stop button in
the OFF position.
•
Moving the shift lever from P (Park)
OLFP0Q5015K
OLFP046575N
to R (Reverse)/N(Neutral)/D (Drive)
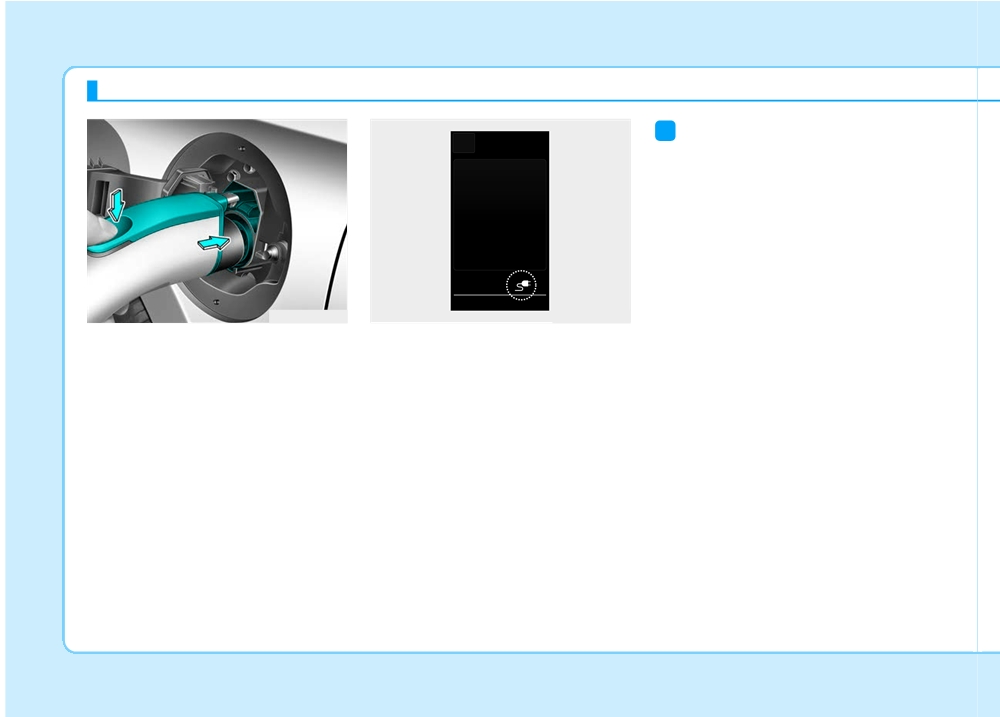
5. Remove any dust on the charging
7. Check if the charging cable con-
stops the charging process.
connector and charging inlet.
nection indicator of the high volt-
To restart the charging process,
age battery in the instrument clus-
6. Hold the charging connector han-
move the shift lever to P (Park),
ter is turned ON.
dle. Then, insert it into the charg-
press the Engine Start/Stop button
ing inlet, until you hear a click
Charging does not occur when the
to the OFF position, and disconnect
sound. If it is not fully connected, a
indicator is OFF. When the charg-
the charging cable. Then, connect
bad connection between the
ing connector is not connected
the charging cable.
charging connector and the charg-
properly, reconnect the charging
ing terminals may cause a fire.
cable to charge.
H10
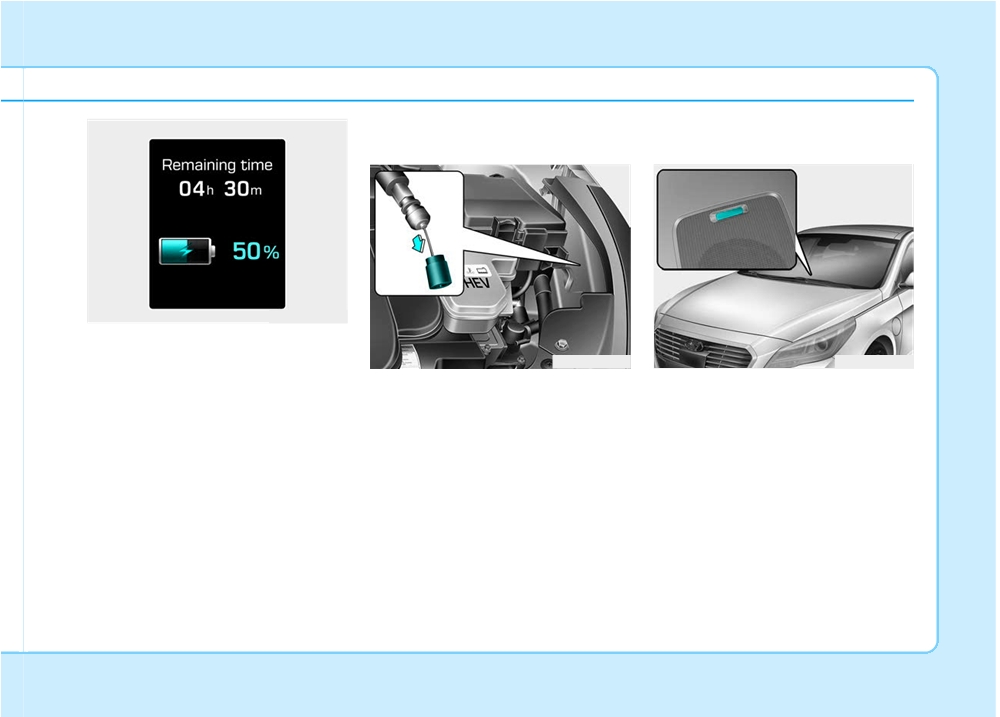
Unlock Charging Door in
Charging Status
Emergency
Checking Charging Status
OLFP045260N
8. After charging has started, the
estimated charging time is dis-
OLFP075118
OLFP0Q5009K
played on the instrument cluster
If the charging door does not open
for about 1 minute. It is also dis-
You can monitor the charging status
due to battery discharge, open the
played, when the driver’s door is
outside of the vehicle when charging
hood and slightly pull the emergency
opened with charging in progress.
the high-voltage battery.
cable as shown above. The charging
When scheduled charging is set,
door will then open.
the estimated charging time is dis-
played as “--" .
H11