Hyundai Tiburon (2003 year). Manual - part 108


  Index      Hyundai     Hyundai Tiburon - service repair manual 2003 year


Search            


Content   ..  106  107  108  109   ..


Hyundai Tiburon (2003 year). Manual - part 108


Oil temperature (°C) 

Resistance (K

16.7 ~ 20.5 

100 

0.57 ~ 0.69 

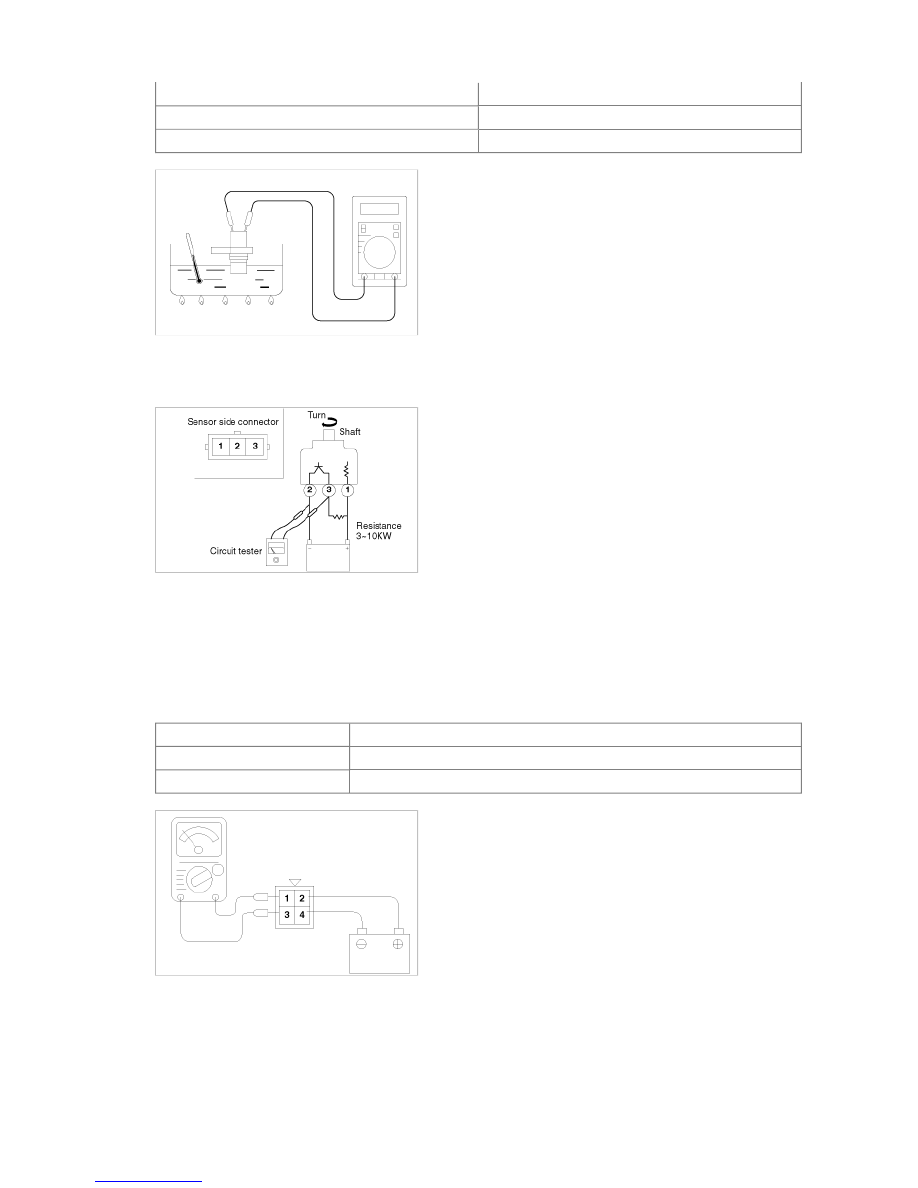
3. VEHICLE SPEED SENSOR CHECK 

(1) Remove the vehicle speed sensor and connect a 3~10 K

 resistance as shown in the illustration. 

(2) Turn the shaft of the vehicle speed sensor and check that there is voltage between terminals 2-3 (1 turn=4 pulses). 


4. A/T CONTROL RELAY CHECK 

(1) Remove the A/T control relay. 

(2) Use jumper wires to connect A/T control relay terminal 2 to the battery (+) terminal and terminal 4 to the battery (-) 

terminal. 

(3) Check the continuity between terminal 1 and terminal 3 of the A/T control relay when the jumper wires are 

connected and disconnected from the battery. 

(4) If there is a problem, replace the A/T control relay. 


Jumper wire 

Continuity between terminal No.1 

Connected 

Continuity 

Disconnected 

No continuity 

5. SOLENOID VALVE CHECK 

(1) Remove the valve body cover. 

(2) Disconnect the connectors of each solenoid valve. 


(3) Measure the resistance between terminals 1 and 2 of each solenoid valve. 

STANDARD VALUE 


Name 

Resistance 

Damper clutch solenoid valve 

2.7 ~ 3.4


(at 20°C) 

Low and reverse solenoid valve 

Second solenoid valve 

Underdrive solenoid valve 

Overdrive solenoid valve 

(4) If the resistance is outside the standard value, replace the solenoid valve. 

Resistance of the solenoid valve connector. 


Terminal No. 

Name 

Resistance 

7 & 10 

Damper clutch solenoid valve 

2.7 ~ 3.4


(at 20°C) 

10 & 6 

Low and reverse solenoid valve 

9 & 4 

Second solenoid valve 

9 & 3 

Underdrive solenoid valve 

9 & 5 

Overdrive solenoid valve 

BASIC INSPECTION ADJUSTMENT

AUTOMATIC TRANSAXLE FLUID CHECK

1. Drive the vehicle until the fluid temperature rises to the normal temperature (70~80°C). 

2. Park the vehicle on a level surface. 

3. Move the selector lever through all positions to fill the torque converter and the hydraulic circuits with fluid, and then 

move the selector lever to the N position. 

4. After wiping off any dirt around the oil level gauge, reinsert and remove the oil level gauge and check the condition of 

the fluid. 

If the fluid smells as if it is burning, it means that the fluid has been contaminated by fine particles from the bushes 
and friction materials, a transaxle overhaul may be necessary. 

5. Check that the fluid level is at the HOT mark on the oil level gauge. If the fluid level is lower than this, add more fluid 

until the level reaches the HOT mark. 
Automatic transaxle fluid : DIAMOND ATF SP-III., SK ATF SP-III. 

If the fluid level is low, the oil pump will draw in air along with the fluid, which will cause bubbles to form inside the 
hydraulic circuit. This will in turn cause the hydraulic pressure to drop, which will result in late shifting and slipping 
of the clutches and brakes. If there is too much fluid, the gears can churn it up into foam and cause the same 
conditions that can occur with low fluid levels. In either case, air bubbles can cause overheating and oxidation of 
the fluid which can interfere with normal valve, clutch, and brake operation. Foaming can also result in fluid 
escaping from the transaxle vent, in which case it may be mistaken for a leak. 

6. Insert the oil level gauge securely. 

7. The fluid and the oil filters should always be replaced when overhauling the transaxle or after the vehicle has been 

driven under severe conditions. The replacement procedures are given below. Furthermore, the oil filters are special 
filters which are only to be used for the automatic transaxle. 

When new, automatic transmission fluid should be red. The red dye is added so distinguish it from engine oil or 
antifreeze. As the vehicle is driven the transmission fluid will begin to look darker. The color may eventually appear 
light brown 
Also, the dye, which is not an indicator of fluid quality, is not permanent 
Therefore, further investigation of the automatic transaxle is required if, 

• the fluid is dark brown or black. 

• the fluid smells burnt. 

• metal particles can be seen or felt on the dipstick. 

AUTOMATIC TRANSAXLE FLUID

1. Remove the drain plug from the bottom of the transaxle case to drain the fluid. 

2. Install the drain plug and gasket, and tighten to the specified torque. 

Tightening torque : 32 Nm (320 kg·cm, 23 lb·ft) 

3. Pour the new fluid in through the oil filler tube. 

Stop pouring if the full volume of fluid cannot be poured in. 

4. Repeat the procedure in step 1 if too much fluid was added. 

5. Reconnect the hose that was disconnected in step 1 above, and firmly replace the oil level gauge. 

6. Start the engine and run it at idle for 1-2 minutes. 

7. Move the select lever through all positions, and then move it to the N position. 

8. Drive the vehicle until the fluid temperature rises to the normal temperature (70~80°C), and then ch eck the fluid level 

again. The fluid level must be at the HOT Mark. 

9. Firmly insert the oil level gauge into the oil filler tube. 


TRANSAXLE RANGE SWITCH CONTINUITY CHECK

TRANSAXLE RANGE SWITCH AND CONTROL CABLE ADJUSTMENT

1. Set the selector lever to the "N" position. 

2. Loosen the control cable to the manual control lever coupling nut to free the cable and lever. 

3. Set the manual control lever to the neutral position. 


Content   ..  106  107  108  109   ..