Hyundai Elantra Neos / Hyundai i30. Manual - part 18
 

  Index      Hyundai     Hyundai Elantra Neos / Hyundai i30 - service repair manual 2008 year


Search            


Content   ..  16  17  18  19   ..


Hyundai Elantra Neos / Hyundai i30. Manual - part 18


BP-8

BODY  PANEL REPAIR PROCEDURE

5.

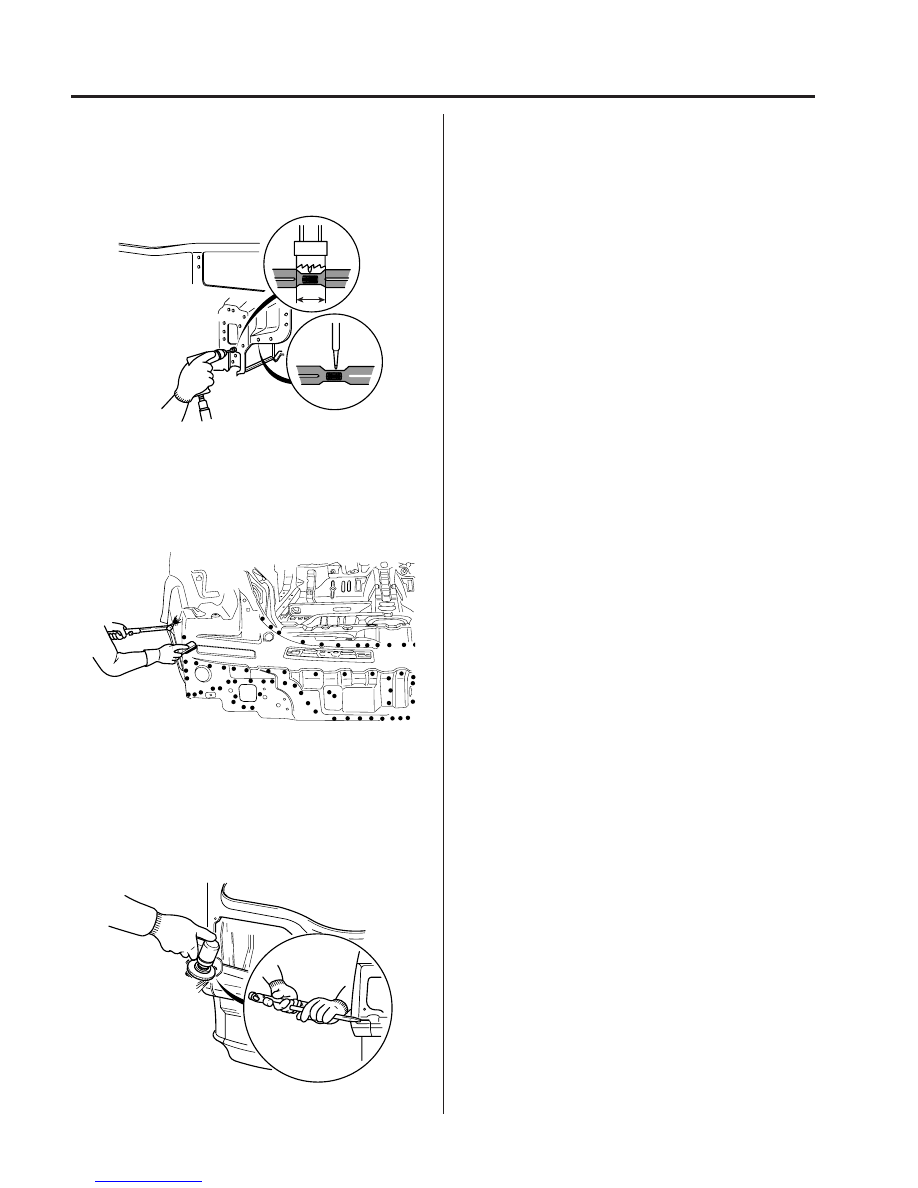
Determine a cutting method
a)

Cutting a spot welded area
Make a hole in the middle of spot welded area
with a punch, remove welded area using a spot
cutter and remove using a chisel.

b)

Removing brazed area
Remove using a torch and wire brush, and chisel.

c)

Removing arc welded area
Remove plug welded area using a disk grinder
and chisel.

BVQBP6014

BVQBP6016

BFDBP6015

BODY PANEL REPAIR PROCEDURE

BP-9

4.

Preparation for spot welding
Remove paint on spot welded area and on the area
overlapped by the new part using a belt sander or
similar tool.

5.

Drilling a hole for plug welding
If the thickness of the part to be welded is less than 3
mm, drill a 5~6 mm diameter hole. If the thickness of
the part to be welded is greater than 3 mm, drill a hole
using a 7 mm diameter drill.

NOTE

Do not spot weld where thickness is greater than
3 mm.

PREPARATION FOR INSTALLATION

1.

Spot weld finish
Use a disk grinder or similar tool to finish spot weld
mark, Do not grind more than is necessary to smooth
surface.

2.

Panel preparation
Repair any bent or uneven areas with a hammer to
improve the installation process.

3.

Cutting a rough area for a new part
When rough cutting an area for a new part, leave a
tolerance of 30~50 mm.

BVQBP6017

BVQBP6020

BVQBP6021

BFDBP6018

BFDBP6608

BP-10

BODY  PANEL REPAIR PROCEDURE

INSTALLATION

1.

Checking welding and fitting in advance
a)

When installing a new par t, measure the
dimensions of each part according to the body
dimensions given in Section BD, and set part to
the reference dimensions.

b)

Prior to final welding, check the fit of all related
parts.

2. Selecting number of welding points

Spot welding : Multiply the original number of

        factory welds by 1.3 times

Plug welding : Same number as original number

       of factory welds

NOTE

Plug welding should be done using a carbon arc
welding machine.

Brazing should be done only on areas that were
originally brazed at the factory.

3.

Caution when spot welding
a)

Do a test welding on a piece of material of the
same type and thickness as the part to be welded
and proceed if test weld is good.

b)

Before spot welding, check if welding debris, oil
or paint is present on the area where surfaces
meet.
Clean or sand as necessary.

BVQBP6024

3mm

Spot welding:initial number of welds x1.3

Plug welding-used when
spot welding is not
feasible or material is
thicker than 3 mm 

Welding points-same number as original number of factory welds.

Initial welding

pitch:50 mm

Welding after repair

pitch:35 mm

BVQBP6025

Center

diameter

3 mm 

Using a test piece

Using a hammer

and a chisel

Nugget
diameter:
4/5 of tip 

BFDBP6022

BFDBP6601B

BODY PANEL REPAIR PROCEDURE

BP-11

c)

The tip of the spot welding machine should be
maintained to a minimum tolerance of 3 mm. Also
let area cool after 5 or 6 welds to minimize
problems caused by excessive heat.

4.

Cutting and welding an removed area
To align a roof panel and a center pillar together for
butt welding, temporarily fasten a steel flange to the
roof panel and then apply the new center pillar panel.
Remove the flange when final welding is done.

5.

Finishing after welding
a)

Grind any areas that were plug welded or butt
welded using a disk grinder. Grind carefully to avoid
removing too much material. This degrades the
strength of the weld.

b)

Finish areas that have been brazed by applying
body filler then smooth the area with a flexible file
and sander.

6.

Applying anti-rust agent and body sealer
After coating the surface with anti-rust agent, apply
body sealer where necessary.

NOTE

Apply body sealer before assembly.

7.

Anti-rust treatment
Apply anti-rust agent to inside of doors and sills by
spraying through access holes provided.

BVQBP6026

3mm(0.2 in)

BVQBP6027

BVQBP6028

BVQBP6029

BVQBP6030

BFDBP6031


Content   ..  16  17  18  19   ..