Hummer H3. Manual - part 1225


  Index      Hummer     Hummer H3 - service repair manual 2006-2009 year


Search            


Content   ..  1223  1224  1225  1226   ..


Hummer H3. Manual - part 1225
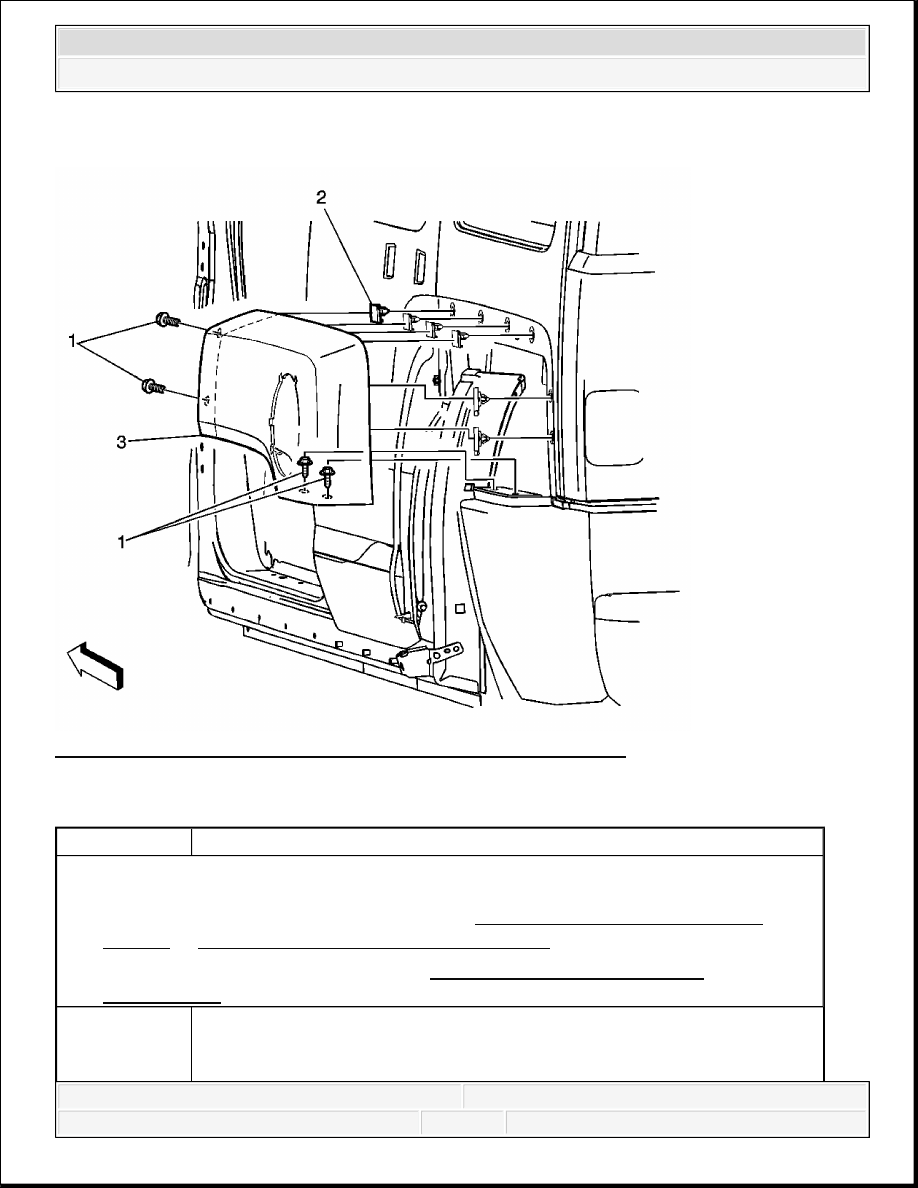


REAR WHEEL OPENING FLARE REPLACEMENT (BASE REAR BODY) 

Fig. 9: Wheel Opening Flare Replacement - Rear (Wheelhouse) 
Courtesy of GENERAL MOTORS CORP. 

Rear Wheel Opening Flare Replacement (Base Rear Body) 

Callout

Component Name

Preliminary Procedure 

1. Remove the rear wheelhouse panel. Refer to Wheelhouse Panel Replacement 

(Front) or Wheelhouse Panel Replacement (Rear) .  

2. Remove the fuel filler pocket. Refer to Fuel Tank Filler Pipe Housing 

Replacement .  

Rear Wheel Opening Flare Bolt (Qty: 4) 

NOTE:


2007 Hummer H3 

2007 ACCESSORIES & EQUIPMENT Exterior Trim - H3


REAR WHEEL OPENING FLARE REPLACEMENT (REAR DOOR W/BRM AND RHD) 

Fig. 10: Identifying Rear Wheel Opening Flare (Rear Door w/BRM & RHD) 
Courtesy of GENERAL MOTORS CORP. 

Rear Wheel Opening Flare Replacement (Rear Door w/BRM and RHD) 

1

Tighten: 9 N.m (80 lb in) 

Refer to Fastener Notice .

2

Rear Wheel Opening Flare Retainer (Qty: 6) 
Tip: Use side cutters to clip the ends of the retainers for removal.

3

Rear Wheel Opening Flare Assembly

Callout

Component Name

Preliminary Procedures 

1. The component part and surface should be 21°C (70°F) prior to installation. The 

vehicle should remain at 21°C (70°F) for one hour after assembly to allow the 

NOTE:

Refer to Exterior Trim Emblem Removal Notice .


2007 Hummer H3 

2007 ACCESSORIES & EQUIPMENT Exterior Trim - H3


REAR WHEEL OPENING FLARE REPLACEMENT (REAR BODY W/BRM AND RHD) 

adhesive to develop sufficient bond strength.  

2. Clean the old adhesive tape from the door flare and wipe the surface with a clean, dry 

lint-free towel prior to installing the door flare.  

3. When removing protective liners from the adhesive tape, be careful not to touch the 

tape with the hands and do not allow the tape to come in contact with dirt or any 
foreign matter prior to adhesion.  

1

Rear Door Flare Retainer (Qty: 4) 
Tip: 

1. Disengage the inner retainers.  

2. Using a plastic flat-bladed tool, release the adhesive tape from the 

flare.  

3. Pull the flare outward in order to release the outer flare retainers.  

2

Rear Door Flare (LH Similar)

3

Rear Door Flare Retainer (Qty: 4)

4

Double Sided Adhesive Tape 
Tip: Remove the adhesive tape backing only after the flare assembly is 
secured to the vehicle. Completely wet-out the entire outer periphery of the 
flare.


2007 Hummer H3 

2007 ACCESSORIES & EQUIPMENT Exterior Trim - H3


Fig. 11: Identifying Rear Wheel Opening Flare (Rear Body w/BRM & RHD) 
Courtesy of GENERAL MOTORS CORP. 

Rear Wheel Opening Flare Replacement (Rear Body w/BRM and RHD) 

Callout

Component Name

Preliminary Procedures 

1. The component part and surface should be 21°C (70°F) prior to installation. The 

vehicle should remain at 21°C (70°F) for one hour after assembly to allow the 
adhesive to develop sufficient bond strength.  

2. Clean the old adhesive tape from the body flare and wipe the surface with a clean, dry 

lint-free towel prior to installing the body flare.  

3. When removing protective liners from the adhesive tape, be careful not to touch the 

tape with the hands and do not allow the tape to come in contact with dirt or any 
foreign matter prior to adhesion.  

NOTE:

Refer to Exterior Trim Emblem Removal Notice .

Rear Body Flare Retainer (Qty: 3) 
Tip: 


2007 Hummer H3 

2007 ACCESSORIES & EQUIPMENT Exterior Trim - H3


Content   ..  1223  1224  1225  1226   ..