Hummer H2. Manual - part 796


  Index      Hummer     Hummer H2 - service repair manual 2004 year


Search            


Content   ..  794  795  796  797   ..


Hummer H2. Manual - part 796


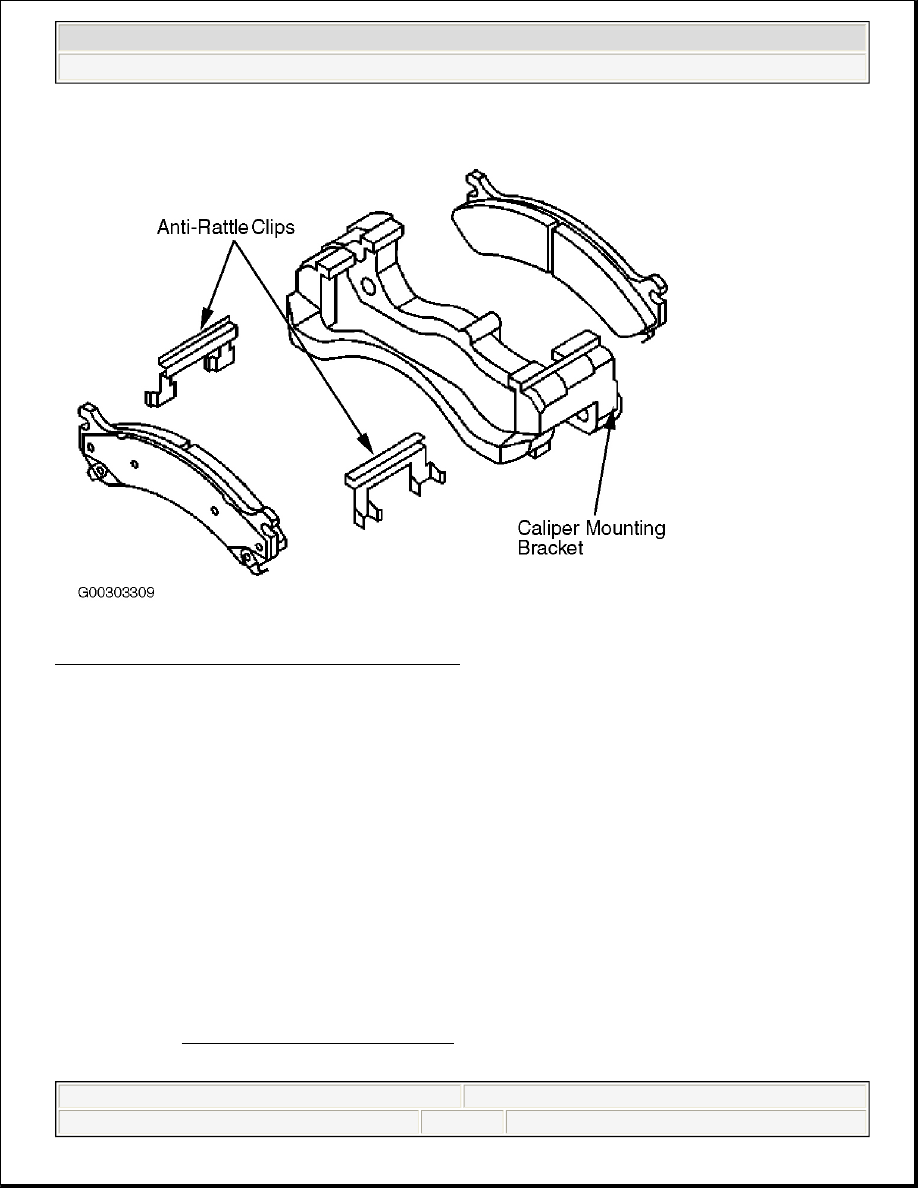
Fig. 26: Discarding Anti-Rattle Clips (Front & Rear) 
Courtesy of GENERAL MOTORS CORP. 

Installation 

1. Install NEW anti-rattle clips to the inside ends of the caliper mounting bracket. Install the brake pads to 

the caliper mounting bracket. Install the brake caliper to the brake caliper bracket.  

2. Perform the following procedure before installing the caliper guide pin bolts: 

z

Remove all traces of the original adhesive patch.  

z

Clean the threads of the bolt with brake parts cleaner or the equivalent and allow to dry.  

z

Apply Threadlocker (GM P/N 12345493) to the threads of the bolt.  

3. Install the brake caliper guide pin bolts. Install the tire and wheel assembly. Remove the safety stands. 

Lower the vehicle.  

4. With the engine OFF, gradually apply the brake pedal to approximately 2/3 of its travel distance. Slowly 

release the brake pedal. Wait 15 seconds, then repeat this step until a firm pedal is obtained. This will 
properly seat the brake caliper pistons and brake pads.  

5. Fill the master cylinder reservoir to the proper level with clean brake fluid. Burnish the brake pads and 

rotors. See BURNISHING PADS & ROTORS under SERVICING. 


2004 Hummer H2 

2003-04 BRAKES Disc - Hummer


BRAKE PEDAL ASSEMBLY 

Removal & Installation 

1. Remove the pushrod retaining clip. See Fig. 27 . Remove the stop light switch and the pushrod from the 

brake pedal stud.  

2. Remove the nut from the brake pedal bolt. See Fig. 28 . Remove the brake pedal bolt. Remove the brake 

pedal.  

3. To install, install the brake pedal. Install the brake pedal bolt. Install the nut to the brake pedal bolt. Hold 

the nut with a wrench and tighten the brake pedal bolt to specification. See TORQUE 
SPECIFICATIONS 
.  

4. Install the pushrod and the stop light switch to the brake pedal pin. Install the pushrod retaining clip.  

Fig. 27: Removing/Installing Brake Pedal Assembly 
Courtesy of GENERAL MOTORS CORP.


2004 Hummer H2 

2003-04 BRAKES Disc - Hummer


Fig. 28: Removing/Installing Brake Pedal Bolt & Nut 
Courtesy of GENERAL MOTORS CORP. 

BRAKE PIPE 

Removal & Installation 

1. Disconnect the brake pipe fittings. See Fig. 21 . Remove the brake pipe fasteners from the vehicle. 

CAUTION: Always use double-walled steel brake pipe when replacing brake pipes. 

The use of any other pipe is not recommended and may cause brake 
system failure. Carefully route and retain replacement brake pipes. Always 
use the correct fasteners and in the original location for replacement 
brake pipes. Failure to properly route and retain brake pipes may cause 
damage to the brake pipes and brake system resulting in personal injury. 


2004 Hummer H2 

2003-04 BRAKES Disc - Hummer


Remove the brake pipe from the vehicle.  

2. To install, bend the brake pipe to achieve proper fit. Install the brake pipe to the vehicle. Maintain a 

clearance of 3/4" (19 mm) for all moving or vibrating components. Install the brake pipe fasteners to the 
vehicle.  

3. Connect the brake pipe fittings. Tighten the brake pipe fitting to specification. See TORQUE 

SPECIFICATIONS .  

4. If the brake pipe that was replaced, was between the master cylinder and the BPMV, bleed ABS system. 

See appropriate ANTI-LOCK article. If the brake pipe that was replaced, was between the BPMV and the 
wheel jounce hoses, bleed hydraulic brake system. See BLEEDING BRAKE SYSTEM .  

BRAKE ROTOR 

Removal (Front) 

1. Raise and support the vehicle. Remove the tire and wheel assembly. Mark the relationship of the rotor to 

the hub.  

2. Install a C-clamp over the body of the brake caliper, with the C-clamp ends against the rear of the caliper 

body and the outboard disc brake pad. See Fig. 14 . Slowly tighten the C-clamp until the pistons are 
pushed into the caliper bores enough to remove the caliper from the pads. Remove the C-clamp from the 
caliper. Remove the 2 brake caliper bracket mounting bolts.  

3.  

Remove the brake caliper and brake caliper mounting bracket as an assembly and support with heavy 
mechanic's wire or equivalent. DO NOT disconnect the hydraulic brake flexible hose from the caliper. 
Remove the rotor retaining push nuts from the wheel studs, if applicable. It may be necessary to strike the 
end of the hub or the rotor with a deadblow hammer to separate the rotor from the hub.  

4. Remove the rotor. See Fig. 29 . If the rotor is difficult to remove due to corrosion in the hub area use the 

following procedure to remove the rotor. 

z

Clean all the surface areas and the threaded holes of contamination.  

z

Generously apply penetrating oil or the equivalent to the hub/rotor area.  

z

Insert M10 x 1.5" bolts (jack screws) into the threaded holes of the rotor.  

z

Tighten both bolts evenly to force the rotor from the hub. 

NOTE:

Any NEW rotor must have the protective coating removed from the friction 
surfaces before being placed in service. Use Goodwrench Brake Parts Cleaner 
(GM P/N 123777981), or the equivalent, and wipe the surface clean with clean 
cloths. DO NOT use gasoline, kerosene, or other oil base solvents which may 
leave an oily residue. This residue is damaging to the brake lining and is 
flammable. 

NOTE:

Support the brake caliper with heavy mechanic's wire, or equivalent, 
whenever it is separated from its mount and the hydraulic flexible brake 
hose is still connected. Failure to support the caliper in this manner will 
cause the flexible brake hose to bear the weight of the caliper, which may 
cause damage to the brake hose and in turn may cause a brake fluid leak. 


2004 Hummer H2 

2003-04 BRAKES Disc - Hummer


Content   ..  794  795  796  797   ..