Hummer H2. Manual - part 2400


  Index      Hummer     Hummer H2 - service repair manual 2004 year


Search            


Content   ..  2398  2399  2400  2401   ..


Hummer H2. Manual - part 2400


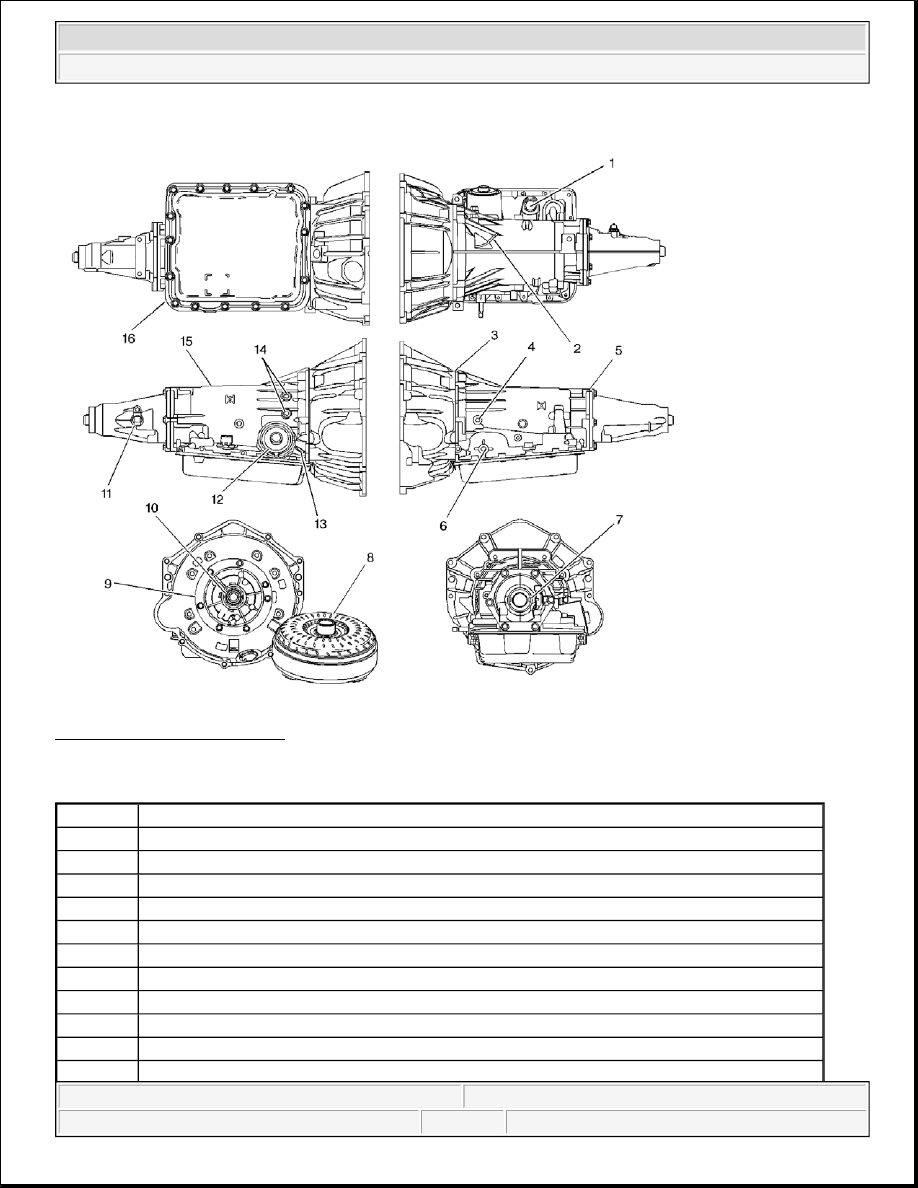
Fig. 5: Leak Inspection Points 
Courtesy of GENERAL MOTORS CORP. 

Callouts For Fig. 51 

Callout

Component Name

1

Wiring Harness Pass-Through Connector O-ring Seal

2

Transmission Vent Assembly

3

Converter Housing to Case Joint (Pump to Case Oil Seal)

4

Line Pressure Plug

5

Case Extension to Case Seal

6

Manual Shaft Seal

7

Case Extension Oil Seal Assembly

8

Torque Converter Assembly

9

Pump to Case Oil Seal

10

Pump Oil Seal Assembly

11

Internal Transmission Speed Sensor to Case O-ring Seal - Some Models


2004 Hummer H2 

2004 TRANSMISSION Automatic Transaxle - 4L60-E/4L65-E (Troubleshooting)


CASE POROSITY REPAIR 

Some external leaks are caused by case porosity in non-pressurized areas. You can usually repair these leaks 
with the transmission in the vehicle. 

1. Thoroughly clean the area to be repaired with a cleaning solvent. Air dry the area. 

2. Using instructions from the manufacturer, mix a sufficient amount of an epoxy to make the repair.  

3. While the transmission case is still hot, apply the epoxy. You can use a clean, dry soldering acid brush to 

clean the area and also to apply the epoxy cement. Make certain that the area to be repaired is fully 
covered.  

4. Allow the epoxy cement to cure for three hours before starting the engine.  

5. Repeat the fluid leak diagnosis procedures.  

SHIFT SOLENOID LEAK TEST 

Tools Required 

z

J 35616 GM Terminal Test Kit  

z

J 44246 Solenoid Testing Kit  

Leak Test Procedure 

1. Remove the shift solenoid valve from the control valve body or the torque converter clutch (TCC) 

solenoid valve from the transmission case. Refer to Control and Shift Solenoids Replacement or 
Torque Converter Clutch Pulse Width Modulation (TCC PWM) Solenoid, TCC Solenoid, and 
Wiring Harness
 . 

12

2-4 Servo Cover O-ring Seal

13

Oil Fill Tube Seal

14

Oil Cooler Pipe Connectors

15

Transmission Case

16

Transmission Oil Pan Gasket

CAUTION: Epoxy adhesive may cause skin irritations and eye damage. Read 

and follow all information on the container label as provided by the 
manufacturer.

IMPORTANT:

z

This procedure tests On/Off type solenoid valves.  

z

Visually inspect the physical condition of the solenoid before 
testing. Inspect the O-rings before and after the test to be sure that 
they are not cut or damaged.  


2004 Hummer H2 

2004 TRANSMISSION Automatic Transaxle - 4L60-E/4L65-E (Troubleshooting)


Fig. 6: Installing Valve Into J 44246 
Courtesy of GENERAL MOTORS CORP. 

2. Install the TCC solenoid valve, the 1-2 shift solenoid valve or the 2-3 shift solenoid valve into bore 

number 2 of the J 44246 and install the factory retainer clip to retain the solenoid. 


2004 Hummer H2 

2004 TRANSMISSION Automatic Transaxle - 4L60-E/4L65-E (Troubleshooting)


Fig. 7: Connecting The Solenoid Testing Harness To The Solenoid 
Courtesy of GENERAL MOTORS CORP. 

3. Connect the solenoid testing harness supplied with the J 44246 to the solenoid. 

IMPORTANT: The supplied solenoid testing harness will not power the 4L60-E TCC 

On/Off solenoid. To energize this solenoid, apply battery, 12-volt, positive 
(+) and negative (-) to the TCC On/Off solenoid wiring harness using 
connector test adapter kit J 35616 . Use terminal E, Red, Power, and 
terminal T, Black, Ground. Refer to the Automatic Transmission Inline 20-
Way Connector End View .


2004 Hummer H2 

2004 TRANSMISSION Automatic Transaxle - 4L60-E/4L65-E (Troubleshooting)


Content   ..  2398  2399  2400  2401   ..