Hummer H1 (2006+). Manual - part 173
 

  Index      Hummer     Hummer H1 DMAX - service repair manual 2006 year


Search            


Content   ..  171  172  173  174   ..


Hummer H1 (2006+). Manual - part 173


3-34 Fuel, Emissions, and Exhaust

___________________________________________

.

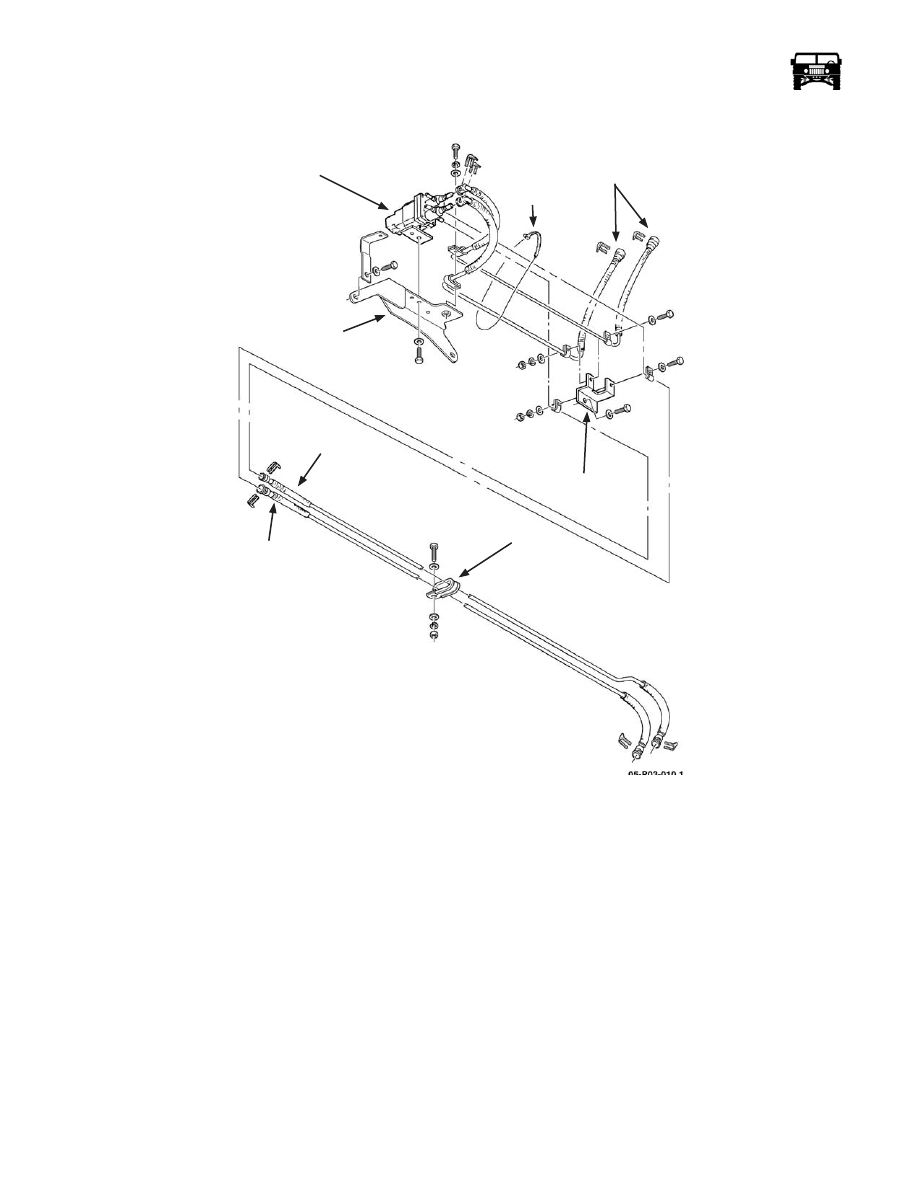
Figure 3-19:   Fuel Lines, Connections, and Attachment

VALVE

MOUNTING

BRACKET

RETURN LINE

(AUXILIARY TANK)

CLAMP

(TYPICAL)

SUPPLY LINE

(AUXILIARY TANK)

FUEL SELECTOR VALVE

TANK-TO-VALVE 

LINES

FUEL LINE

BRACKET

TIE STRAP

___________________________________________

 Fuel, Emissions, and Exhaust  3-35

Figure 3-20:   Fuel Selector Valve and Fitting

Quick Connect Fittings

Quick connect fittings are used at the main tank fuel tubes, auxiliary tank fuel tubes, and at the fuel tank selector valve
(Figure 3-20). 

The plastic fitting retainer only requires a screwdriver and needle nose pliers to remove.

Plastic Fittings

1.

To disconnect, raise the retainer tab with a small flat blade screwdriver and remove the retainer with needle nose pliers. 

2.

To reconnect, push the fitting onto the tube, insert the retainer through the fitting sides, and seat it firmly.

3.

Be sure the retainer seats behind the fuel tube flange. 

4.

Pull on the fitting afterward to verify proper seating.

FUEL SELECTOR

VALVE

TUBE

FUEL LINE

CLIP

3-36 Fuel, Emissions, and Exhaust

___________________________________________

Figure 3-21:   Fuel Tank Vent Line Locations

Fuel Tank Vent Line Service 

Removal

1.

Remove the fuel tank. (Refer to section 3)

2.

Remove the clip and the fuel tank vent line hose from the vent line (Figure 3-21).

3.

Remove the vent line clamps and disengage the lines.

4.

Remove the tie strap securing the vent line to the fuel lines. Discard the tie strap.

5.

Disconnect the fuel tank vent lines at the tank fittings and remove the lines.

Installation

1.

Connect the vent lines to the tank fittings.

2.

Secure the vent line to the fuel lines with a new tie strap (Figure 3-21).

3.

Secure the vent lines in the brackets with clamps and bolts.

4.

Install the fuel tank.

Main Fuel Tank Vent Filter 

The main fuel tank vent filter is located just above the vacuum pump motor at the passenger side of the engine compartment. 

The filter is serviced as an assembly and should be replaced if restricted or damaged.

Removal

1.

Remove the filter retaining clamp bolt and pull the filter out of the P clamp

2.

Disconnect the clamp from the filter’s vent line.

3.

Remove the filter from the vent line

Installation

1.

Connect the filter to the vent line.

2.

Install the vent line clamp.

3.

Install the filter in the P clamp and secure with the bolt.

FUEL TANK

VENT LINE

FUEL LINES

VENT LINE

BRACKETS

TIE STRAP

___________________________________________

 Fuel, Emissions, and Exhaust  3-37

Figure 3-22:   Fuel Tank Vent Filters

FUEL TANK

VENT LINE

ELBOW

BODY

BRACKET

P CLAMP

VENT LINE FILTER

VENT LINE

CLAMP

TIE STRAP


Content   ..  171  172  173  174   ..