Hummer H1 (2006+). Manual - part 53
 

  Index      Hummer     Hummer H1 DMAX - service repair manual 2006 year


Search            


Content   ..  51  52  53  54   ..


Hummer H1 (2006+). Manual - part 53


OBD-56

On-Board Diagnostics

_______________________________________________

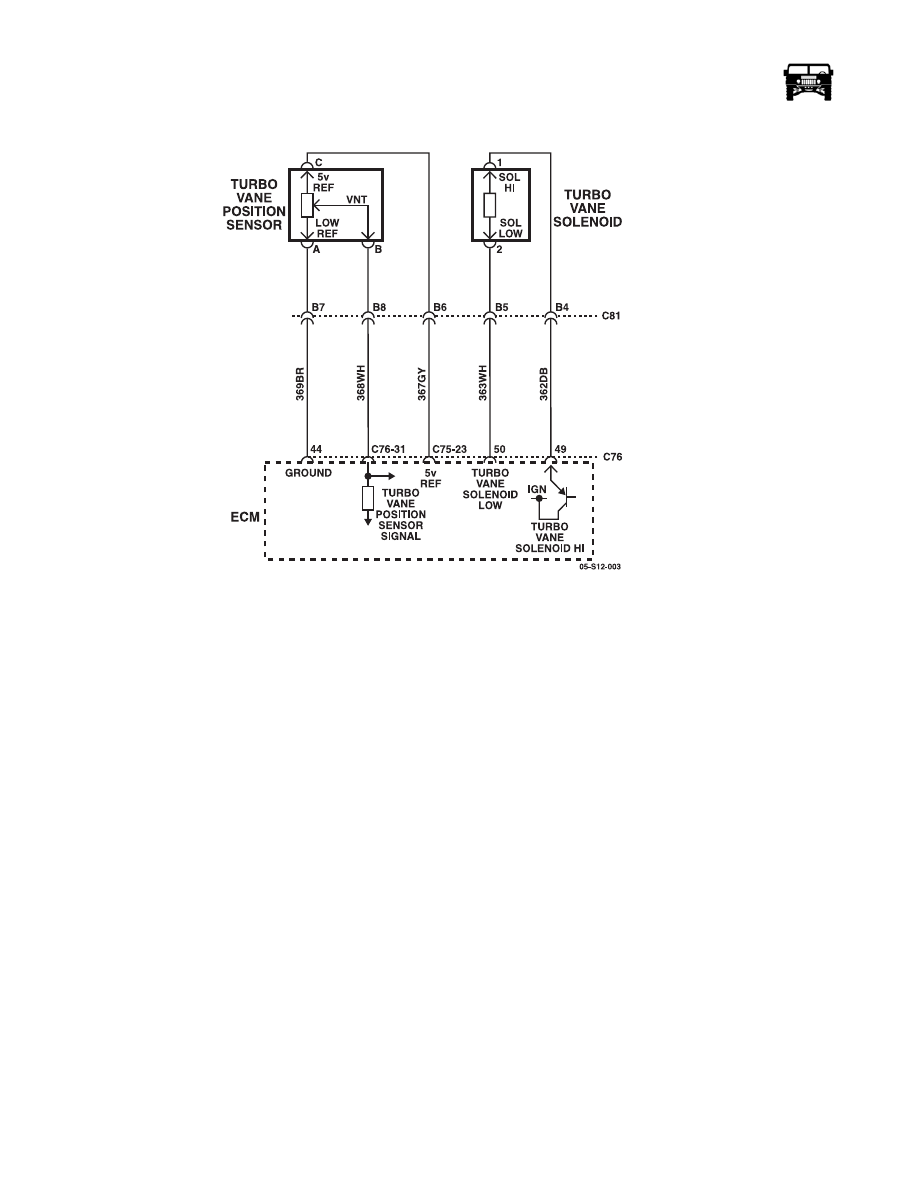
DTC P0046 Turbocharger Vane Control Position Performance (Figure OBD-18)

Figure OBD-18:   Turbocharger Vane Control Position Circuit

Circuit Description

The position of the turbocharger vanes is controlled by the engine control module (ECM). The ECM utilizes a turbocharger vane
control solenoid valve and a turbocharger vane position sensor to control the turbocharger vanes. When the engine is not under
load, the turbocharger vanes are in an open position, or no boost condition. When the engine is under load, the ECM commands the
control solenoid valve to close the turbocharger vanes, thus increasing the boost. The ECM will vary the boost dependant upon the
load requirements of the engine. The vane control solenoid valve uses 2 circuits, a control circuit and a low reference circuit. The
ECM uses a pulse width modulation (PWM) on the control circuit to control the solenoid valve. The ECM provides a ground on the
low reference circuit. If the ECM detects that the commanded position of the turbocharger vanes does not match the actual posi-
tion, DTC P0046 will set. 

Conditions for Setting the DTC

The ECM detects that the commanded position of the turbocharger vanes does not match the actual position for 1 second.

Action Taken When the DTC Sets 

• The control module illuminates the malfunction indicator lamp (MIL) on the second consecutive ignition cycle that the diag-

nostic runs and fails. 

• The control module records the operating conditions at the time the diagnostic fails. The first time the diagnostic fails, the

control module stores this information in the Failure Records. If the diagnostic reports a failure on the second consecu-
tive ignition cycle, the control module records the operating conditions at the time of the failure. The control module 
writes the operating conditions to the Freeze Frame and updates the Failure Records. 

______________________________________________

 On-Board Diagnostics  OBD-57

5745804

Conditions for Clearing the MIL/DTC 

• The control module turns OFF the malfunction indicator lamp (MIL) after 3 consecutive ignition cycles that the diagnostic 

runs and does not fail. 

• A current DTC, Last Test Failed, clears when the diagnostic runs and passes. 

• A history DTC clears after 40 consecutive warm-up cycles, if no failures are reported by this or any other emission related 

diagnostic.

• Clear the MIL and the DTC with a scan tool. 

Diagnostic Aids 

• If any service has been performed on the turbocharger or on the turbocharger components, a turbocharger relearn must be 

performed. Failure to perform the turbocharger learn procedure may cause this DTC to set.

• For an intermittent condition, refer to Intermittent Conditions. 

Step

Action

Value(s)

Yes

No

    1

NOTE: Before clearing DTC(s) use the scan tool “Capture info” to
record Freeze Frame and Failure Records for reference, as data will be
lost when “Clear Info” function is used 

Was the “On-Board Diagnostic (OBD) System Check” performed?

Go to step 2.

Go to OBD 

System

Check.

    2

If any of the following DTCs are set, go to that DTC first.

 P0652

 P0653

 P2564

 P2565 

 P2563

Are any of these DTCs set?

Go to the 

Diagnostic

for each

Trouble Code

in numerical 

order

Go to Step 3 

    3

1.

Perform the Turbocharger Learn Procedure.

2.

Turn OFF the ignition for 30 seconds.

3.

Turn ON the ignition, with the engine OFF.

4.

Clear the DTCs with the scan tool.

Is the procedure complete?

Go to Step 4

    4

1.

Observe the Freeze Frame/Failure Records for this DTC.

2.

Turn OFF the ignition for 30 seconds.

3.

Turn ON the ignition, with the engine OFF.

4.

Operate the vehicle within the Conditions for Running the DTC. 
You may also operate the vehicle within the conditions that you 
observed from the Freeze Frame/Failure Records.

Did the DTC fail this ignition?

Go to Step 5

Intermittent, 

go to Diag-

nostic Aids.

    5

1.

Turn OFF the ignition for 30 seconds.

2.

Disconnect the turbocharger vane position sensor.

3.

Test for an intermittent and for a poor connection at the vane posi-
tion sensor. 

Did you find and correct the condition?

Go to Step 18 

Go to Step 6

OBD-58

On-Board Diagnostics

_______________________________________________

    6

1.

Inspect the ECM connector for corrosion, pushed out pins and cor-
rect pin tension.

2.

Connect the ECM and the sensor.

3.

Key on, engine off.

4.

Clear the DTCs.

5.

Perform the On-Board Diagnostic (OBD) Self-Test.

Did you find and correct the condition?

Go to Step 18

Go to Step 7

    7

Measure the resistance of the 5-volt reference circuit 367 (GY) between
the vane position sensor pin C harness side and the engine control mod-
ule (ECM) C75 pin 23 harness side, with a DVOM.

Is the resistance more than the specified value?

5 ohms

Go to Step 16

Go to Step 8

    8

Measure the resistance of the signal circuit 368 (WH) between the vane
position sensor pin B harness side and the ECM C76 pin 31 harness
side, with a DVOM.

Is the resistance more than the specified value?

5 ohms

Go to Step 16

Go to Step 9

    9

1.

Connect the vane position sensor.

2.

Disconnect the turbocharger vane position control solenoid valve.

3.

Test the turbocharger vane position control solenoid valve high 
control circuit 362 (DB) pin 1 at the vane position control solenoid 
for a short to voltage.

Did you find and correct the condition?

0 volts

Go to Step 18 

Go to Step 10 

   10

1.

Inspect the vane control solenoid valve connector for corrosion, 
pushed out pins and correct pin tension.

2.

Connect vane control solenoid valve sensor.

3.

Key on, engine off.

4.

Clear the DTCs.

5.

Perform the On-Board Diagnostic (OBD) Self-Test.

Did you find and correct the condition?

Go to Step 18 

Go to Step 11

   11

Measure the resistance of the control circuit 362 (DB) between the sole-
noid valve pin 1 and the ECM C76 pin49, with a DVOM.

Is the resistance more than the specified value?

3 ohms

Go to Step 16

Go to Step 12

   12

Measure the resistance of the low reference circuit 363 (WH) between
the solenoid valve pin 2 and the ECM C76 pin 50, with a DVOM.

Is the resistance more than the specified value?

3 ohms

Go to Step 16 

Go to Step 13

   13

1.

Remove the turbocharger vane position control solenoid valve. 

The solenoid valve may be in 3 different positions:

• Open--Light is visible through the slot. 

• Closed--The surface of the valve in the slot is smooth. 

• At Rest--The surface of the valve in the slot is serrated. 

2.

Observe both sets of slots on the side of the valve. A serrated sur-
face, which is part of the sliding piece visible through the slots, 
should be fully visible in both slots.

Is the serrated surface visible through the solenoid valve slots?

Go to Step 14 

Go to Step 17 

Step

Action

Value(s)

Yes

No

______________________________________________

 On-Board Diagnostics  OBD-59

5745804

   14

1.

Connect the ECM.

2.

Connect the turbocharger vane control solenoid valve connector.

3.

Turn ON the ignition, with the engine OFF.

4.

Depress and hold the button at the tip of the control solenoid valve.

5.

Command the control solenoid valve ON with the scan tool.

6.

Observe the slot closest to the button when commanding the sole-
noid valve ON.

Does the spool valve move and open the slot on the vane control sole-
noid valve when commanded ON?

Go to Step 15 

Go to Step 17

   15

1.

Inspect the turbocharger for debris, damage, or stuck.

2.

If required, replace the turbocharger. 

3.

Did you find and correct the condition?

Go to Step18 


   16

Repair the high resistance in the circuit.

Did you complete the repair?

 Go to Step18

   17

Replace the faulty turbocharger vane control solenoid valve.

Did you complete the replacement?

Go to Step 18 

   18

1.

Clear the DTCs with a scan tool. 

2.

Turn OFF the ignition for 30 seconds.

3.

Start the engine.

4.

Perform the turbocharger learn procedure. 

5.

Operate the vehicle within the Conditions for Running the DTC. 
You may also operate the vehicle within the conditions that you 
observed from the Freeze Frame/Failure Records. 

Did the DTC fail this ignition?

Go to Step 2

Go to Step 19

   19

1.

Using the Scan Tool select “Capture Info,” Review Info.” Are any 
DTC’s displayed that have not been diagnosed?

Go to the 

applicable

DTC table.

System OK.

Step

Action

Value(s)

Yes

No


Content   ..  51  52  53  54   ..