Hummer H1 (2002+). Manual - part 216
 

  Index      Hummer     Hummer H1 - service repair manual 2002 year


Search            


Content   ..  214  215  216  217   ..


Hummer H1 (2002+). Manual - part 216


______________________________________________________


 Electrical System  12-89


®


05745159


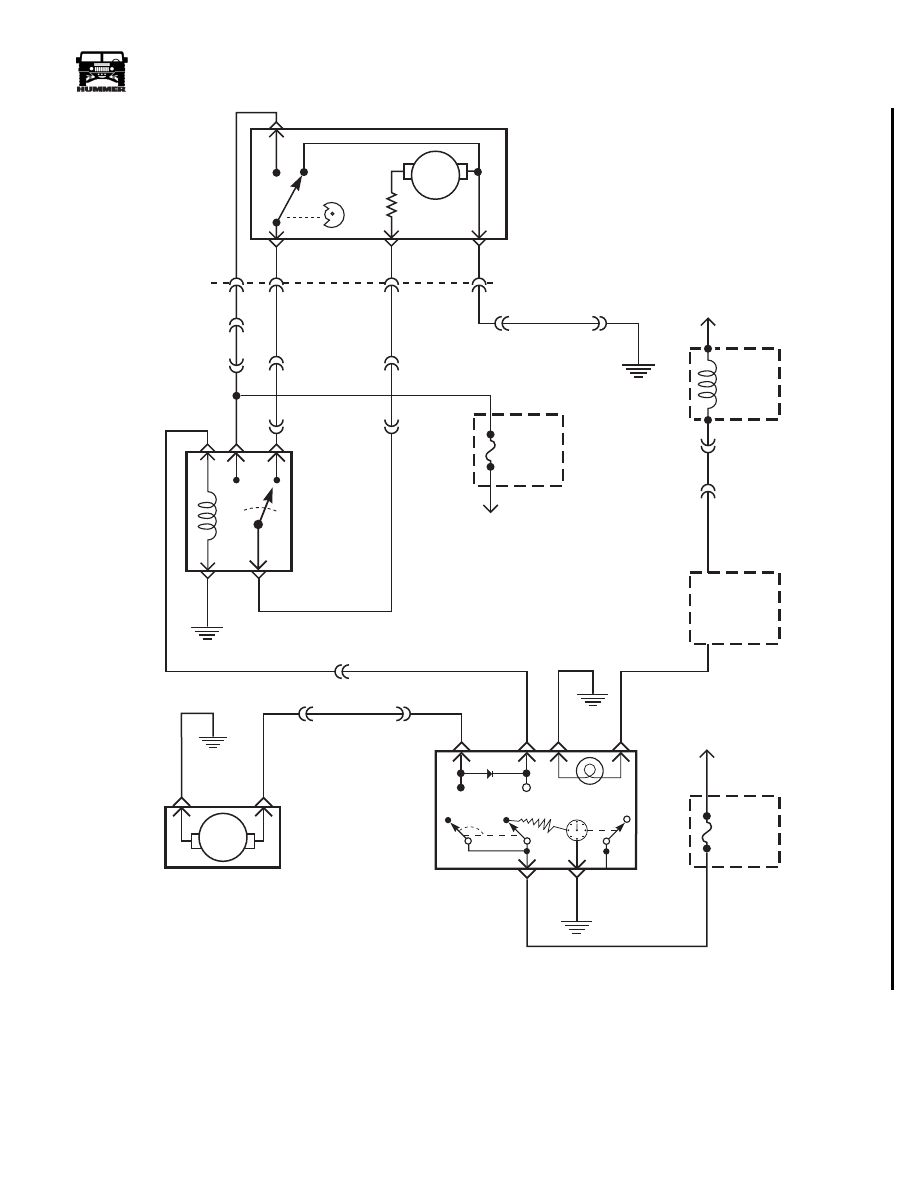
Figure 12-98:   Rear Wiper Motor Schematic

C42

REAR
WIPER
MOTOR

M

G4

66 RD

FUSE
11G
25 AMP

SWITCHED

12V

INTERMITTENT
RELAY

59 BK

C20-L13

62 LB

67 BR

C20-C

66 RD

G1

59 BK

REAR
WIPER
SWITCH

C3-A4

67 BR

REAR
WASHER
MOTOR

M

G2

58 BK

59 BK

FUSE
13G
25 AMP

65 YL

00-S12-015

G1

59 BK

G4

17 PP

SWITCHED

12V

38 RD

C1-67

C3-B1

BATT

MAXI
7W
20 AMP

64 LG

C41-59

C20-B

C1-70

C3-E4

943 TN

HEAD-
LAMP
SWITCH

C20-E

C41-D

C41-B

C

D

B

A

C41-C


4-1-00


12-90

Electrical System


_______________________________________________________


®


 Left Heated Windshield Inoperative


Step

Action

Value(s)

Yes

No


1

Gain access to the heated windshield connections. 
With the ignition in the “RUN” position, preform a 
voltage drop test between the yellow wire (CKT 740) 
and the black wire (CKT 59) going to the left hand 
windshield. Turn the heated windshield “ON”. Is the 
specified voltage present?

12v

Replace the 

heated        

windshield.

Go to step 2.

2

Using a DVOM check the resistance to ground at 
the black wire (CKT 59) going to the left side 
windshield. Does the resistance to ground meet 
the specified range?

<.2 


Go to step 3.

Repair the open 

or bad connection 

in CKT 59 

between the 

windshield and 

G4.

3

Remove the left hand heated windshield relay from 
the exterior fuse box.  Check the voltage drop 
between cavities 1 (CKT 580) and 2 (CKT 59). With 
the ignition in the run position, turn the heated wind-
shield switch to “ON”. Is the specified voltage 
present?

12v

Go to step 4.

Repair the open 

or bad connec-

tion in CKT 580 

between the 

heated wind-

shield  switch 

and  Heated 

windshield relay 

(R-4).

4

With the ignition still in the run position. Preform 
a voltage drop test between cavities 2 (CKT 59) 
and 3 (CKT 738). Is the specified voltage present?

12v

Go to step 5.

Repair the open 

or bad connection 

in CKT 738 

between fuse 2C 

and R-4.

5

With a DVOM check the resistance between cav-
ity 5 (CKT 740) and the yellow wire (CKT 740) 
going to the left side windshield. Does the resis-
tance meet the specified value?

<.2 


Replace relay 

R-4.

Repair the open 

or bad connection 

in CKT 740 

between the left 

side heated wind-

shield and R-4.


4-1-00 


______________________________________________________


 Electrical System  12-91


®


05745159


 Right Heated Windshield Inoperative


Step

Action

Value(s)

Yes

No


1

Gain access to the heated windshield connections. 
With the ignition in the “RUN” position and the 
heated windshield switch on, preform a voltage drop 
test between the purple wire (CKT 739) and the black 
wire (CKT 59) going to the right hand windshield. 
Turn the heated windshield “ON”. Is the specified 
voltage present?

12v

Replace the 

heated        

windshield.

Go to step 2.

2

Using a DVOM check the resistance to ground at 
the black wire (CKT 59) going to the right side 
windshield. Does the resistance to ground meet 
the specified range?

<.2 


Go to step 3.

Repair the open 

or bad connection 

in CKT 59 

between the 

windshield and 

G4.

3

Remove the right hand heated windshield relay from 
the exterior fuse box.  Check the voltage drop 
between cavities 1 (CKT 580) and 2 (CKT 59). With 
the ignition in the “RUN” position, turn the heated 
windshield switch to “ON”. Is the specified voltage 
present?

12v

Go to step 4.

Repair the open 

or bad connec-

tion in CKT 580 

between the 

heated wind-

shield switch and  

the heated wind-

shield relay (R-2).

4

With the ignition still in the “RUN” position. Preform 
a voltage drop test between cavities 2 (CKT 59) and  
3 (CKT 737). Is the specified voltage present?

12v

Go to step 5.

Repair the open 

or bad connection 

in CKT 738 

between fuse 2C 

and R-2.

5

With a DVOM check the resistance between cav-
ity 5 (CKT 739) and the purple wire (CKT 739) 
going to the right side windshield. Does the resis-
tance meet the specified value?

<.2 


Replace relay 

R-2.

Repair the open 

or bad connection 

in CKT 739 

between the left 

side heated wind-

shield and R-2.


4-1-00


12-92

Electrical System


_______________________________________________________


®


 Both Heated Windshields Inoperative


Step

Action

Value(s)

Yes

No


1

Gain access to the heated windshield connections. 
Using a DVOM check the resistance to ground on 
the black wires at both windshields. Does the  
resistance meet the specified value?

<.2 


Go to step 2.

Repair the open 

or bad connection 

in CKT 59 

between the 

windshields and 

G4.

2

Remove the heated windshield switch from the 
bezel. Turn the ignition switch to the “RUN” 
position and turn the heated windshield switch to 
the “ON” position. Using a DVOM check the 
voltage drop between the brown wire (CKT 580) 
and the black wire (CKT 58). Is the specified volt-
age present?

12v

Repair the open 

or bad connection 

in CKT 580 
between the 

heated wind-

shield switch and 

the relays.

Go to step 3.

3

Using a DVOM measure the resistance to ground on 
the black wire (CKT 58) at the heated windshield 
switch. Does the resistance meet the specification?

<.2 


Go to step 4.

Repair the open 

or bad connection 

in CKT 58 

between the 

heated wind-

shield switch and 

G4.

4

With the ignition in the “RUN” position and the 
heated windshield switch in the “ON” position. 
Use a DVOM to check for voltage at both tan 
wires (CKT 83) at the heated windshield switch. 
Is the specified voltage present?

12v

Replace the 

heated wind-

shield switch.

Repair the open 

or bad connec-

tion in CKT 83 

between the 

windshield 

switch and fuse 

1C interior.

4-1-00 


Content   ..  214  215  216  217   ..