Hummer H1 (2002+). Manual - part 141
________________________________________
Axles, Suspension, and Frame 9-25
®
05745159
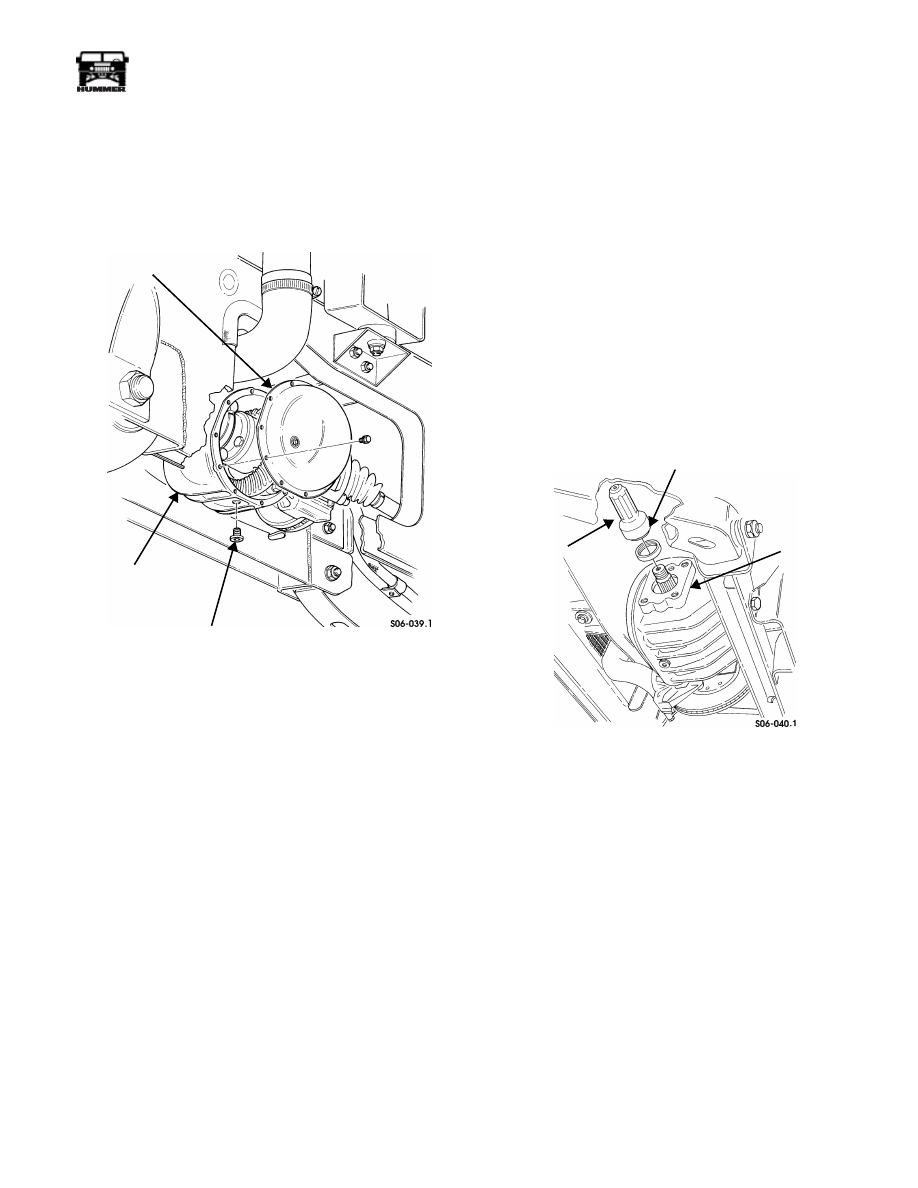
AXLE ASSEMBLY COVER SERVICE
Removal
1.
Remove drainplug from axle assembly and drain axle
assembly (Figure 9-53).
2.
Remove twelve bolts and cover from axle assembly.
Figure 9-53: Axle Assembly Cover Service
Cleaning and Inspection
NOTE:
Clean all components, examine for wear or damage,
and replace if necessary.
1.
Clean axle assembly cover, bolts, and axle assembly with
solvent (Figure 9-53).
2.
Inspect axle assembly cover for cracks, wear, or breaks.
Installation
1.
Apply RTV sealant to cover sealing surface and secure
cover to axle assembly with twelve bolts. Tighten bolts to
16 lb-ft (22 N•m).
2.
Thread drainplug into axle assembly and tighten to 13-18
lb-ft (18-25 N•m) (Figure 9-53).
3.
Fill axle assembly to proper oil level (Section 1).
AXLE OUTPUT SHAFT SEAL REPLACEMENT
Removal
1.
Remove brake caliper and yoke from caliper adapter (dis-
connect park brake cable from rear calipers) and support
caliper to the side being careful not to kink brake line.
2.
Disconnect halfshaft at the axle flange and swing off to
the side.
3.
Remove the brake rotor.
4.
Remove the axle output flange retaining nut and the
flange.
5.
Support the axle assembly, disconnect and move the axle
assembly support bracket over to gain access to the output
seal.
6.
Remove output shaft seal from axle (Figure 9-54).
Figure 9-54: Axle Output Shaft Seal Replacement
Installation
1.
Using seal installer J–38869, install output shaft seal in
axle assembly (Figure 9-54).
2.
Install axle assembly support bracket.
3.
Install axle output shaft flange and nut using Loctite 242
(or equivalent) and torque to 166-196 lb ft (224-265 N.m).
4.
Install brake rotor and halfshaft. Use bolts with preapplied
Loctite or original bolts with Loctite 272 (or equivalent),
cam-lock washers and torque 57 lb ft (77 N.m).
5.
Install brake caliper and yoke using Loctite 272 (or
equivalent) (connect park brake cable on rear calipers) and
torque to 40 lb ft (54 N.m).
AXLE COVER
AXLE ASSEMBLY
DRAINPLUG
AXLE SHAFT
OUTPUT
SHAFT
SEAL
AXLE
AND SEAL
INSTALLER
ASSEMBLY
J–38869