Honda Odyssey (2024 year). Manual in english - page 15
 

  Index      Manuals     Honda Odyssey (2024 year). Manual in english


Search            copyright infringement  


Content      ..     13      14      15      16     ..


Honda Odyssey (2024 year). Manual in english - page 15


483

uu

When Driving

u

Shifting

Continued

Driving

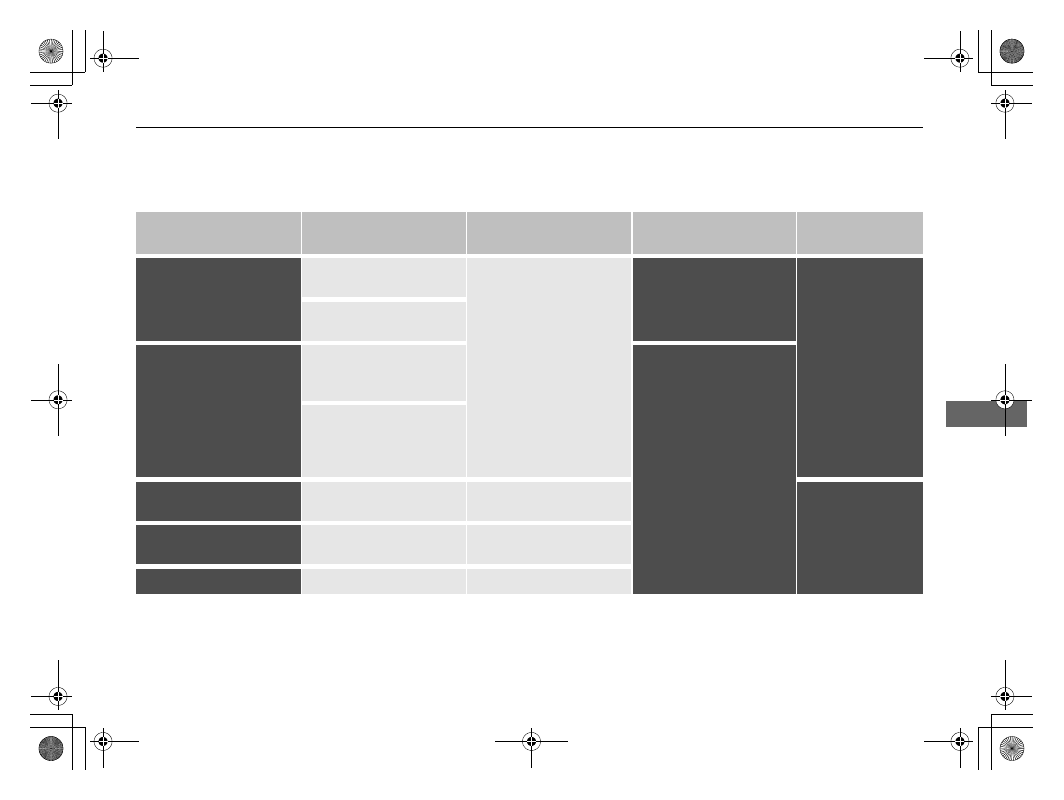
Restrictions on selecting a gear position

You cannot select a gear position under certain circumstances that may lead to a crash.

When the transmission 
is in:

1. Under these 
circumstances:

2. If you try to change to 
the following:

3. The gear position 
remains in/changes to:

How to change 
the gear position

(

P

The brake pedal is not 
depressed.

Other gear position

(

P

Release the 
accelerator pedal 
and depress the 
brake pedal.

The accelerator pedal is 
depressed.

(

N

The vehicle is moving at 
low speed without the 
brake pedal depressed.

(

N

The vehicle is moving at 
low speed with the 
accelerator pedal 
depressed.

(

N

(

D

 or 

(

S

The vehicle is moving 
forward.

(

R

Stop your vehicle in 
a safe place, depress 
the brake pedal, and 
select the 
appropriate gear 
position.

(

R

 or 

(

N

The vehicle is moving 
backward.

(

D

(

S

(

R

(

N

(

D

 or 

(

S

The vehicle is moving.

(

P

484

uu

When Driving

u

Shifting

Driving

Use the paddle shifters to change between 1st and 10th gears without removing 
your hands from the steering wheel. The transmission will switch to the sequential 
mode.

When the transmission is in 

(

D

:

The vehicle will go into the sequential mode momentarily, and the sequential mode 
gear selection indicator will come on.
When the vehicle goes into the sequential mode by 

(

-

 paddle shifter and the lower 

gear is available, the transmission properly selects single or double gear change.

Once you start traveling at a constant speed, the sequential mode will automatically 
switch off, and the sequential mode gear selection indicator will go off.

Hold the 

(

+

 paddle shifter for two seconds to return to normal drive.

When the transmission is in 

(

S

:

The vehicle will go into the sequential mode, and the 

M

 (sequential mode) indicator 

and sequential mode gear selection indicator will come on.
If the vehicle speed increases and the engine speed reaches near the tachometer red 
zone, the transmission automatically shifts up to the next gear.
You can cancel this mode by holding the 

(

+

 paddle shifter for two seconds. When 

the sequential mode is canceled, the sequential mode indicator and sequential 
mode gear selection indicator go off.

Sequential Mode

485

uu

When Driving

u

Shifting

Driving

Sequential Mode Operation

1

Sequential Mode Operation

Each paddle shift operation makes a single or double 
gear change.
To change gears continuously, release the paddle 
shifter before pulling it again for the next gear.

If the sequential mode gear selection indicator blinks 
when you try to shift up or down, this means your 
vehicle speed is not in its allowable gear range or the 
protection of transmission system is necessary.
Slightly accelerate to shift up and decelerate to shift 
down while the indicator is blinking.

Sequential 
Mode Gear 
Selection 
Indicator

(

-

 Paddle Shifter 

(Shift down)

(

+

 Paddle Shifter 

(Shift up)

Downshifting when 
pulling the 

(

-

 paddle 

shifter.
(Changes to a lower 
gear)

Upshifting when 
pulling the 

(

+

 paddle 

shifter.
(Changes to a higher 
gear)

486

uu

When Driving

u

Auto Idle Stop

Driving

Auto Idle Stop

To help maximize fuel economy, the engine automatically stops when the vehicle 
comes to a stop, depending on environmental and vehicle operating conditions. The 
indicator (green) comes on at this time.

The environmental and vehicle conditions that 
impact Auto Idle Stop system operation are 
varied.

2

Auto Idle Stop Activates When:

 P. 488, 

489

The engine then restarts once the vehicle is 
about to move again, and the indicator 
(green) goes off.

2

The Engine Automatically Restarts When:


P. 489

If the driver’s door is opened while the 
indicator comes on, a buzzer sounds to notify 
you that the Auto Idle Stop function is in 
operation.

A message associated with Auto Idle Stop 
appears on the driver information interface.

2

Indicators

 P. 88

1

Auto Idle Stop

The 12-volt battery installed in this vehicle is 
specifically designed for a model with Auto Idle Stop.
Using a 12-volt battery other than this specified type 
may shorten the 12-volt battery life, and prevent 
Auto Idle Stop from activating. If you need to replace 
the 12-volt battery, make sure to select the specified 
type. Ask a dealer for more details.

The duration of the Auto Idle Stop operation:

Increase

 in the ECON mode, compared to when 

the ECON mode is off, with climate control in use.

2

ECON Button

 P. 491

Auto Idle Stop 
Indicator (Green)

Continued

487

uu

When Driving

u

Auto Idle Stop

Driving

The Auto Idle Stop suspend indicator comes 
on and a message appears on the driver 
information interface when the Auto Idle Stop 
system cannot be activated.

2

Indicators

 P. 88

2

Auto Idle Stop System ON/OFF

 P. 487

To turn the Auto Idle Stop system off, press 
this button. The Auto Idle Stop system stops.

u

The Auto Idle Stop system will stop and 
the indicator will come on.

The Auto Idle Stop system is turned on every 
time you start the engine, even if you turned it 
off the last time you drove the vehicle.

Auto Idle Stop 
Suspend Indicator

Auto Idle Stop System ON/OFF

1

Auto Idle Stop System ON/OFF

If you turn off the Auto Idle Stop system while it is 
activated, the engine will restart.

If you press and hold the Auto Idle Stop 

OFF

 button, 

you can select whether to display the status messages 
or not.

Auto Idle Stop 

OFF

 Indicator

Auto Idle Stop 

OFF

 Button

uu

When Driving

u

Auto Idle Stop

488

Driving

The vehicle stops with the gear position in 

(

D

 and the brake pedal depressed.

When you put the transmission into 

(

P

, the Auto Idle Stop continues to operate, 

even if the brake pedal is released.

u

If you depress the brake pedal, the engine may automatically restart.

Auto Idle Stop does not activate when:

The Auto Idle Stop 

OFF

 button is pressed.

The driver’s seat belt is not fastened.

The engine is not adequately warmed up or coolant temperature is high.

The transmission fluid temperature is low or high.

The vehicle comes to a stop again before the vehicle speed reaches 3 mph (5 km/
h) after the engine starts.

The vehicle is stopped on a steep incline.

The transmission is in a position other than 

(

D

.

The engine is started with the hood open.

u

Turn off the engine. Close the hood before you restart the engine to activate 
Auto Idle Stop.

The battery charge is low.

The internal temperature of the battery is 14°F (−10°C) or less.

The climate control system is in use, and the outside temperature is below −4°F 
(−20°C) or over 104°F (40°C).

The climate control system is in use, and the temperature is set to 

Hi

 or 

Lo

.

 is on (indicator on).

The rear fan is set to maximum speed.

u

Auto Idle Stop may not activate under other conditions when the rear climate 
control system is in use.

When the Intelligent Traction Management is set to 

Snow

.

Auto Idle Stop Activates When:

1

Auto Idle Stop Activates When:

Do not open the hood while the Auto Idle Stop 
function is activated. If the hood is opened, the 
engine will not restart automatically.

In this case, restart the engine with the 

ENGINE 

START/STOP

 button.

2

Starting the Engine

 P. 470

Pressing the 

ENGINE START/STOP

 button causes 

the engine to no longer restart automatically. Follow 
the standard procedure to start the engine.

2

Starting the Engine

 P. 470

When ACC with Low Speed Follow is in operation, 
the vehicle stops without depressing the brake pedal 
and Auto Idle Stop may activate.
In such cases, the engine may restart if you change 
the shift position other than 

(

D

.

Continued

489

uu

When Driving

u

Auto Idle Stop

Driving

Auto Idle Stop may not activate when:

The vehicle is stopped by braking suddenly.

The steering wheel is operated.

The fan speed is high.

The climate control system is in use, and there is a significant difference between 
the set temperature and the actual interior temperature.

The climate control system is in use, and humidity in the interior is high.

The rear fan is set to maximum speed.

u

Auto Idle Stop may not activate under other conditions when the rear climate 
control system is in use.

The brake pedal is released (without the automatic brake hold system activated).

The accelerator pedal is depressed (with the automatic brake hold system 
activated).

2

Automatic Brake Hold

 P. 559

The Engine Automatically Restarts When:

1

The Engine Automatically Restarts When:

If you are using an electronic device during Auto Idle 
Stop, the device may temporarily be turned off when 
the engine restarts.

uu

When Driving

u

Auto Idle Stop

490

Driving

The engine restarts even if the brake pedal is depressed

*1

 when:

The Auto Idle Stop 

OFF

 button is pressed.

The steering wheel is operated.

The transmission is put into 

(

R

 or 

(

S

, or when it is set from 

(

N

 to 

(

D

.

u

If you put the transmission into 

(

P

 after the Auto Idle Stop activates, the Auto 

Idle Stop continues to operate. In this case, the engine restarts when you 
depress the brake pedal.

The pressure on the brake pedal is reduced and the vehicle starts moving while 
stopped on an incline.

The brake pedal is released slightly during a stop.

The battery charge becomes low.

The accelerator pedal is depressed.

The driver’s seat belt is unlatched.

 is on (indicator on).

The climate control system is in use, and the difference between the set 
temperature and actual interior temperature becomes significant.

The climate control system is being used to dehumidify the interior.

The rear fan is set to maximum speed.

u

Auto Idle Stop may not activate under other conditions when the rear climate 
control system is in use.

When the Intelligent Traction Management is set to 

Snow

.

The vehicle ahead of you starts again when your vehicle stops automatically with 
ACC with Low Speed Follow.

Briefly keeps the brake applied after releasing the brake pedal to restart the engine. 
This can keep your vehicle from unexpectedly moving while on an incline.

Starting Assist Brake Function

1

The engine restarts even if the brake pedal is depressed

*1

 when:

*1: With the automatic brake hold system activated, 
you can release the brake pedal while Auto Idle Stop 
is in operation.
If the automatic brake hold system has been turned 
off, or if there is a problem with the system, the 
engine will restart automatically when you release 
the brake pedal.

2

Automatic Brake Hold

 P. 559

491

uu

When Driving

u

ECON Button

Driving

ECON Button

The 

ECON

 button turns the ECON mode on 

and off.
The ECON mode helps you improve your fuel 
economy by adjusting the performance of the 
engine, air conditioning system, and cruise 
control.

1

ECON Button

While in ECON mode, the climate control system has 
greater temperature fluctuation.

492

uu

When Driving

u

Intelligent Traction Management

Driving

Intelligent Traction Management

The Intelligent Traction Management optimizes vehicle performance to help you 
drive on various surfaces. The system has available modes to select from: 

Normal


and 

Snow

.

Press the 

SNOW

 button to select the appropriate mode. The mode you select 

appears on the driver information interface. When the vehicle is turned off and 
restarted, Intelligent Traction Management mode will revert to 

Normal

.

SNOW

 Button

Normal

Provides balanced 
driving performance 
on most road 
surfaces.

Snow

Use when driving on 
snowy road surfaces.

493

uu

When Driving

u

Vehicle Stability Assist

TM

 (VSA

®

), aka Electronic Stability Control (ESC), System

Continued

Driving

Vehicle Stability Assist

TM

 (VSA

®

), aka Electronic 

Stability Control (ESC), System

VSA

®

 helps to stabilize the vehicle during cornering if the vehicle turns more or less 

than what was intended. It also assists in maintaining traction on slippery surfaces. 
It does so by regulating engine output and selectively applying the brakes.

When VSA

®

 activates, you may notice that the 

engine does not respond to the accelerator. 
You may also notice some noise from the 
hydraulic brake system. You will also see the 
indicator blink.

VSA

®

 Operation

1

Vehicle Stability Assist

TM

 (VSA

®

), aka Electronic Stability Control 

(ESC), System

The VSA

®

 may not function properly if tire type and 

size are mixed. Make sure to use the same size and 
type of tire, and the air pressures as specified.

When the VSA

®

 system indicator comes on and stays 

on while driving, there may be a problem with the 
system. While this may not interfere with normal 
driving, have your vehicle checked by a dealer 
immediately.

VSA

®

 cannot enhance stability in all driving situations 

and does not control the entire braking system. You 
still need to drive and corner at speeds appropriate 
for the conditions and always leave a sufficient 
margin of safety.

The main function of the VSA

®

 system is generally 

known as Electronic Stability Control (ESC). The 
system also includes a traction control function.

VSA

®

 System 

Indicator

uu

When Driving

u

Vehicle Stability Assist

TM

 (VSA

®

), aka Electronic Stability Control (ESC), System

494

Driving

This button is on the driver side control panel. 
To partially disable VSA

®

 functionality/

features, press and hold it until you hear a 
beep.

Your vehicle will have normal braking and 
cornering ability, but traction control function 
will be less effective.

To restore VSA

®

 functionality/features, press 

the  

(VSA

®


OFF

) button until you hear a 

beep.

VSA

®

 is turned on every time you start the 

engine, even if you turned it off the last time 
you drove the vehicle.

VSA

®

 On and Off

1

Vehicle Stability Assist

TM

 (VSA

®

), aka Electronic Stability Control 

(ESC), System

In certain unusual conditions when your vehicle gets 
stuck in shallow mud or fresh snow, it may be easier 
to free it with the VSA

®

 temporarily switched off.

When the   button is pressed, the traction control 
function becomes less effective. This allows for the 
wheels to spin more freely at low speed. You should 
only attempt to free your vehicle with the VSA

®

 off if 

you are not able to free it when the VSA

®

 is on.

Immediately after freeing your vehicle, be sure to 
switch VSA

®

 on again. We do not recommend driving 

your vehicle with the VSA

®

 system switched off.

You may hear a motor sound coming from the 
engine compartment while system checks are being 
performed immediately after starting the engine or 
while driving. This is normal.

VSA

®


OFF

 Indicator

495

uu

When Driving

u

Agile Handling Assist

Driving

Agile Handling Assist

Lightly brakes each of the front and rear wheels, as needed, when you turn the 
steering wheel, and helps support the vehicle’s stability and performance during 
cornering.

1

Agile Handling Assist

The agile handling assist cannot enhance stability in 
all driving situations. You still need to drive and 
corner at speeds appropriate for the conditions and 
always leave a sufficient margin of safety.

When the VSA

®

 system indicator comes on and stays 

on while driving, the agile handling assist does not 
activate.

You may hear a sound coming from the engine 
compartment while the agile handling assist is 
activated. This is normal.

496

uu

When Driving

u

Tire Pressure Monitoring System (TPMS) with Tire Fill Assist

Driving

Tire Pressure Monitoring System (TPMS) with Tire 
Fill Assist

Monitors the tire pressure while you are 
driving. If your vehicle’s tire pressure becomes 
significantly low, the Low Tire Pressure/TPMS 
indicator comes on and a message appears on 
the driver information interface.

1

Tire Pressure Monitoring System (TPMS) with Tire Fill Assist

Conditions such as low ambient temperature and 
altitude change directly affect tire pressure and can 
trigger the Low Tire Pressure/TPMS indicator to come 
on.

2

If the Low Tire Pressure/TPMS Indicator 
Comes On or Blinks

 P. 660

Tire pressure checked and inflated in:

Warm weather can become under-inflated in 
colder weather.

Cold weather can become overinflated in warmer 
weather.

The Low Tire Pressure/TPMS indicator will not come 
on as a result of overinflation.

Only use genuine TPMS specified wheels since your 
vehicle’s wheels are equipped with the low tire 
pressure/TPMS sensor.
If you drive your vehicle without the genuine TPMS 
specified wheels, the Low Tire Pressure/TPMS 
indicator blinks for one minutes and then stays on.

2

Tire and Wheel Replacement

 P. 621

The TPMS audibly and visually informs you of 
changes in tire pressure of the individual tire that you 
are adjusting using audible and visual indications.

If a change in tire pressure has been significant, the 
system beeps and the hazard lights flash continuously 
for five seconds when the specified tire pressure is 
reached. Stop filling the tire.

Low Tire Pressure/
TPMS Indicator

497

uu

When Driving

u

Tire Pressure Monitoring System (TPMS) with Tire Fill Assist

Driving

To select the tire pressure monitor, please 
follow the following steps using the buttons 
on the steering wheel.

1.

Set the power mode to ON.

2.

Press the 

 (home) button.

3.

Press the 

/

 button repeatedly until 


Maintenance

 appears.

4.

Press the 

ENTER

 button and select 

Tire 

Pressure

 by pressing the 

/

 button.

5.

Press the 

ENTER

 button and the tire 

pressure appears on the driver information 
interface.

The pressure for each tire is displayed in psi.

Tire Pressures Low

 is displayed when a tire 

has significantly low pressure. The specific tire 
is displayed on the screen.

Tire Pressure Monitor

1

Tire Pressure Monitor

The pressure displayed on the driver information 
interface can be slightly different from the actual 
pressure as measured by a gauge. If there is a 
significant difference between the two values, or if 
the Low Tire Pressure/TPMS indicator and the 
message on the driver information interface do not 
go off after you have inflated the tire to the specified 
pressure, have the system checked by a dealer.

Tire Pressure Monitor Problem

 may appear if you 

drive with the compact spare tire, or there is a 
problem with the TPMS.

3 4

3 4

498

uu

When Driving

u

Tire Pressure Monitoring System (TPMS) - Required Federal Explanation

Driving

Tire Pressure Monitoring System (TPMS) - Required 
Federal Explanation

Each tire, including the spare (if provided), should be checked 
monthly when cold and inflated to the inflation pressure 
recommended by the vehicle manufacturer on the vehicle placard 
or tire inflation pressure label.

(If your vehicle has tires of a different size than the size indicated 
on the vehicle placard or tire inflation pressure label, you should 
determine the proper tire inflation pressure for those tires.)

As an added safety feature, your vehicle has been equipped with 
a tire pressure monitoring system (TPMS) that illuminates a low 
tire pressure telltale 

when one or more of your tires is significantly under-inflated.

Accordingly, when the low tire pressure telltale illuminates, you 
should stop and check your tires as soon as possible, and inflate 
them to the proper pressure.

Driving on a significantly under-inflated tire causes the tire to 
overheat and can lead to tire failure. Under-inflation also reduces 
fuel efficiency and tire tread life, and may affect the vehicle’s 
handling and stopping ability.

499

uu

When Driving

u

Tire Pressure Monitoring System (TPMS) - Required Federal Explanation

Driving

Please note that the TPMS is not a substitute for proper tire 
maintenance, and it is the driver’s responsibility to maintain 
correct tire pressure, even if under-inflation has not reached the 
level to trigger illumination of the TPMS low tire pressure telltale.

Your vehicle has also been equipped with a TPMS malfunction 
indicator to indicate when the system is not operating properly. 
The TPMS malfunction indicator is combined with the low tire 
pressure telltale. When the system detects a malfunction, the 
telltale will flash for approximately one minute and then remain 
continuously illuminated. This sequence will continue upon 
subsequent vehicle start-ups as long as the malfunction exists.

When the malfunction indicator is illuminated, the system may 
not be able to detect or signal low tire pressure as intended.

TPMS malfunctions may occur for a variety of reasons, including 
the installation of replacement or alternate tires or wheels on the 
vehicle that prevent the TPMS from functioning properly.

Always check the TPMS malfunction telltale after replacing one or 
more tires or wheels on your vehicle to ensure that the 
replacement or alternate tires and wheels allow the TPMS to 
continue to function properly.

500

uu

When Driving

u

Blind Spot Information System

Driving

Blind Spot Information System

Is designed to detect vehicles in specified alert zones adjacent to your vehicle, 
particularly in harder to see areas commonly known as “blind spots.” When the 
system detects vehicles approaching from behind in adjacent lanes, the appropriate 
indicator comes on for a few seconds, providing assistance when you change lanes.

How the system works

1

Blind Spot Information System

Important Safety Reminder

Like all assistance systems, blind spot information 
system has limitations. Over reliance on the blind spot 
information system may result in a collision.

The system is for your convenience only. Even if an object is 
within the alert zone, the following situations may occur.

The blind spot information system alert indicator 
may not come on due to obstruction (splashes, 
etc.) even without the 

Blind Spot Info Not 

Available

 driver information interface appearing.

The blind spot information system alert indicator 
may come on even with the message appearing.

The blind spot information system alert indicator may 
not come on under the following conditions:

A vehicle does not stay in the alert zone for more 
than two seconds.

A vehicle is parked in a side lane.

The speed difference between your vehicle and the 
vehicle you are passing is greater than 6 mph (10 km/h).

An object not detected by the radar sensors 
approaches or passes your vehicle.

A vehicle running in the adjacent lane is a 
motorcycle or other small vehicle.

3

WARNING

Failure to visually confirm that it is safe to 
change lanes before doing so may result in 
a crash and serious injury or death.
Do not rely only on the blind spot 
information system when changing lanes.
Always look in your mirrors, to either side 
of your vehicle, and behind you for other 
vehicles before changing lanes.

The transmission is in 

(

D

 or 

(

S

.

Your vehicle speed is 
between 20 mph (32 km/h) 
and 100 mph (160 km/h)

Alert zone range

A: Approx. 1.6 ft. (0.5 m)
B: Approx. 10 ft. (3 m)
C: Approx. 10 ft. (3 m)

Alert Zone

Radar Sensors: 
underneath 
the rear 
bumper 
corners

A

B

C

Continued

501

uu

When Driving

u

Blind Spot Information System

Driving

When the system detects a vehicle

1

Blind Spot Information System

You can change the setting for the blind spot 
information system.

2

Customized Features

 P. 413

Turn the system off when towing a trailer. The system 
may not work properly for the following reasons:

The added mass tilts the vehicle and changes the 
radar coverage.

The trailer itself can be detected by the radar 
sensors, causing the blind spot information system 
alert indicators to come on.

Blind spot information system may be adversely 
affected when:

Objects (guard rails, poles, trees, etc.) are detected.

An object that does not reflect radio waves well, 
such as a motorcycle, is in the alert zone.

Driving on a curved road.

A vehicle is moving from a far lane to the adjacent 
lane.

The system picks up external electrical interference.

The rear bumper or the sensors have been 
improperly repaired or the rear bumper has been 
deformed.

The orientation of the sensors has been changed.

In bad weather (Heavy rain, snow, and fog).

For proper blind spot information system operation:

Always keep the rear bumper corner area clean.

Do not cover the rear bumper corner area with 
labels or stickers of any kind.

Take your vehicle to a dealer if you need the rear 
bumper corner area or the radar sensors to be 
repaired, or the rear bumper corner area is strongly 
impacted.

The system does not operate when in 

(

R

.

Comes on when:

A vehicle enters the alert zone from behind 
to overtake you with a speed difference of no 
more than 31 mph (50 km/h) from your 
vehicle.

You pass a vehicle with a speed difference of 
no more than 12 mph (20 km/h).

Comes On

Blind spot information System Alert Indicator: 
Located near the pillar on both sides.

Blinks and the beeper sounds when:
You move the turn signal lever in the direction 
of the detected vehicle. The beeper sounds 
three times.

Blinks

502

uu

When Driving

u

Blind Spot Information System

Driving

Blind spot information system on and off

When you turn the blind spot information 
system on and off, do the following.

1.

Press the safety support switch.

2.

Press the 

/

 button to select 

 symbol, 

then press 

ENTER

.

u

A tick appears in the box and the color of 
the 

 symbol changes green when the 

system is on. The tick disappear and the 
color of the 

 symbol changes gray 

when the system is off.

The blind spot information system is in the 
previously selected on or off setting each time 
you start the engine.

/

 Button

3 4

Safety Support Switch

3 4

503

Continued

Driving

Honda Sensing

®

Assists with functions such as acceleration, braking, and steering in order to reduce 
the burden on the driver, as well as avoid or reduce the severity of collisions.

Honda Sensing

®

 has following functions.

The functions which do not require switch operations to activate

Collision Mitigation Braking System

TM

 (CMBS

TM

2

 P. 506

Road Departure Mitigation (RDM) System 

2

 P. 517

Traffic Sign Recognition System 

2

 P. 547

Auto High-Beam 

2

 P. 197

Blind Spot Information System 

2

 P. 500

Cross Traffic Monitor 

2

 P. 570

Parking Sensor System

*


2

 P. 565

The functions which require switch operations to activate

Adaptive Cruise Control (ACC) with Low Speed Follow 

2

 P. 522

Lane Keeping Assist System (LKAS) 

2

 P. 538

* Not available on all models

504

uu

Honda Sensing

®

u

Driving

 Button

Press to activate standby mode for ACC with 
Low Speed Follow. Or press to cancel the 
system.

LKAS Button

Press to activate standby mode for LKAS. Or 
press to cancel this system.

RES/+ and −/SET Buttons

Press 

RES/+

 button to resume the ACC with 

Low Speed Follow or increase the vehicle 
speed.
Press 

−/SET

 button to set the ACC with Low 

Speed Follow or decrease the vehicle speed.

Interval Button

Press to change the ACC with Low Speed 
Follow following-interval.

CANCEL Button

Press to cancel ACC with Low Speed Follow.

Operation Switches for the ACC with Low Speed Follow/

LKAS

 Button

Interval 
Button

CANCEL

 Button

LKAS Button

RES/+

 Button

−/SET

 Button

505

uu

Honda Sensing

®

u

Driving

You can see the current state of ACC with 
Low Speed Follow, and LKAS.

a

Indicates that ACC with Low Speed Follow 
is ready to be activated.

White: The system is in standby.

Green: The system is on.

Amber: There is a problem with the system.

b

Indicates that LKAS is ready to be activated.

White: The system is in standby.

Green: The system is on.

Amber: There is a problem with the system.

c

Indicates that LKAS is activated and 
whether or not traffic lane lines are 
detected.

Solid line: The system is on.

Lane outline: The system is in standby.

d

Indicates whether or not ACC with Low 
Speed Follow detects the vehicle ahead.

e

Shows vehicle set speed in ACC with Low 
Speed Follow.

f

Shows set vehicle interval in ACC with Low 
Speed Follow.

Driver Information Interface Content

6

506

uu

Honda Sensing

®

u

Collision Mitigation Braking System

TM

 (CMBS

TM

)

Driving

Collision Mitigation Braking System

TM

 (CMBS

TM

)

The system can assist you when it determines there is a possibility of your vehicle 
colliding with a vehicle or a pedestrian detected in front of your vehicle. The CMBS

TM


is designed to alert you when the potential for a collision is determined, as well as to 
reduce your vehicle speed to help minimize collision severity when a collision is 
deemed unavoidable.

1

Collision Mitigation Braking System

TM

 (CMBS

TM

)

For directions on the proper handling of the radar 
sensor, refer to the following page.

2

Radar Sensor

 P. 554

You can read about handling information for the 
camera equipped with this system.

2

Front Sensor Camera

 P. 552

Important Safety Reminder

The CMBS

TM

 is designed to reduce the severity of an 

unavoidable collision. It does not prevent a collisions 
nor stop the vehicle automatically. It is still your 
responsibility to operate the brake pedal and steering 
wheel appropriately according to the driving 
conditions.

The CMBS

TM

 may not activate or may not detect a 

vehicle in front of your vehicle under certain 
conditions:

2

CMBS

TM

 Conditions and Limitations

 P. 511

Continued

507

uu

Honda Sensing

®

u

Collision Mitigation Braking System

TM

 (CMBS

TM

)

Driving

How the System Works

1

How the System Works

When the CMBS

TM

 activates, it may automatically 

apply the brake. It will be canceled when your vehicle 
stops or a potential collision is not determined.

When to use

The camera is 
located behind 
the rearview 
mirror.

The radar sensor is 
in the front grille.

The system starts monitoring the roadway ahead when your vehicle speed is about 
3 mph (5 km/h) or above and will search for a vehicle in front of you.
The CMBS

TM

 activates when:

The speed difference between your vehicle and a vehicle or pedestrian detected in 
front of you becomes about 3 mph (5 km/h) and over with a chance of a collision.

Your vehicle speed is about 62 mph (100 km/h) or less and the system determines 
there is a chance of a collision with:

 - Vehicles detected in front of you that are stationary, oncoming, or traveling in 
your same direction.
 - A pedestrian who is detected in front of you.

Your vehicle speed is above 62 mph (100 km/h), and the system determines there 
is a chance of a collision with a vehicle detected in front of you traveling in your 
same direction.

uu

Honda Sensing

®

u

Collision Mitigation Braking System

TM

 (CMBS

TM

)

508

Driving

When the system activates

You can change the distance (

Long

/

Normal

/

Short

) between vehicles at which the 

system’s earliest collision alert will come on through the driver information 
interface

*

 or audio/information screen

*

 setting options.

2

List of customizable options

 P. 414

1

When the system activates

The camera in the CMBS

TM

 is also designed to detect 

pedestrians.
However, this pedestrian detection feature may not 
activate or may not detect a pedestrian in front of 
your vehicle under certain conditions.
Refer to the ones indicating the pedestrian detection 
limitations from the list.

2

CMBS

TM

 Conditions and Limitations

 P. 511

The system provides visual and audible alerts of a possible collision, and stops if the 
collision is avoided.

Take appropriate action to prevent a collision (apply the brakes, change lanes, 
etc.)

Visual Alerts

Beep

Audible Alert

* Not available on all models

509

uu

Honda Sensing

®

u

Collision Mitigation Braking System

TM

 (CMBS

TM

)

Continued

Driving

The system has three alert stages for a possible collision. However, depending on circumstances, the CMBS

TM

 may not go through all of 

the stages before initiating the last stage.

Collision Alert Stages

Distance between vehicles

CMBS

TM

The sensors detect a vehicle

Audible & Visual WARNINGS

Braking

Stage 

one

There is a risk of a collision with 
the vehicle ahead of you.

When in 

Long

, visual and 

audible alerts come on at a 
longer distance from a vehicle 
ahead than in 

Normal

 setting, 

and in 

Short

, at a shorter 

distance than in 

Normal

.

Stage 

two

The risk of a collision has 
increased, time to respond is 
reduced.

Visual and audible alerts.

Lightly applied

Stage 

three 

The CMBS

TM

 determines that a 

collision is unavoidable.

Forcefully applied

Your Vehicle

Vehicle 
Ahead

Normal

Short

Long

Your 
Vehicle

Vehicle 
Ahead

Your 
Vehicle

Vehicle 
Ahead

uu

Honda Sensing

®

u

Collision Mitigation Braking System

TM

 (CMBS

TM

)

510

Driving

When you turn the CMBS

TM

 on and off, do the 

following.

1.

Press the safety support switch.

2.

Press the 

/

 button to select 


symbol, then press 

ENTER

.

u

A tick appears in the box and the color of 
the 

 symbol changes green when the 

system is on. The tick disappear and the 
color of the 

 symbol changes gray 

when the system is off.

The CMBS

TM

 is turned on every time you start 

the engine, even if you turned it off the last 
time you drove the vehicle.

CMBS

TM

 On and Off

1

CMBS

TM

 On and Off

The CMBS

TM

 may automatically shut off, and the 

safety support indicator (amber) will come and stay 
on under certain conditions:

2

CMBS

TM

 Conditions and Limitations

 P. 511

When the CMBS

TM

 is activated, it will continue to 

operate even if the accelerator pedal is partially 
depressed. However, it will be canceled if the 
accelerator pedal is deeply depressed.

Have your vehicle checked by a dealer if you find any 
unusual behavior of the system (e.g., the warning 
message appears too frequently).

Safety Support Switch

/

 Button

3 4

3 4

511

uu

Honda Sensing

®

u

Collision Mitigation Braking System

TM

 (CMBS

TM

)

Continued

Driving

The system may automatically shut off and the safety support indicator (amber) will 
come on under certain conditions. Some examples of these conditions are listed 
below. Other conditions may reduce some of the CMBS

TM

 functions.

2

Front Sensor Camera

 P. 552

2

Radar Sensor

 P. 554

Environmental conditions

Driving in bad weather (rain, fog, snow, etc.).

Sudden changes between light and dark, such as an entrance or exit of a tunnel.

There is little contrast between objects and the background.

Driving into low sunlight (e.g., at dawn or dusk).

Strong light is reflected onto the roadway.

Driving in the shadows of trees, buildings, etc.

Roadway objects or structures are misinterpreted as vehicles and pedestrians.

Reflections on the interior of the windshield.

Driving at night or in a dark condition such as a tunnel.

Roadway conditions

Driving on a snowy or wet roadway (obscured lane marking, vehicle tracks, 
reflected lights, road spray, high contrast).

Driving on curvy, winding, or undulating roads.

The road is hilly or the vehicle is approaching the crest of a hill.

CMBS

TM

 Conditions and Limitations

512

uu

Honda Sensing

®

u

Collision Mitigation Braking System

TM

 (CMBS

TM

)

Driving

Vehicle conditions

Headlight lenses are dirty or the headlights are not properly adjusted.

The outside of the windshield is blocked by dirt, mud, leaves, wet snow, etc.

The inside of the windshield is fogged.

An abnormal tire or wheel condition (wrong size, varied size or construction, 
improperly inflated, compact spare tire, etc.).

When tire chains are installed.

The vehicle is tilted due to a heavy load or suspension modifications.

The camera temperature gets too high.

Driving with the parking brake applied.

When the radar sensor in the front grille gets dirty.

The vehicle is towing a trailer.

Driving at night or in a dark place (e.g., a tunnel) with the headlights off.

513

uu

Honda Sensing

®

u

Collision Mitigation Braking System

TM

 (CMBS

TM

)

Continued

Driving

Detection limitations

A vehicle or pedestrian suddenly crosses in front of you.

The distance between your vehicle and the vehicle or pedestrian ahead of you is 
too short.

A vehicle cuts in front of you at a slow speed, and it brakes suddenly.

When you accelerate rapidly and approach the vehicle or pedestrian ahead of you 
at high speed.

The vehicle ahead of you is a motorcycle, bicycle, mobility scooter or other small 
vehicle.

When there are animals in front of your vehicle.

When you drive on a curved, winding or undulating road that makes it difficult for 
the sensor to properly detect a vehicle in front of you.

The speed difference between your vehicle and a vehicle or pedestrian in front of 
you is significantly large.

An oncoming vehicle suddenly comes in front of you.

Another vehicle suddenly comes in front of you at an intersection, etc.

Your vehicle abruptly crosses over in front of an oncoming vehicle.

When driving through a narrow iron bridge.

When the lead vehicle suddenly slows down.

When there is a group of people in front of your vehicle walking together side by 
side.

Surrounding conditions or belongings of the pedestrian alter the pedestrian’s 
shape, preventing the system from recognizing that the person is a pedestrian.

When the pedestrian is shorter than about 3.3 feet (1 meter) or taller than about 
6.6 feet (2 meters) in height.

When a pedestrian blends in with the background.

When a pedestrian is bent over or squatting, or when their hands are raised or 
they are running.

When several pedestrians are walking ahead in a group.

When the camera cannot correctly identify that a pedestrian is present due to an 
unusual shape (holding luggage, body position, size).

Limitations applicable to pedestrian detection only

514

uu

Honda Sensing

®

u

Collision Mitigation Braking System

TM

 (CMBS

TM

)

Driving

Automatic shutoff

CMBS

TM

 may automatically shut itself off and the safety support indicator (amber) 

comes and stays on when:

The temperature inside the system is high.

You drive off-road or on a mountain road, or curved and winding road for an 
extended period.

An abnormal tire condition is detected (wrong tire size, flat tire, etc.).

The camera behind the rearview mirror, or the area around the camera, including 
the windshield, gets dirty.

Once the conditions that caused CMBS

TM

 to shut off improve or are addressed (e.g., 

cleaning), the system comes back on.


Content      ..     13      14      15      16     ..