Honda HR-V (2024 year). Manual in english - page 13
 

  Index      Manuals     Honda HR-V (2024 year). Manual in english


Search            copyright infringement  


Content      ..     11      12      13      14     ..


Honda HR-V (2024 year). Manual in english - page 13


417

uu

When Driving

u

Shifting

Continued

Driving

Shifting

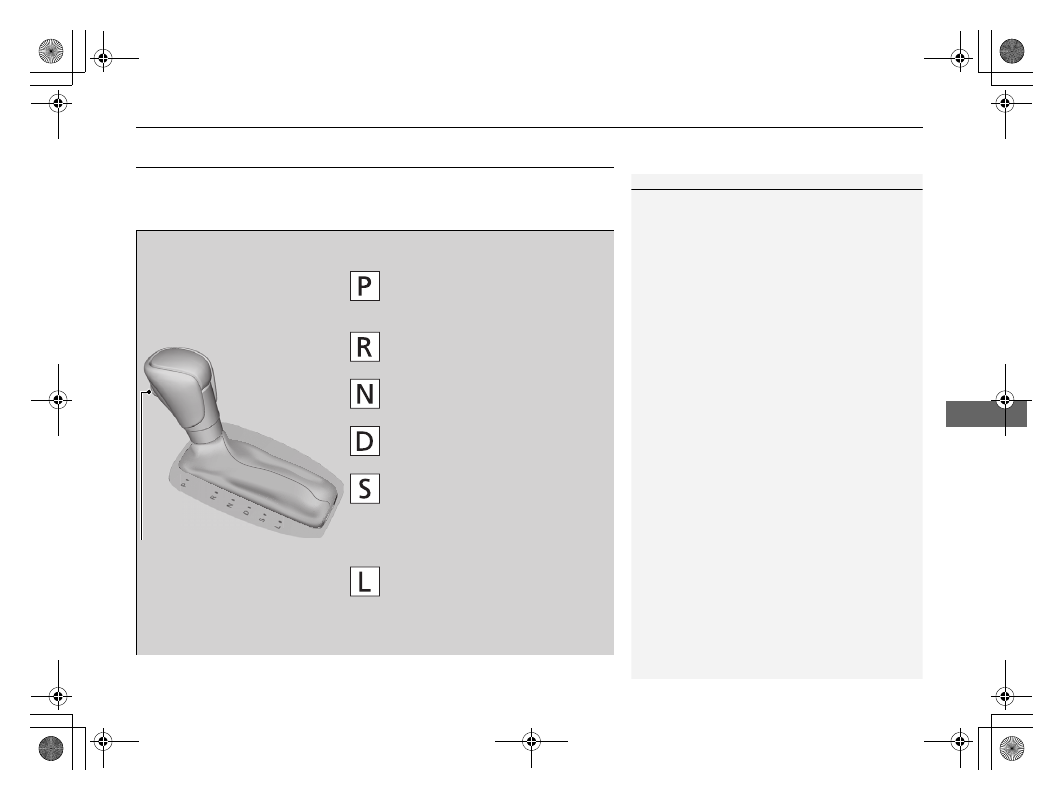
Change the shift position in accordance with your driving needs.

Shift positions

1

Shifting

You cannot change the power mode from ON to 
VEHICLE OFF unless the shift lever is in 

(

P

.

The vehicle may move forward very slightly even in 

(

N

 while the engine is cold.

Depress the brake pedal firmly and, when necessary, 
apply the parking brake.

Park

Used when parking or starting the 

engine.

Reverse

Used when reversing.

Neutral

Transmission is not locked.

Drive

Used for normal driving.

Drive (S)

Used:

For better acceleration

To increase engine braking

When going up or down hills

Release Button

Low

Used to further increase engine 
braking

Used when going up or down hills

uu

When Driving

u

Shifting

418

Driving

Shift Operation

1

Shift Operation

NOTICE

When you change the shift position from 

(

D

 to 

(

R


and vice versa, come to a complete stop and keep the 
brake pedal depressed.
Operating the shift lever before the vehicle has come 
to a complete standstill can damage the transmission.

Use the shift position indicator to check the lever 
position before pulling away.

If the transmission system indicator blinks when 
driving, in any shift position, there is a problem with 
the transmission.
Avoid sudden acceleration and have the transmission 
checked by a dealer as soon as possible.

The fuel supply may be cut off if you drive at engine 
speeds in or over the tachometer red zone (engine 
speed limit). If this happens, you may experience a 
slight jolt.

It may not be possible to operate the shift lever if the 
brake pedal is applied while the shift lever release 
button is held down.
Depress the brake pedal first.

When shifting positions in extremely low 
temperatures (-22°F/-30°C), there may be a short 
delay before the shift position is displayed. Always 
confirm you are in the correct shift position before 
driving.

Tachometer red zone

Depress the brake pedal and press 

the shift lever release button to shift.

Shift without pressing the shift lever 

release button.

Press the shift lever release button 

and shift.

Shift Position Indicator 

(Transmission system indicator)

419

uu

When Driving

u

Drive Mode System

Continued

Driving

Drive Mode System

Press the drive mode switch to select the appropriate mode. The mode you select 
appears on the driver information interface.

1

Drive Mode System

The mode may not be able to be changed under 
some driving conditions.
If there is a vehicle system failure, the following 
message will also appear on the driver information 
interface, and you cannot select any other mode.

Drive Mode Switch

NORMAL


Mode

ECON


Mode

SNOW


Mode

uu

When Driving

u

Drive Mode System

420

Driving

Optimizes the balance between operability 
and comfort.

Facilitates fuel-efficient driving.

NORMAL Mode

ECON Mode

1

ECON

 Mode

While in ECON mode, the climate control system will 
be less effective and the vehicle slower to accelerate.

421

uu

When Driving

u

Drive Mode System

Driving

Maximizes controllability on snowy road 
through powertrain settings.

The mode for the next start-up is saved according to the following chart.

SNOW Mode

1

SNOW

 Mode

NOTICE

SNOW

 mode does not allow you to drive on snowy 

or frozen roads in all situations. There are limits to 

SNOW

 mode. 

When driving on snowy or frozen roads; mount 
winter tires or tire chains, reduce speed, and maintain 
sufficient distance between vehicles. 

2

Winter Tires

 P. 580

Next Start-up Mode

Last Mode

Next Mode

NORMAL

NORMAL

ECON

ECON

SNOW

NORMAL

422

uu

When Driving

u

Hill Descent Control System

Driving

Hill Descent Control System

When driving down hills where engine braking is not enough to decelerate the 
vehicle, this system helps maintain a constant vehicle speed without needing to 
depress the brake pedal.

The system operates under the following conditions.

Driving at a speed between about 2-12 mph (3-20 km/h).

Driving downhill.

Accelerator pedal and brake pedal are not depressed.

The system’s operating status

Green: Activated

White: Standby

Vehicle speed display

White: Set speed

Grey: Current speed

u

Blinks when the vehicle speed is above 
the operating speed.

Hill Descent Control Operating Conditions

Driver Information Interface Display

1

Hill Descent Control System

The brake lights automatically come on while the 
system is in operation.

The system may not operate when driving down a 
gentle slope. Check the Hill Descent Control System 
indicator to see if the system is in operation.

The system may activate even when not driving 
downhill, such as when the vehicle leans while 
driving over uneven surfaces.

3

WARNING

Hill descent control cannot maintain a 
constant vehicle speed in every situation.

When driving down a very steep hill or on 
slippery road surfaces, the vehicle may not 
be able to maintain the vehicle speed and 
could cause a crash, resulting in serious 
injury or death.

Since Hill Descent Control is not designed 
to increase the limits of vehicle 
performance, the driver must always be 
aware of road surface conditions and drive 
safely.

System’s Operating Status

Vehicle Speed 

Display

Current Speed

Operating Range of Set Speed

423

uu

When Driving

u

Hill Descent Control System

Driving

To turn the system on

When the vehicle speed is less than about 
12 mph (20 km/h), press the 

 button to 

turn the system on.

u

The system goes into standby mode, and 
the Hill Descent Control System indicator 
(white) comes on.

When all the working conditions are met, the 
system activates, and the vehicle begins to 
maintain the vehicle speed when driving 
downhill.

u

The Hill Descent Control System indicator 
(green) comes on when operating.

To adjust the set speed

Depress the accelerator pedal or brake pedal 
to adjust the vehicle speed within the 
operating range. The vehicle speed at which 
you release the accelerator pedal or brake 
pedal will be the set speed.

To turn the system off

Press the 

 button to turn the system off.

How to Operate Hill Descent Control

1

How to Operate Hill Descent Control

Using the system repeatedly for a long time may 
cause the brakes to heat up and make the system go 
into standby mode temporarily.

Hill Descent Control is turned off every time you turn 
the engine off, even if it was turned on the last time 
you drove the vehicle.

The pedals may vibrate or you may hear the system 
working when in operation.

Hill Descent Control 

System Indicator

 (Hill Descent Control) Button

1

To turn the system off

When the vehicle speed is 37 mph (60 km/h) or more, 
the system turns off automatically.

424

uu

When Driving

u

Vehicle Stability Assist

TM

 (VSA

®

), aka Electronic Stability Control (ESC), System

Driving

Vehicle Stability Assist

TM

 (VSA

®

), aka Electronic 

Stability Control (ESC), System

VSA

®

 helps to stabilize the vehicle during cornering if the vehicle turns more or less 

than what was intended. It also assists in maintaining traction on slippery surfaces. 
It does so by regulating engine output and selectively applying the brakes.

When VSA

®

 activates, you may notice that the 

engine does not respond to the accelerator. 
You may also notice some noise from the 
hydraulic brake system. You will also see the 
indicator blink.

VSA

®

 Operation

1

Vehicle Stability Assist

TM

 (VSA

®

), aka Electronic Stability Control 

(ESC), System

The VSA

®

 may not function properly if tire type and 

size are mixed. Make sure to use the same size and 
type of tire, and the air pressures as specified.

When the VSA

®

 system indicator comes on and stays 

on while driving, there may be a problem with the 
system. While this may not interfere with normal 
driving, have your vehicle checked by a dealer 
immediately.

VSA

®

 cannot enhance stability in all driving situations 

and does not control the entire braking system. You 
still need to drive and corner at speeds appropriate 
for the conditions and always leave a sufficient 
margin of safety.

The main function of the VSA

®

 system is generally 

known as Electronic Stability Control (ESC). The 
system also includes a traction control function.

The Vehicle Stability Assist

TM

 (VSA

®

) system, Vehicle 

Stability Assist

TM

 (VSA

®

OFF

, Adaptive Cruise Control 

(ACC) with Low Speed Follow, low tire pressure/
TPMS

*

, parking brake and brake system and safety 

support indicators may come on in amber along with 
a message in the gauge when you set the power 
mode to ON after reconnecting the battery.
Drive a short distance at more than 12 mph (20 km/h).
Each indicator should go off. If any do not, have your 
vehicle checked by a dealer.

VSA

®

 System 

Indicator

* Not available on all models

425

uu

When Driving

u

Vehicle Stability Assist

TM

 (VSA

®

), aka Electronic Stability Control (ESC), System

Driving

This button is on the driver side control panel. 
To partially disable VSA

®

 functionality/

features, press and hold it until you hear a 
beep.

Your vehicle will have normal braking and 
cornering ability, but traction control function 
will be less effective.

To restore VSA

®

 functionality/features, press 

the  

(VSA

®


OFF

) button until you hear a 

beep.

VSA

®

 is turned on every time you start the 

engine, even if you turned it off the last time 
you drove the vehicle.

VSA

®

 On and Off

1

Vehicle Stability Assist

TM

 (VSA

®

), aka Electronic Stability Control 

(ESC), System

In certain unusual conditions when your vehicle gets 
stuck in shallow mud or fresh snow, it may be easier 
to free it with the VSA

®

 temporarily switched off.

When the 

 button is pressed, the traction control 

function becomes less effective. This allows for the 
wheels to spin more freely at low speed. You should 
only attempt to free your vehicle with the VSA

®

 off if 

you are not able to free it when the VSA

®

 is on.

Immediately after freeing your vehicle, be sure to 
switch VSA

®

 on again. We do not recommend driving 

your vehicle with the VSA

®

 system switched off.

You may hear a motor sound coming from the 
engine compartment while system checks are being 
performed immediately after starting the engine or 
while driving. This is normal.

VSA

®

 OFF Indicator

426

uu

When Driving

u

Agile Handling Assist

Driving

Agile Handling Assist

Lightly brakes the front wheels, as needed, when you turn the steering wheel, and 
helps support the vehicle’s stability and performance during cornering.

1

Agile Handling Assist

The agile handling assist cannot enhance stability in 
all driving situations. You still need to drive and 
corner at speeds appropriate for the conditions and 
always leave a sufficient margin of safety.

When the VSA

®

 system indicator comes on and stays 

on while driving, the agile handling assist does not 
activate.

You may hear a sound coming from the engine 
compartment while the agile handling assist is 
activated. This is normal.

427

uu

When Driving

u

Real Time AWD with Intelligent Control System

TM

*

Driving

Real Time AWD with Intelligent Control System

TM

*

Your vehicle is equipped with the AWD system. When the system senses a loss of 
front wheel traction, it automatically transfers some power to the rear wheels. This 
allows you to utilize all available traction and may increase mobility.

You still need to exercise the same care when accelerating, steering, and braking 
that you would in a two wheel drive vehicle.

If you excessively spin all four wheels and overheat the AWD system, only the front 
wheels receive power. Stop until the system cools down.

1

Real Time AWD with Intelligent Control System

TM

*

NOTICE

Do not continuously spin the front tires of your 
vehicle. Continuously spinning the front tires can 
cause transmission or rear differential damage.

The AWD system may not function properly if tire 
type and size are mixed. Make sure to use the same 
size and type of tire, and the air pressures as 
specified.

2

Tire and Wheel Replacement

 P. 578

* Not available on all models

428

uu

When Driving

u

Tire Pressure Monitoring System (TPMS)

Driving

Tire Pressure Monitoring System (TPMS)

Instead of directly measuring the pressure in each tire, the TPMS on this vehicle 
monitors and compares the rolling radius and rotational characteristics of each 
wheel and tire while you are driving to determine if one or more tires are 
significantly under-inflated.

This will cause the low tire pressure/TPMS 
indicator to come on and a message to appear 
on the gauge.

U.S. models only

1

Tire Pressure Monitoring System (TPMS)

The system does not monitor the tires when driving 
at low speed.

Conditions such as low ambient temperature and 
altitude change directly affect tire pressure and can 
trigger the low tire pressure/TPMS indicator to come 
on.

Tire pressure checked and inflated in:

Warm weather can become under-inflated in 
colder weather.

Cold weather can become overinflated in warmer 
weather.

The low tire pressure/TPMS indicator will not come 
on as a result of overinflation.

The TPMS may not function properly if tire type and 
size are mixed. Make sure to use the same size and 
type of tire.

2

Checking and Maintaining Tires

 P. 571

The low tire pressure/TPMS indicator may come on 
with a delay or may not come on at all when:

You rapidly accelerate, decelerate, or turn the 
steering wheel.

You drive on snowy or slippery roads.

Tire chains are used.

The low tire pressure/TPMS indicator may come on 
under the following conditions:

A compact spare tire is used.

There is a heavier and uneven load on the tires than 
the condition at calibration.

Tire chains are used.

Low Tire Pressure/TPMS Indicator

Continued

429

uu

When Driving

u

Tire Pressure Monitoring System (TPMS)

Driving

You must start TPMS calibration every time you:

Adjust the pressure in one or more tires.

Rotate the tires.

Replace one or more tires.

Before calibrating the TPMS:

Set the cold tire pressure in all four tires.

2

Checking Tires

 P. 571

Make sure:

The vehicle is at a complete stop.

The transmission is in 

(

P

.

The power mode is in ON.

TPMS Calibration

1

Tire Pressure Monitoring System (TPMS)

The Vehicle Stability Assist

TM

 (VSA

®

) system, Vehicle 

Stability Assist

TM

 (VSA

®

OFF

, Adaptive Cruise Control 

(ACC) with Low Speed Follow, low tire pressure/
TPMS

*

, parking brake and brake system and safety 

support indicators may come on in amber along with 
a message in the gauge when you set the power 
mode to ON after reconnecting the battery.
Drive a short distance at more than 12 mph (20 km/h).
Each indicator should go off. If any do not, have your 
vehicle checked by a dealer.

1

TPMS Calibration

TPMS cannot be calibrated if a compact spare tire is installed.
The calibration process requires approximately 30 
minutes of cumulative driving at speeds between 30-
60 mph (48-97 km/h).
During this period, if the power mode is set to ON 
and the vehicle is not moved within 45 seconds, you 
may notice the low tire pressure/TPMS indicator 
comes on briefly. This is normal and indicates that the 
calibration process is not yet complete.

If the tire chains are installed, remove them before 
calibrating the TPMS.

If the low tire pressure/TPMS indicator comes on even 
when the properly inflated specified regular tires are 
installed, have your vehicle checked by a dealer.

We recommend that the tires be replaced with the 
same brand, model, and size as the originals. Ask a 
dealer for details.

* Not available on all models

430

uu

When Driving

u

Tire Pressure Monitoring System (TPMS)

Driving

When you calibrate the TPMS, do the 
following.

2

Settings

*

 P. 123

1.

Press the 

 (home) button, to select 

Settings

, then press the left selector wheel.

u

Vehicle settings

 appears on the driver 

information interface.

2.

Roll the left selector wheel.

u

TPMS calibration

 appears on the driver 

information interface.

Models with 7-in. Color Touchscreen

* Not available on all models

431

uu

When Driving

u

Tire Pressure Monitoring System (TPMS)

Continued

Driving

3.

Press the left selector wheel.

u

The driver information interface switches 
to the customization setup screen, where 
you can select 

Cancel

 or 

Calibrate

.

4.

Roll the left selector wheel and select 

Calibrate

, then press the left selector 

wheel.

u

Calibration started

 screen appears, 

then the driver information interface 
returns to the customization menu 
screen.

If the 

Calibration failed to start

 message 

appears, repeat step 4.

The calibration process finishes 
automatically.

432

uu

When Driving

u

Tire Pressure Monitoring System (TPMS)

Driving

When you calibrate the TPMS, do the 
following.

2

Customized Features

 P. 342

1.

Set the power mode to ON.

2.

Press the 

 button.

3.

Select 

Vehicle Settings

.

4.

Select 

TPMS Calibration

.

5.

Select 

Calibrate

 or 

Cancel

.

If the 

Calibration Failed To Start.


message appears, repeat step 5.

The calibration process finishes 
automatically.

Models with 9-in. Color Touchscreen

433

uu

When Driving

u

Tire Pressure Monitoring System (TPMS) - Required Federal Explanation

Continued

Driving

Tire Pressure Monitoring System (TPMS) - Required 
Federal Explanation

Each tire, including the spare (if provided), should be checked 
monthly when cold and inflated to the inflation pressure 
recommended by the vehicle manufacturer on the vehicle placard 
or tire inflation pressure label.

(If your vehicle has tires of a different size than the size indicated 
on the vehicle placard or tire inflation pressure label, you should 
determine the proper tire inflation pressure for those tires.)

As an added safety feature, your vehicle has been equipped with 
a tire pressure monitoring system (TPMS) that illuminates a low 
tire pressure telltale 

when one or more of your tires is significantly under-inflated.

Accordingly, when the low tire pressure telltale illuminates, you 
should stop and check your tires as soon as possible, and inflate 
them to the proper pressure.

Driving on a significantly under-inflated tire causes the tire to 
overheat and can lead to tire failure. Under-inflation also reduces 
fuel efficiency and tire tread life, and may affect the vehicle’s 
handling and stopping ability.

U.S. models

434

uu

When Driving

u

Tire Pressure Monitoring System (TPMS) - Required Federal Explanation

Driving

Please note that the TPMS is not a substitute for proper tire 
maintenance, and it is the driver’s responsibility to maintain 
correct tire pressure, even if under-inflation has not reached the 
level to trigger illumination of the TPMS low tire pressure telltale.

Your vehicle has also been equipped with a TPMS malfunction 
indicator to indicate when the system is not operating properly. 
The TPMS malfunction indicator is combined with the low tire 
pressure telltale. When the system detects a malfunction, the 
telltale will flash for approximately one minute and then remain 
continuously illuminated. This sequence will continue upon 
subsequent vehicle start-ups as long as the malfunction exists.

When the malfunction indicator is illuminated, the system may 
not be able to detect or signal low tire pressure as intended.

TPMS malfunctions may occur for a variety of reasons, including 
the installation of replacement or alternate tires or wheels on the 
vehicle that prevent the TPMS from functioning properly.

Always check the TPMS malfunction telltale after replacing one or 
more tires or wheels on your vehicle to ensure that the 
replacement or alternate tires and wheels allow the TPMS to 
continue to function properly.

435

uu

When Driving

u

Blind Spot Information System

*

Continued

Driving

Blind Spot Information System

*

When the system detects vehicles approaching from behind in adjacent lanes, the 
appropriate indicator comes on, providing assistance when you change lanes.

The system activates when your vehicle is moving forward at about 20 mph (32 km/h) 
or above.

Alert zone range
A: Approx. 1.6 ~ 10 feet (0.5 ~ 3 meters) from vehicle side.
B: Approx. 10 feet (3 meters) from rear bumper.
C: Approx. 10 ~ 82 feet (3 ~ 25 meters) behind from rear bumper. (The faster the 
approaching vehicle, the further away it will be detected.)

The initially set alert zone is alert zone 1. Over time, after the vehicle has been driven 
on straight roads with traffic and roadside objects, the system will adapt and expand 
the alert zone (alert zone 1 and 2).

How the System works

1

Blind Spot Information System

*

Important Safety Reminder

Like all assistance systems, the blind spot information 
system has limitations. Always look in your mirrors, to 
either side of your vehicle, and behind you for other 
vehicles before changing lanes. Overreliance on the 
blind spot information system may result in a 
collision.

Have your vehicle checked by a dealer in the 
following situations:

The rear bumper or area around the radar sensors 
is strongly impacted.

The indicator does not come on even if a vehicle in 
the alert zone should have been detected.

The rear bumper or any system components need 
to be repaired.

If the rear bumper or any system components are 
repaired, the system will revert to alert zone 1 only 
until it is able to adapt and expand to alert zone 1 
and 2.

Radar Sensors: underneath the 

rear bumper corners

: Alert zone 1

A

B

C

: Alert zone 2

* Not available on all models

uu

When Driving

u

Blind Spot Information System

*

436

Driving

When the system detects a vehicle

Blind spot information system alert indicator: 
Located on the outside rearview mirror on 
both sides.

Comes on when:

A vehicle approaches you from behind to 
overtake you at a speed difference of no 
more than about 31 mph (50 km/h).

You pass a vehicle at a speed difference of 
no more than about 12 mph (20 km/h).

Blinks and a beeper sounds when:

You use the turn signal lever to signal a turn in 
the direction of the detected vehicle while the 
blind spot information system alert indicator is 
on.

u

The beeper sounds three times.

1

Blind Spot Information System

*

For proper blind spot information system operation:

Always keep the rear bumper and area around the 
radar sensors clean.

Do not cover the rear bumper corner area with 
labels or stickers of any kind.

The system is for your convenience only. Even if an 
object is within the alert zone, the following 
situations may occur:

The blind spot information system alert indicator 
does not come on and the message 

Blind spot 

information system not available

 appears on 

the driver information interface.

The blind spot information system alert indicator 
may come on even with the message displayed.

Comes On

Blinks

* Not available on all models

Continued

437

uu

When Driving

u

Blind Spot Information System

*

Driving

You can turn the system on and off using the driver information interface.

2

Switching the Display

 P. 107

2

Safety Support

 P. 118

The blind spot information system will stay on the previously selected on or off 
setting each time you start the engine.

Blind Spot Information System On and Off

1

Blind Spot Information System

*

You can change the settings for the blind spot 
information system.

2

Settings

*

 P. 123

2

Customized Features

 P. 342

* Not available on all models

438

uu

When Driving

u

Blind Spot Information System

*

Driving

The blind spot information system alert indicator may not come on under the 
following conditions:

There is a large speed difference between your vehicle and the vehicle in the 
adjacent lane.

A vehicle is parked in a side lane.

An object not detected by the radar sensors approaches or passes your vehicle.

The vehicle driving in the adjacent lane is a motorcycle or other small vehicle.

The blind spot information system may not operate correctly under the following 
conditions:

Making a turn at an intersection.

Objects (guard rails, poles, trees, etc.) are detected.

An object that does not reflect radio waves well or a motorcycle, is in the alert 
zone.

Driving on a curved road.

A vehicle is moving from a far lane to the adjacent lane.

The system picks up signal interference such as other radar sensors from another 
vehicle or strong radio wave transmitted from a facility nearby.

The rear bumper or the area around the radar sensors is covered by dirt, mud, 
snow, ice, etc.

The rear bumper or the area around the radar sensors has been damaged or 
deformed.

In bad weather (heavy rain, snow, and fog).

Making a short turn or driving on a bumpy road that slightly tilts the vehicle.

An object such as a bicycle rack is attached to the rear of the vehicle.

Blind Spot Information System Conditions and Limitations

439

Continued

Driving

Honda Sensing

®

Honda Sensing

®

 is a driver support system which employs the use of two distinctly 

different kinds of sensors: the sonar sensors located in the front and rear bumpers, 
and the front grille, and a front wide view camera mounted to the interior side of 
the windshield, behind the rearview mirror.

Honda Sensing

®

 is a driver support system which employs the use of a front wide 

view camera mounted to the interior side of the windshield, behind the rearview 
mirror.

Models with Low Speed Braking Control

Models without Low Speed Braking Control

440

uu

Honda Sensing

®

u

Driving

Honda Sensing

®

 has the following functions.

The functions which do not require switch operations to activate

Collision Mitigation Braking System

TM

 (CMBS

TM

2

 P. 443

Low Speed Braking Control

*


2

 P. 455

Road Departure Mitigation System 

2

 P. 501

Traffic Sign Recognition System 

2

 P. 509

The functions which require switch operations to activate

Adaptive Cruise Control (ACC) with Low Speed Follow 

2

 P. 461

Lane Keeping Assist System (LKAS) 

2

 P. 481

Traffic Jam Assist

*


2

 P. 492

* Not available on all models

441

uu

Honda Sensing

®

u

Continued

Driving

 Button

Press to activate standby mode for ACC with 
Low Speed Follow. 
Or press to cancel the system.

LKAS Button

Press to activate standby mode for LKAS and 
Traffic Jam Assist

*

Or press to cancel these systems.

CANCEL Button

Press to cancel ACC with Low Speed Follow.

Interval Button

Press to change the ACC with Low Speed 
Follow following-interval.

RES/+/SET/− Switch

Press the 

RES/+

/

SET/−

 switch up to set or 

resume the ACC with Low Speed Follow or 
increase the vehicle speed. Press the 

RES/+

/

SET/−

 switch down to set the ACC with Low 

Speed Follow or decrease the vehicle speed.

Operation Switches for the Adaptive Cruise Control (ACC) with Low 
Speed Follow/Lane Keeping Assist System (LKAS)/Traffic Jam Assist

*

Interval Button

 Button

LKAS Button

CANCEL

 Button

RES/+

/

SET/−

 Switch

* Not available on all models

442

uu

Honda Sensing

®

u

Driving

You can see the current state of Adaptive 
Cruise Control (ACC) with Low Speed Follow, 
Lane Keeping Assist System (LKAS) and Traffic 
Jam Assist

*

.

a

Indicates that ACC with Low Speed Follow 
is ready to be activated.

Green: The system is on.

White: The system is standby.

Amber: There is a problem with the system.

b

Indicates that LKAS or Traffic Jam Assist

*

 is 

ready to be activated.

Green: The system is on.

White: The system is standby.

Amber: There is a problem with the system.

c

Indicates that LKAS or Traffic Jam Assist

*

 is 

activated and whether or not traffic lane 
lines are detected.

Green lines: The system is on.

White lines: Traffic lane lines are detected.

Amber line: Lane departure is detected.

d

Indicates whether or not a vehicle is 
detected ahead.

e

Indicates that ACC with Low Speed Follow 
shows the set vehicle speed.

f

Indicates that ACC with Low Speed Follow 
shows the set vehicle interval.

Gauge Content

6

* Not available on all models

443

uu

Honda Sensing

®

u

Collision Mitigation Braking System

TM

 (CMBS

TM

)

Continued

Driving

Collision Mitigation Braking System

TM

 (CMBS

TM

)

The system can assist you when it determines there is a possibility of your vehicle 
colliding with a vehicle (including motorcycles) ahead from behind, an oncoming 
vehicle in front, a pedestrian, or someone riding a bicycle (moving bicycle). 
The CMBS

TM

 is designed to alert you when the potential for a collision is determined, 

as well as assist in reducing speed, avoiding collisions, and reducing collision 
severity.

1

Collision Mitigation Braking System

TM

 (CMBS

TM

)

Important Safety Reminder

The CMBS

TM

 is designed to reduce the severity of an 

unavoidable collision. It does not prevent collisions 
nor stop the vehicle automatically. It is still your 
responsibility to operate the brake pedal and steering 
wheel appropriately according to the driving 
conditions.

The CMBS

TM

 may not activate or may not detect a 

vehicle in front of your vehicle under certain 
conditions:

2

CMBS

TM

 Conditions and Limitations

 P. 448

You can read about handling information for the 
camera equipped with this system.

2

Front Wide View Camera

 P. 515

When the CMBS

TM

 is activated, it will continue to 

operate even if the accelerator pedal is partially 
depressed. However, it will be canceled if the 
accelerator pedal is fully depressed.

uu

Honda Sensing

®

u

Collision Mitigation Braking System

TM

 (CMBS

TM

)

444

Driving

How the system works

The system starts monitoring the roadway ahead when your vehicle speed is about 
3 mph (5 km/h) or above and will search for a vehicle, pedestrian, or moving bicycle 
in front of you.

The CMBS

TM

 activates when:

The speed difference between your vehicle and a vehicle, pedestrian, or moving 
bicycle detected in front of you becomes about 3 mph (5 km/h) and over with a 
chance of a collision.

Your vehicle drives at about 18 mph (30 km/h) or less and there is a chance of in 
frontal collision with a detected oncoming vehicle when you turn left at an 
intersection.

Your vehicle speed is about 62 mph (100 km/h) or less and the system determines 
there is a chance of a collision with:

- An oncoming or stationary vehicle detected in front of you.
- A pedestrian or moving bicycle detected in front of you.

1

How the system works

The camera in the CMBS

TM

 is also designed to detect 

pedestrians.
However, this pedestrian detection feature may not 
activate or may not detect a pedestrian in front of 
your vehicle under certain conditions.
Refer to the ones indicating the pedestrian detection 
limitations from the list.

2

CMBS

TM

 Conditions and Limitations

 P. 448

A front wide view camera is located 

behind the rearview mirror.

When to use

445

uu

Honda Sensing

®

u

Collision Mitigation Braking System

TM

 (CMBS

TM

)

Continued

Driving

The CMBS

TM

 will be canceled when your vehicle stops or the system determines 

there no longer is the potential for a collision.
The CMBS

TM

 may also be canceled when a driver operates the steering wheel and 

the brake or accelerator pedal to avoid a collision.

When the system activates

The system provides visual and audible alerts 
of a possible collision, and stops if the collision 
is avoided.

u

Take appropriate action to prevent a 
collision (apply the brakes, change lanes, 
etc.)

You can change the distance (

Long

/

Normal

/

Short

) between vehicles at which the 

system’s earliest collision alert will come on.

2

Settings

*

 P. 123

2

Customized Features

 P. 342

Visual Alerts

Beep

Audible Alert

* Not available on all models

446

uu

Honda Sensing

®

u

Collision Mitigation Braking System

TM

 (CMBS

TM

)

Driving

The system has three alert stages for a possible collision. However, depending on circumstances, the CMBS

TM

 may not go through all of 

the stages before initiating the last stage.

Collision Alert Stages

Distance between vehicles

CMBS

TM

The sensors detect a vehicle

Audible & Visual WARNINGS

Braking

Stage 

one

There is a risk of a collision with the 
vehicle ahead of you.

When in 

Long

, visual and audible 

alerts come on at a longer distance 
from a vehicle ahead than in 

Normal


setting, and in 

Short

, at a shorter 

distance than in 

Normal

.

Stage 

two

The risk of a collision has increased, 
time to respond is reduced.

Visual and audible alerts.

Lightly applied

Stage 

three 

The CMBS

TM

 determines that a collision 

is unavoidable.

Forcefully applied

Your 
Vehicle

Vehicle 
Ahead

Normal

Short

Long

Your 
Vehicle

Vehicle 
Ahead

Your 
Vehicle

Vehicle 
Ahead

Continued

447

uu

Honda Sensing

®

u

Collision Mitigation Braking System

TM

 (CMBS

TM

)

Driving

You can turn the system on and off using the driver information interface.

2

Switching the Display

 P. 107

2

Safety Support

 P. 118

The CMBS

TM

 is turned on every time you start the engine, even if you turned it off 

the last time you drove the vehicle.

CMBS

TM

 On and Off

1

Collision Mitigation Braking System

TM

 (CMBS

TM

)

You cannot turn the CMBS

TM

 off while driving.

The CMBS

TM

 may automatically shut off, and the 

safety support indicator (amber) will come and stay 
on under certain conditions:

2

CMBS

TM

 Conditions and Limitations

 P. 448

The CMBS

TM

 is not activated for about 15 seconds 

after the engine starts.

The Vehicle Stability Assist

TM

 (VSA

®

) system, Vehicle 

Stability Assist

TM

 (VSA

®

OFF

, Adaptive Cruise Control 

(ACC) with Low Speed Follow

*

, low tire pressure/

TPMS

*

, parking brake and brake system and safety 

support indicators may come on in amber along with 
a message in the gauge when you set the power 
mode to ON after reconnecting the battery.
Drive a short distance at more than 12 mph (20 km/h).
Each indicator should go off. If any do not, have your 
vehicle checked by a dealer.

* Not available on all models

uu

Honda Sensing

®

u

Collision Mitigation Braking System

TM

 (CMBS

TM

)

448

Driving

In the following situations, the camera may be unable to correctly detect vehicles, 
pedestrians, moving bicycles, or road conditions, potentially causing the CMBS

TM

 to 

operate improperly.

2

Front Wide View Camera

 P. 515

Environmental conditions

Driving in bad weather (rain, fog, snow, etc.).

Sudden changes between light and dark, such as the entrance or exit of a tunnel 
or the shadows of trees, buildings, etc.

Driving into low sunlight (e.g., at dawn or dusk).

Strong light is reflected onto vehicles, pedestrians, moving bicycles, or road 
surfaces.

Water is sprayed by or snow blown from a vehicle ahead.

Driving at night or in a dark place such as a tunnel (due to low-light conditions, 
vehicles, pedestrians, or moving bicycles may not be illuminated).

Roadway conditions

Driving on curvy, winding, undulating, or sloping roads.

There is a film of water or puddles on the road surface.

Driving on rutted roads (snowy or unpaved roads, etc.).

Your vehicle is strongly shaken on uneven road surfaces.

CMBS

TM

 Conditions and Limitations

1

CMBS

TM

 Conditions and Limitations

Have your vehicle checked by a dealer if you find any 
unusual behavior of the system (e.g., the warning 
message appears too frequently).


Content      ..     11      12      13      14     ..