Honda CR-V (2024 year). Manual in english - page 6
 

  Index      Manuals     Honda CR-V (2024 year). Manual in english


Search            copyright infringement  


Content      ..     4      5      6      7     ..


Honda CR-V (2024 year). Manual in english - page 6


uu

Seats

u

Front Seats

198

Co
ntrols

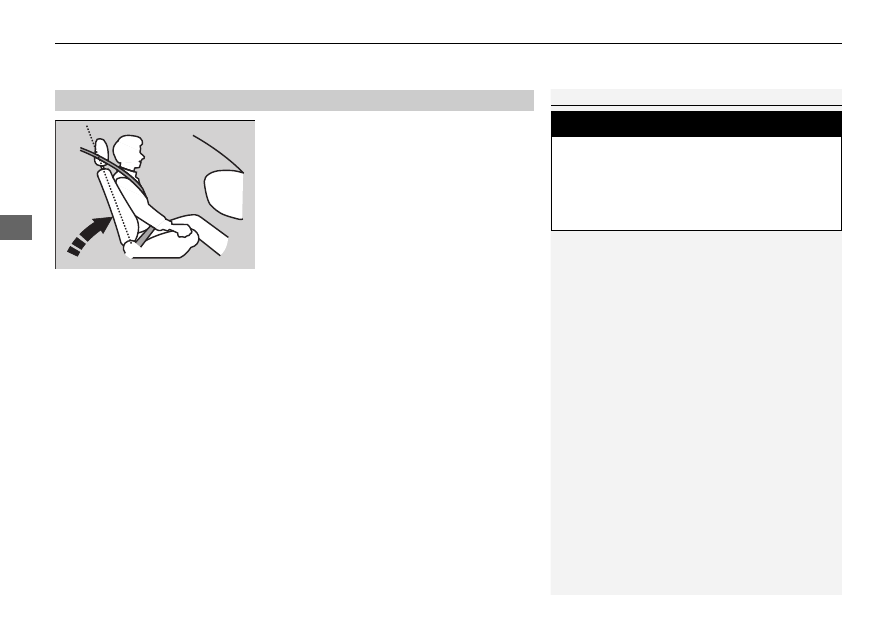
Adjust the driver’s seat-back to a comfortable, 
upright position, leaving ample space 
between your chest and the airbag cover in 
the center of the steering wheel.

The front seat passenger should also adjust 
their seat-back to a comfortable, upright 
position.

Reclining a seat-back so that the shoulder part of the belt no longer rests against the 
occupant’s chest reduces the protective capability of the belt. It also increases the 
chance of sliding under the belt in a crash and being seriously injured. The farther a 
seat-back is reclined, the greater the risk of injury.

Adjusting the Seat-Backs

1

Adjusting the Seat-Backs

Do not put a cushion, or other object, between the 
seat-back and your back.

Doing so may interfere with proper seat belt or airbag 
operation.

If you cannot get far enough away from the steering 
wheel and still reach the controls, we recommend 
that you investigate whether some type of adaptive 
equipment may help.

3

WARNING

Reclining the seat-back too far can result in 
serious injury or death in a crash.

Adjust the seat-back to an upright position, 
and sit well back in the seat.

199

uu

Seats

u

Rear Seats

Continued

Co
ntrols

Rear Seats

Adjusting the Seat Positions

1

Rear Seats

Once a seat is adjusted correctly, rock it back and 
forth to make sure it is locked in position.

Lever

Seat-back Angle Adjustment

Pull up the lever to change the 
angle.

uu

Seats

u

Rear Seats

200

Co
ntrols

1.

Store the center seat belt first. Insert the 
latch plate into the slot on the side of the 
anchor buckle.

2.

Retract the seat belt into the holder on the 
ceiling.

2

Seat Belt with Detachable Anchor

 P. 50

3.

Lower the rear seat head restraint to its 
lowest position. Put the armrest back into 
the seat-back.

4.

Pull the release lever and fold down the 
seat.

Folding Down the Rear Seats

1

Folding Down the Rear Seats

The rear seat-backs can be folded down to 
accommodate bulkier items in the cargo area.

Remove any items from the rear seat cushion and 
floor before you fold down the rear seat.

When returning the seat-back to its original position, 
push it firmly back. Also, make sure all rear shoulder 
belts are positioned in front of the seat-back.

Make sure all items in the cargo area or items 
extending through the opening into the rear 
seats are properly secured. Loose items can fly 
forward if you have to brake hard.

Make sure that the folded seat-back does not press 
against the front passenger seat, as this can cause the 
weight sensors in the front passenger seat to work 
improperly.

2

Passenger Airbag Off Indicator

 P. 70

Make sure the seat-back, head restraints and seat 
cushion are securely latched back into place before 
driving.

Latch 
Plate

Anchor Buckle

Release Lever

201

uu

Seats

u

Rear Seat Reminder

Co
ntrols

Rear Seat Reminder

This feature alerts you of the possible presence of passengers or items in the rear 
seats before you exit the vehicle. It activates when the power mode is set to VEHICLE 
OFF if the rear doors were opened shortly before or after the power mode was set 
to ON.

A reminder appears on the driver information 
interface and an alert will sound when the 
power mode is set to VEHICLE OFF.

1

Rear Seat Reminder

When the power mode is set to VEHICLE OFF, the 
reminder comes on briefly, then the function is 
deactivated.

The reminder will not work if the power mode has 
not been set to ON within 10 minutes of operating 
the rear doors.

The system does not detect passengers in the rear 
seats. Instead, it can detect when a rear door is 
opened and closed, indicating that there may be 
something in the rear seats.

You can turn off the notification setting.

2

Settings

*

 P. 129

2

Customized Features

 P. 359

* Not available on all models

202

uu

Seats

u

Maintain a Proper Sitting Position

Co
ntrols

Maintain a Proper Sitting Position

After all occupants have adjusted their seats and head restraints, and put on their 
seat belts, it is very important that they continue to sit upright, well back in their 
seats, with their feet on the floor, until the vehicle is safely parked and the engine is 
off.

Sitting improperly can increase the chance of injury during a crash. For example, if 
an occupant slouches, lies down, turns sideways, sits forward, leans forward or 
sideways, or puts one or both feet up, the chance of injury during a crash is greatly 
increased.

In addition, an occupant who is out of position in the front seat can be seriously or 
fatally injured in a crash by striking interior parts of the vehicle or being struck by an 
inflating front airbag.

1

Maintain a Proper Sitting Position

3

WARNING

Sitting improperly or out of position can 
result in serious injury or death in a crash.

Always sit upright, well back in the seat, 
with your feet on the floor.

203

uu

Seats

u

Head Restraints

Continued

Co
ntrols

Head Restraints

Your vehicle is equipped with head restraints in all seating positions.

Head restraints are most effective for 
protection against whiplash and other rear-
impact crash injuries when the center of the 
back of the occupant’s head rests against the 
center of the restraint. The tops of the 
occupant’s ears should be level with the 
center height of the restraint.

To raise the head restraint:

Pull it upward.

To lower the head restraint:

Push it down while pressing the release 
button.

Adjusting the Front Head Restraints

1

Adjusting the Front Head Restraints

In order for the head restraint system to work 
properly:

Do not hang any items on the head restraints, or 
from the restraint legs.

Do not place any objects between an occupant and 
the seat-back.

Install each restraint in its proper location.

The front seat head restraints cannot be removed.

3

WARNING

Improperly positioning head restraints 
reduces their effectiveness and increases 
the likelihood of serious injury in a crash.

Make sure head restraints are in place and 
positioned properly before driving.

Position head in the center 
of the head restraint.

uu

Seats

u

Head Restraints

204

Co
ntrols

A passenger sitting in the rear seat should 
adjust the height of their head restraint to an 
appropriate position before the vehicle begins 
moving.

To raise the head restraint:

Pull it upward.

To lower the head restraint:

Push it down while pressing the release 
button.

Head restraints can be removed for cleaning or repair.

To remove a head restraint:

Pull the restraint up as far as it will go. Then, push the release button and pull the 
restraint up and out.

To reinstall a head restraint:

Insert the legs back in place, then adjust the head restraint to an appropriate height 
while pressing the release button. Pull up on the restraint to make sure it is locked 
in position.

Changing the Rear Seat Head Restraint Position

Removing and Reinstalling the Rear Head Restraints

1

Removing and Reinstalling the Rear Head Restraints

3

WARNING

Failure to reinstall or correctly reinstall, the 
head restraints can result in severe injury 
during a crash.

Always replace the head restraints before 
driving.

205

uu

Seats

u

Armrest

Co
ntrols

Armrest

The console lid can be used as an armrest.

Pull down the armrest in the center backrest.

Using the Front Seat Armrest

Using the Rear Seat Armrest

206

Co
ntrols

Interior Convenience Items

Interior Lights

ON

The interior lights come on regardless of 
whether the doors are open or closed.

Door activated

The interior lights come on in the following 
situations:

When any doors are opened.

You unlock the driver’s door.

When the power mode is set to VEHICLE 
OFF.

OFF

The interior lights remain off regardless of 
whether the doors are open or closed.

Interior Light Switches

1

Interior Light Switches

In the door activated position, the interior lights fade 
out and go off about 30 seconds after the doors are 
closed.
The lights go off after about 30 seconds in the 
following situations:

When you unlock the driver’s door but do not open 
it.

When you set the power mode to VEHICLE OFF but 
do not open a door.

You can change the interior lights dimming time.

2

Settings

*

 P. 129

2

Customized Features

 P. 359

The interior lights go off immediately in the following 
situations:

When you lock the driver’s door.

When you close the driver’s door in ACCESSORY 
mode.

When you set the power mode to ON.

To avoid draining the battery, do not leave the 
interior light on for an extended length of time when 
the engine is off.

If you leave any of the doors open in VEHICLE OFF 
mode, the interior lights go off after about 15 
minutes.

Door Activated 
Position

Door Activated 
Position

ON

OFF

ON

OFF

Front

Rear

* Not available on all models

207

uu

Interior Convenience Items

u

Interior Lights

Co
ntrols

The map lights can be turned on and off by 
pressing the switches.

The cargo area lights come on when you open 
the tailgate.

Map Light Switches

1

Map Light Switches

When the front interior light switch is in the door 
activated position and any door is open, the map 
light will not go off when you press the switches.

Cargo Area Lights

208

uu

Interior Convenience Items

u

Storage Items

Co
ntrols

Storage Items

Pull the handle to open the glove box.

You can lock the glove box with the built-in 
key.

Glove Box

1

Glove Box

3

WARNING

An open glove box can cause serious injury 
to your passenger in a crash, even if the 
passenger is wearing the seat belt.

Always keep the glove box closed while 
driving.

Glove Box

Handle

To Lock

209

uu

Interior Convenience Items

u

Storage Items

Continued

Co
ntrols

Pull the handle to open the console 
compartment.

Removable tray

*

The tray can be removed and stored on the 
bottom surface of the armrest.

Console Compartment

* Not available on all models

uu

Interior Convenience Items

u

Storage Items

210

Co
ntrols

Front seat beverage holders

Located in the console between the front 
seats.

Rear seat beverage holders

Fold the armrest down to use the rear seat 
beverage holders.

Beverage Holders

1

Beverage Holders

NOTICE

Spilled liquids damage the upholstery, carpeting, and 
electrical components in the interior.

Be careful when you are using the beverage holders. 
Hot liquid can scald you.

211

uu

Interior Convenience Items

u

Storage Items

Continued

Co
ntrols

Door beverage holders

Located on both of front and rear door side 
pockets.

Front seat

Rear seat

uu

Interior Convenience Items

u

Storage Items

212

Co
ntrols

There is a coat hook on the rear left grab 
handle.

The tie-down anchors on the cargo area floor 
can be used to install a net for securing items.

Coat Hook

1

Coat Hook

The coat hook is not designed for large or heavy 
items.

Tie-down Anchors

1

Tie-down Anchors

Do not let anyone access items in the cargo area 
while driving. Loose items can cause injury if you have 
to brake hard.

Anchor

Anchor

Continued

213

uu

Interior Convenience Items

u

Storage Items

Co
ntrols

The cargo hooks on the both of the cargo area 
can be used to hang a light items.

To open the sunglasses holder, push and 
release the indent. To close, push it again until 
it latches.

You can store eyeglasses and other small 
items in this holder.

Cargo Hooks

1

Cargo Hooks

Do not hang a large object or an object that weighs 
more than 6 lbs (3 kg) on the side cargo hooks.
Hanging heavy or large objects may damage the 
hooks.

Hook

Sunglasses Holder

1

Sunglasses Holder

Keep the holder closed while driving except when 
accessing stored items.

Push

214

uu

Interior Convenience Items

u

Storage Items

Co
ntrols

When putting the cargo floor lid in the 
bottom position

This is convenient when storing a tall item.

1.

Pull the strap to open the cargo floor lid.

2.

Pull the strap upwards to lift the floor lid.

3.

Pull the lid towards you until it disengages 
from the support rods.

4.

Push the far end of the floor lid down to the 
bottom under the support rods, then lower 
the other end.

Cargo Storage Area

Support Rod

215

uu

Interior Convenience Items

u

Other Interior Convenience Items

Continued

Co
ntrols

Other Interior Convenience Items

The accessory power sockets can be used when the power mode is in ACCESSORY 
or ON.

Console panel

Open the cover to use it.

Cargo area

Open the cover to use it.

Accessory Power Socket

1

Accessory Power Socket

NOTICE

Do not insert an automotive type cigarette lighter 
element. This can overheat the accessory power 
socket.

The accessory power socket is designed to supply 
power for 12-volt DC accessories that are rated 180 
watts (15 amps) or less.

To prevent battery drain, use the accessory power 
socket only when the engine is running.

When the accessory power socket is not in use, close 
the cover to prevent any small foreign objects from 
getting into the accessory power socket.

uu

Interior Convenience Items

u

Other Interior Convenience Items

216

Co
ntrols

To use the wireless charger, the power mode must be in ACCESSORY or ON.
Charge any devices compatible with Qi wireless charging on the area indicated by 
the 

 mark as follows:

1.

To turn the system on and off, press and 
hold the 

 (power) button.

u

When the system is activated, the green 
indicator light comes on.

2.

Place the device you want to charge on the 
charging area.

u

The system will automatically start 
charging the device, and the amber 
indicator light will come on.

u

Make sure that the device is compatible 
with the system and placed with the 
chargeable side in the center of the 
charging area.

3.

When charging is completed, the green 
indicator light will come on.

u

Depending on the device, the amber 
indicator light will stay on.

Wireless Charger

*

1

Wireless Charger

*

RF Radiation Exposure Statement:

This equipment complies with FCC RF Radiation 
exposure limits set forth for an uncontrolled 
environment. 
This device and its antenna must not be co-located or 
operating in conjunction with any other antenna or 
transmitter.

In order to use safely:

Remove any metal objects from the charge pad 
before charging a device.

Do not open the charger case.

Do not use the charger if it malfunctions. Contact 
your dealer.

If the charger interferes with radio communications, 
attempt to correct the interference:

Press and hold the switch on the charger for a few 
seconds to turn off the charger.

Green Indicator

Charging Area

 (Power) Button

Amber Indicator

* Not available on all models

Continued

217

uu

Interior Convenience Items

u

Other Interior Convenience Items

Co
ntrols

When charging does not start

Perform one of the solutions in the following table.

Indicator

Cause

Solution

Green 

Amber

Blinking 
simulta-

neously

There is an obstacle(s) between 
the charging area and the 
device.

Remove the 
obstacle(s).

The device is not within the 
charging area.

Pick up and reset the 
device to the center of 
the charging area 
where 

 is located.

The temperature of the wireless 
charger pad increases.

Temporarily suspend 
charging the device. 
Wait for the 
temperature to drop 
and attempt to charge 
the device again.

Amber

Blinking

The wireless charger is faulty.

Contact a dealer for 
repairs.

1

Wireless Charger

*

This system consumes a lot of power. Do not use the 
system for a long time when the engine is not 
running. This may weaken the battery, making it 
difficult to start the engine.

When using the wireless charger, check the user’s manual 
that came with the compatible device you want to charge.

3

CAUTION

Metal objects between the charge pad 
and the device to be charged will get 
hot and can burn you.

Always remove foreign objects from 
the charge pad before charging the 
device.

Be sure the surface is clear of dust and 
other debris before charging.

Do not spill liquids (i. e. water, drinks, 
etc.) on the charger and the device.

Do not use oil, grease, alcohol, 
benzine or thinner for cleaning the 
charge pad.

Do not cover the system with towels, 
clothing, or other objects while 
charging etc.

Avoid spraying aerosols which may 
come in contact with the charge pad 
surface.

* Not available on all models

uu

Interior Convenience Items

u

Other Interior Convenience Items

218

Co
ntrols

1

Wireless Charger

*

The wireless charger can support up to 15 W, but the 
charging rate varies based on the device and other 
conditions.

NOTICE

Do not place any magnetic recording media or 
precision machines within the charging area while 
charging.
The data on your cards such as credit cards can be 
lost because of the magnetic effect. Also, precision 
machines such as watches can be affected.

“Qi” and 

 marks are the registered trademarks 

owned by Wireless Power Consortium (WPC).

In the following cases, charging may stop or not start:

The device is already fully charged.

The temperature of the device is extremely high 
while charging.

You are at a place that emits strong 
electromagnetic waves or noises, such as a TV 
station, electric power plant, or gas station.

The device has a cover, case, or accessories which 
are not compatible with wireless charging.

A device may not charge if the size or shape of its 
chargeable side is not appropriate for use with the 
charging area.

Not all devices are compatible with the system.

* Not available on all models

Continued

219

uu

Interior Convenience Items

u

Other Interior Convenience Items

Co
ntrols

1

Wireless Charger

*

During the charging phase, it is normal for the 
charging area and device to heat up.

Charging may be briefly interrupted when:

All the doors and the tailgate are closed
- to avoid interference with the proper functioning 
of the keyless access system.

The position of the device is altered.

Do not charge more than one device at a time on a 
charging area.

If the device becomes too hot and its battery 
protection function activates, it may charge 
extremely slowly or no longer charge.
The temperature at which the battery protection 
function activates depends on the device.

* Not available on all models

uu

Interior Convenience Items

u

Other Interior Convenience Items

220

Co
ntrols

The power mode must be in ON to use the 
heated steering wheel.

Press the button on the lower side of the 
steering wheel.

When a comfortable temperature is reached, 
press the button again to turn it off.

The heated steering wheel is turned off every 
time you start the engine, even if you turned it 
on the last time you drove the vehicle.

Heated Steering Wheel

*

Canadian models

1

Heated Steering Wheel

*

Do not use the heated steering wheel continuously 
when the engine is off. Under such conditions, the 
battery may be weakened, making the engine 
difficult to start.

* Not available on all models

Continued

221

uu

Interior Convenience Items

u

Other Interior Convenience Items

Co
ntrols

The seat heaters can be used when the power 
mode is in ON.

Press the seat heater button:
Once - The HI setting (three indicators on)
Twice - The MID setting (two indicators on)
Three times - The LO setting (one indicator on)
Four times - The OFF setting (no indicators on)

When the power mode is turned on after it is 
turned off, the previous setting is maintained.

Front Seat Heaters

*

1

Front Seat Heaters

*

Do not use the seat heaters even in LO when the 
engine is off. Under such conditions, the battery may 
be weakened, making the engine difficult to start.

After a certain period of time, the strength setting for 
the front seat heaters will automatically be reduced 
by one level at a time until the front seat heaters 
shuts off. The elapsed time varies according to the 
interior environment.

3

WARNING

Heat induced burns are possible when 
using seat heaters. 

Persons with a diminished ability to sense 
temperature (e.g., persons with diabetes, 
lowerlimb nerve damage, or paralysis) or 
with sensitive skin should not use seat 
heaters.

* Not available on all models

uu

Interior Convenience Items

u

Other Interior Convenience Items

222

Co
ntrols

The seat heaters can be used when the power 
mode is in ON.

There is no heater in the rear center seating 
position.

Press the seat heater button:
Once - The HI setting (three indicators on)
Twice - The MID setting (two indicators on)
Three times - The LO setting (one indicator on)
Four times - The OFF setting (no indicators on)

The sun visor can be extended horizontally.

Rear Seat Heaters

*

Canadian models

1

Rear Seat Heaters

*

Do not use the seat heaters even in LO when the 
engine is off. Under such conditions, the battery may 
be weakened, making the engine difficult to start.

After a certain period of time, the strength setting for 
the rear seat heaters will automatically be reduced by 
one level at a time until the rear seat heaters shuts 
off. The elapsed time varies according to the interior 
environment.

3

WARNING

Heat induced burns are possible when 
using seat heaters. 

Persons with a diminished ability to sense 
temperature (e.g., persons with diabetes, 
lowerlimb nerve damage, or paralysis) or 
with sensitive skin should not use seat 
heaters.

Sun Visor

* Not available on all models

223

Continued

Co
ntrols

Climate Control System

Using Automatic Climate Control

The automatic climate control system maintains the interior temperature you select. 
The system also selects the proper mix of heated or cooled air that raises or lowers 
the interior temperature to your preference as quickly as possible.

Use the system when the engine is running.

1.

Press the 

AUTO

 button.

2.

Adjust the interior temperature using the driver’s side or passenger’s side 
temperature control dial.

3.

Press the 

 (

ON/OFF

) button to cancel.

1

Using Automatic Climate Control

If any buttons are pressed while using the climate 
control system in auto, the function of the button 
that was pressed will take priority.

The auto button indicator

*

/

AUTO

 indicator

*

 will go 

off, but functions unrelated to the button that were 
pressed will be controlled automatically.

During idle-stops, air-conditioning is suspended, and 
only the blower remains active. If you do not want 
air-conditioning suspended, press the Auto Idle Stop 

OFF

 button to cancel idle-stop.

To prevent cold air from blowing in from outside, the 
fan may not start immediately when the 

AUTO


button is pressed.

If the interior is very warm, you can cool it down 
more rapidly by partially opening the windows, 
turning the system on auto, and setting the 
temperature to low. Change the fresh air mode to 
recirculation mode until the temperature cools down.

When you set the temperature to the lower or upper 
limit, 

Lo

 or 

Hi

 is displayed.

Models with SYNC button

Dashboard 
vents

Dashboard 
and floor 
vents

Floor vents

Floor and 
defroster 
vents

AUTO

 Button

SYNC

 Button

A/C

 (Air Conditioning) Button

 (Recirculation) Button

 (

ON/OFF

) Button

Fan Control Dial

Driver’s Side 
Temperature 
Control Dial

Passenger’s Side 
Temperature 
Control Dial

* Not available on all models

uu

Climate Control System

u

Using Automatic Climate Control

224

Co
ntrols

Use the system when the engine is running.

1.

Press the 

AUTO

 button.

2.

Adjust the interior temperature using the temperature control dial.

3.

Press the 

 (

ON/OFF

) button to cancel.

Switching between the recirculation and fresh air modes

Press the 

 (recirculation) button and switch the mode depending on 

environmental conditions.
Recirculation mode (indicator on): Recirculates air from the vehicle’s interior through 
the system.
Fresh air mode (indicator off): Maintains outside ventilation. Keep the system in 
fresh air mode in normal situations.

1

Using Automatic Climate Control

Pressing the 

 button switches the climate control 

system between on and off. When turned on, the 
system returns to your last selection.

While ECON mode is active, the climate control 
system may have reduced cooling performance.

Models without SYNC button

AUTO

 Button

Temperature 
Control Dial

 (Recirculation) Button

 (

ON/OFF

) Button

Fan Control Dial

Dashboard 
vents

Dashboard 
and floor 
vents

Floor vents

Floor and 
defroster 
vents

A/C

 (Air Conditioning) Button

Continued

225

uu

Climate Control System

u

Using Automatic Climate Control

Co
ntrols

Pressing the 

 (windshield defroster) button 

turns the air conditioning system on and 
automatically switches the system to fresh air 
mode.

Press the 

 button again to turn off, the 

system returns to the previous settings.

Defrosting the Windshield and Windows

1

Defrosting the Windshield and Windows

For your safety, make sure you have a clear view 
through all the windows before driving.

Do not set the temperature near the upper or lower 
limit.
When cold air hits the windshield, the outside of the 
windshield may fog up.

If you press the 

 button during Auto Idle Stop, the 

engine restarts automatically.

Models with SYNC button

Models without SYNC button

uu

Climate Control System

u

Using Automatic Climate Control

226

Co
ntrols

To rapidly defrost the windows

1.

Press the 

 button.

2.

Press the 

 button.

1

To rapidly defrost the windows

After defrosting the windows, switch over to fresh air 
mode. If you keep the system in recirculation mode, 
the windows may fog up from humidity. This 
impedes visibility.

Models with SYNC button

Models without SYNC button

227

uu

Climate Control System

u

Using Automatic Climate Control

Co
ntrols

You can set the temperature synchronously for the driver’s side and the passenger’s 
side in synchronization mode.

1.

Press the 

SYNC

 button.

u

The system switches to synchronization mode.

2.

Adjust the temperature using the driver’s side temperature control dial.

Press the 

SYNC

 button or adjust the interior temperature using the passenger’s side 

temperature control dial to return to dual mode.

Synchronization Mode

*

1

Synchronization Mode

*

When the system is in dual mode, the driver’s side 
temperature and the passenger’s side temperature 
can be set separately.

When you press the 

 button, the system changes 

to synchronization mode.

Driver’s Side 
Temperature 
Control Dial

Passenger’s 
Side 
Temperature 
Control Dial

SYNC

 Button

* Not available on all models

228

uu

Climate Control System

u

Automatic Climate Control Sensors

Co
ntrols

Automatic Climate Control Sensors

The automatic climate control system is 
equipped with sensors. Do not cover or spill 
any liquid on them.

Sensor

Sensor

229

Features

This chapter describes how to operate technology features.

Audio System

About Your Audio System................ 230
USB Port(s) ....................................... 231
Audio System Theft Protection ......... 232
Audio Remote Controls.................... 233

Audio System Basic Operation

........ 237

Adjusting the Sound ........................ 238
Display Setup ................................... 239
Playing AM/FM Radio ....................... 240
Playing an iPod ................................ 242
Playing a USB Flash Drive ................. 245
Playing 

Bluetooth

®

 Audio................. 248

Models with 7-in. Color Touchscreen

Siri Eyes Free .................................... 252
Smartphone Voice Recognition ........ 253
Apple CarPlay .................................. 254
Android Auto

TM

................................ 258

Audio System Basic Operation

........ 262

Start Up ........................................... 263
Audio/Information Screen ................ 264
System Updates ............................... 275
Adjusting the Sound ........................ 281
Display Setup ................................... 282
Voice Control Operation .................. 284
Playing AM/FM Radio....................... 287

Models with 9-in. Color Touchscreen

Playing SiriusXM

®

 Radio................... 291

Playing an iPod ................................ 302
Playing a USB Flash Drive ................. 305
Playing 

Bluetooth

®

 Audio ................ 308

HondaLink

®

..................................... 311

Smart Shortcuts ............................... 315
Wi-Fi Connection............................. 317
Apple CarPlay .................................. 318
Android Auto

TM

............................... 325

Audio Error Messages

...................... 331

General Information on the Audio 

System

............................................. 333

Customized Features

................ 354

359

Bluetooth

®

 HandsFreeLink

®

..... 376

396


Content      ..     4      5      6      7     ..