Honda Accord Hybrid (2022 year). Manual in english - page 38
 

  Index      Manuals     Honda Accord Hybrid (2022 year). Manual in english


Search            copyright infringement  


Content      ..     36      37      38      39     ..


Honda Accord Hybrid (2022 year). Manual in english - page 38


uu

Overheating

u

How to Handle Overheating

608

Han

d

lin

g the U

n

expected

Next thing to do

1.

Check that the cooling fan is operating and 
turn the power system off once the 

Engine 

Temperature Too Hot. Do Not Drive. 
Allow Engine To Cool.

 message 

disappears.

u

If the cooling fan is not operating, 
immediately turn the power system off.

2.

Once the engine has cooled down, inspect 
the coolant level and check the cooling 
system components for leaks.

u

If the coolant level in the engine coolant 
reserve tank is low, add coolant until it 
reaches the 

MAX

 mark.

u

If there is no coolant in the reserve tank, 
check that the radiator is cool. Cover the 
radiator cap with a heavy cloth and open 
the cap. If necessary, add coolant up to 
the base of the filler neck, and put the 
cap back on.

Last thing to do

Once the engine has cooled sufficiently, turn the power system on.
If the 

Engine Temperature Too Hot. Do Not Drive. Allow Engine To Cool.


message does not appear, resume driving. If it appears again, contact a dealer for 
repairs.

1

How to Handle Overheating

If the coolant is leaking, contact a dealer for repairs.

Use water as an emergency/temporary measure only. 
Have a dealer flush the system with proper antifreeze 
as soon as possible.

3

WARNING

Removing the radiator cap while the 
engine is hot can cause the coolant to spray 
out, seriously scalding you.

Always let the engine and radiator cool 
down before removing the radiator cap.

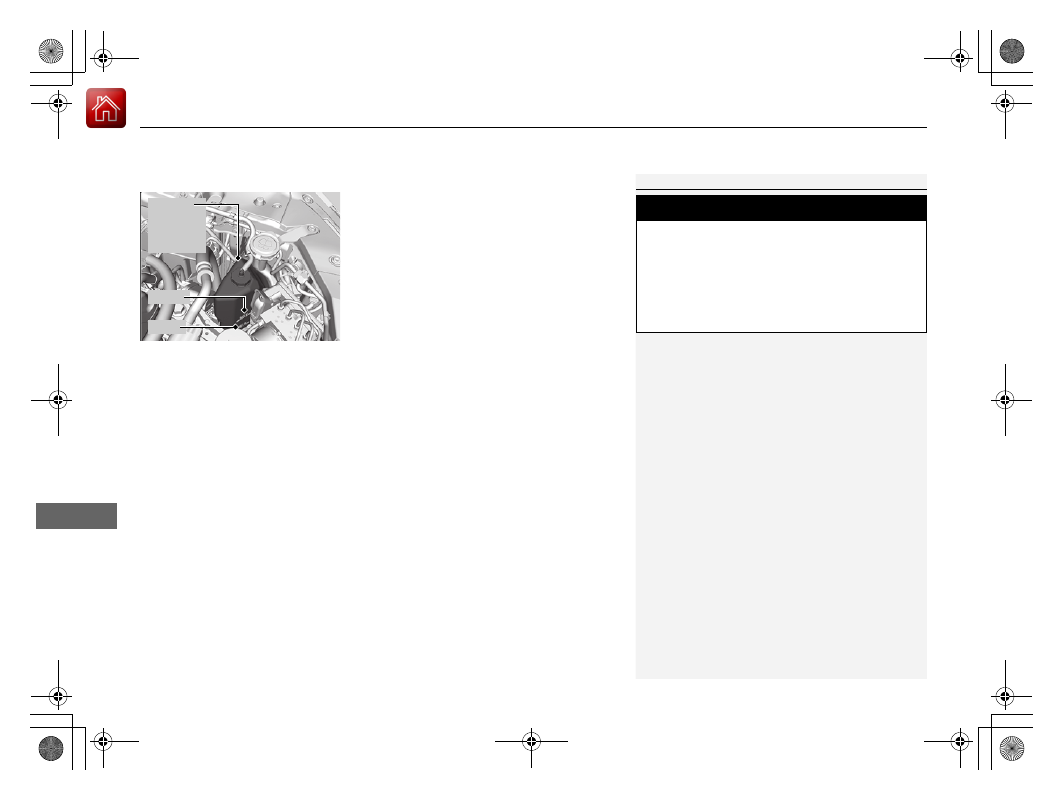
Engine 

Coolant 

Reserve 

Tank

MAX

MIN

609

Han

d

lin

g the U

n

expected

Indicator, Coming On/Blinking

If the Low Oil Pressure Warning Appears

Reasons for the warning to appear

Appears when the engine oil pressure is low.

What to do as soon as the warning 
appears

1.

Immediately park the vehicle on level 
ground in a safe place.

2.

If necessary, turn the hazard warning lights 
on.

What to do after parking the vehicle

1.

Turn the power system off and let the 
engine sit for approximately three minutes.

2.

Open the hood and check the oil level.

u

Add oil as necessary.

2

Oil Check

 P. 543

3.

Start the engine and check the low oil 
pressure warning.

u

The warning disappears: Start driving 
again.

u

The warning does not disappear within 
10 seconds: Immediately turn the power 
system off and contact a dealer for 
repairs.

1

If the Low Oil Pressure Warning Appears

NOTICE

Running the engine with low oil pressure can cause 
serious mechanical damage almost immediately.

610

uu

Indicator, Coming On/Blinking

u

If the 12-Volt Battery Charging System Indicator Comes On

Han

d

lin

g the U

n

expected

If the 12-Volt Battery Charging System Indicator 
Comes On

Reasons for the indicator to come on

Comes on when there is a problem with the charging system.

What to do when the indicator comes on

Stop in a safe place and have your vehicle checked by a dealer 
immediately.

If the Malfunction Indicator Lamp Comes On or 
Blinks

Reasons for the indicator lamp to come on or blink

Comes on if there is a problem with the engine emissions control 
system.

Blinks when engine misfiring is detected.

What to do when the indicator lamp comes on

Avoid high speeds and immediately get your vehicle inspected at a 
dealer.

What to do when the indicator lamp blinks

Park the vehicle in a safe place with no flammable items and wait at least 
10 minutes or more with the engine stopped until it cools.

1

If the 12-Volt Battery Charging System Indicator Comes On

If you need to stop temporarily, do not turn off the 
power system. The power system uses the 12-volt 
battery to activate. You may not be able to turn the 
power system on again if you have turned it off with 
this indicator on.

This indicator may come on when the outside 
temperature is below -40°F (-40°C). It will go off after 
the battery warms up.

1

If the Malfunction Indicator Lamp Comes On or Blinks

NOTICE

If you drive with the malfunction indicator lamp on, 
the emissions control system and the engine could be 
damaged.

If the malfunction indicator lamp blinks again when 
restarting the engine, drive to the nearest dealer at 
31 mph (50 km/h) or less. Have your vehicle 
inspected.

611

uu

Indicator, Coming On/Blinking

u

If the Brake System Indicator (Red) Comes On or Blinks

Han

d

lin

g the U

n

expected

If the Brake System Indicator (Red) Comes On or 
Blinks

Reasons for the indicator to come on

The brake fluid is low.

There is a malfunction in the brake system.

What to do when the indicator comes on while driving

Depress the brake pedal lightly to check pedal pressure.

If normal, check the brake fluid level the next time you stop.

If abnormal, take immediate action. If necessary, downshift the 
transmission to slow the vehicle using regenerative braking.

Reasons for the indicator to blink

There is a problem with the electric parking brake system.

What to do when the indicator blinks

Avoid using the parking brake and have your vehicle checked by a 
dealer immediately.

1

If the Brake System Indicator (Red) Comes On or Blinks

Have your vehicle repaired immediately.
It is dangerous to drive with low brake fluid. If there 
is no resistance from the brake pedal, stop 
immediately in a safe place. If necessary, downshift 
the transmission.

If the brake system indicator (red) and 

ABS

 indicator 

come on simultaneously, the electronic brake 
distribution system is not working. This can result in 
vehicle instability under sudden braking.
Have your vehicle inspected by a dealer immediately.

If the brake system indicator (red) blinks at the same 
time when the brake system indicator (amber) comes 
on, the parking brake may not work.
Avoid using the parking brake and have your vehicle 
checked by a dealer immediately.

2

If the Brake System Indicator (Red) Comes 
On or Blinks at the Same Time When the 
Brake System Indicator (Amber) Comes On


P. 612

U.S.

Canada

612

uu

Indicator, Coming On/Blinking

u

If the Brake System Indicator (Red) Comes On or Blinks at the Same Time When the Brake System Indicator (Amber) Comes On

Han

d

lin

g the U

n

expected

If the Brake System Indicator (Red) Comes On or 
Blinks at the Same Time When the Brake System 
Indicator (Amber) Comes On

If the brake system indicator (red) comes on or blinks at the 

same time when the brake system indicator (amber) comes on, 
release the parking brake manually or automatically

2

Parking Brake

 P. 503

If the brake system indicator (red) continuously comes on or blinks at 

the same time when the brake system indicator (amber) comes on, 
stop the vehicle in a safe place and have it inspected by a dealer 
immediately.

u

Preventing the vehicle from moving, put the transmission into 

(

P

.

If only the brake system indicator (red) is turned off, avoid using the 

parking brake and have your vehicle checked by a dealer immediately.

1

If the Brake System Indicator (Red) Comes On or Blinks at the Same 
Time When the Brake System Indicator (Amber) Comes On

If you apply the parking brake, you may not be able 
to release it.

If the brake system indicator (red) and the brake 
system indicator (amber) come on at the same time, 
the parking brake is working.

If the brake system indicator (red) blinks at the same 
time when the brake system indicator (amber) comes 
on, the parking brake may not work because it is 
checking the system.

If you repeatedly operate the electric parking brake in 
a short period of time, the brake stops operating to 
prevent heating of the system and the indicator 
blinks.
It returns to its original state in approximately one 
minute.

U.S.

Canada

(Red)

U.S.

Canada

(Amber)

613

uu

Indicator, Coming On/Blinking

u

If the Electric Power Steering (EPS) System Indicator Comes On

Han

d

lin

g the U

n

expected

If the Electric Power Steering (EPS) System Indicator 
Comes On

Reasons for the indicator to come on

Comes on if there is a problem with the EPS system.

What to do when the indicator comes on

Stop the vehicle in a safe place and turn on the power system again.
If the indicator comes on and stays on, immediately have your vehicle 
inspected by a dealer.

614

uu

Indicator, Coming On/Blinking

u

If the Low Tire Pressure/TPMS Indicator Comes On or Blinks

Han

d

lin

g the U

n

expected

If the Low Tire Pressure/TPMS Indicator Comes On or 
Blinks

Reasons for the indicator to come on or blink

A tire pressure is significantly low, or the TPMS has not been calibrated. 
If there is a problem with the TPMS, the indicator blinks for about one 
minute, and then stays on.

What to do when the indicator comes on

Drive carefully and avoid abrupt cornering and hard braking.
Stop your vehicle in a safe place. Check the tire pressure and adjust the 
pressure to the specified level. The specified tire pressure is on a label on 
the driver side doorjamb.

u

Calibrate the TPMS after the tire pressure is adjusted.

What to do when the indicator blinks, then remains on

Have the tire inspected by a dealer as soon as possible. 

1

If the Low Tire Pressure/TPMS Indicator Comes On or Blinks

NOTICE

Driving on an extremely underinflated tire can cause 
it to overheat. An overheated tire can fail. Always 
inflate your tires to the prescribed level.

615

uu

Indicator, Coming On/Blinking

u

If the Transmission System Indicator Blinks along with the Warning Message

Han

d

lin

g the U

n

expected

If the Transmission System Indicator Blinks along 
with the Warning Message

Reasons for the indicator to blink

The transmission is malfunctioning.

What to do when the indicator blinks

Immediately have your vehicle inspected by a 

dealer.

1

If the Transmission System Indicator Blinks along with the 
Warning Message

You may not be able to turn on the power system.

Make sure to set the parking brake when parking 
your vehicle.

Call a professional towing service if you need to tow 
your vehicle.

2

Emergency Towing

 P. 620

616

Han

d

lin

g the U

n

expected

Fuses

Fuse Locations

If any electrical devices are not working, set 
the power mode to VEHICLE OFF, and check 
to see if any applicable fuse is blown.

Located near the 12-volt battery. Push the 
tabs to open the box.
Fuse locations are shown on the fuse box 
cover. Locate the fuse in question by the 
fuse number and box cover number.

Engine Compartment Fuse 

Box

Tab

Circuit protected and fuse rating

Circuit Protected

Amps

1

Battery

150 A

2

(70 A)

EPS

70 A

(30 A)

Fuse Box Main 2

60 A

Electric Servo Brake

40 A

ABS/VSA FSR

40 A

SBW 1

30 A

IG Main 1

30 A

3

Rear Defogger

40 A

Fuse Box Main 1

60 A

(30 A)

Heater Motor

40 A

(40 A)

(30 A)

(30 A)

(30 A)

4

(30 A)

Fuse Box Option 2

*

(70 A)

(40 A)

Fuse Box Option 1

60 A

*1:Canadian models

Circuit Protected

Amps

5

RFC

40 A

(30 A)

SRM2

30 A

ABS/VSA Motor

40 A

IG Main 2

30 A

ENG EWP

30 A

6

SRM1

30 A

7

8

Wiper  Motor

30 A

9

Brake Light

10 A

10

EVTC

20 A

11

PCU EWP

15 A

12

RFC Coil

10 A

13

IGP

15 A

14

IG Hold

10 A

15

FI ECU

10 A

16

Battery Sensor

7.5 A

17

DBW

15 A

18

Ignition Coil

15 A

19

Hazard

15 A

20

21

P-ACT ECU

7.5 A

22

Heated Steering Wheel

*, *1

(10 A)

23

24

Audio

15 A

* Not available on all models

617

uu

Fuses

u

Fuse Locations

Han

d

lin

g the U

n

expected

*1:Canadian models

Circuit Protected

Amps

25

Rear Seat Heaters

*

(20 A)

26

Heated Windshield

*1

(15 A)

27

Back Up

10 A

28

Horn

10 A

29

Front Fog Lights

*

(10 A)

30

A/C EWP

(10 A)

31

32

Washer Motor

15 A

33

34

(10 A)

35

Audio Sub

(7.5 A)

36

IGPS (LAF)

7.5 A

37

IG1 E-PARKING

7.5 A

38

IG1 IPU

10 A

39

IG1 TCU

10 A

40

IG1 Fuel Pump

20 A

41

IG1 ABS/VSA

7.5 A

42

IG1 ACG

10 A

43

IG1 RFC

7.5 A

44

IG1 Monitor

7.5 A

45

Located under the dashboard.

Fuse locations are shown on the label on 
the side panel.
Locate the fuse in question by the fuse 
number and label number.

Interior Fuse Box

Fuse Label

Circuit protected and fuse rating

Circuit Protected

Amps

1

2

Driver’s Side Door Unlock

10 A

3

Passenger’s Side Door 

Unlock

10 A

4

ACCESSORY

10 A

5

ACC Key Lock

7.5 A

6

SRS

10 A

7

8

IG Hold2

(10 A)

9

SMART

10 A

10

11

Driver’s Side Door Lock

10 A

12

Driver’s Door Lock

(10 A)

13 Passenger’s Side Door Lock

10 A

14

IG2_Option

10 A

15

Daytime Running Lights

10 A

16

Accessory Power Socket 
(Console Compartment)

(20 A)

17

Moonroof

*

(20 A)

18

19

20

Shift By Wire ECU

(10 A)

21

Driver’s Door Unlock

(10 A)

22

23

24

Premium Audio

*

(20 A)

* Not available on all models

618

uu

Fuses

u

Fuse Locations

Han

d

lin

g the U

n

expected

25

26

27

28

29

30

31

32

IG Hold3

(15 A)

33 Driver’s Power Seat Sliding

*

(20 A)

34

Passenger’s Power Seat 

Sliding

*

(20 A)

35

IG1_Option2

10 A

36

Meter

10 A

37

IG1_Option1

10 A

38

Driver’s Power Seat 

Reclining

*

(20 A)

39

Passenger’s Power Seat 

Reclining

*

(20 A)

40

Driver’s Lumbar Support

*

(10 A)

41

42

Front Air Ventilated Seat

*

(20 A)

43

+B_Option

10 A

44

ADS

*

(20 A)

45

46

SRS

10 A

47

48

Head-Up Display

*

(10 A)

Circuit Protected

Amps

49

Door Lock

20 A

50

Front Accessory Power 

Socket

20 A

51

Rear Passenger’s Side 

Power Window

20 A

52

Rear Driver’s Side Power 

Window

20 A

53

Front Passenger’s Power 

Window

20 A

54

Driver’s Power Window

20 A

55

Circuit Protected

Amps

* Not available on all models

619

uu

Fuses

u

Inspecting and Changing Fuses

Han

d

lin

g the U

n

expected

Inspecting and Changing Fuses

1.

Set the power mode to VEHICLE OFF. Turn 
headlights and all accessories off.

2.

Remove the fuse box cover.

3.

Check the large fuse in the engine 
compartment.

u

If the fuse is blown, use a Phillips-head 
screwdriver to remove the screw and 
replace it with a new one.

4.

Inspect the small fuses in the engine 
compartment and the vehicle interior.

u

If there is a blown fuse, remove it with 
the fuse puller and replace it with a new 
one.

1

Inspecting and Changing Fuses

NOTICE

Replacing a fuse with one that has a higher rating 
greatly increases the chances of damaging the 
electrical system.

Use the charts to locate the fuse in question and 
confirm the specified amperage on the fuse label.

2

Fuse Locations

 P. 616

Replace fuse with a spare fuse of the same specified 
amperage.

There is a fuse puller on the back of the engine 
compartment fuse box cover.

Combined 

Fuse

Blown Fuse

Screw

Fuse Puller

620

Han

d

lin

g the U

n

expected

Emergency Towing

Call a professional towing service if you need to tow your vehicle.

Flatbed equipment

The operator loads your vehicle on the back of a truck.

This is the best way to transport your vehicle.

Wheel lift equipment

The tow truck uses two pivoting arms that go under the front tires and lift them off 
the ground. The rear tires remain on the ground. 

This is an acceptable way to 

tow your vehicle.

1

Emergency Towing

NOTICE

Trying to lift or tow your vehicle by the bumpers will 
cause serious damage. The bumpers are not designed 
to support the vehicle’s weight.

NOTICE

Improper towing such as towing behind a 
motorhome or other motor vehicle can damage the 
transmission.

Make sure the parking brake is released. If you 
cannot release the parking brake, your vehicle must 
be transported by the flatbed equipment.

2

Parking Brake

 P. 503

Never tow your vehicle with just a rope or chain.
It is very dangerous since ropes or chains may shift 
from side to side or break.

621

Han

d

lin

g the U

n

expected

If You Cannot Unlock the Fuel Fill Door

If you cannot unlock the fuel fill door, use the following procedure.

1.

Open the trunk.

2.

Pull the release cord beneath the rear tray 
as shown.

u

The release cord unlocks the fuel fill door 
when it is pulled.

3.

Open the fuel fill door.

2

How to Refuel

 P. 526

What to Do If Unable to Unlock the Fuel Fill Door

1

What to Do If Unable to Unlock the Fuel Fill Door

After taking these steps, contact a dealer to have the 
vehicle checked.

Release Cord

622

Han

d

lin

g the U

n

expected

If You Cannot Open the Trunk

If you cannot open the trunk, use the following procedure.

1.

Remove the built-in key from the smart 
entry remote.

2.

Remove the cover with the key.

u

Wrap a key with a cloth to prevent 
scratching the cover.

3.

Insert the key into the cylinder and turn it 
clockwise.

4.

Replace the cover.

What to Do If Unable to Open the Trunk

1

What to Do If Unable to Open the Trunk

Following up:
After taking these steps, contact a dealer to have the 
vehicle checked.

Trunk Release Cover

623

Han

d

lin

g the U

n

expected

Refueling

Refueling From a Portable Fuel Container

If you have run out of fuel and need to refuel your vehicle from a portable fuel 
container, use the funnel provided with your vehicle.

1.

Turn off the power system.

2.

Press on the edge of the fuel fill door to 
make it pop up slightly.

u

The fuel fill door opens.

3.

Take the funnel out of the tool case in the 
trunk.

2

Types of Tools

 P. 586

4.

Place the end of the funnel on the lower 
part of filler opening, then insert it slowly 
and fully.

u

Make sure that the end of the funnel 
goes down along with the filler pipe.

5.

Fill the tank with fuel from the portable fuel 
container.

u

Pour fuel carefully so you do not spill any.

6.

Remove the funnel from the filler neck.

u

Wipe up any fuel from the funnel before 
storing it.

7.

Shut the fuel fill door by hand.

1

Refueling From a Portable Fuel Container

NOTICE

Do not insert the nozzle of a portable fuel container 
or any funnel other than the one provided with your 
vehicle. Doing so can damage the fuel system.
Do not try to pry open or push open the sealed fuel 
tank with foreign objects. This can damage the fuel 
system and its seal.

Make sure the fuel in the portable fuel container is 
gasoline before you refuel.

3

WARNING

Gasoline is highly flammable and explosive.
You can be burned or seriously injured 
when handling fuel.

Turn the power system off, and keep 
heat, sparks, and flames away.

Handle fuel only outdoors.

Wipe up spills immediately.

Funnel


Content      ..     36      37      38      39     ..