Honda Accord (2022 year). Manual in english - page 16
 

  Index      Manuals     Honda Accord (2022 year). Manual in english


Search            copyright infringement  


Content      ..     14      15      16      17     ..


Honda Accord (2022 year). Manual in english - page 16


254

uu

Audio System Basic Operation

u

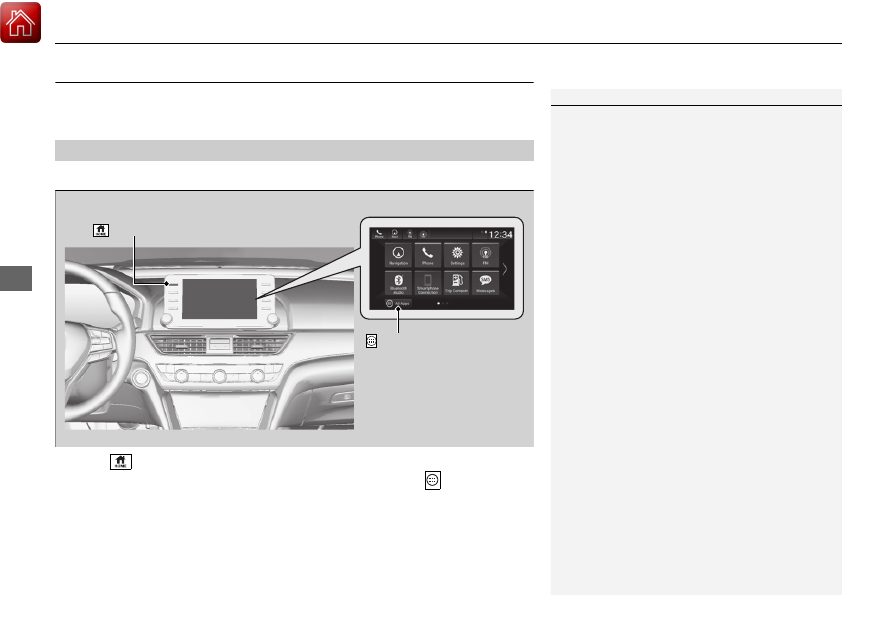
Audio/Information Screen

Features

Audio/Information Screen

Displays the audio status and wallpaper. From this display, you can go to various 
setup options.

Using the audio/information screen

Press the 

 button to go to the home screen.

Select the following icons on the home screen or after selecting 


All Apps

.

Phone

Displays the HFL information.

2

Bluetooth

®

 HandsFreeLink

®

 P. 374

Switching the Display

1

Audio/Information Screen

Touchscreen Operation

Use simple gestures - including touching, swiping, 
and scrolling - to operate certain audio functions.

Some items may be grayed out during driving to 
reduce the potential for distraction.

You can select them when the vehicle is stopped or 
use voice commands.

Wearing gloves may limit or prevent touchscreen 
response.

You can change the touchscreen sensitivity setting.

2

Customized Features

 P. 351

Home Screen

 (Home) Button


All Apps

255

uu

Audio System Basic Operation

u

Audio/Information Screen

Continued

Features

Trip Computer

Displays the trip computer information.

Current Drive

 tab: Displays the current trip information.

Trip A

/

Trip B

 tab: Displays information for the current and three previous drives. 

The information is stored every time you reset Trip A/B.
To reset the Trip A/B, select 

Settings

, then select 

Delete Trip History

.

To change the setting of how to reset Trip A/B, select 

Settings

, then select 

“Trip 

A” Reset Timing

 or 

“Trip B” Reset Timing

.

Clock

Displays the clock.

System Updates

*

Updates the software version of the audio system.

2

System Updates

*

 P. 266

FM/AM/SiriusXM

*

/USB1 (USB)/USB2

*

/Bluetooth Audio/Smartphone 

Connection

Displays information for each audio format.

Settings

Enters the customizing menu screen.

2

Customized Features

 P. 351

Navigation

*

Displays the navigation screen.

2

Refer to the Navigation System Manual

* Not available on all models

256

uu

Audio System Basic Operation

u

Audio/Information Screen

Features

HondaLink

Displays the HondaLink screen.

2

HondaLink

®

 P. 301

Apple CarPlay/Android Auto

Displays the 

Apple CarPlay

 or 

Android Auto

 screen.

2

Apple CarPlay

 P. 313

2

Android Auto

 P. 320

Messages

Displays the text message screen.

2

Bluetooth

®

 HandsFreeLink

®

 P. 374

AT&T Hotspot

*

Displays the AT&T Hotspot screen.

2

AT&T Hotspot

*

 P. 311

Compass

*

Displays the compass screen.

* Not available on all models

Continued

257

uu

Audio System Basic Operation

u

Audio/Information Screen

Features

You can change, store, and delete the wallpaper on the audio/information screen.

Import wallpaper

1.

Connect the USB flash drive to the USB port 
in the center pocket.

2

USB Ports

 P. 247

2.

Select 

Clock

.

3.

Select 

Settings

.

4.

Select 

Clock Faces

.

5.

Select 

Add New Wallpaper

.

u

The 

Searching...

 screen is displayed.

6.

Import a desired picture.

u

Multiple pictures can be imported at the 
same time.

7.

Select 

Start Import

.

u

The display will return to the 

Clock Faces


screen.

Wallpaper Setup

1

Wallpaper Setup

The wallpaper you set up on 

Clock Faces

 cannot be 

displayed on the driver information interface.

When importing wallpaper files, the image must be 
in the USB flash drive’s root directory. Images in a 
folder cannot be imported.

The file name must be fewer than 64 characters (64 
bytes).

The file format of the image that can be imported 
is BMP (bmp) or JPEG (jpg).

If the USB flash drive does not have any pictures, 
the 

No files detected

 message appears.

Up to five pictures can be imported.

The individual file size limit is 2 MB.

The maximum image size is 1,920 × 936 pixels. If 
the image size is less the image is displayed in the 
middle of the screen with the extra area appearing 
in black.

uu

Audio System Basic Operation

u

Audio/Information Screen

258

Features

Select wallpaper

1.

Select 

Clock

.

2.

Select 

Settings

.

3.

Select 

Clock Faces

.

4.

Select a desired wallpaper.

5.

Select 

Set

.

u

The display will return to the 

Clock Faces

 screen.

To view wallpaper once it is set

1.

Press the 

 button.

2.

Select 

Clock

.

Delete wallpaper

1.

Select 

Clock

.

2.

Select 

Settings

.

3.

Select 

Clock Faces

.

4.

Select a desired wallpaper.

5.

Select 

Delete

.

6.

Select 

Yes

.

u

The display will return to the 

Clock Faces

 screen.

1

Wallpaper Setup

You cannot delete the initial imported wallpapers.

When the file size is large, it takes a while to be 
previewed.

Continued

259

uu

Audio System Basic Operation

u

Audio/Information Screen

Features

To move to the next screen

Selecting 

 or 

, or swiping the screen left or right changes to the next screen.

Home Screen

1

Home Screen

The home screen has 2 pages. You can add up to 7 
pages.

Press the 

 button to go directly back to the first 

page of the home screen from any page.

Swipe

 Icon

>

 Icon

<

Current page position

<

>

uu

Audio System Basic Operation

u

Audio/Information Screen

260

Features

To add app icons on the home screen

App icons can be added on the home screen.

1.

Press the 

 button.

2.

Select and hold the home screen.

3.

Select 

Add

.

4.

Drag and drop the icon to where you want 
it to be.

5.

Select 

Done

.

u

The screen will return to the home 
screen.

1

To add app icons on the home screen

You can add app icons by the following procedure.
1. Press the 

 button.

2. Select 

All Apps

.

3. Select 

Customize

.

4. Select 

Add

.

5. Drag and drop the icon to where you want it to 

be.

6. Select 

Done

.

u

The screen will return to the home screen.

Pre-installed apps may not start up normally. If this 
occurs, you need to reset the system.

2

Defaulting All the Settings

 P. 370

If you perform 

Factory Data Reset

, it may reset all 

the settings to their factory default.

2

Defaulting All the Settings

 P. 370

In case those apps still do not startup normally even 
after 

Factory Data Reset

, contact your dealer.

If a browser shuts down mid-use, the screen will 
return to the screen viewed prior to the browser 
startup.

Continued

261

uu

Audio System Basic Operation

u

Audio/Information Screen

Features

To move icons on the home screen

You can change location on the home screen.

1.

Select and hold an icon.

u

The screen switches to the customization 
screen.

2.

Drag and drop the icon to where you want 
it to be.

3.

Select 

Done

.

u

The screen will return to the home 
screen.

1

To move icons on the home screen

Select 

Tips

 to show tips. To hide them, select it again.

Select and hold.

Drag and drop.

uu

Audio System Basic Operation

u

Audio/Information Screen

262

Features

To remove icons on the home screen

You can delete the icons on the home screen.

1.

Select and hold an icon.

u

The screen switches to the customization 
screen.

2.

Drag and drop the icon you want to remove 
to the 

Hide

 icon.

u

The icon is removed from the home 
screen.

3.

Select 

Done

.

u

The screen will return to the home 
screen.

1

To remove icons on the home screen

Apps will not be deleted by deleting the icon on the 
home screen.

Select 

Tips

 to show tips. To hide them, select it again.

Select and hold.

Drag and drop to 

Hide

 icon.

Continued

263

uu

Audio System Basic Operation

u

Audio/Information Screen

Features

To shortcut icons on the home screen

You can store up to three icons on the upper left of the home screen.

1.

Select and hold an icon.

u

The screen switches to the customization 
screen.

2.

Drag and drop the icon you want to store to 
the upper left of the home screen.

u

The icon is a shortcut.

3.

Select 

Done

.

u

The screen will return to the home 
screen.

1

To shortcut icons on the home screen

Select 

Tips

 to show tips. To hide them, select it again.

Select and hold.

Drag and 
drop to preset 
icon.

Shortcut 
Icons

264

uu

Audio System Basic Operation

u

Audio/Information Screen

Features

1.

Select the system status icon.

u

The status area appears.

2.

Select an item to see the details.

3.

Press the 

 button or select the system 

status icon to close the area.

Status Area

System 
Status Icon

Status Area

265

uu

Audio System Basic Operation

u

Audio/Information Screen

Features

You can edit, show, or hide the meter contents on the driver information interface.

1.

Press the 

 button.

2.

Select 

Settings

.

3.

Select 

System

.

4.

Select 

Config. of Instrument Panel

.

5.

Select the content you wish to show or 
hide.

u

The checked items are displayed on the 
driver information interface.

6.

Select 

Done

.

Editing order

You can change the order of the contents on the driver information interface.

1.

Press the 

 button.

2.

Select 

Settings

.

3.

Select 

System

.

4.

Select 

Config. of Instrument Panel

.

5.

Select 

Reorder

.

6.

Select and hold the contents you want to 
move.

7.

Drag and drop the contents to where you 
want them to be.

8.

Select 

Done

.

Customizing the Meter

1

Customizing the Meter

You can store up to three customized configurations.
To select or customize a configuration, select 

Select 

configuration

.

266

uu

Audio System Basic Operation

u

System Updates

*

Features

System Updates

*

The audio system’s firmware can be updated with a Wi-Fi connection or with a USB 
device.

Wireless connection mode setup

1.

Press the 

 button.

2.

Select 

System Updates

.

3.

Select 

Settings

.

4.

Select 

Connection Setup

.

5.

Select 

Wi-Fi

.

6.

Select 

Change Mode

.

7.

Select 

Network

, then 

Confirm

.

u

The display returns to the network list.

8.

Select an access point from the network list, 
then 

Save

.

u

If the audio system requires a password, 
enter a password.

How to Update Wirelessly

1

Wireless connection mode setup

If your vehicle has a telematics control unit (TCU), you 
do not need the wireless connection mode setup.

* Not available on all models

Continued

267

uu

Audio System Basic Operation

u

System Updates

*

Features

How to update

When the audio system update is available, the notification is shown on the audio/
information screen. Use the following procedure to update the system.

1.

Press the 

 button.

2.

Select 

System Updates

.

3.

Select 

via Wireless

.

u

If a notification is displayed on the 
screen, the screen of step 5 will be 
displayed.

4.

Select 

Download Now

.

u

A notification appears on the screen.

1

How to update

You can update the system via Wi-Fi, but cannot use 
the captive portal that require login or agreement the 
terms of use on the browser.

Your download will be canceled if:

Your Wi-Fi connection is severed.

You turn off the ignition when the battery is low on 
power. 

Your download will recommence the next time a Wi-
Fi connection is established. 

Notification

uu

Audio System Basic Operation

u

System Updates

*

268

Features

5.

Select 

Install Now

 or 

Install while 

Vehicle OFF

.

u

A notification appears on the screen if 
the update is successful.

1

How to update

For battery protection, 

Install while Vehicle OFF


cannot be selected when the battery is low on power. 
If you want to install the updated data, recharge the 
battery or select 

Install Now

.

269

uu

Audio System Basic Operation

u

System Updates

*

Continued

Features

Automatic download settings

Use the following procedure to change to the automatic download setting.

1.

Press the 

 button.

2.

Select 

System Updates

.

3.

Select 

Settings

.

4.

Select 

Auto Download

.

5.

Select the access point, then 

Yes

.

View a version and update status

Use the following procedure to confirm the version and update status.

1.

Press the 

 button.

2.

Select 

System Updates

.

3.

Select 

Settings

.

4.

Select 

Version Status

.


Content      ..     14      15      16      17     ..