Honda Passport (2022 year). Manual in english - page 21
 

  Index      Manuals     Honda Passport (2022 year). Manual in english


Search            copyright infringement  


Content      ..     19      20      21      22     ..


Honda Passport (2022 year). Manual in english - page 21


333

uu

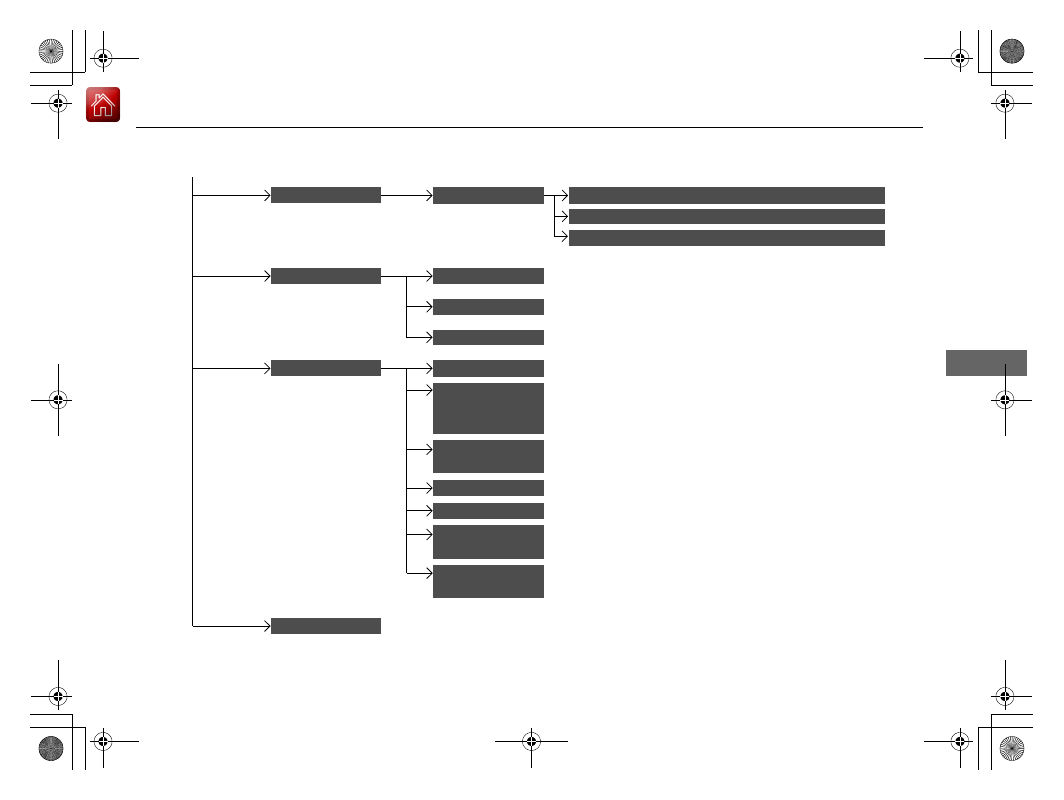
Customized Features

u

Continued

Features

Audio Zones

*

Bass / Treble

Camera

Rear Camera

Default Camera View

Guidelines

Cross Traffic Monitor

*

Sound

Balance / Fader

Center / 

Subwoofer 

Volume

*

DTS Neural 

Surround

*

Speed Volume 
Compensation

Notifications

Brightness

Contrast

Black Level

Display

Subwoofer 

Volume

*

* Not available on all models

334

uu

Customized Features

u

Features

List of customizable options

*1:Default Setting

Setup 

Group

Customizable Features

Description

Selectable Settings

System

Date & Time

Set 
Date & 
Time

Automatic 
Date & 
Time

Selects 

ON

 to have the GPS automatically adjust 

the clock. Select 

OFF

 to cancel this function.

ON

*1

/

OFF

Set Date

Adjusts date.

2

Adjusting the Clock

 P. 124

Set Time

Adjusts clock.

2

Adjusting the Clock

 P. 124

Set 
Time 
Zone

Automatic 
Time Zone

*

Sets the navigation system to automatically adjust 
the clock when driving through different time 
zones.

ON

*1

/

OFF

Select time 
zone

Changes the time zone manually.

Select Time Format

Selects the digital clock display from 12H to 24H.

12H

*1

/

24H

* Not available on all models

335

uu

Customized Features

u

Continued

Features

*1:Default Setting

Setup 

Group

Customizable Features

Description

Selectable Settings

System

System 
Volumes

System Sounds

Changes the system sounds volume.

Navigation 
Guidance

*

Changes the navigation guidance volume.

Touch 
Sensitivity

Sets the sensitivity of the touch panel screen.

High

/

Low

*1

Subscriptions

HondaLink 
Subscription Status

Lists subscriptions and subscription status for 
HondaLink

®

.

Language

Changes the display language.

English

 (United 

States)

*1

/

English


(United Kingdom)/

Korean

/

French

/

Spanish

/

Arabic

Factory Data 
Reset

Resets all the settings to their factory default.

2

Defaulting All the Settings

 P. 345

Continue

/

Cancel

About

Displays the Android setting items.

* Not available on all models

336

uu

Customized Features

u

Features

*1:Default Setting

Setup 

Group

Customizable Features

Description

Selectable Settings

System

Advanced 
Options

App Manager

Displays the Android system memory and apps 
information.

Recent Location 
Request from Apps

Displays the recent location requests from apps.

Location Setting

Selects 

OFF

 not to allow apps including the 

navigation system

*

 to access the vehicle’s location.

ON

*1

/

OFF

Inter-
ruptions

Inter-
ruption 
Mode

Sets the interruption mode for allowing to notify 
when calls and notifications arrive.

Always interrupt

*1

/

Don’t interrupt

/

Allow only priority 
interruptions

Events and 
reminders

Sets priority interruptions of events and reminders.

ON

*1

/

OFF

Calls

Sets priority interruptions of calls.

ON

*1

/

OFF

Messages

Sets priority interruptions of messages.

ON

*1

/

OFF

Calls/
messages 
from

Sets priority interruptions of from who.

Anyone

*1

/

Contacts 

only

/

Starred 

contacts only

* Not available on all models

337

uu

Customized Features

u

Continued

Features

*1:Default Setting

Setup 

Group

Customizable Features

Description

Selectable Settings

Connec-
tions

Bluetooth

+ Connect New 
Device

Pairs a new phone to HFL.

2

Phone Setup

 P. 354

Saved Devices

Connects, disconnects, or deletes a paired phone.

2

Phone Setup

 P. 354

Wi-Fi

Change Mode

Changes the Wi-Fi mode.

Network

*1

/

HotSpot

/

OFF

Available Networks

/

Connected Devices

Displays the available network(s) or current 
connected device(s).

Android Auto

Sets up the Android Auto connection.

Apple CarPlay

Sets up the Apple CarPlay connection.

CabinControl

Options

Cabin-
Control

Turns the Honda CabinControl function on and off.

ON

*1

/

OFF

Connection 
Information

Displays the Honda CabinControl connection 
information.

(Device list)

Selects functions or deletes a device.

338

uu

Customized Features

u

Features

*1:Default Setting

Setup 

Group

Customizable Features

Description

Selectable Settings

Vehicle

Driving 
Position 
Setup

*

Seat Position 
Movement at Entry/
Exit

Moves the seat rearward when you get in/get out 
of the vehicle. Changes the setting for this feature.

ON

*1

/

OFF

Memory Position 
Link

Turns the driving position memory system on and 
off.

ON

*1

/

OFF

Meter Setup

Adjust Outside Temp 
Display

Adjusts the temperature reading by a few degrees.

-5°F ~ ±0°F

*1

 ~ +5°F

(U.S.)

-3°C ~ ±0°C

*1

 ~ +3°C

(Canada)

Trip A Reset Timing

Changes the setting of how to reset trip meter A 
and average fuel economy A.

With Refuel

/

IGN 

Off

/

Manually 

Reset

*1

Trip B Reset Timing

Changes the setting of how to reset trip meter B 
and average fuel economy B.

With Refuel

/

IGN 

Off

/

Manually 

Reset

*1

Reverse Shift 
Position Beep

Turns the reverse alert tone on and off.

ON

/

OFF

*1

Adjust Alarm Volume

Changes the alarm volume, such as the buzzers, 
warnings, turn signal sound, and so on.

High

/

Mid

*1

/

Low

* Not available on all models

339

uu

Customized Features

u

Continued

Features

*1:Default Setting

Setup 

Group

Customizable Features

Description

Selectable Settings

Vehicle

Meter Setup

Turn by Turn Display

Selects whether the turn-by-turn display comes on 
during the route guidance.

ON

*1

/

OFF

Fuel Efficiency 
Backlight

Turns the ambient meter feature on and off.

ON

*1

/

OFF

Rear Seat Reminder

Turns the Rear Seat Reminder feature on and off.

ON

*1

/

OFF

Power 
Tailgate 
Setup

*

Power Tailgate 
Keyless Open Mode

Changes the keyless setting for when the power 
tailgate opens.

Anytime

*1

/

When 

Unlocked

Power Tailgate Open 
by Outer Handle

Changes the setting to open power tailgate by 
tailgate outer handle.

Off (Manual only)

/

On (Power/
Manual)

*1

Hands Free Access 
Power Tailgate

*

Changes the setting to open power tailgate by a 
swift forward in and out kicking motion under the 
rear bumper.

ON

*1

/

OFF

Keyless Access 
Setup

Door Unlock Mode

Changes which doors unlock when you grab the 
driver’s door handle.

Driver Door or 
Tailgate

*1

/

All Doors

Keyless Access Light 
Flash

Causes some exterior lights to flash when you 
unlock/lock the doors.

ON

*1

/

OFF

Keyless Access Beep

Causes the beeper to sound when you unlock/lock 
the doors.

ON

*1

/

OFF

* Not available on all models

340

uu

Customized Features

u

Features

*1:Default Setting

Setup 

Group

Customizable Features

Description

Selectable Settings

Vehicle

Keyless Access 
Setup

Remote Start System 
On/Off

*

Turns the remote engine start feature on and off.

ON

*1

/

OFF

Walk Away Auto 
Lock

Changes the settings for the automatic locking the 
doors when you walk away from the vehicle while 
carrying the remote.

Enable

/

Disable

*1

Driver Assist 
System Setup

Forward Collision 
Warning Distance

Changes at which distance CMBS

TM

 alerts.

Long

/

Normal

*1

/

Short

ACC Forward Vehicle 
Detect Beep

Causes the system to beep when the system 
detects a vehicle, or when the vehicle goes out of 
the ACC range.

ON

/

OFF

*1

Road Departure 
Mitigation Setting

Changes the setting for the road departure 
mitigation system.

Normal

*1

/

Wide

/

Warning Only

Lane Keeping Assist 
Suspend Beep

Causes the system to beep when the LKAS is 
suspended.

ON

/

OFF

*1

Blind Spot 
Information

*

Changes the setting for the blind spot information.

Audible and Visual 
Alert

*1

/

Visual Alert

/

OFF

* Not available on all models

341

uu

Customized Features

u

Continued

Features

*1:Default Setting

Setup 

Group

Customizable Features

Description

Selectable Settings

Vehicle

Door Setup

Auto Door Lock

Changes the setting for the automatic locking 
feature.

With Vehicle 
Speed

*1

/

Shift from 

P

/

OFF

Auto Door Unlock

Changes the setting for when the doors unlock 
automatically.

All Doors with 
Driver’s Door 
Opens

*1

/

All Doors 

with Shift to P

/

All 

Doors with IGN Off

/

OFF

Key and Remote 
Unlock Mode

Sets up either the driver’s door or all doors to 
unlock on the first push of the remote or built-in 
key.

Driver Door

*1

/

All 

Doors

Keyless Lock Answer 
Back

LOCK/UNLOCK- The exterior lights flash.
LOCK (2nd push)- The beeper sounds.

ON

*1

/

OFF

Security Relock Timer

Changes the time it takes for the doors to relock 
and the security system to set after you unlock the 
vehicle without opening any door.

90 sec

/

60 sec

/

30 

sec

*1

342

uu

Customized Features

u

Features

*1:Default Setting

Setup 

Group

Customizable Features

Description

Selectable Settings

Vehicle

Lighting 
Setup

Interior Light 
Dimming Time

Changes the length of time the interior lights stay 
on after you close the doors.

60 sec

/

30 sec

*1

/

15 

sec

Headlight Auto Off 
Timer

Changes the length of time the exterior lights stay 
on after you close the driver’s door.

60 sec

/

30 sec

/

15 

sec

*1

/

0 sec

Auto Interior 
Illumination 
Sensitivity

Changes the sensitivity of the brightness of the 
instrument panel when the headlight switch is in 
the 

AUTO

 position.

Min

/

Low

/

Mid

*1

/

High

/

Max

Auto Headlight On 
with Wiper On

Changes the settings for the wiper operation when 
the headlights automatically come on while the 
headlight switch is in the 

AUTO

 position.

ON

*1

/

OFF

Auto Light 
Sensitivity

*

Changes the timing for the headlights to come on.

Max

/

High

/

Mid

*1

/

Low

/

Min

Wireless 
Charger

*

Turns the wireless charger feature on and off.

ON

*1

/

OFF

Maintenance 
Information

Oil Life

Resets the engine oil life display when you have 
performed the maintenance service.

* Not available on all models

343

uu

Customized Features

u

Continued

Features

*1:Default Setting

Setup 

Group

Customizable Features

Description

Selectable Settings

Camera

Rear Camera

Default Camera View

Changes the camera view mode when the rear 
camera monitor is turned on.

2

Multi-View Rear Camera

 P. 491

Last Used

/

Normal 

View

/

Wide View

*1

Guidelines

Selects whether the guidelines come on the rear 
camera monitor.

2

Multi-View Rear Camera

 P. 491

Dynamic

/

Fixed

/

Both

*1

/

OFF

Cross Traffic 
Monitor

*

Turns the cross traffic monitor on and off.

ON

*1

/

OFF

Display

Brightness

Adjusts the settings of the audio/information 
screen.

2

Display Setup

 P. 255

Contrast

Black Level

* Not available on all models

344

uu

Customized Features

u

Features

Setup 

Group

Customizable Features

Description

Selectable Settings

Sound

Bass / Treble

Adjusts the settings of the audio speakers’ sound.

2

Adjusting the Sound

 P. 254

Center / 
Subwoofer 
Volume

*

Subwoofer 
Volume

*

Balance / Fader

Audio Zones

*

Speed Volume 
Compensation

DTS Neural 
Surround

*

Notifications

Changes the notification settings for apps.

* Not available on all models

345

uu

Customized Features

u

Defaulting All the Settings

Features

Defaulting All the Settings

Reset all the menu and customized settings as the factory defaults.

1.

Select .

2.

Select 

Settings

.

3.

Select 

System

.

4.

Select 

Factory Data Reset

.

u

A confirmation message appears on the 
screen.

5.

Select 

Continue

 to reset the settings.

6.

Select 

Continue

 again to reset the settings.

u

The system will reboot.

1

Defaulting All the Settings

When you transfer the vehicle to a third party, reset 
all settings to default and delete all personal data.

If you perform 

Factory Data Reset

, it will reset the 

preinstalled apps to their factory default.

If you perform 

Factory Data Reset

, you cannot use 

the HondaLink

®

 because it goes offline.

2

HondaLink

®

 P. 287

346

Features

HomeLink

®

 Universal Transceiver

*

The HomeLink

®

 Universal Transceiver can be programmed to operate up to three 

remote controlled devices around your home, such as garage doors, lighting, or 
home security systems.

Refer to the safety information that came with your garage door opener to test that 
the safety features are functioning properly. If you do not have the safety 
information, contact the manufacturer.

Before programming HomeLink, make sure that people and objects are out of the 
way of the garage or gate to prevent potential injury or damage.

When programming a garage door opener, park just outside the garage door’s path.

Important Safety Precautions

1

HomeLink

®

 Universal Transceiver

*

Before programming HomeLink to operate a garage 
door opener, confirm that the opener has an external 
entrapment protection system, such as an “electronic 
eye,” or other safety and reverse stop features. If it 
does not, HomeLink may not be able to operate it.

NOTE:
Some LED lightbulbs installed in the garage door 
opener can interfere with the training and consistent 
operation of your HomeLink device. Please consider 
use of Low RF interference bulbs in your garage door 
opener.

* Not available on all models

347

uu

HomeLink

®

 Universal Transceiver

*

u

Training HomeLink

Continued

Features

Training HomeLink

If it is necessary to erase a previously entered 
learned code:

Press and hold the I and III HomeLink 
buttons for about 10 seconds, until the 
orange indicator blinks. Release the 
buttons, and proceed to step 1.

If you are training the second or third 
button, go directly to step 1.

The instructions on the next page should work for most gate or garage openers, but 
may not work for all. For detailed instructions about your specific remote opener, 
visit 

http://www.homelink.com

 or call (800) 355-3515.

III HomeLink 
Button

Indicator

I HomeLink 
Button

uu

HomeLink

®

 Universal Transceiver

*

u

Training HomeLink

348

Features

Programming a Button

1

Training HomeLink

Reprogramming a Button
If you want to retrain a programmed button for a 
new device, you do not have to erase all button 
memory. You can replace the existing memory code 
using this procedure:

Erasing Button Memory
To erase programming from the buttons, press and hold 
the two outside HomeLink buttons until the HomeLink 
indicator changes from 

orange to rapidly flashing green

This should take about 10 seconds. You should erase all 
programming before selling the vehicle.

Operating
To operate, simply press and release the programmed 
HomeLink button. Activation will now occur for the 
trained device.

Questions
For questions or comments, visit 

www.HomeLink.com

www.youtube.com/

HomeLinkGentex

, or by calling the HomeLink Hotline 

(North America only) at (800) 355-3515.

HomeLink

®

 is a registered trademark of Gentex 

Corporation.

2.

1.

Press and hold the desired HomeLink button until 
the HomeLink indicator begins to 

slowly flash 

orange

. This should take about 20 seconds.

Release the HomeLink button and position the 
remote transmitter you wish to link 1 - 3 inches 
(3 - 8 cm) from the HomeLink button you want to 
program, then follow steps 3 - 6 under 
“programming a button.”

Training 
Complete

HomeLink LED is 

continuously on green

.

YES

YES

1.

Position the remote transmitter you wish to link 1 to 3 inches (3 - 8 cm) from the 
HomeLink

®

 button you want to program.

3b.

Canadian Garage Door Opener
A. Press and release the HomeLink 
button. Press, hold and release the 
button on the remote every 2 secs. 
Does the HomeLink indicator (LED) 
change from 

slowly flashing orange to 

rapidly flashing or continuously on 
green

? The process should take less 

than 60 seconds.

NO

2.

Press and hold the desired HomeLink button. Is the HomeLink indicator (LED) 

slowly 

flashing orange

NO

3a.

Hold the button on the remote 
transmitter. Does HomeLink indicator 
(LED) change from 

slowly flashing 

orange to rapidly flashing green or 
continuously on green

? The process 

should take less than 60 seconds.

5.

Press and hold the HomeLink button again.

HomeLink indicator 

rapidly flashes 

green

.

5a.

The remote has a rolling code. Press the 
“learn” button on the remote-controlled 
device (e.g. garage door opener).

6.

Press and hold the HomeLink button 
again.
The remote-controlled device should 
operate.

Training Complete

5b.

Within 30 secs, press and hold the 
programmed HomeLink button for 2 
secs.

4.

Press and hold the programmed HomeLink 
button for about a second. Does the device 
(garage door opener) work?


Content      ..     19      20      21      22     ..