Honda HR-V eHEV (2022 year). Manual in english - page 17
 

  Index      Manuals     Honda HR-V eHEV (2022 year). Manual in english


Search            copyright infringement  


Content      ..     15      16      17      18     ..


Honda HR-V eHEV (2022 year). Manual in english - page 17


272

uu

Display Audio

u

System Updates

Features

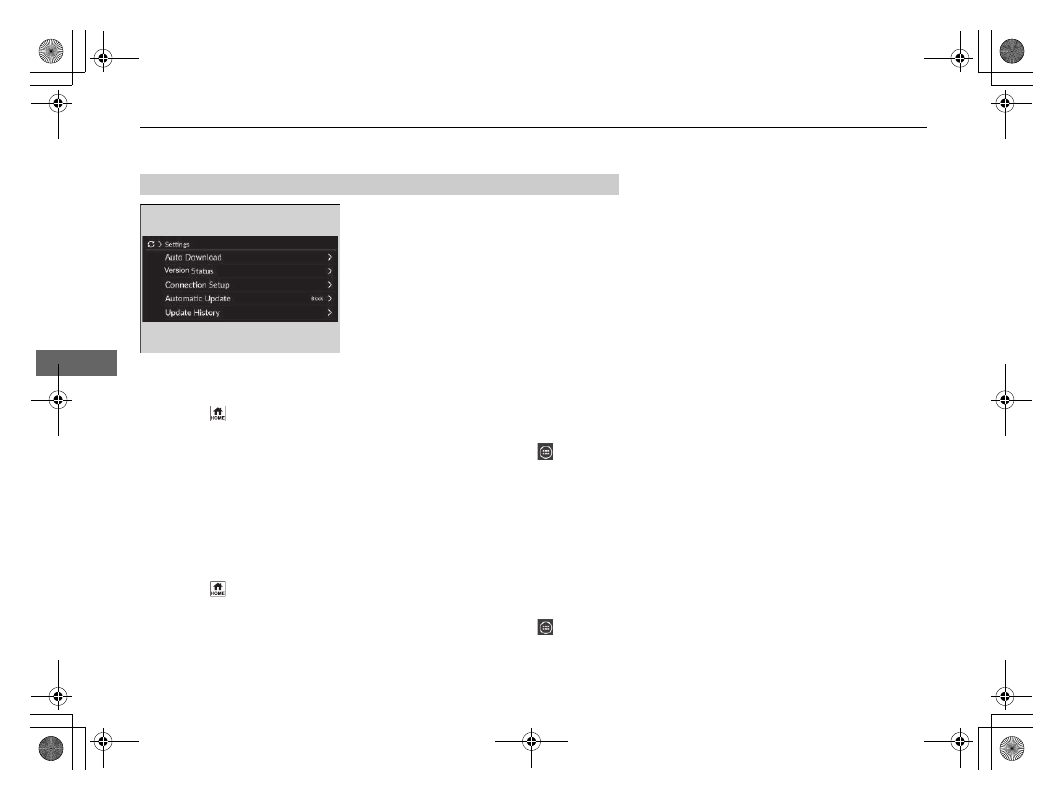
The following settings can be set.

Auto Download

Version Status

Connection Setup

Automatic Update

Update History

Automatic download settings

Use the following procedure to change to the automatic download setting.

1.

Press the 

 button.

2.

Select 

System Updates

.

u

If 

System Updates

 is not displayed on the home screen, select 


All Apps

.

3.

Select 

Settings

.

4.

Select 

Auto Download

.

5.

Select the access point, then select 

Allow

.

u

If you do not want to system update automatically, select 

Block

.

View a version and update status

Use the following procedure to confirm the version and update status.

1.

Press the 

 button.

2.

Select 

System Updates

.

u

If 

System Updates

 is not displayed on the home screen, select 


All Apps

.

3.

Select 

Settings

.

4.

Select 

Version Status

.

System Updates Settings

273

uu

Display Audio

u

System Updates

Continued

Features

Connection setup

Use the following procedure to connect to the Internet via a Wi-Fi network.

1.

Press the 

 button.

2.

Select 

System Updates

.

u

If 

System Updates

 is not displayed on the home screen, select 


All Apps

.

3.

Select 

Settings

.

4.

Select 

Connection Setup

.

5.

Select 

OK

.

6.

Select 

Change Mode

.

7.

Select 

Network

.

u

If the vehicle's Wi-Fi is turned off, select 

OFF

.

Automatic update settings

Use the following procedure to change to the automatic update setting.

1.

Press the 

 button.

2.

Select 

System Updates

.

u

If 

System Updates

 is not displayed on the home screen, select 


All Apps

.

3.

Select 

Settings

.

4.

Select 

Automatic Update

.

5.

Select 

Accept

.

u

If you do not want to system update automatically, select 

Decline

.

View the update history

Use the following procedure to confirm the update history.

1.

Press the 

 button.

2.

Select 

System Updates

.

u

If 

System Updates

 is not displayed on the home screen, select 


All Apps

.

3.

Select 

Settings

.

4.

Select 

Update History

.

274

uu

Display Audio

u

System Updates

Features

Wireless connection mode setup

1.

Press the 

 button.

2.

Select 

System Updates

.

u

If 

System Updates

 is not displayed on the home screen, select 


All Apps

.

3.

Select 

Settings

.

4.

Select 

Connection Setup

.

5.

Select 

OK

.

6.

Select 

Change Mode

.

7.

Select 

Network

.

u

It will return to the network list.

8.

Select an access point from the network list.

u

If the audio system requires a password, enter a password.

9.

Select 

Connect

.

How to update

1.

Press the 

 button.

2.

Select 

System Updates

.

u

If 

System Updates

 is not displayed on the home screen, select 


All Apps

.

3.

Select 

via Wireless

.

4.

Select 

Download

.

u

A notification appears on the screen if need to user acceptance for download.

5.

Select 

Install Now

 or 

Install While Vehicle Off

.

u

A notification appears on the screen if the update is ready.

How to Update Wirelessly

275

uu

Display Audio

u

System Updates

Features

Download the update files from the server

1.

Press the 

 button.

2.

Select 

System Updates

.

u

If 

System Updates

 is not displayed on the home screen, select 


All Apps

.

3.

Select 

Other Methods

.

4.

Select 

Via USB

.

u

A notification appears on the screen.

5.

Connect a USB device into the USB port.

u

The inventory data is copied into the USB device.

2

USB Ports

 P. 251

6.

Remove the USB device from the USB port.

7.

Connect the USB device into your computer, and then download the update files.

u

Follow the link to download the required software update files. Refer to 

https://usb.honda.com

 for instructions.

Update the audio system

1.

Press the 

 button.

2.

Select 

System Updates

.

3.

Select 

Other Methods

.

4.

Select 

Via USB

.

u

A notification appears on the screen.

5.

Connect the USB device with the update files into the USB port.

u

A notification appears on the screen.

2

USB Ports

 P. 251

6.

Select 

Install Now

.

u

A notification appears on the screen if the update is successful.

How to Update with a USB Device

1

How to Update with a USB Device

A USB device with a minimum of 8 GB of free space 
or more is recommended.

Be sure to delete any previous inventory or update 
files from the USB before starting the USB update 
process.

276

uu

Display Audio

u

Playing FM/AM Radio

Features

Playing FM/AM Radio

a

Settings Icon

e

Scan Icon

b

Sound Icon

f

Tune Icon

c

Preset Icons

g

Seek Icon

d

Station List Icon

Continued

277

uu

Display Audio

u

Playing FM/AM Radio

Features

Tunes the radio frequency for preset memory.
To store a station:

1.

Tune to the selected station.

2.

Select and hold the preset icon to store that station.

u

Selecting 

Press & Hold

 can be set a new preset station.

Lists the strongest stations on the selected band.

1.

Select 

Station List

 to display a list.

2.

Select the station.

Manual update

Updates your available station list at any time.

1.

Select 

Station List

 to display a list.

2.

Select 

Refresh

.

Samples each of the strongest stations on the selected band for 10 seconds.
To begin scanning, select 

Scan

, and to turn it off, select 

Cancel

 or press the 


button.

Selects 

 or 

 to search the selected band up or down for a station with a 

strong signal.

Preset Memory

Station List

Scan

Seek

1

Preset Memory

The 

ST

 indicator appears on the display indicating 

stereo FM broadcasts.

Switching the Audio Mode
Roll up or down to select 

 (audio) on the left 

selector wheel.

2

Audio Remote Controls

 P. 252

You can store 12 AM/FM stations into preset 
memory.

uu

Display Audio

u

Playing FM/AM Radio

278

Features

Adjusts the sound settings.

2

Adjusting the Sound

 P. 269

Selects to use the on-screen keyboard for entering the radio frequency directly.

1.

Select 

Tune

.

2.

Enter the desired radio frequency using the 
on-screen keyboard.

3.

Select 

Enter

 to tune into the frequency.

Sound

Radio Frequency Manual Tune Screen

1

Radio Frequency Manual Tune Screen

You can tune the range of FM frequency between 
87.5 to 108.0MHz.

/


icons:

Select 

 or 

 to tune the radio frequency.

a

On-screen Keyboard

Continued

279

uu

Display Audio

u

Playing FM/AM Radio

Features

Provides text data information related to your selected RDS-capable FM station.

To find an RDS station from Station List

1.

Select 

Station List

 to display a list while listening to an FM station.

2.

Select the station.

Manual update

Updates your available station list at any time.

1.

Select 

Station List

 to display a list while listening to an FM station.

2.

Select 

Refresh

.

Traffic announcement (TA)

The TA standby function allows the system to stand by for traffic announcements in 
any mode while the function is on. The last tuned station must be an RDS capable 
traffic program station.

To turn the function on: 

Select 

TA

. When a traffic announcement begins, the 

information screen appears on the audio/information screen. The system returns to 
your last selected mode after the traffic announcement is finished.

u

If you want to go back to your last selected mode during the traffic 
announcement, select 

Stop

.

To turn the function off: 

Select 

TA

 again.

Radio Data System (RDS)

1

Radio Data System (RDS)

When you select an RDS-capable FM station, the RDS 
automatically turns on, and the frequency display 
changes to the station name. However, when the 
signals of that station become weak, the display 
changes from the station name to the frequency.

1

Traffic announcement (TA)

The 

TA

 indicator appears on the header area while 

the TA standby function is on.

If you select 

Scan

 while the TA standby function is 

on, the system searches TP station only.

Selecting 

TA

 while the traffic announcement is on 

does not cancel the TA standby function.

280

uu

Display Audio

u

Playing FM/AM Radio

Features

Changes the RDS settings.

1. Settings

.

2.

Select an option.

TA-Information: 

Turns on and off the traffic information. (

ON

/

OFF

*1

)

AF: 

Turns on and off to automatically change the frequency of the same program 

you enter different regions. (

ON

*1

/

OFF

)

REG: 

Turns on and off to keep the same stations within that region even if the 

signal gets weak. (

ON

*1

/

OFF

)

NEWS: 

Turns on and off to automatically to tune to the news program. (

ON

/

OFF

*1

)

*1: Default Setting

Settings

281

uu

Display Audio

u

Playing DAB (Digital Audio Broadcasting)

Continued

Features

Playing DAB (Digital Audio Broadcasting)

a

Settings Icon

e

Scan Icon

b

Sound Icon

f

Service Icons

c

Preset Icons

g

Ensemble Icons

d

Ensemble List Icon

uu

Display Audio

u

Playing DAB (Digital Audio Broadcasting)

282

Features

Tunes the preset frequency. 
To store a service:

1.

Tune to the selected service.

2.

Select and hold the preset icon to store that station.

u

Selecting 

Press & Hold

 can be set a new preset station.

Lists the receivable ensembles on the selected service.

1.

Select 

Ensemble List

 to display a list.

2.

Select the ensemble.

Manual update

Updates your available ensemble list at any time.

1.

Select 

Ensemble List

 to display a list.

2.

Select 

Refresh

.

Tunes the ensemble.

1.

Select  

to  

the 

tune 

ensemble.

2.

Select and hold 

 or 

 to search the selected service up to down for an 

ensemble until a receivable ensemble is found.

Tunes the service component.
To tune it, select 

 or 

.

Preset Memory

Ensemble List

Ensemble

Service

1

Preset Memory

Switching the Audio Mode
Roll up or down to select 

 (audio) on the left 

selector wheel.

2

Audio Remote Controls

 P. 252

You can store 12 DAB stations into preset memory.

283

uu

Display Audio

u

Playing DAB (Digital Audio Broadcasting)

Features

Samples each of the receivable ensemble or service on the selected service for 10 
seconds.
To begin scanning, select 

Scan

, and to turn it off, select 

Cancel

 or press the 


button.

Adjusts the sound settings.

2

Adjusting the Sound

 P. 269

Changes the DAB settings.

1. Settings

.

2.

Select the option you want to change.

*1: Default Setting

Scan

Sound

Settings

284

uu

Display Audio

u

Playing an iPod

Features

Playing an iPod

Using your USB connector, connect the iPod to the USB port, then select the USB 
mode.

2

USB Ports

 P. 251

1

Playing an iPod

Available operating functions vary on models or 
versions. Some functions may not be available on the 
vehicle’s audio system.

If there is a problem, you may see an error message 
on the audio/information screen.

2

iPod/USB Flash Drive

 P. 338

If you operate the music app on your iPhone/iPod 
while the phone is connected to the audio system, 
you may no longer be able to operate the same app 
on the audio/information screen.
Reconnect the device if necessary.

If a smartphone is connected via Apple CarPlay or 
Android Auto, the iPod/USB source will be 
unavailable and audio files on the phone will be 
playable only within Apple CarPlay or Android Auto.

a

Sound Icon

e

Track Icons

b

Shuffle Icon

f

Browse Icon

c

Repeat Icon

g

Cover Art

d

Play/Pause Icon

285

uu

Display Audio

u

Playing an iPod

Continued

Features

You can select to display the music search list screen.

1.

Select 

Browse

.

2.

Select a search category.

3.

Continue making selections until you find the song of your choice.

You can select shuffle and repeat modes when playing a song.

Shuffle/Repeat

Select shuffle or repeat icon repeatedly until a desired mode.

Shuffle

 (shuffle off): Shuffle mode to off.
 (shuffle all songs): Plays all available songs in a selected list in random order.

Repeat

 (repeat off): Repeat mode to off.

 (repeat song): Repeats the current song.

 (repeat all): Repeats the all songs.

To pause or resume a song

Select the play/pause icon.

How to Select a Song from the Music Search List

How to Select a Play Mode

286

uu

Display Audio

u

Playing an iPod

Features

You can select 

 or 

 to change songs. Select and hold to move rapidly 

within a song.

You can adjust the sound settings.

2

Adjusting the Sound

 P. 269

How to Change a Song

Sound

287

uu

Display Audio

u

Playing Aha

TM

*

Features

Playing Aha

TM

*

Aha

TM

 can be displayed and operated on the audio/information screen when your 

smartphone is connected to the audio system by Wi-Fi.

2

Wi-Fi Connection

 P. 295

1

Playing Aha

TM

*

Aha

TM

 by Harman is a cloud-based service that 

organises your favourite web content into live radio 
stations. You can access podcasts, internet radio, 
location-based services, and audio updates from 
social media sites.

Available operating functions vary on software 
versions. Some functions may not be available on the 
vehicle’s audio system.

The menu items vary depending on the station you 
selected.

You can set up Aha

TM

 account prior to using the 

service in your vehicle. Visit 

www.aharadio.com

 for 

more information.

* Not available on all models


Content      ..     15      16      17      18     ..