Honda Element (2010 year). Instruction - part 18
 

  Index      Honda     Honda Element - instruction 2010 year in english


Search            


Content   ..  16  17  18  19   ..


Honda Element (2010 year). Instruction - part 18


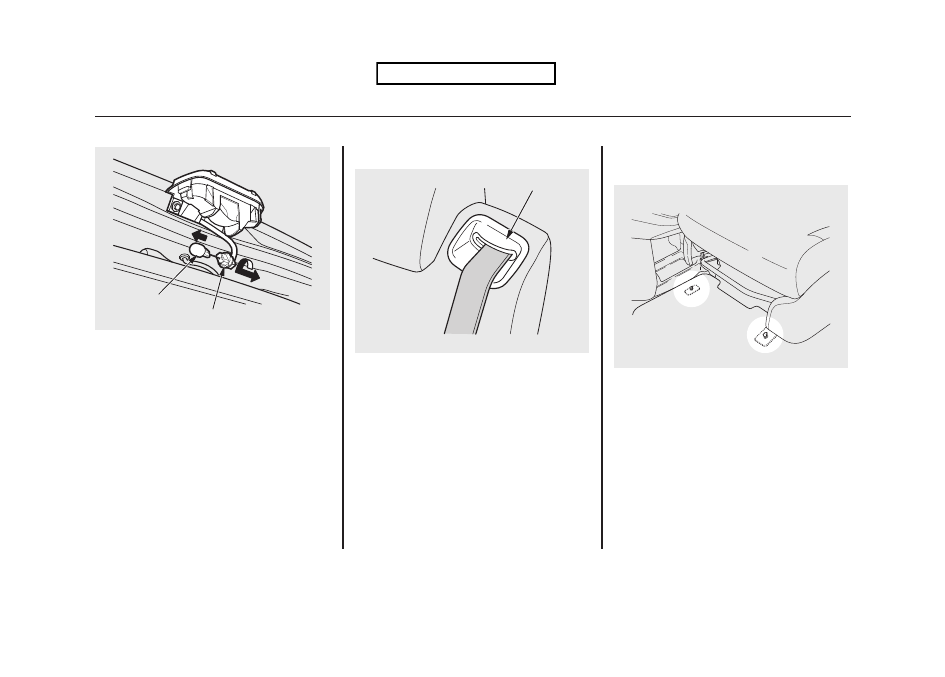
3. Pull the bulb straight out of its

socket. Push the new bulb straight
into the socket until it bottoms.

4. Press the brake pedal to make

sure the new bulb is working.

5. Put the socket back into the light

assembly, and turn it clockwise to
lock it in place.

6. Put the cover back onto the light

assembly. Push it on until it locks
in place.

Cleaning the Seat Belts

If your seat belts get dirty, use a soft
brush with a mixture of mild soap
and warm water to clean them. Do
not use bleach, dye, or cleaning
solvents. Let the belts air-dry before
you use the vehicle.
Dirt build-up in the loops of the seat
belt anchors can cause the belts to
retract slowly. Wipe the insides of
the loops with a clean cloth
dampened in mild soap and warm
water or isopropyl alcohol.

Floor Mats
If equipped

The floor mats that came with your
vehicle hook over the floor mat
anchors. This keeps the floor mats
from sliding forward, possibly
interfering with the pedals, or
backwards, making the front
passenger's weight sensors
ineffective.

BULB

SOCKET

LOOP

Lights, Cleaning the Seat Belts, Floor Mats

268

Table of Contents

If you remove the driver's floor mat,
make sure to re-anchor it when you
put it back in your vehicle.

If you use non-Honda floor mats,
make sure they fit properly and that
they can be used with the floor mat
anchors. Do not put additional floor
mats on top of the anchored mats.

Dust and Pollen Filter
This filter removes the dust and
pollen that is brought in from the
outside through the heating and
cooling system.

Have your dealer replace the filter
when this service is indicated by a
maintenance message on the
information display. It should be
replaced every 15,000 miles
(24,000 km) if you drive primarily in
urban areas that have high
concentrations of soot in the air, or if
the flow from the heating and cooling
system becomes less than usual.

Wiper Blades
Check the condition of the wiper
blades at least every 6 months.
Replace them if you find signs of
cracking in the rubber, areas that are
getting hard, or if they leave streaks
and unwiped areas when used.

1. Front:

Raise the wiper arm off the
windshield.

Do not open the hood when the wiper
arms are raised, or you will damage the
hood and the arms.

Rear:
Raise the wiper arm off the hatch
glass and hold it.

CONTINUED

Floor Mats, Dust and Pollen Filter, Wiper Blades

269

Maintenance

Table of Contents

2. Disconnect the blade assembly

from the wiper arm by pushing in
the lock tab. Hold the lock tab in
while you push the blade assembly
toward the base of the arm.

If you are changing the rear wiper
blade, go to step 6.

3. Remove the blade from its holder

by grabbing the tabbed end of the
blade. Pull up firmly until the tabs
come out of the holder.

4. Examine the new wiper blades. If

they have no plastic or metal
reinforcement along the back
edge, remove the metal
reinforcement strips from the old
wiper blade, and install them in the
slots along the edge of the new
blade.

5. Slide the new wiper blade into the

holder until the tabs lock.

6. Slide the wiper blade assembly

onto the wiper arm. Make sure it
locks in place.

7. Lower the wiper arm down against

the windshield or the hatch glass.

LOCK TAB

BLADE

BLADE

REINFORCEMENT

Wiper Blades

270

Table of Contents

Wheels
Clean the wheels as you would the
rest of the exterior. Wash them with
the same solution, and rinse them
thoroughly.

If equipped
Aluminum alloy wheels have a
protective clear-coat that keeps the
aluminum from corroding and
tarnishing. Cleaning the wheels with
harsh chemicals (including some
commercial wheel cleaners) or a stiff
brush can damage the clear-coat. To
clean the wheels, use a mild
detergent and a soft brush or sponge.

Tires
To safely operate your vehicle, your
tires must be the proper type and
size, in good condition with adequate
tread, and correctly inflated.

The following pages give more
detailed information on how to take
care of your tires and what to do
when they need to be replaced.

Using tires that are excessively
worn or improperly inflated can
cause a crash in which you can
be seriously hurt or killed.

Follow all instructions in this
owner's manual regarding tire
inflation and maintenance.

Inflation Guidelines
Keeping the tires properly inflated
provides the best combination of
handling, tread life, and riding
comfort.

Underinflated tires wear unevenly,
adversely affect handling and fuel
economy, and are more likely to
fail from being overheated.

Overinflated tires can make your
vehicle ride more harshly, are
more prone to damage from road
hazards, and wear unevenly.

The tire pressure monitoring system
(TPMS) will warn you when a tire
pressure is low. See page 227 for
more information on the TPMS.

CONTINUED

Wheels, Tires

271

Maintenance

Table of Contents

Even though your vehicle is
equipped with TPMS, we
recommend that you visually check
your tires every day. If you think a
tire might be low, check it
immediately with a tire gauge.

Use a gauge to measure the air
pressure in each tire at least once a
month. Even tires that are in good
condition may lose 1 to 2 psi (10 to
20 kPa, 0.1 to 0.2 kgf/cm

2

) per

month. Remember to check the
spare tire at the same time.

Check the air pressures when the
tires are cold. This means the vehicle
has been parked for at least 3 hours,
or driven less than 1 mile (1.6 km).
Add or release air, if needed, to
match the recommended cold tire
pressures.

If you check air pressures when the
tires are hot [driven for several miles
(kilometers)], you will see readings 4
to 6 psi (30 to 40 kPa, 0.3 to 0.4
kgf/cm

2

) higher than the cold

readings. This is normal. Do not let
air out to match the recommended
cold air pressure. The tire will be
underinflated.

You should get your own tire
pressure gauge and use it whenever
you check your tire pressures. This
will make it easier for you to tell if a
pressure loss is due to a tire problem
and not due to a variation between
gauges.

While tubeless tires have some
ability to self-seal if they are
punctured, you should look closely
for punctures if a tire starts losing
pressure.

Recommended Tire Pressures
The following chart shows the
recommended cold tire pressures for
most normal and high-speed driving
conditions.

On all models except SC

Tire Size

Cold Tire Pressure
for Normal Driving

P215/70R16 99S

Front:
33 psi (230 kPa,
2.3 kgf/cm

2

)

Rear:
35 psi (240 kPa,
2.4 kgf/cm

2

)

On SC model

Tire Size

Cold Tire Pressure
for Normal Driving

P225/55R18 97H

Front/Rear:
32 psi (220 kPa,
2.2 kgf/cm

2

)

Tires

272

Table of Contents

The compact spare tire pressure is:
60 psi (420 kPa, 4.2 kgf/cm

2

)

For convenience, the recommended
tire sizes and cold tire pressures are
on a label on the driver's doorjamb.

For additional technical information
about your tires, see page 311.

Tire Inspection
Every time you check inflation, you
should also examine the tires for
damage, foreign objects, and wear.

You should look for:

Bumps or bulges in the tread or
side of the tire. Replace the tire if
you find either of these conditions.

Cuts, splits, or cracks in the side of
the tire. Replace the tire if you can
see fabric or cord.

Excessive tread wear.

Your tires have wear indicators
molded into the tread. When the
tread wears down, you will see a
1/2 inch (12.7 mm) wide band across
the tread. This shows there is less
than 1/16 inch (1.6 mm) of tread left
on the tire.

A tire this worn gives very little
traction on wet roads. You should
replace the tire if you can see three
or more tread wear indicators.

Tire Service Life
The service life of your tires is
dependent on many factors,
including, but not limited to, driving
habits, road conditions, vehicle
loading, inflation pressure,
maintenance history, speed, and
environmental conditions (even
when the tires are not in use).
In addition to your regular
inspections and inflation pressure
maintenance, it is recommended that
you have annual inspections
performed once the tires reach five
years old. It is also recommended
that all tires, including the spare, be
removed from service after 10 years
from the date of manufacture,
regardless of their condition or state
of wear.
The last four digits of the TIN (tire
identification number) are found on
the sidewall of the tire and indicate
the date of manufacture (See

Tire

Labeling on page 313).

INDICATOR LOCATION MARKS

TREAD WEAR INDICATORS

CONTINUED

Tires

273

Maintenance

Table of Contents

Tire Maintenance
In addition to proper inflation, correct
wheel alignment helps to decrease
tire wear. If you find a tire is worn
unevenly, have your dealer check the
wheel alignment.

Have your dealer check the tires if
you feel a consistent vibration while
driving. A tire should always be
rebalanced if it is removed from the
wheel. When you have new tires
installed, make sure they are
balanced. This increases riding
comfort and tire life. For best results,
have the installer perform a dynamic
balance.

On vehicles with aluminum wheels,
improper wheel weights can damage
your vehicle's aluminum wheels. Use
only Honda wheel weights for
balancing.

Tire Rotation

To help increase tire life and
distribute wear more evenly, rotate
the tires according to the
maintenance messages displayed on
the information display.
Move the tires to the positions
shown in the illustration each time
they are rotated. If you purchase
directional tires, rotate only front-to-
back.

Replacing Tires and Wheels
Replace your tires with radial tires of
the same size, load range, speed
rating, and maximum cold tire
pressure rating (as shown on the
tire's sidewall).

Mixing radial and bias-ply tires on
your vehicle can reduce braking
ability, traction, and steering
accuracy. Using tires of a different
size or construction can cause the
ABS and vehicle stability assist
system (VSA) to work inconsistently.

ABS and VSA system work by
comparing the speed of the wheels.
When replacing tires, use the same
size originally supplied with the
vehicle. Tire size and construction
can affect wheel speed and may
cause the ABS or VSA system to
activate.

Front

Front

(For Non-directional
Tires and Wheels)

(For Directional
Tires and Wheels)

Tires

274

Table of Contents

It is best to replace all four tires at
the same time. If that is not possible
or necessary, replace the two front
tires or two rear tires as a pair.
Replacing just one tire can seriously
affect your vehicle's handling.

If you ever replace a wheel, make
sure that the wheel's specifications
match those of the original wheels.

Also be sure you use only TPMS
specific wheels. If you do not, the tire
pressure monitoring system will not
work.

Replacement wheels are available at
your dealer.

Installing improper tires on your
vehicle can affect handling and
stability. This can cause a crash
in which you can be seriously
hurt or killed.

Always use the size and type of
tires recommended in this
owner's manual.

Wheel and Tire Specifications
Wheels:
(On all models except SC)

16 x 6 1/2JJ

(On SC model)

18 x 7JJ

Tires:
(On all models except SC)

P215/70R16 99S

(On SC model)

P225/55R18 97H

See page 311 for DOT tire quality
grading information, and page 313
for tire size and labeling information.

Winter Driving
Tires marked ‘‘M + S’’ or ‘‘All

Season’’ on the sidewall have an all-

weather tread design suitable for
most winter driving conditions.
For the best performance in snowy
or icy conditions, you should install
snow tires or tire chains. They may
be required by local laws under
certain conditions.

Snow Tires
If you mount snow tires on your
vehicle, make sure they are radial
tires of the same size and load range
as original tires. Mount snow tires on
all four wheels. The traction provided
by snow tires on dry roads may be
lower than your original tires. Check
with the tire dealer for maximum
speed recommendations.

CONTINUED

Tires

275

Maintenance

Table of Contents

Tire Chains
Mount tire chains on your tires when
required by driving conditions or
local laws. Install them only on the
front tires.

On all models except SC
Because your vehicle has limited tire
clearance, use only SAE Class ‘‘S’’

cable-type traction devices, with
rubber chain tensioners, on the front
tires. Use traction devices only when
required by driving conditions or
local laws. Make sure they are the
correct size for your tires. Metal link-
type ‘‘chains’’ should not be used.

Traction devices that are the wrong size
or improperly installed can damage
your vehicle's brake lines, suspension,
body, and wheels. Stop driving if they
are hitting any part of the vehicle.

On SC model
Because your vehicle has limited tire
clearance, Honda strongly
recommends using the chains listed
below, made by Security Chain
Company (SCC).

Cable-type: SCC Super Z6 SZ 139

When installing cables, follow the
manufacturer's instructions, and
mount them as tight as you can.
Make sure they are not contacting
the brake lines or suspension. Drive
slowly with them installed. If you
hear them coming into contact with
the body or chassis, stop and
investigate. Remove them as soon as
you begin driving on cleared roads.

Using the wrong chains, or not
properly installing chains, can
damage the brake lines and
cause a crash in which you can
be seriously injured or killed.

Follow all instructions in this
owner's manual regarding the
selection and use of tire chains.

Tires

276

Table of Contents

Check the condition of the battery
monthly by looking at the test indicator
window. The label on the battery
explains the test indicator's colors.

Check the terminals for corrosion (a
white or yellowish powder). To remove
it, cover the terminals with a solution of
baking soda and water. It will bubble
up and turn brown. When this stops,
wash it off with plain water. Dry off the
battery with a cloth or paper towel.
Coat the terminals with grease to help
prevent future corrosion.

If additional battery maintenance is
needed, see your dealer or a
qualified technician.

WARNING: Battery posts,
terminals, and related accessories
contain lead and lead compounds.
Wash your hands after handling.

If you need to connect the battery to
a charger, disconnect both cables to
prevent damaging your vehicle's
electrical system. Always disconnect
the negative (-) cable first, and
reconnect it last.

If your vehicle's battery is
disconnected, or goes dead, the time
setting may be lost. To reset the
time, see page 189.

The battery gives off explosive
hydrogen gas during normal
operation.

A spark or flame can cause the
battery to explode with enough
force to kill or seriously hurt
you.

Wear protective clothing and a
face shield, or have a skilled
technician do the battery
maintenance.

On EX and SC models
If your vehicle's battery is
disconnected or goes dead, the audio
system may disable itself. The next
time you turn on the radio, you will
see ‘‘ENTER CODE’’ in the

frequency display. Use the preset
buttons to enter the code (see page
188).

NEGATIVE TERMINAL

TEST INDICATOR
WINDOW

POSITIVE TERMINAL

CONTINUED

Checking the Battery

277

Maintenance

Table of Contents

On vehicles with navigation system
The navigation system will also
disable itself. The next time you turn
on the ignition switch, the system
will require you to enter a PIN before
it can be used. Refer to the
navigation system manual.

Vehicle Storage
If you need to park your vehicle for
an extended period (more than 1
month), there are several things you
should do to prepare it for storage.
Proper preparation helps prevent
deterioration and makes it easier to
get your vehicle back on the road. If
possible, store your vehicle indoors.

Fill the fuel tank.

Wash and dry the exterior
completely.

Clean the interior. Make sure the
carpeting, floor mats, etc., are
completely dry.

Leave the parking brake off. Put
the transmission in reverse
(manual) or Park (automatic).

Block the rear wheels.

If the vehicle is to be stored for a
longer period, it should be
supported on jackstands so the
tires are off the ground.

Leave one window open slightly (if
the vehicle is being stored
indoors).

Disconnect the battery.

Support the front and rear wiper
blade arms with a folded towel or
rag so they do not touch the
windshield.

To minimize sticking, apply a
silicone spray lubricant to all door
and tailgate seals. Also, apply a
vehicle body wax to the painted
surfaces that mate with the door
and tailgate seals.

Checking the Battery, Vehicle Storage

278

Table of Contents

Cover the vehicle with a
‘‘breathable’’ cover, one made from

a porous material such as cotton.
Non-porous materials, such as
plastic sheeting, trap moisture,
which can damage the paint.

If possible, periodically run the
engine until it reaches full
operating temperature (the cooling
fans cycle on and off twice).
Preferably, do this once a month.

Vehicle Storage

279

Maintenance

Table of Contents

This section covers the more
common problems that motorists
experience with their vehicles. It
gives you information about how to
safely evaluate the problem and what
to do to correct it. If the problem has
stranded you on the side of the road,
you may be able to get going again. If
not, you will also find instructions on
getting your vehicle towed.

Compact Spare Tire

....................

282

Changing a Flat Tire

...................

283

If the Engine Won't Start

.............

289

Jump Starting

..............................

291

If the Engine Overheats

..............

293

Low Oil Pressure Indicator

.........

295

Charging System Indicator

.........

295

Malfunction Indicator Lamp

........

296

Brake System Indicator

...............

297

Fuses

..........................................

298

Fuse Locations

............................

301

Emergency Towing

.....................

303

Taking Care of the Unexpected

281

Taking

Care

of
the

Unexpected

Use the compact spare tire as a
temporary replacement only. Get
your regular tire repaired or
replaced, and put it back on your
vehicle as soon as you can.

Check the inflation pressure of the
compact spare tire every time you
check the other tires. It should be
inflated to:
60 psi (420 kPa, 4.2 kgf/cm

2

)

Follow these precautions:

Never exceed 50 mph (80 km/h).

This tire gives a harsher ride and
less traction on some road
surfaces. Use greater caution while
driving.

Do not mount snow chains on the
compact spare tire.

Do not use your compact spare tire
on another vehicle unless it is the
same make and model.

The low tire pressure indicator
comes on and stays on after you
replace the flat tire with the
compact spare tire. After several
miles (kilometers) driving with the
compact spare tire, the TPMS
indicator comes on and the low tire
pressure indicator goes off.

Replace the tire when you can see
the tread wear indicator bars. The
replacement should be the same size
and design tire, mounted on the
same wheel. The spare tire is not
designed to be mounted on a regular
wheel, and the spare wheel is not
designed for mounting a regular tire.

INDICATOR LOCATION MARK

TREAD WEAR INDICATOR BAR

Compact Spare Tire

282

Table of Contents

If you have a flat tire while driving,
stop in a safe place to change it.
Drive slowly along the shoulder until
you get to an exit or an area to stop
that is far away from the traffic lanes.

The vehicle can easily roll off
the jack, seriously injuring
anyone underneath.

Follow the directions for
changing a tire exactly, and
never get under the vehicle
when it is supported only by the
jack.

1. Park the vehicle on firm, level, and

non-slippery ground. Put the
transmission in Park (automatic)
or reverse (manual). Apply the
parking brake.

If you are towing a trailer, unhitch
the trailer.

2. Turn on the hazard warning lights,

and turn the ignition switch to the
LOCK (0) position. Have all
passengers get out of the vehicle
while you change the tire.

3. Open the hatch and the tailgate.

4. The spare tire, jack, and tools are

under the cargo area floor.

TOOLS

SPARE TIRE

JACK

CONTINUED

Changing a Flat Tire

283

Taking

Care

of
the

Unexpected

Table of Contents

5. Push the rear edge of the handle

to raise the handle loop and pull up
the loop to raise the cargo area
floor.

6. Unscrew the wing bolt, and take

the spare tire out of the cargo area.

7. Remove the tools and the jack. To

remove the jack, turn the jack's
end bracket counterclockwise to
loosen it.

8. Loosen the five wheel nuts 1/2

turn with the wheel nut wrench.

JACK

WHEEL NUTS

WHEEL NUT WRENCH

Changing a Flat Tire

284

Table of Contents


Content   ..  16  17  18  19   ..