Honda Crosstour (2015 year). Instruction - part 2


  Index      Honda     Honda Crosstour - instruction 2015 year in english


Search            


Content   ..   1  2  3   ..


Honda Crosstour (2015 year). Instruction - part 2


16

Quick

 Referenc

e Guide

● Press the AUTO button to activate the climate control system.

● Press the 

 button to turn the system on or off.

● Press the 

 button to defrost the windshield.

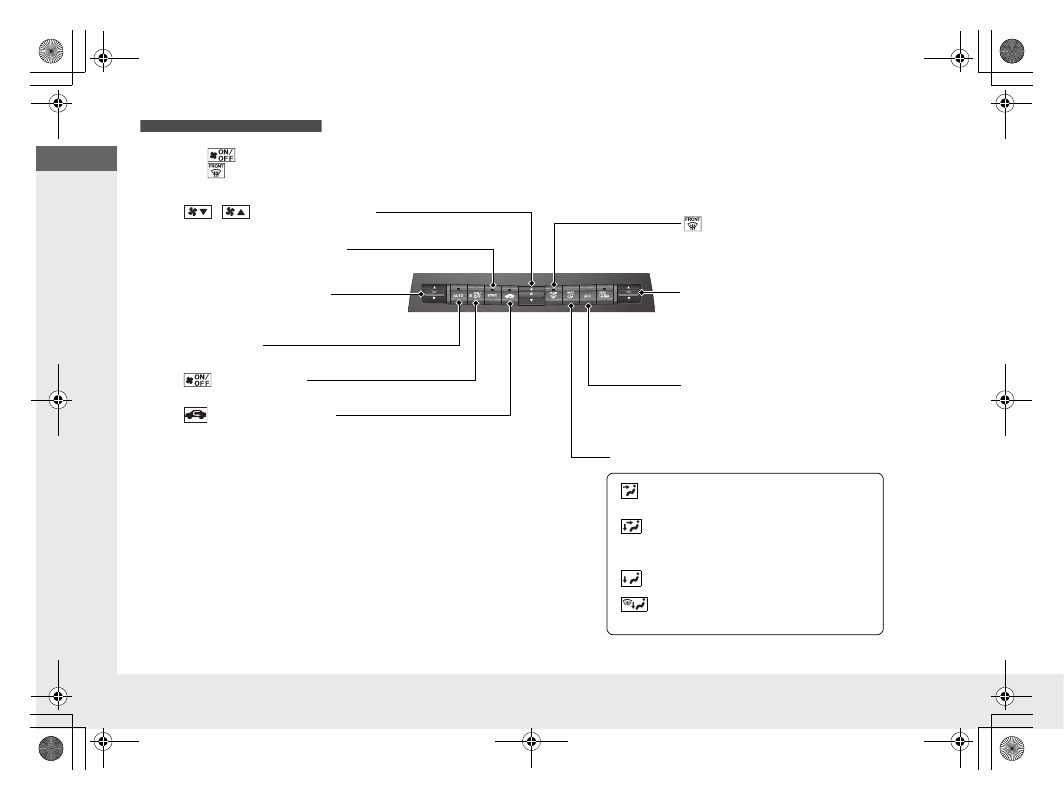
Models without audio touch screen

Driver’s Side Temperature 
Control Switch

 / 

 (Fan Control) Buttons

 (Windshield Defroster) Button

A/C (Air Conditioning) Button

SYNC (Synchronized) Button

 (Recirculation) Button

AUTO Button

Passenger’s Side Temperature 
Control Switch

MODE Control Button

 (On/Off) Button

Air flows from floor and 
dashboard vents, and back of the 
center console.

Air flows from dashboard vents, 
and back of the center console.

Air flows from floor and 
windshield defroster vents.

Air flows from floor vents.

17

Quick

 Referenc

e Guide

Features 

(P 163)

Audio Remote Controls 

(P 168)

(

+ / 

(

- Button

Press to adjust the volume up/down.

● SOURCE Button

Press to change the audio mode: FM/AM/
CD/SiriusXM®

*

/HDD

*

/USB/iPod/Bluetooth/

Pandora®

*

/Aha

TM*

/AUX.

 / 

 Button

Radio:Press to change the preset station.

Press and hold to select the next or 
previous strong station.

CD/HDD

*

/USB device:

Press to skip to the beginning of 
the next song or return to the 
beginning of the current song.
Press and hold to change a folder.

(

+ / 

(

- / 

 / 

 Button

SOURCE 
Button

Audio System 

(P169, 182, 215)


(P169)

Audio system without touch screen

RETURN Button

FM Button

SCAN Button

Selector Knob

AM Button

VOL/PWR 
(Volume/Power) 
Knob

CD Button

AUX Button

CD Slot

 (CD Eject) 

Button

Preset Buttons 
(1-6)

TITLE Button

 / 

 (Skip) 

Bar

MENU Button

LOAD Button

FOLDER Bar

A.SEL (Auto Select) 
Button

* Not available on all models

18

Quick

 Referenc

e Guide

*1: Icons that appear on the screen vary by the source selected.

CD Slot

 (CD Eject) Button

BACK Button

MENU/SEL (Menu/Selector) 
Knob

 (Tune Down) Icon

*1

 (Skip/Seek) Icon

*1

Models without navigation system

Audio/Information Screen

Touch Screen

 Button

Source

*1

VOL/  

(Volume/Power) 

Knob

 (Skip/Seek) Icon

*1

Presets

*1

Clock/Screen

*1

DISP Button

 (Tune Up) Icon

*1

More

*1


(P 182)

Audio system with touch screen

19

Quick

 Referenc

e Guide

*1: Icons that appear on the screen vary by the source selected.

CD Slot

 (CD Eject) Button

MENU Button

Interface Dial/ENTER Button

 (Skip/Seek) Icon

*1


(P 215)

Models with navigation system

Audio/Information Screen

Touch Screen

 Button

Source

*1

VOL (Volume) Knob

 (Skip/Seek) Icon

*1

Presets

*1

 (Tune Up) Icon

*1

More

*1

 (Power) Button

 (Tune Down) Icon

*1

INFO Button

AUDIO Button

SETTINGS Button

BACK Button

NAV Button

PHONE Button

20

Quick

 Referenc

e Guide

Driving 

(P409)

Release Button

Shift Lever

Automatic Transmission 

(P426, 428)

● Shift to 

(

P and depress the brake pedal when starting the engine.

Shifting

Park
Turn off or start the engine.
Transmission is locked.

Reverse
Used when reversing.

Neutral
Transmission is not locked.

Drive
Normal driving.
On models with paddle shifter, 
D-paddle shift mode can be used.

Drive (D3)
Used when:
•Going up or down hills
•Towing a trailer in hilly terrain

Second
Used to increase engine braking (the 
transmission is locked in 2nd gear)

First
Used to further increase engine braking 
(the transmission is locked in 1st gear)

Models with 
paddle shifter

Models without 
paddle shifter

S Position
Sequential shift mode can be used.

Models with paddle shifter

Models without paddle shifter

Paddle Shifters 

(P431)

● Paddle shifters allow you to shift gears much like a 

manual transmission (1st through 6th). This is useful for 
engine braking.

● D-paddle shift mode: The transmission will shift back to 

automatic mode once the system detects that the vehicle 
is cruising.

● Sequential shift mode: Holds the selected gear, and the M 

indicator comes on.

● The selected gear position is shown in the instrument 

panel.

Shift Down 

(

Paddle Shifter

Shift Up 

(

Paddle Shifter

Selected Gear 
Number

M Indicator

Shift Lever 
Position Indicator

Depress the brake pedal and 
press the release button to 
move out of 

(

P.

Move the shift lever without 
pressing the release button.

Press the release button to move 
the shift lever.

21

Quick

 Referenc

e Guide

VSA® OFF Button 

(P 443)

● The vehicle stability assist (VSA®) system 

helps stabilize the vehicle during 
cornering, and helps maintain traction 
while accelerating on loose or slippery 
road surfaces.

● VSA® comes on automatically every time 

you start the engine.

● To turn VSA® on or off, press and hold 

the button until you hear a beep.

Cruise Control 

(P 432)

● Cruise control allows you to maintain a 

set speed without keeping your foot on 
the accelerator pedal.

● To use cruise control, press the CRUISE 

button, then press –/SET once you have 
received the desired speed (above 25 mph 
or 40 km/h).

Tire Pressure Monitoring 
System (TPMS) 

(P 446)

● The TPMS monitors tire pressure.

● The TPMS is turned on automatically 

every time you start the engine.

Refueling 

(P 456)

Fuel recommendation: Unleaded gasoline with a pump octane number 87 or 

higher required

Fuel tank capacity: 18.5 US gal (70 L)

a

Unlock the driver’s door.

b

Press on the edge of the 
fuel fill door to make it 
pop up slightly.

c

Turn the fuel fill cap 
slowly to remove the 
cap.

d

Place the cap in the 
holder on the fuel fill 
door.

e

After refueling, screw 
the cap back on until it 
clicks at least once.

22

Quick

 Referenc

e Guide

Maintenance 

(P 461)

Under the Hood 

(P 469)

● Check engine oil, engine coolant, and windshield washer 

fluid. Add when necessary.

● Check brake fluid.

● Check the battery condition monthly.

a

Pull the hood release handle under the corner of the 
dashboard.

b

Locate the hood latch lever, pull the lever up, and lift up 
the hood.

c

When finished, close the hood and make sure it is firmly 
locked in place.

Lights 

(P 484)

● Inspect all lights regularly.

Wiper Blades 

(P 493)

● Replace blades if they leave streaks 

across the windshield.

Tires 

(P 497)

● Inspect tires and wheels regularly.

● Check tire pressures regularly.

● Install snow tires for winter 

driving.

Quick

 Referenc

e Guide

23

Handling the Unexpected 

(P 515)

Flat Tire 

(P 517)

● Park in a safe location and replace the 

flat tire with the compact spare tire in the 
cargo area.

Indicators Come On 

(P 534)
● Identify the indicator and consult the 

owner’s manual.

Engine Won’t Start 

(P 525)
● If the battery is dead, jump start using a 

booster battery.

Blown Fuse 

(P 538)

● Check for a blown fuse if an electrical 

device does not operate.

Overheating 

(P 532)

● Park in a safe location. If you do not see 

steam under the hood, open the hood, 
and let the engine cool down.

Emergency Towing 

(P 542)
● Call a professional towing service if you 

need to tow your vehicle.

24

Quick

 Referenc

e Guide

What to Do If

*1:Models with the smart entry system have an ENGINE START/STOP button instead of an ignition switch.

The ignition switch does 
not turn from 

(

0

 to 

(

q

*1

Why?

The steering wheel may be locked.

Try to turn the steering wheel left and right 
while turning the ignition key

*

.

Move the steering wheel left and right while 
pressing the ENGINE START/STOP button

*

 at 

the same time.

The ignition switch does 
not turn from 

(

q

 to 

(

0

*1


and I cannot remove the 
key. Why?

The shift lever should be moved to 

(

P

.

Why does the brake pedal 
pulsate slightly when 
applying the brakes?

This can occur when the ABS activates, and does not indicate a 
problem. Apply firm, steady pressure on the brake pedal. Never 
pump the brake pedal.

The rear door cannot be 
opened from inside the 
vehicle. Why?

Check if the childproof lock is in the 
lock position. If so, open the rear 
door with the outside door handle.
To cancel this function, push the 
lever to the unlock position.

25

Quick

 Referenc

e Guide

Why do the doors lock 
after I unlocked the doors 
using a remote 
transmitter?

If you do not open the doors within 30 seconds, the doors are 
relocked automatically for security.

Why does the beeper 
sound when I open the 
driver’s door?

The beeper sounds when:

The key is left in the ignition switch

*

.

The power mode

*

 is in ACCESSORY.

The exterior lights are left on.

Why does the beeper 
sound when I start driving?

The beeper sounds when:

Driver and/or front passenger are not wearing their seat belts.

The parking brake lever is not fully released.

Why do I hear a screeching 
sound when I apply the 
brake pedal?

The brake pads may need to be replaced. Have your vehicle 
inspected by a dealer.

* Not available on all models

26

28

Safe Driving

For Safe Driving

The following pages explain your vehicle’s safety features and how to use them 
properly. The safety precautions below are ones that we consider to be among the 
most important.

Important Safety Precautions

Always wear your seat belt

A seat belt is your best protection in all types of collisions. Airbags are designed to 
supplement seat belts, not replace them. So even though your vehicle is equipped 
with airbags, make sure you and your passengers always wear your seat belts, and 
wear them properly.

Restrain all children

Children ages 12 and under should ride properly restrained in a back seat, not the 
front seat. Infants and small children should be restrained in a child seat. Larger 
children should use a booster seat and a lap/shoulder seat belt until they can use the 
belt properly without a booster seat.

Be aware of airbag hazards

While airbags can save lives, they can cause serious or fatal injuries to occupants 
who sit too close to them, or are not properly restrained. Infants, young children, 
and short adults are at the greatest risk. Be sure to follow all instructions and 
warnings in this manual.

Don’t drink and drive

Alcohol and driving don’t mix. Even one drink can reduce your ability to respond to 
changing conditions, and your reaction time gets worse with every additional drink. 
So don’t drink and drive, and don’t let your friends drink and drive, either.

1

Important Safety Precautions

Some states, provinces and territories prohibit the use 
of cell phones other than hands-free devices by the 
driver while driving.

29

uu

For Safe Driving

u

Important Safety Precautions

Safe Driving

Pay appropriate attention to the task of driving safely

Engaging in cell phone conversation or other activities that keep you from paying 
close attention to the road, other vehicles, and pedestrians could lead to a crash. 
Remember, situations can change quickly, and only you can decide when it is safe to 
divert some attention away from driving.

Control your speed

Excessive speed is a major factor in crash injuries and deaths. Generally, the higher 
the speed, the greater the risk, but serious injuries can also occur at lower speeds. 
Never drive faster than is safe for current conditions, regardless of the maximum 
speed posted.

Keep your vehicle in safe condition

Having a tire blowout or a mechanical failure can be extremely hazardous.
To reduce the possibility of such problems, check your tire pressures and condition 
frequently, and perform all regularly scheduled maintenance.

30

uu

For Safe Driving

u

Your Vehicle’s Safety Features

Safe Driving

Your Vehicle’s Safety Features

The following checklist will help you take an active role in protecting yourself and 
your passengers.

1

Your Vehicle’s Safety Features

Your vehicle is equipped with many features that 
work together to help protect you and your 
passengers during a crash.

Some features do not require any action on your part. 
These include a strong steel framework that forms a 
safety cage around the passenger compartment, 
front and rear crush zones, a collapsible steering 
column, and tensioners that tighten the front seat 
belts in a sufficient crash.

However, you and your passengers cannot take full 
advantage of these features unless you remain seated 
in the correct position and always wear your seat 
belts. In fact, some safety features can contribute to 
injuries if they are not used properly.

6

7

8

9

10

11

Safety Cage
Crush Zones
Seats and Seat-Backs
Head Restraints
Collapsible Steering Column
Seat Belts
Front Airbags

Side Curtain Airbags

Seat Belt Tensioners
Occupant Position Detection 
System (OPDS) Sensor

Side Airbags

11

10

8

9

9

8

12

6

10

7

7

Door Locks

12

31

uu

For Safe Driving

u

Your Vehicle’s Safety Features

Safe Driving

For the safety of you and your passengers, make a habit of checking these items 
each time before you drive.
• After everyone has entered the vehicle, be sure all doors and the tailgate are 

closed and locked. Locking the doors and the tailgate helps prevent an occupant 
from being ejected and an outsider from unexpectedly opening a door or the 
tailgate.

Locking/Unlocking the Doors from the Inside P. 99

• Adjust your seat to a position suitable for driving. Be sure the front seats are 

adjusted as far to the rear as possible while allowing the driver to control the 
vehicle. Sitting too close to a front airbag can result in serious or fatal injury in a 
crash.

Adjusting the Seats P. 133

• Adjust head restraints to the proper position. Head restraints are most effective 

when the center of the head restraint aligns with the center of your head. Taller 
persons should adjust their head restraint to the highest position.

Adjusting the Head Restraints P. 136

• Always wear your seat belt, and make sure you wear it properly. Confirm that any 

passengers are properly belted as well.

Fastening a Seat Belt P. 35

• Protect children by using seat belts or child seats according to a child’s age, height 

and weight.

Child Safety P. 54

Safety CheckList

1

Safety CheckList

If the door and tailgate open indicator is on, a door 
and/or the tailgate is not completely closed. Close all 
doors and the tailgate tightly until the indicator goes 
off.

Door and Tailgate Open Indicator P. 74


Content   ..   1  2  3   ..