Honda Civic Hybrid (2015 year). Instruction - part 21


  Index      Honda     Honda Civic Hybrid - instruction 2015 year in english


Search            


Content   ..  19  20  21  22   ..


Honda Civic Hybrid (2015 year). Instruction - part 21


320

Main

tenan

ce

Cleaning

Interior Care

Use a damp cloth with a mixture of mild detergent and warm water to remove dirt. 
Use a clean cloth to remove detergent residue.

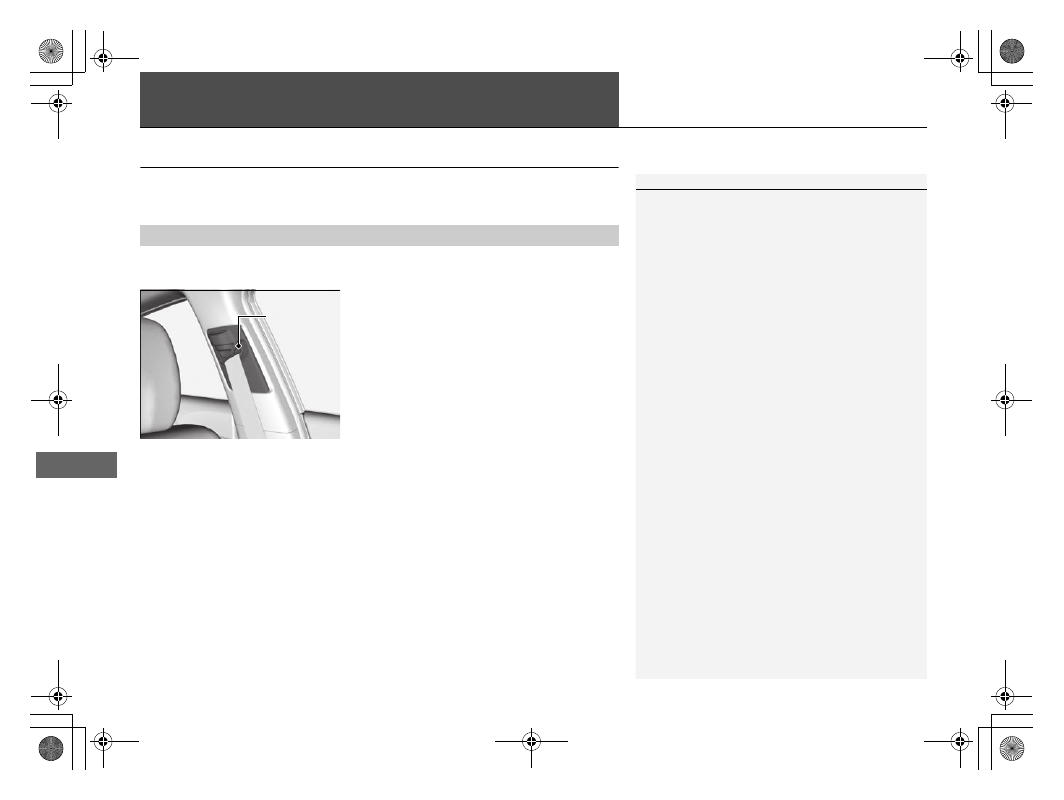
Use a soft brush with a mixture of mild soap and warm water to clean the seat belts. 
Let the belts air dry. Wipe the openings of the seat belt anchors using a clean cloth.

Cleaning Seat Belts

1

Interior Care

Do not spill liquids inside the vehicle.
Electrical devices and systems may malfunction if 
liquids are splashed on them.

Do not use silicone based sprays on electrical devices 
such as audio devices and switches.
Doing so may cause the items to malfunction or a fire 
inside the vehicle.
If a silicone based spray is inadvertently used on 
electrical devices, consult a dealer.

Depending on their composition, chemicals and 
liquid aromatics may cause discoloration, wrinkles, 
and cracking to resin-based parts and textiles.
Do not use alkali solvents or organic solvents such as 
benzene or gasoline.

After using chemicals, make sure to gently wipe them 
off using a dry cloth.
Do not place used cloths on top of resin based parts 
or textiles for long periods of time without washing.

Opening

321

uu

Cleaning

u

Interior Care

Main

tenan

ce

The driver’s floor mat hooks over the floor 
anchors, which keep the mat from sliding 
forward. To remove a mat for cleaning, turn 
the anchor knobs to the unlock position. 
When reinstalling the mat after cleaning, turn 
the knobs to the lock position.

Do not put additional floor mats on top of 
the anchored mat.

Vacuum dirt and dust from the leather frequently. Pay close attention to the pleats 
and seams. Clean the leather with a soft cloth dampened with a 90% water and 
10% neutral soap solution. Then buff it with a clean, dry cloth. Remove any dust or 
dirt on leather surfaces immediately.

Floor Mats

1

Floor Mats

If you use any floor mats that were not originally 
provided with your vehicle, make sure they are 
designed for your specific vehicle, fit correctly, and 
are securely anchored by the floor anchors.
Position the rear seat floor mats properly. If they are 
not properly positioned, the floor mats can interfere 
with the front seat functions.

Unlock

Lock

Maintaining Genuine Leather

*

* Not available on all models

322

uu

Cleaning

u

Exterior Care

Main

tenan

ce

Exterior Care

Dust off the vehicle body after you drive.
Regularly inspect your vehicle for scratches on painted surfaces. A scratch on a 
painted surface can result in body rust. If you find a scratch, promptly repair it.

Wash the vehicle regularly. Wash more frequently when driving in the following 
conditions:
• If driving on roads with road salt.
• If driving in coastal areas.
• If tar, soot, bird droppings, insects, or tree sap are stuck to painted surfaces.

Make sure to follow the instructions indicated on the automated car wash:
• Remove the audio antenna.
• Fold in the door mirrors.

• Keep sufficient distance between the cleaning nozzle and the vehicle body.
• Take particular care around the windows. Standing too close may cause water to 

enter the vehicle interior.

• Do not spray high pressure water directly into the engine compartment. Instead, 

use low pressure water and a mild detergent.

Washing the Vehicle

Using an Automated Car Wash

Using High Pressure Cleaners

1

Washing the Vehicle

It can cause a malfunction.

Air Intake 
Vents

Continued

323

uu

Cleaning

u

Exterior Care

Main

tenan

ce

A good coat of automotive body wax helps protect your vehicle’s paint from the 
elements. Wax will wear off over time and expose your vehicle’s paint to the 
elements, so reapply as necessary.

If you get gasoline, oil, engine coolant, or battery fluid on resin coated parts, they 
may be stained or the coating may peel. Promptly wipe it away using a soft cloth and 
clean water.

Wipe using a glass cleaner.

Applying Wax

Maintaining the Bumpers and Other Resin Coated Parts

Cleaning the Window

1

Applying Wax

NOTICE

Chemical solvents and strong cleaners can damage 
the paint, metal, and plastic on your vehicle. Wipe up 
spills immediately.

1

Maintaining the Bumpers and Other Resin Coated Parts

Ask a dealer about the correct coating material when 
you want to repair the painted surface of the parts 
made of resin.

1

Cleaning the Window

Wires are mounted to the inside of the rear window. 
Wipe along the same direction as the wires with a 
soft cloth so as not to damage them.

324

uu

Cleaning

u

Exterior Care

Main

tenan

ce

Aluminum is susceptible to deterioration caused by salt and other road 
contaminants. Use a sponge and mild detergent to wipe away promptly.
Be careful not to use harsh chemicals (including some commercial wheel cleaners) or 
a stiff brush. They can damage the clear coat of the aluminum alloy wheels that 
helps keep the aluminum from corroding and tarnishing.

The inside lenses of exterior lights (headlights, brake lights, etc.) may fog temporarily 
if you have driven in the rain, or after the vehicle has been run through a car wash. 
Dew condensation also may build up inside the lenses when there is a significant 
enough difference between the ambient and inside lens temperatures (similar to 
vehicle windows fogging up in rainy conditions). These conditions are natural 
processes, not structural design problems in the exterior lights.
Lens design characteristics may result in moisture developing on the light lens frame 
surfaces. This also is not a malfunction.
However, if you see large amounts water accumulation, or large water drops 
building up inside the lenses, have your vehicle inspected by a dealer.

Maintaining Aluminum Wheels

Fogged Exterior Light Lenses

326

Han

d

lin
g the U

n

expected

Tools

Types of Tools

1

Types of Tools

The tools are stored in the trunk.

Models with optional compact spare

Tool Case

Wheel Nut Wrench/

Jack Handle

Jack

Jack Handle Bar

327

Continued

Han

d

lin
g the U

n

expected

If a Tire Goes Flat

Temporarily Repairing a Flat Tire

This vehicle is not equipped with a spare tire. If the tire has a large cut or is otherwise 
severely damaged, you will need to have the vehicle towed. If the tire only has a 
small puncture, from a nail for instance, you can use the temporary tire repair kit so 
that you can drive to the nearest service station for a more permanent repair.

If a tire goes flat while driving, grasp the steering wheel firmly, and brake gradually 
to reduce speed. Then stop in a safe place.

1. Park the vehicle on firm, level, and non-slippery surface and apply the parking 

brake.

2. Put the shift lever in 

(

P.

3. Turn on the hazard warning lights and set the power mode to VEHICLE OFF 

(LOCK).

Getting Ready to Temporarily Repair the Flat Tire

1

Temporarily Repairing a Flat Tire

The kit should not be used in the following situations. 
Instead, contact a dealer or a roadside assistant to 
have the vehicle towed.

The tire sealant has expired.

More than one tire is punctured.

The puncture or cut is larger than 3/16 inch (4 mm).

The tire side wall is damaged or the puncture is 
outside the tire contact area.

Damage has been caused by driving with the tire 
extremely under inflated.

The tire bead is no longer seated.

The rim is damaged.

Do not remove a nail or screw that punctured the 
tire. If you remove it from the tire, you may not be 
able to repair the puncture using the kit.

When the puncture is:

Kit Use

Smaller than 3/16 inch 
(4mm) 

Yes

Larger than 3/16 inch 
(4mm) 

No

Contact 
Area

Pressure Gauge

Sealant/Air Hose (Clear)

Tire Sealant 
Expiration Date

Pressure Relief 
Button

Instruction 
Manual

Air Only Hose (Black)

SEALANT/AIR side

AIR ONLY side

Inflator Switch

Repair Notification Label

Power Plug

Speed Restriction Label

Selector Switch

uu

If a Tire Goes Flat

u

Temporarily Repairing a Flat Tire

328

Han

d

lin
g the U

n

expected

1. Open the trunk floor lid.

2. Take the kit out of the case.

u

Place the kit face up, on flat ground near 
the flat tire, and away from traffic. Do 
not place the kit on its side.

1

Getting Ready to Temporarily Repair the Flat Tire

When making a temporary repair, carefully read the 
instruction manual provided with the kit.

In cold temperatures, the sealant may not flow easily. 
In this situation, warm it up for five minutes before 
using.

Continued

329

uu

If a Tire Goes Flat

u

Temporarily Repairing a Flat Tire

Han

d

lin
g the U

n

expected

1. Remove the valve cap from the tire valve 

stem.

2. Remove the sealant/air hose from the 

packaging.

3. Attach the sealant/air hose onto the tire 

valve stem. Screw it until it is tight.

Injecting Sealant and Air

1

Injecting Sealant and Air

In cold temperatures, the sealant may not flow easily. 
In this situation, warm it up for five minutes before 
using.

The sealant can permanently stain clothing and other 
materials. Be careful during handling and wipe away 
any spills immediately.

3

WARNING

Tire sealant contains substances that are 
harmful and can be fatal if swallowed.

If accidentally swallowed, do not induce 
vomiting. Drink plenty of water and get 
medical attention immediately.
For skin or eye contact, flush with cool 
water and get medical attention if 
necessary.

Valve Cap

Valve Stem

Sealant/Air Hose

Valve Stem

Sealant/Air Hose

uu

If a Tire Goes Flat

u

Temporarily Repairing a Flat Tire

330

Han

d

lin
g the U

n

expected

4. Plug in the compressor to the accessory 

power socket.

u

Be careful not to pinch the cord in a 
door or window.

5. Start the engine.

u

Keep the engine running while injecting 
sealant and air.

Carbon Monoxide Gas P. 64

6. Turn the selector switch to SEALANT/

AIR.

7. Press the inflator switch to turn on the 

compressor.

u

The compressor starts injecting sealant 
and air into the tire.

8. When the sealant injection is complete, 

continue to add air.

9. After the air pressure reaches 32 psi (220 

kPa), turn off the kit.

u

To check the pressure, occasionally turn 
off the compressor and read the gauge.

1

Injecting Sealant and Air

NOTICE

Do not operate the tire repair kit compressor for 
more than 15 minutes. The accessory power socket 
and compressor can overheat and become 
permanently damaged.

Until the sealant injection is complete, the pressure 
shown on the pressure gauge will appear higher than 
actual. After the sealant injection is complete the 
pressure will drop and then begin to rise again as the 
tire is inflated with air. This is normal. To accurately 
measure the air pressure using the gauge, turn the air 
compressor off only after the sealant injection is 
complete.

If the required air pressure is not reached within 10 
minutes, the tire may be too severely damaged for 
the kit to provide the necessary seal and your vehicle 
will need to be towed.

3

WARNING

Running the engine with the vehicle in an 
enclosed or even partly enclosed area can 
cause a rapid build-up of toxic carbon 
monoxide.

Breathing this colorless, odorless gas can 
cause unconsciousness and even death. 
Only run the engine to power the air 
compressor with the vehicle outdoors.

SEALANT/AIR side

Pressure Gauge

ON

OFF

Continued

331

uu

If a Tire Goes Flat

u

Temporarily Repairing a Flat Tire

Han

d

lin
g the U

n

expected

10. Unplug the power plug from the accessory 

power socket.

11. Unscrew the sealant/air hose from the tire 

valve stem. Reinstall the valve cap.

12. Press the pressure relief button until the 

gauge returns 0 psi (0 kPa).

13. Apply the repair notification label to the 

flat surface of the wheel.

u

The wheel surface must be clean to 
ensure the label adheres properly.

1. Apply the speed restriction label to the 

location as shown.

2. Drive the vehicle for about 10 minutes.

u

Do not exceed 50 mph (80 km/h).

3. Stop the vehicle in a safe place.

1

Injecting Sealant and Air

See a Honda dealer for a replacement sealant bottle 
and proper disposal of an empty bottle.

Valve Stem

Sealant/Air Hose

Repair Notification Label

Distributing the Sealant in the Tire

1

Distributing the Sealant in the Tire

Stop and recheck the air pressure after every 10 
minutes of driving as necessary until you reach the 
nearest service station where you should have the tire 
permanently repaired or replaced.

Speed Restriction Label

uu

If a Tire Goes Flat

u

Temporarily Repairing a Flat Tire

332

Han

d

lin
g the U

n

expected

4. Attach the air only hose onto the tire valve 

stem. Screw it until it is tight.

5. Turn the selector switch to AIR ONLY.

u

Do not turn the air compressor on to 
check the pressure.

Inflating an Under-inflated Tire 

P. 333

6. If the air pressure is:

• Less than 19 psi (130 kPa):

Do not add air or continue driving. The leak is too severe. Call for help and 
have your vehicle towed.

Emergency Towing P. 356

• 32 psi (220 kPa) or more:

Continue driving for another 10 minutes or until you reach the nearest service 
station. Do not exceed 50 mph (80 km/h).

u

If the air does not go down after the 10 minute driving, you do not need to 
check the pressure any more.

• Greater than 19 psi (130 kPa), but less than 32 psi (220 kPa):

Turn the air compressor on to inflate the tire until the tire pressure reaches 32 
psi (220 kPa).
Then drive carefully for 10 more minutes or until you reach the nearest service 
station. Do not exceed 50 mph (80 km/h).

u

You should repeat this procedure as long as the air pressure is within this 
range.

7. Press the pressure relief button until the gauge returns to 0 psi (0 kPa).
8. Repackage and properly stow the kit.

1

Distributing the Sealant in the Tire

3

WARNING

Running the engine with the vehicle in an 
enclosed or even partly enclosed area can 
cause a rapid build-up of toxic carbon 
monoxide.

Breathing this colorless, odorless gas can 
cause unconsciousness and even death. 
Only run the engine to power the air 
compressor with the vehicle outdoors.

Air Only Hose

Continued

333

uu

If a Tire Goes Flat

u

Temporarily Repairing a Flat Tire

Han

d

lin
g the U

n

expected

You can use the kit to inflate a non-punctured under-inflated tire.

1. Open the trunk floor lid.

Getting Ready to Temporarily Repair 

the Flat Tire P. 327

2. Remove the kit from the case.

u

Place the kit on flat ground near the tire 
to be inflated, away from traffic.

3. Place the kit, face up, on flat ground near 

the flat tire, away from traffic. Do not 
place the kit on its side.

4. Remove the air only hose from the kit.
5. Remove the valve cap.

6. Attach the air only hose onto the tire valve 

stem. Screw it until it is tight.

Inflating an Under-inflated Tire

1

Inflating an Under-inflated Tire

NOTICE

Do not operate the temporary tire repair kit 
compressor for more than 15 minutes. The accessory 
power socket and compressor can overheat and 
become permanently damaged.

Air Only Hose

Valve Cap

Valve Stem

Air Only Hose

uu

If a Tire Goes Flat

u

Temporarily Repairing a Flat Tire

334

Han

d

lin
g the U

n

expected

7. Plug in the kit to the accessory power 

socket.

u

Be careful not to pinch the cord in a 
door or window.

8. Start the engine.

u

Keep the engine running while injecting 
air.

Carbon Monoxide Gas P. 64

9. Turn the selector switch to AIR ONLY.

10. Press the inflator switch to turn on the kit.

u

The compressor starts to inject air into 
the tire.

11. Inflate the tire to the specified air pressure.

12. Turn off the kit.

u

Check the pressure gauge on the air 
compressor.

u

If overinflated, press the pressure relief 
button.

13. Unplug the kit from the accessory power 

socket.

14. Unscrew the air only hose from the tire 

valve stem. Reinstall the valve cap.

15. Press the pressure relief button until the 

gauge returns 0 psi (0 kPa).

16. Repackage and properly stow the kit.

1

Inflating an Under-inflated Tire

3

WARNING

Running the engine with the vehicle in an 
enclosed or even partly enclosed area can 
cause a rapid build-up of toxic carbon 
monoxide.

Breathing this colorless, odorless gas can 
cause unconsciousness and even death. 
Only run the engine to power the air 
compressor with the vehicle outdoors.

AIR ONLY 
side

ON

Pressure Relief Button

335

uu

If a Tire Goes Flat

u

Changing a Flat Tire

Continued

Han

d

lin
g the U

n

expected

Changing a Flat Tire

If a tire goes flat while driving, grasp the steering wheel firmly, and brake gradually 
to reduce speed. Then, stop in a safe place. Replace the flat tire with a compact 
spare tire. Go to a dealer as soon as possible to have the full-size tire repaired or 
replaced.

1. Park the vehicle on firm, level, and non-slippery surface, and apply the parking 

brake.

2. Move the shift lever to 

(

P.

3. Set the parking brake.
4. Turn on the hazard warning lights and set the power mode to VEHICLE OFF 

(LOCK).

Models with optional compact spare tire

1

Changing a Flat Tire

Follow compact spare precautions:
Periodically check the tire pressure of the compact 
spare. It should be set to the specified pressure. 
Specified Pressure: 60 psi (420 kPa, 4.2 kgf/cm

2

)

When driving with the compact spare tire, keep the 
vehicle speed under 50 mph (80 km/h). Replace with 
a full-size tire as soon as possible.

The compact spare tire and wheel in your vehicle are 
specifically for this model. Do not use them with 
another vehicle. Do not use another type of compact 
spare tire or wheel with your vehicle.

Do not mount tire chains on a compact spare tire.
If a chain-mounted front tire goes flat, remove one of 
the full-size rear tires and replace it with the compact 
spare tire. Remove the flat front tire and replace it 
with the full-size tire that was removed from the rear. 
Mount the tire chains on the front tire.

336

uu

If a Tire Goes Flat

u

Changing a Flat Tire

Han

d

lin
g the U

n

expected

1. Open the trunk floor lid.

2. Take the tool case out of the trunk. Take 

the jack and wheel nut wrench out of the 
tool case.

3. Unscrew the wing bolt, and remove the 

spacer cone. Then, remove the compact 
spare tire.

4. Place a wheel block or rock in front and rear 

of the wheel diagonal to the flat tire.

Getting Ready to Replace the Flat Tire

Compact Spare Tire

Tool Case

Wheel 
Blocks

The tire to be replaced.


Content   ..  19  20  21  22   ..