Honda Civic Hybrid (2015 year). Instruction - part 9


  Index      Honda     Honda Civic Hybrid - instruction 2015 year in english


Search            


Content   ..  7  8  9  10   ..


Honda Civic Hybrid (2015 year). Instruction - part 9


128

uu

Operating the Switches Around the Steering Wheel

u

Wipers and Washers

Co
ntrols

Wipers and Washers

The windshield wipers and washers can be 
used when the power mode is in ON.
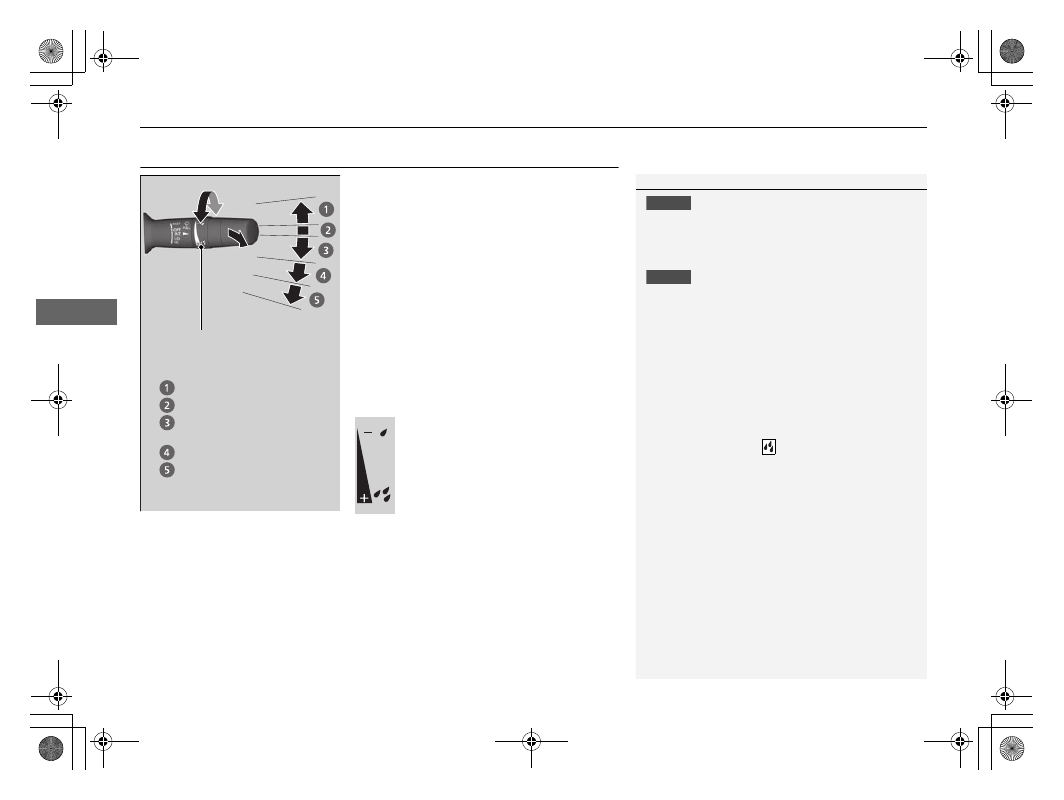
MIST

The wipers run at high speed until you release 
the lever.

Wiper switch (OFF, INT, LO, HI)

Change the wiper switch setting according to 
the amount of rain.

Adjusting the delay

Turn the adjustment ring to adjust the wiper 
delay.

Washer

Sprays while you pull the lever toward you.
When you release the lever, the wipers make 
two or three more sweeps before stopping.

1

Wipers and Washers

NOTICE

Do not use the wipers when the windshield is dry.
The windshield will get scratched, or the rubber 
blades will get damaged.

NOTICE

In cold weather, the blades may freeze to the 
windshield, becoming stuck.
Operating the wipers in this condition may damage 
the wipers. Use the defroster to warm the 
windshield, then turn the wipers on.

If the vehicle speeds up while the wipers are 
operating intermittently, the length of the wipe 
interval shortens. When the vehicle starts moving, the 
wipers make a single sweep.
When the vehicle speeds up, the wiper operation’s 
shortest delay setting (

) and the LO setting 

become the same.

Turn the washers off if no washer fluid comes out.
The pump may get damaged.

The wiper motor is equipped with a breaker that may 
stop motor operation temporarily to prevent an 
overload. Wiper operation will return to normal within a 
few minutes, once the circuit has returned to normal.

If the wipers stop operating due to any obstacle such as 
the build-up of snow, park the vehicle in a safe place.

Rotate the wiper switch to OFF, and set the power 
mode to ACCESSORY or VEHICLE OFF (LOCK), then 
remove the obstacle.

Intermittent Time 
Adjustment Ring

MIST

INT: Low speed with 
intermittent

OFF

LO: Low speed wipe
HI: High speed wipe

Pull to 
use 
washer.

Long delay

Short delay

129

uu

Operating the Switches Around the Steering Wheel

u

Brightness Control

Co
ntrols

Brightness Control

When the parking lights are turned on and the 
power mode is in ON, you can use the 
brightness control knob to adjust instrument 
panel brightness.
Brighten: Turn the knob to the right.
Dim: Turn the knob to the left.

You will hear a beeper when the brightness 
reaches minimum or maximum. The 
intelligent multi-information display (i-MID) 
will return to its original state several seconds 
after you adjust the brightness.

Brightness level indicator

The brightness level is shown on the i-MID 
while you are adjusting it.
As the brightness level increases to the right, 
the instrument panel gets brighter.

1

Brightness Control

Instrument panel brightness varies, depending on 
whether the exterior lights are on or off. The 
instrument panel dims to reduce glare when they are 
on.

Pressing the 

 (Select/Reset) knob or the 


(display/information) button changes to a different 
display.

If you turn the knob to the right until the brightness 
display is up to max, the beeper sounds. This cancels 
the reduced instrument panel brightness when the 
parking lights are on.

The brightness can be set differently for when the 
exterior lights are on, and when they are off.

Control Knob

130

uu

Operating the Switches Around the Steering Wheel

u

Rear Defogger/Heated Door Mirror

*

 Button

Co
ntrols

Rear Defogger/Heated Door Mirror

*

 Button

Press the rear defogger and heated door 
mirror button to defog the rear window and 
mirrors when the power mode is in ON.

The rear defogger and heated door mirrors 
automatically switch off after 10-30 minutes 
depending on the outside temperature.
However, if the outside temperature is 32°F 
(0°C) or below, they do not automatically 
switch off.

1

Rear Defogger/Heated Door Mirror

*

 Button

NOTICE

When cleaning the inside of the rear window, be 
careful not to damage the heating wires.
It is critical to wipe the window from side to side 
along the defogger heating wires.

This system consumes a lot of power, so turn it off 
when the window has been defogged.
Also, do not use the system for a long period when 
the engine is idling. This may weaken the 12 volt 
battery, making it difficult to start the engine.

* Not available on all models

131

uu

Operating the Switches Around the Steering Wheel

u

Adjusting the Steering Wheel

Co
ntrols

Adjusting the Steering Wheel

The steering wheel height and distance from your body can be adjusted so that you 
can comfortably grip the steering wheel in an appropriate driving posture.

1. Pull the steering wheel adjustment lever up.

u

The steering wheel adjustment lever is 
under the steering column.

2. Move the steering wheel up or down, and 

in or out.

u

Make sure you can see the instrument 
panel gauges and indicators.

3. Push the steering wheel adjustment lever 

down to lock the steering wheel in position.

u

After adjusting the position, make sure 
you have securely locked the steering 
wheel in place by trying to move it up, 
down, in, and out.

1

Adjusting the Steering Wheel

Make any steering wheel adjustments before you 
start driving.

3

WARNING

Adjusting the steering wheel position while 
driving may cause you to lose control of the 
vehicle and be seriously injured in a crash.

Adjust the steering wheel only when the 
vehicle is stopped.

To adjust

To lock

Lever

132

Co
ntrols

Adjusting the Mirrors

Interior Rearview Mirror

Adjust the angle of the rearview mirror when you are sitting in the correct driving 
position.

Flip the tab to switch the position.
The night position will help to reduce the glare 
from headlights behind you when driving 
after dark.

Power Door Mirrors

You can adjust the door mirrors when the 
power mode is in ON.

Mirror position adjustment

L/R selector switch: Select the left or right 
mirror. After adjusting the mirror, return the 
switch to the center position.
Mirror position adjustment switch: Press 
the switch left, right, up, or down to move the 
mirror.

Rearview Mirror with Day and Night Positions

1

Adjusting the Mirrors

Keep the inside and outside mirrors clean and 
adjusted for best visibility.

Adjust the mirrors before you start driving.

Adjusting the Seat Positions P. 134

Tab

Up

Down

Night Position

Day time 
Position

Selector 
Switch

Adjustment 
Switch

133

uu

Adjusting the Mirrors

u

Power Door Mirrors

Co
ntrols

The driver side door mirror has outer and inner 
segments.
The outer segment is slightly curved to provide 
a wider angle view than a standard flat mirror. 
This wider view may help you check areas that 
are not visible using a standard door mirror.

Expanded View Driver’s Mirror

1

Expanded View Driver’s Mirror

Objects visible in the outer segment of the driver side 
door mirror appear smaller than objects in the rest of 
the mirror. But in fact, they are closer than they 
appear.

Do not rely on your mirrors. Always look to the side 
and behind your vehicle before changing lanes.

Inner Segment

Outer Segment

134

Co
ntrols

Adjusting the Seats

Adjusting the Seat Positions

Adjust the driver’s seat as far back as possible 
while allowing you to maintain full control of 
the vehicle. You should be able to sit upright, 
well back in the seat and be able to 
adequately press the pedals without leaning 
forward, and grip the steering wheel 
comfortably. The passenger’s seat should be 
adjusted in a similar manner, so that it is as far 
back from the front airbag in the dashboard 
as possible.

1

Adjusting the Seats

The National Highway Traffic Safety Administration 
and Transport Canada recommend that drivers allow 
at least 10 inches (25 cm) between the center of the 
steering wheel and the chest.

Always make seat adjustments before driving.

Once a seat is adjusted correctly, rock it back and 
forth to make sure it is locked in position.

3

WARNING

Sitting too close to a front airbag can result 
in serious injury or death if the front 
airbags inflate.

Always sit as far back from the front 
airbags as possible while maintaining 
control of the vehicle.

Move back.

Allow sufficient 
space.

Horizontal Position 
Adjustment
Pull up on the bar to move the 
seat, then release the bar.

Height Adjustment
(Driver side only)
Pull up or push down the lever 
to raise or lower the seat.

Seat-back Angle 
Adjustment
Pull up the lever to 
change the angle.

Driver’s seat is shown.

Continued

135

uu

Adjusting the Seats

u

Adjusting the Seat Positions

Co
ntrols

Adjust the driver’s seat-back to a comfortable, 
upright position, leaving ample space 
between your chest and the airbag cover in 
the center of the steering wheel.

The front seat passenger should also adjust 
their seat-back to a comfortable, upright 
position.

Reclining a seat-back so that the shoulder part of the belt no longer rests against the 
occupant’s chest reduces the protective capability of the belt. It also increases the 
chance of sliding under the belt in a crash and being seriously injured. The farther a 
seat-back is reclined, the greater the risk of injury.

Adjusting the Seat-Backs

1

Adjusting the Seat-Backs

Do not put a cushion, or other object, between the 
seat-back and your back.

Doing so may interfere with proper seat belt or airbag 
operation.

If you cannot get far enough away from the steering 
wheel and still reach the controls, we recommend 
that you investigate whether some type of adaptive 
equipment may help.

3

WARNING

Reclining the seat-back too far can result in 
serious injury or death in a crash.

Adjust the seat-back to an upright position, 
and sit well back in the seat.

uu

Adjusting the Seats

u

Adjusting the Seat Positions

136

Co
ntrols

Your vehicle is equipped with head restraints 
in all seating positions.

Head restraints are most effective for 
protection against whiplash and other rear-
impact crash injuries when the center of the 
back of the occupant’s head rests against the 
center of the restraint. The tops of the 
occupant’s ears should be level with the 
center height of the restraint.

Adjusting the front head restraint positions

To raise the head restraint: Pull it upward.
To lower the head restraint: Push it down 
while pressing the release button.

Adjusting the Head Restraints

1

Adjusting the Head Restraints

For the head restraint system to work properly:

Do not hang any items on the head restraints, or 
from the restraint legs.

Do not place any objects between an occupant and 
the seat-back.

Install each restraint in its proper location.

3

WARNING

Improperly positioning head restraints 
reduces their effectiveness and increases 
the likelihood of serious injury in a crash.

Make sure head restraints are in place and 
positioned properly before driving.

Position head in the center 
of the head restraint.

Continued

137

uu

Adjusting the Seats

u

Adjusting the Seat Positions

Co
ntrols

A passenger sitting in a back seating position 
should adjust the height of their head restraint 
to an appropriate position before the vehicle 
begins moving.
To raise the head restraint:
Pull it upward.
To lower the head restraint:
Push it down while pressing the release 
button.

Head restraints can be removed for cleaning or repair.

To remove a head restraint:
Pull the restraint up as far as it will go. Then push the release button, and pull the 
restraint up and out.

To reinstall a head restraint:
Insert the legs back in place, then adjust the head restraint to an appropriate height 
while pressing the release button. Pull up on the restraint to make sure it is locked 
in position.

Changing the Rear Seat Head Restraint Positions

Removing and Reinstalling the Head Restraints

1

Removing and Reinstalling the Head Restraints

3

WARNING

Failure to reinstall, or correctly reinstall, the 
head restraints can result in severe injury 
during a crash.

Always replace the head restraints before 
driving.

uu

Adjusting the Seats

u

Armrest

138

Co
ntrols

After all occupants have adjusted their seats and head restraints, and put on their 
seat belts, it is very important that they continue to sit upright, well back in their 
seats, with their feet on the floor, until the vehicle is safely parked and the engine is 
off.

Sitting improperly can increase the chance of injury during a crash. For example, if 
an occupant slouches, lies down, turns sideways, sits forward, leans forward or 
sideways, or puts one or both feet up, the chance of injury during a crash is greatly 
increased.

In addition, an occupant who is out of position in the front seat can be seriously or 
fatally injured in a crash by striking interior parts of the vehicle or being struck by an 
inflating front airbag.

Armrest

The console lid can be used as an armrest.
To adjust:
Slide the armrest to a desired position.

Maintain a Proper Sitting Position

Using the Front Seat Armrest

1

Maintain a Proper Sitting Position

3

WARNING

Sitting improperly or out of position can 
result in serious injury or death in a crash.

Always sit upright, well back in the seat, 
with your feet on the floor.

139

Co
ntrols

Interior Lights/Interior Convenience Items

Interior Lights

ON

The interior light comes on regardless of 
whether the doors are open or closed.

Door activated

The interior light comes on in the following 
situations:
• When any of the doors are opened.
• You unlock the driver’s door.
• When the power mode is set to VEHICLE 

OFF (LOCK).

OFF

The interior light remains off regardless of 
whether the doors are open or closed.

The map lights can be turned on and off by 
pressing the lenses.

Interior Light Switch

1

Interior Light Switch

In the door activated position, the interior light fades 
out and goes off about 30 seconds after the doors 
are closed.
The light goes off after 30 seconds in the following 
situations:

When you unlock the driver’s door but do not open 
it.

When the power mode is set to VEHICLE OFF 
(LOCK).

You can change the interior light dimming time.

Customized Features P. 93

The interior light goes off immediately in the 
following situations:

When you lock the driver’s door.

When you close the driver’s door in ACCESSORY 
mode.

When you set the power mode to ON.

If you leave any doors open, the interior lights go off 
after about 15 minutes.

Door Activated Position

On

Off

Map Lights

140

uu

Interior Lights/Interior Convenience Items

u

Interior Convenience Items

Co
ntrols

Interior Convenience Items

Pull the handle to open the glove box.

Pull the handle to open the console 
compartment.

Glove Box

1

Glove Box

3

WARNING

An open glove box can cause serious injury 
to your passenger in a crash, even if the 
passenger is wearing the seat belt.

Always keep the glove box closed while 
driving.

Handle

Glove Box

Console Compartment

Continued

141

uu

Interior Lights/Interior Convenience Items

u

Interior Convenience Items

Co
ntrols

Front seat beverage holders

Press on the upper edge to open the pocket.

Beverage Holders

1

Beverage Holders

NOTICE

Spilled liquids damage the upholstery, carpeting, and 
electrical components in the interior.

Be careful when you are using the beverage holders. 
Hot liquid can scald you.

Center Pocket

uu

Interior Lights/Interior Convenience Items

u

Interior Convenience Items

142

Co
ntrols

The accessory power socket can be used when the power mode is in ACCESSORY or 
ON.

Open the cover to use it.

There is a coat hook on the rear left grab 
handle. Pull it down to use it.

Accessory Power Socket

1

Accessory Power Socket

NOTICE

Do not insert an automotive type cigarette lighter 
element.
This can overheat the power socket.

The accessory power socket is designed to supply 
power for 12 volt DC accessories that are rated 180 
watts (15 amps) or less.

To prevent battery drain, only use the power socket 
with the engine running.

NOTICE

Do not operate the temporary tire repair kit 
compressor for more than 15 minutes. The accessory 
power socket and compressor can overheat and 
become permanently damaged.

Coat Hook

1

Coat Hook

The coat hook is not designed for large or heavy 
items.

143

uu

Interior Lights/Interior Convenience Items

u

Interior Convenience Items

Co
ntrols

The power mode must be in ON to use the 
seat heaters. The HI setting heats the seats 
faster than the LO setting.

While in HI, the heater cycles on and off.

u

The appropriate indicator will be on 
while the seat heater is on. Briefly press 
the button on the opposite side to turn 
the heater off. The indicator will be off. 
When a comfortable temperature is 
reached, select LO to keep the seat 
warm.

Seat Heaters

*

1

Seat Heaters

*

Do not use the seat heaters even in LO when the 
engine is off. Under such conditions, the battery may 
be weakened, making the engine difficult to start.

In the LO setting, the heater runs continuously and 
does not automatically turn off.

3

WARNING

Heat induced burns are possible when 
using seat heaters.

Persons with a diminished ability to sense 
temperature (e.g., persons with diabetes, 
lower-limb nerve damage, or paralysis) or 
with sensitive skin should not use seat 
heaters.

* Not available on all models


Content   ..  7  8  9  10   ..