Honda Accord Coupe (2017 year). Instruction - part 35


  Index      Honda     Honda Accord Coupe - instruction 2017 year in english


Search            


Content   ..  33  34  35  36   ..


Honda Accord Coupe (2017 year). Instruction - part 35


544

uu

Checking and Maintaining Tires

u

Tire Rotation

Main

tenan

ce

Tire Rotation

Rotating tires according to the maintenance messages on the information display

*

/

multi-information display

*

 helps to distribute wear more evenly and increase tire life.

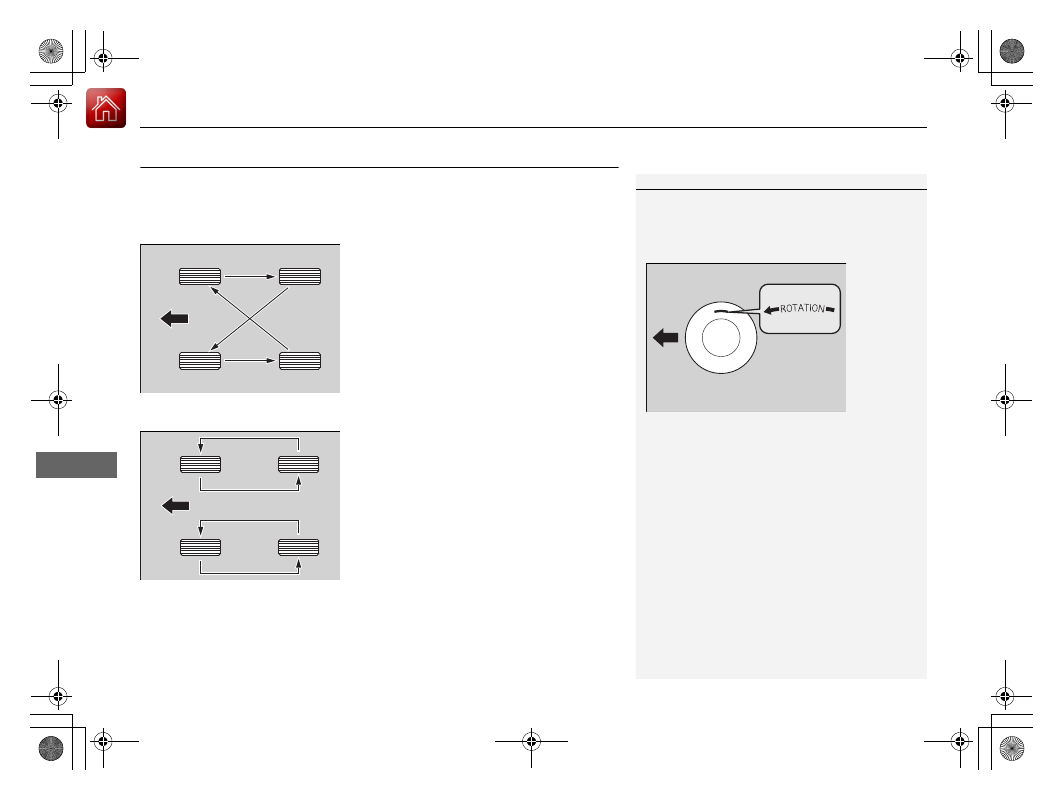
Tires without rotation marks

Rotate the tires as shown here.

Tires with rotation marks

Rotate the tires as shown here.

1

Tire Rotation

Tires with directional tread patterns should only be 
rotated front to back (not from one side to the other).
Directional tires should be mounted with the rotation 
indication mark facing forward, as shown below.

Whenever tires are rotated, you must calibrate the 
TPMS.

TPMS Calibration P. 475

FRONT

Direction Mark

Front

Front

* Not available on all models

545

uu

Checking and Maintaining Tires

u

Winter Tires

Main

tenan

ce

Winter Tires

If driving on snowy or frozen roads, mount all season marked M+S tires, snow tires, 
or tire chains; reduce speed; and maintain sufficient distance between vehicles when 
driving.

Be particularly careful when operating the steering wheel or brakes to prevent 
skidding.

Use tire chains, snow tires, or all season tires when necessary or according to the 
law.

When mounting, refer to the following points.

For winter tires:
• Select the size and load ranges that are the same as the original tires.
• Mount the tires to all four wheels.
For tire chains:
• Install them on the front tires only.
• Because your vehicle has limited tire clearance, we strongly recommend using the 

chains listed below:

• Follow the chain manufacturer’s instruction when installing. Mount them as 

tightly as you can.

• Check that the chains do not touch the brake lines or suspension.
• Drive slowly.

Cable-type: SCC Radial Chain SC1034

Cable-type: SCC Radial Chain SC1040

1

Winter Tires

NOTICE

Traction devices that are the wrong size or improperly 
installed can damage your vehicle’s brake lines, 
suspension, body, and wheels. Stop driving if they are 
hitting any part of the vehicle.

When tire chains are mounted, follow the chain 
manufacturer's instructions regarding vehicle 
operational limits.

If your vehicle is equipped with summer tires, be 
aware that these tires are not designed for winter 
driving conditions. For more information, contact a 
dealer.

3

WARNING

Using the wrong chains, or not properly 
installing chains, can damage the brake 
lines and cause a crash in which you can be 
seriously injured or killed.

Follow all instructions in this owner’s 
manual regarding the selection and use of 
tire chains.

Models with 215/55R17 tires

Models with 235/45R18 tires

Models with 235/40R19 tires

546

Main

tenan

ce

Battery

Checking the Battery

Check the battery terminals for corrosion 
monthly.

The battery condition is being monitored by 
the sensor on the negative terminal. If there is 
a problem with the sensor, the warning 
message on the information display

*

/multi-

information display

*

 will let you know. Have 

your vehicle checked by a dealer.

If your vehicle's battery is disconnected or goes dead:
• The audio system is disabled.

Reactivating the audio system P. 189

• The clock resets.

Clock P. 116

• The navigation system

*

 is disabled.

Refer to the Navigation System Manual

Charging the Battery

Disconnect both battery cables to prevent damaging your vehicle's electrical system. 
Always disconnect the negative (–) cable first, and reconnect it last.

1

Battery

WARNING:  Battery post, terminals, 
and related accessories contain lead 
and lead compounds.
Wash your hands after handling.

When you find corrosion, clean the battery terminals 
by applying a baking powder and water solution. 
Clean the terminals with a damp towel. Cloth/towel 
dry the battery. Coat the terminals with grease to 
help prevent future corrosion.

When replacing the battery, the replacement must be 
of the same specifications.
Please consult a dealer for more information.

3

WARNING

The battery gives off explosive hydrogen 
gas during normal operation.

A spark or flame can cause the battery to 
explode with enough force to kill or 
seriously hurt you.

When conducting any battery 
maintenance, wear protective clothing and 
a face shield, or have a skilled technician do 
it.

* Not available on all models

547

Continued

Main

tenan

ce

Remote Transmitter Care

Replacing the Button Battery

If the indicator does not come on when the button is pressed, replace the battery.

1. Unscrew the cover with a small Phillips-

head screwdriver.

2. Open the remote transmitter.

u

Wrap the small flat-tip screwdriver with a 
cloth to prevent scratching the 
transmitter.

3. Remove the button battery with the small 

flat-tip screwdriver.

4. Make sure to replace the battery with the 

correct polarity.

Master Keys with Remote Transmitter

*

1

Replacing the Button Battery

NOTICE

An improperly disposed of battery can damage the 
environment. Always confirm local regulations for 
battery disposal.

Replacement batteries are commercially available or 
at a dealer.

Screw

Battery type: CR1620

Battery

* Not available on all models

548

uu

Remote Transmitter Care

u

Replacing the Button Battery

Main

tenan

ce

1. Remove the built-in key.

2. Remove the upper half of the cover by 

carefully prying on the edge with a coin.

u

Remove carefully to avoid losing the 
buttons.

u

Wrap a coin with a cloth to prevent 
scratching the smart entry remote.

3. Make sure to replace the battery with the 

correct polarity.

Smart Entry Remote

*

Battery type: CR2032

Battery

* Not available on all models

549

Main

tenan

ce

Climate Control System Maintenance

Dust and Pollen Filter

The climate control system is equipped with a dust and pollen filter that collects 
pollen, dust, and other debris in the air. The Maintenance Minder

TM

 messages will let 

you know when to replace the filter.

We recommend that you replace the dust and pollen filter sooner when using your 
vehicle in areas with high concentrations of dust.

1

Dust and Pollen Filter

If the airflow from the climate control system 
deteriorates noticeably, and the windows fog up 
easily, the filter may need to be replaced. Please 
contact a dealer for replacement.

550

Main

tenan

ce

Cleaning

Interior Care

Use a damp cloth with a mixture of mild detergent and warm water to remove dirt. 
Use a clean cloth to remove detergent residue.

Use a soft brush with a mixture of mild soap and warm water to clean the seat belts. 
Let the belts air dry. Wipe the openings of the seat belt anchors using a clean cloth.

Wipe using a glass cleaner.

Cleaning Seat Belts

1

Interior Care

Do not spill liquids inside the vehicle.
Electrical devices and systems may malfunction if 
liquids are splashed on them.

Do not use silicone based sprays on electrical devices 
such as audio devices and switches.
Doing so may cause the items to malfunction or a fire 
inside the vehicle.
If a silicone based spray is inadvertently used on 
electrical devices, consult a dealer.

Depending on their composition, chemicals and 
liquid aromatics may cause discoloration, wrinkles, 
and cracking to resin-based parts and textiles.
Do not use alkali solvents or organic solvents such as 
benzene or gasoline.

After using chemicals, make sure to gently wipe them 
away using a dry cloth.
Do not place used cloths on top of resin based parts 
or textiles for long periods of time without washing.

Opening

Cleaning the Window

1

Cleaning the Window

Wires are mounted to the inside of the rear window. 
Wipe along the same direction as the wires with a 
soft cloth so as not to damage them.

551

uu

Cleaning

u

Interior Care

Main

tenan

ce

The floor mats for the driver, and the rear 
passenger on the passenger’s side hook over 
the floor anchors, which keep the mats from 
sliding forward. To remove a mat for cleaning, 
turn the anchor knobs to the unlock position. 
When reinstalling the mat after cleaning, turn 
the knobs to the lock position.

Do not put additional floor mats on top of 
the anchored mat.

Vacuum dirt and dust from the leather frequently. Pay close attention to the pleats 
and seams. Clean the leather with a soft cloth dampened with a 90% water and 
10% neutral soap solution. Then buff it with a clean, dry cloth. Remove any dust or 
dirt on leather surfaces immediately.

Floor Mats

1

Floor Mats

If you use any floor mats that were not originally 
provided with your vehicle, make sure they are 
designed for your specific vehicle, fit correctly, and 
are securely anchored by the floor anchors.
Position the rear seat floor mats properly. If they are 
not properly positioned, the floor mats can interfere 
with the front seat functions.

Lock

Unlock

Lock

Unlock

Front (driver side)

Rear (passenger side)

Maintaining Genuine Leather

*

* Not available on all models

552

uu

Cleaning

u

Exterior Care

Main

tenan

ce

Exterior Care

Dust off the vehicle body after you drive.
Regularly inspect your vehicle for scratches on painted surfaces. A scratch on a 
painted surface can result in body rust. If you find a scratch, promptly repair it.

Wash the vehicle regularly. Wash more frequently when driving in the following 
conditions:
• If driving on roads with road salt.
• If driving in coastal areas.
• If tar, soot, bird droppings, insects, or tree sap are stuck to painted surfaces.

• Make sure to follow the instructions indicated on the automated car wash.
• Fold in the door mirrors.
• Turn off the automatic intermittent wipers

*

.

• Keep sufficient distance between the cleaning nozzle and the vehicle body.
• Take particular care around the windows. Standing too close may cause water to 

enter the vehicle interior. Do not spray water into the engine compartment.

• Do not spray high pressure water directly into the engine compartment. Instead, 

use low pressure water and a mild detergent.

Washing the Vehicle

Using an Automated Car Wash

Using High Pressure Cleaners

1

Washing the Vehicle

Do not spray water into the air intake vents. It can 
cause a malfunction.

Air Intake Vents

* Not available on all models

Continued

553

uu

Cleaning

u

Exterior Care

Main

tenan

ce

A good coat of automotive body wax helps protect your vehicle’s paint from the 
elements. Wax will wear off over time and expose your vehicle’s paint to the 
elements, so reapply as necessary.

If you get gasoline, oil, engine coolant, or battery fluid on resin coated parts, they 
may be stained or the coating may peel. Promptly wipe it away using a soft cloth and 
clean water.

Wipe using a glass cleaner.

Aluminum is susceptible to deterioration caused by salt and other road 
contaminants. Use a sponge and mild detergent to wipe away promptly.
Be careful not to use harsh chemicals (including some commercial wheel cleaners) or 
a stiff brush. They can damage the clear coat of the aluminum alloy wheels that 
helps keep the aluminum from corroding and tarnishing.

Applying Wax

Maintaining the Bumpers and Other Resin Coated Parts

Cleaning the Window

Maintaining Aluminum Wheels

1

Applying Wax

NOTICE

Chemical solvents and strong cleaners can damage 
the paint, metal, and plastic on your vehicle. Wipe 
away spills immediately.

1

Maintaining the Bumpers and Other Resin Coated Parts

Ask a dealer about the correct coating material when 
you want to repair the painted surface of the parts 
made of resin.

554

uu

Cleaning

u

Exterior Care

Main

tenan

ce

The inside lenses of exterior lights (headlights, brake lights, etc.) may fog temporarily 
if you have driven in the rain, or after the vehicle has been run through a car wash.
Dew condensation also may build up inside the lenses when there is a significant 
enough difference between the ambient and inside lens temperatures (similar to 
vehicle windows fogging up in rainy conditions). These conditions are natural 
processes, not structural design problems in the exterior lights.

Lens design characteristics may result in moisture developing on the light lens frame 
surfaces. This also is not a malfunction.

However, if you see large amounts of water accumulation, or large water drops 
building up inside the lenses, have your vehicle inspected by a dealer.

Fogged Exterior Light Lenses

556

Han

d

lin
g the U

n

expected

Tools

Types of Tools

1

Types of Tools

The tools are stored in the trunk.

Wheel Nut Wrench/

Jack Handle

Jack

Jack Handle Bar

Tool Case

557

Continued

Han

d

lin
g the U

n

expected

If a Tire Goes Flat

Changing a Flat Tire

If a tire goes flat while driving, grasp the steering wheel firmly, and brake gradually 
to reduce speed. Then, stop in a safe place. Replace the flat tire with a compact 
spare tire. Go to a dealer as soon as possible to have the full-size tire repaired or 
replaced.

1. Park the vehicle on firm, level, and non-slippery surface, and apply the parking 

brake.

2. Move the shift lever to 

(

P.

2. Move the shift lever to 

(

R.

3. Turn on the hazard warning lights and turn the ignition switch to LOCK 

(

0

*1

.

*1: Models with the smart entry system have an ENGINE START/STOP button instead of an 
ignition switch.

1

Changing a Flat Tire

Follow these compact spare precautions:
Periodically check the tire pressure of the compact 
spare. It should be set to the specified pressure. 
Specified Pressure: 60 psi (420 kPa, 4.2 kgf/cm

2

)

When driving with the compact spare tire, keep the 
vehicle speed under 50 mph (80 km/h). Replace with 
a full-size tire as soon as possible.

The compact spare tire and wheel in your vehicle are 
specifically for this model. Do not use them with 
another vehicle. Do not use another type of compact 
spare tire or wheel with your vehicle.

Do not mount tire chains on a compact spare tire. 
If a chain-mounted front tire goes flat, remove one of 
the full-size rear tires and replace it with the compact 
spare tire. Remove the flat front tire and replace it 
with the full-size tire that was removed from the rear. 
Mount the tire chains on the front tire.

Do not use the jack if it doesn’t work properly.
Call your dealer or a professional towing service.

Automatic transmission/CVT models

Manual transmission models

All models

558

uu

If a Tire Goes Flat

u

Changing a Flat Tire

Han

d

lin
g the U

n

expected

1. Open the trunk floor lid.

2. Take the tool case out of the trunk. Take 

the jack and wheel nut wrench out of the 
tool case.

3. Unscrew the wing bolt, and remove the 

spacer cone. Then, remove the spare tire.

4. Place a wheel block or rock in front and rear 

of the wheel diagonal to the flat tire.

Getting Ready to Replace the Flat Tire

Tool Case

Spare Tire

Wheel 
Blocks

The tire to be replaced.

559

uu

If a Tire Goes Flat

u

Changing a Flat Tire

Continued

Han

d

lin
g the U

n

expected

5. Place the compact spare tire (wheel side up) 

under the vehicle body, near the tire that 
needs to be replaced.

6. Loosen each wheel nut about one turn 

using the wheel nut wrench.

uu

If a Tire Goes Flat

u

Changing a Flat Tire

560

Han

d

lin
g the U

n

expected

1. Place the jack under the jacking point 

closest to the tire to be changed.

2. Turn the end bracket clockwise as shown in 

the image until the top of the jack contacts 
the jacking point.

u

Make sure that the jacking point tab is 
resting in the jack notch.

3. Raise the vehicle, using the jack handle bar 

and the jack handle, until the tire is off the 
ground.

How to Set Up the Jack

1

How to Set Up the Jack

Do not use the jack with people or luggage in the 
vehicle.

Use the jack provided in your vehicle.
Other jacks may not support the weight (“load”) or 
may not fit the jacking point.

The following instructions must be followed to use 
the jack safely:

Do not use while the engine is running.

Use only where the ground is firm and level.

Use only at the jacking points.

Do not get in the vehicle while using the jack.

Do not put anything on top of or underneath the 
jack.

3

WARNING

The vehicle can easily roll off the jack, 
seriously injuring anyone underneath.

Follow the directions for changing a tire 
exactly, and never get under the vehicle 
when it is supported only by the jack.

Jacking Points

Jacking Point

Jack 
Handle 
Bar

Wheel Nut

 Wrench as Jack Handle


Content   ..  33  34  35  36   ..