Honda Accord Coupe (2017 year). Instruction - part 32


  Index      Honda     Honda Accord Coupe - instruction 2017 year in english


Search            


Content   ..  30  31  32  33   ..


Honda Accord Coupe (2017 year). Instruction - part 32


496

Driving

Multi-View Rear Camera

About Your Multi-View Rear Camera

The audio/information screen can display your vehicle’s rear view. The display 
automatically changes to the rear view when the shift lever is moved to 

(

R.

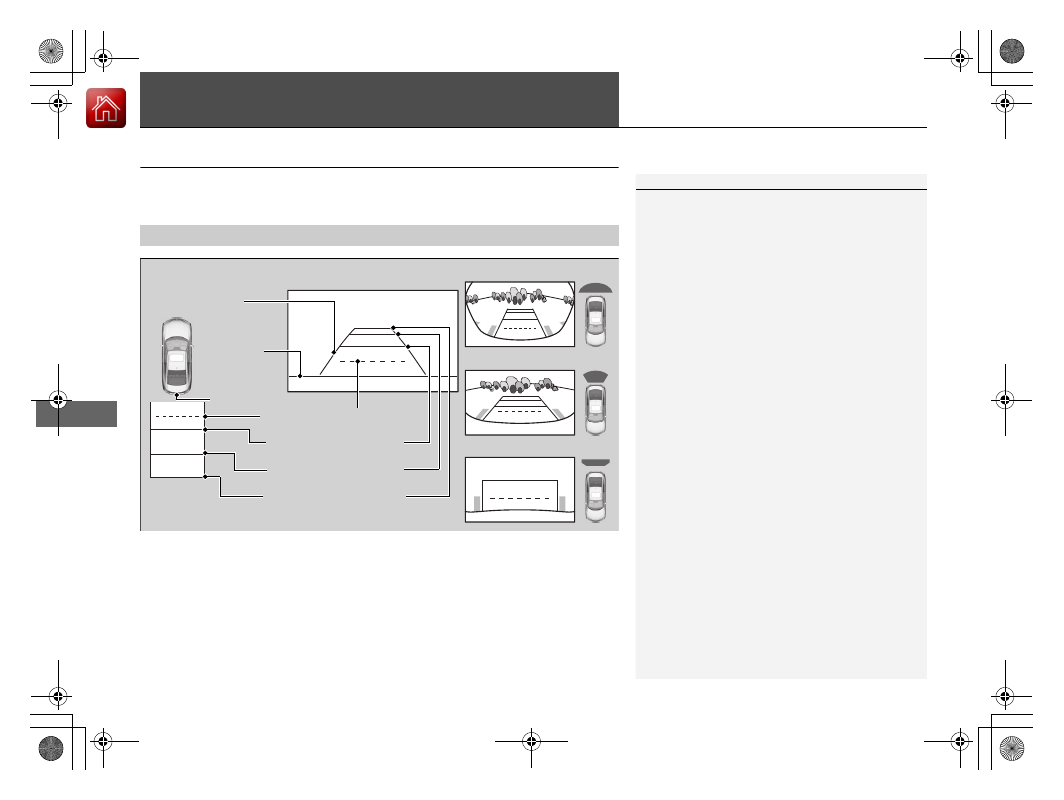
You can view three different camera angles on the rearview display. Press the 
selector knob or the interface dial to switch the angle.

If the last used viewing mode is Wide or Normal, the same mode is selected the next 
time you shift into 

(

R. If Top View was last used, Wide mode is selected. If you shift 

out of 

(

R in Top View mode, then shift into 

(

R again 10 seconds later, Wide mode 

is selected.

Multi-View Rear Camera Display Area

1

About Your Multi-View Rear Camera

The rear camera view is restricted. You cannot see 
the corner ends of the bumper or what is underneath 
the bumper. Its unique lens also makes objects 
appear closer or farther than they actually are.

Visually confirm that it is safe to drive before backing 
up. Certain conditions (such as weather, lighting, and 
high temperatures) may also restrict the rear view. Do 
not rely on the rearview display which does not give 
you all information about conditions at the back of 
your vehicle.

If the camera lens is covered with dirt or moisture, 
use a soft, moist cloth to keep the lens clean and free 
of debris.

You can change the Fixed Guideline and Dynamic 
Guideline
 settings.

Customized Features P. 298, 316

Fixed Guideline
On
: Guidelines appear when you shift into 

(

R.

Off: Guidelines do not appear.
Dynamic Guideline
On
: Guidelines move according to the steering wheel 
direction.
Off: Guidelines do not move.

Top Down View Mode

Normal View Mode

Wide View Mode

Guidelines

Bumper

Camera

Approx. 118 inches (3 m)

Approx. 79 inches (2 m)

Approx. 39 inches (1 m)

Approx. 20 inches (50 cm)

497

Driving

Refueling

Fuel Information

Fuel recommendation

Use of a lower octane gasoline can cause a persistent, heavy metallic knocking noise 
that can lead to engine damage.

Top tier detergent gasoline

Because the level of detergency and additives in gasoline vary in the market, Honda 
endorses the use of “TOP TIER Detergent Gasoline” where available to help 
maintain the performance and reliability of your vehicle. TOP TIER Detergent 
Gasoline meets a new gasoline standard jointly established by leading automotive 
manufacturers to meet the needs of today’s advanced engines.

Qualifying gasoline retailers will, in most cases, identify their gasoline as having met 
“TOP TIER Detergent Gasoline” standards at the retail location. This fuel is 
guaranteed to contain the proper level of detergent additives and be free of metallic 
additives. The proper level of detergent additives, and absence of harmful metallic 
additives in gasoline, help avoid build-up of deposits in your engine and emission 
control system. 

For further important fuel-related information for your vehicle, or on information on 
gasoline that does not contain MMT, visiwww.hondacars.com. In Canada, visit 
www.honda.ca for additional information on gasoline. For more information on top 
tier gasoline, visit www.toptiergas.com.

Fuel tank capacity: 17.2 US gal (65 liters)

Unleaded gasoline, pump octane number 87 or higher

1

Fuel Information

NOTICE

We recommend quality gasoline containing 
detergent additives that help prevent fuel system and 
engine deposits. In addition, in order to maintain 
good performance, fuel economy, and emissions 
control, we strongly recommend the use of gasoline 
that does NOT contain harmful manganese-based 
fuel additives such as MMT, if such gasoline is 
available.

Use of gasoline with these additives may adversely 
affect performance, and cause the malfunction 
indicator lamp on your instrument panel to come on. 
If this happens, contact a dealer for service.
Some gasoline today is blended with oxygenates such 
as ethanol. Your vehicle is designed to operate on 
oxygenated gasoline containing up to 15% ethanol 
by volume. Do not use gasoline containing methanol. 
If you notice any undesirable operating symptoms, try 
another service station or switch to another brand of 
gasoline.

498

uu

Refueling

u

How to Refuel

Driving

How to Refuel

1. Stop your vehicle with the service station 

pump on the left side of the vehicle in the 
rear.

2. Turn off the engine.
3. Push on the fuel fill door release handle at 

the foot of the driver’s seat.

u

The fuel fill door opens.

4. Remove the fuel fill cap slowly. If you hear a 

release of air, wait until this stops, then turn 
the knob slowly to open the fuel fill cap.

5. Place the fuel fill cap in the holder.
6. Insert the filler nozzle fully.

u

When the tank is full, the fuel nozzle will 
click off automatically. This leaves space 
in the fuel tank in case the fuel expands 
with a change in the temperature.

7. After filling, replace the fuel fill cap, 

tightening it until you hear it click at least 
once.

u

Shut the fuel fill door by hand.

1

How to Refuel

The filler nozzle automatically stops to leave space in 
the fuel tank so that fuel does not overflow as a result 
of changes in air temperature.

If the fuel nozzle keeps turning off when the tank is 
not full, there may be a problem with the pump's fuel 
vapor recovery system. Try filling at another pump. If 
this does not fix the problem, consult a dealer.

Do not continue to add fuel after the nozzle has 
automatically stopped. Additional fuel can exceed 
the full tank capacity.

3

WARNING

Gasoline is highly flammable and explosive. 
You can be burned or seriously injured 
when handling fuel.

• Stop the engine, and keep heat, sparks, 

and flame away.

• Handle fuel only outdoors.
• Wipe up spills immediately.

Push

Cap

Cap

Holder

499

Driving

Fuel Economy

Improving Fuel Economy

Fuel economy depends on several conditions, including driving conditions, your 
driving habits, the condition of your vehicle, and loading. Depending on these and 
other conditions, you may or may not achieve the rated fuel economy of this vehicle.

You can optimize your fuel economy with proper maintenance of your vehicle. 
Always maintain your vehicle in accordance with the messages displayed on the 
information display

*

/multi-information display

*

.

• Use the recommended viscosity engine oil, displaying the API Certification Seal.
• Maintain the specified tire pressure.
• Do not load the vehicle with excess cargo.
• Keep your vehicle clean. A buildup of snow or mud on your vehicle's underside 

adds weight and increases wind resistance.

Maintenance and Fuel Economy

1

Improving Fuel Economy

Direct calculation is the recommended method to 
determine actual fuel consumed while driving.

In Canada, posted fuel economy numbers are 
established following a simulated test. For more 
information on how this test is performed, please visit 
http://oee.nrcan.gc.ca/

Miles driven

Gallons of 

fuel

Miles per 

Gallon

100

Liter

Kilometers

L per 100 km

* Not available on all models

500

Driving

Accessories and Modifications

Accessories

When installing accessories, check the following:
• Do not install accessories on the windshield. They can obstruct your view and 

delay your reaction to driving conditions.

• Do not install accessories over areas marked SRS AIRBAG, on the sides or backs 

of the front seats, on front or side pillars, or near the side windows.
Accessories installed in these areas may interfere with proper operation of the 
vehicle’s airbags or may be propelled into you or another occupant if the airbags 
deploy.

• Be sure electronic accessories do not overload electrical circuits or interfere with 

proper operation of your vehicle.

Fuses P. 576

• Before installing any electronic accessory, have the installer contact a dealer for 

assistance. If possible, have a dealer inspect the final installation.

Modifications

Do not modify your vehicle or use non-Honda components that can affect its 
handling, stability, and reliability.

Overall vehicle performance can be affected. Always make sure all equipment is 
properly installed and maintained, and that it meets federal, state, province, 
territory, and local regulations.

1

Accessories and Modifications

Honda Genuine accessories are recommended to 
ensure proper operation on your vehicle.

3

WARNING

Improper accessories or modifications can 
affect your vehicle's handling, stability, and 
performance, and cause a crash in which 
you can be seriously hurt or killed.

Follow all instructions in this owner's 
manual regarding accessories and 
modifications.

501

Maintenance

This chapter discusses basic maintenance.

Before Performing Maintenance

Inspection and Maintenance ............ 502
Safety When Performing Maintenance .... 503
Parts and Fluids Used in Maintenance 

Service ........................................... 504

Maintenance Minder

TM

..................... 505

Maintenance Under the Hood

Maintenance Items Under the Hood .... 513
Opening the Hood ........................... 515
Recommended Engine Oil ................ 517
Oil Check ......................................... 518
Adding Engine Oil ............................ 520
Changing the Engine Oil and Oil Filter..... 521

Engine Coolant ................................ 523
Transmission Fluid............................ 525
Brake/Clutch Fluid............................ 527
Refilling Window Washer Fluid......... 528

Replacing Light Bulbs ....................... 529

Checking and Maintaining Wiper 

Blades .......................................... 535

Checking and Maintaining Tires

Checking Tires ................................. 537
Tire and Loading Information Label ..... 538
Tire Labeling .................................... 538
DOT Tire Quality Grading (U.S. Vehicles)...... 540
Wear Indicators................................ 542

Tire Service Life................................ 542
Tire and Wheel Replacement ........... 543
Tire Rotation.................................... 544
Winter Tires ..................................... 545

Battery............................................... 546
Remote Transmitter Care

Replacing the Button Battery ........... 547

Climate Control System Maintenance .... 549
Cleaning

Interior Care .................................... 550
Exterior Care.................................... 552

502

Main

tenan

ce

Before Performing Maintenance

Inspection and Maintenance

For your safety, perform all listed inspections and maintenance to keep your vehicle 
in good condition. If you become aware of any abnormality (noise, smell, insufficient 
brake fluid, oil residue on the ground, etc.), have your vehicle inspected by a dealer. 
(Note, however, that service at a dealer is not mandatory to keep your warranties in 
effect.)

Daily inspections

Perform inspections before long distance trips, when washing the vehicle, or when 
refueling.

Periodic inspections

• Check the brake fluid level monthly.

Brake/Clutch Fluid P. 527

• Check the tire pressure monthly. Examine the tread for wear and foreign objects.

Checking and Maintaining Tires P. 537

• Check the operation of the exterior lights monthly.

Replacing Light Bulbs P. 529

• Check the condition of the wiper blades at least every six months.

Checking and Maintaining Wiper Blades P. 535

Types of Inspection and Maintenance

1

Inspection and Maintenance

Maintenance, replacement, or repair of 
emissions control devices and systems may be 
done by any automotive repair establishment or 
individuals using parts that are “certified” to 
EPA standards.

According to state and federal regulations, failure to 
perform maintenance on the maintenance main 
items marked with # will not void your emissions 
warranties. However, all maintenance services should 
be performed in accordance with the intervals 
indicated by the information display

*

/multi-

information display

*

.

Maintenance Service Items P. 507, 511

If you want to perform complex maintenance tasks 
that require more skills and tools, you can purchase a 
subscription to the Service Express website at 
www.techinfo.honda.com.

Authorized Manuals P. 593

If you want to perform maintenance yourself, make 
sure that you have the necessary tools and skills first.
After performing maintenance, update the records in 
the separate maintenance booklet.

U.S. models

* Not available on all models

503

uu

Before Performing Maintenance

u

Safety When Performing Maintenance

Main

tenan

ce

Safety When Performing Maintenance

Some of the most important safety precautions are given here.
However, we cannot warn you of every conceivable hazard that can arise in 
performing maintenance. Only you can decide whether or not you should perform 
a given task.

• To reduce the possibility of fire or explosion, keep cigarettes, sparks, and flames 

away from the battery and all fuel related parts.

• Never leave rags, towels, or other flammable objects under the hood.

u

Heat from the engine and exhaust can ignite them causing a fire.

• To clean parts, use a commercially available degreaser or parts cleaner, not 

gasoline.

• Wear eye protection and protective clothing when working with the battery or 

compressed air.

• Engine exhaust contains carbon monoxide, which is poisonous and can kill you.

u

Operate the engine only when there is sufficient ventilation.

• The vehicle must be in a stationary condition.

u

Make sure your vehicle is parked on level ground, the parking brake is set, and 
the engine is off.

• Be aware that hot parts can burn you.

u

Make sure to let the engine and exhaust system cool thoroughly before 
touching vehicle parts.

• Be aware that moving parts can injure you.

u

Do not start the engine unless instructed, and keep your hands and limbs away 
from moving parts.

Maintenance Safety

Vehicle Safety

1

Safety When Performing Maintenance

3

WARNING

Improperly maintaining this vehicle or 
failing to correct a problem before driving 
can cause a crash in which you can be 
seriously hurt or killed.

Always follow the inspection and 
maintenance recommendations according 
to the schedules in this owner's manual.

3

WARNING

Failure to properly follow maintenance 
instructions and precautions can cause you 
to be seriously hurt or killed.

Always follow the procedures and 
precautions in this owner's manual.

504

uu

Before Performing Maintenance

u

Parts and Fluids Used in Maintenance Service

Main

tenan

ce

Parts and Fluids Used in Maintenance Service

The use of Honda genuine parts and fluids is recommended when maintaining and 
servicing your vehicle. Honda genuine parts are manufactured according to the 
same high quality standards used in Honda vehicles.

505

Continued

Main

tenan

ce

Maintenance Minder

TM

If the engine oil life is less than 15%, you will see the Maintenance Minder messages 
appear on the information display

*

/multi-information display

*

 every time you turn 

the ignition switch to ON 

(

w

*1

. The messages notify you when to change the engine 

oil, or when to bring your vehicle to a dealer for indicated maintenance services.

To Use Maintenance Minder

TM

Maintenance items, which should be serviced at the same time that you replace the 
engine oil, appear on the information display.
You can view them on the engine oil life screen at any time.

1. Turn the ignition switch to ON 

(

w

*1

.

2. Press the 

 (Select/Reset) knob repeatedly 

until the engine oil life appears on the 
information display.

The Maintenance Minder indicator (

) stays 

on in the instrument panel after the engine oil 
life becomes 0%. Have the indicated 
maintenance done by a dealer immediately.

*1: Models with the smart entry system have an ENGINE START/STOP button instead of an 
ignition switch.

Displaying the Maintenance Minder Information

Models with information display

1

Displaying the Maintenance Minder Information

Based on the engine operating conditions, the 
remaining engine oil life is calculated and displayed 
as a percentage.

There is a list of maintenance main and sub items you 
can view on the information display.

Maintenance Service Items P. 507

Displayed Engine Oil 

Life (%)

Calculated Engine Oil 

Life (%)

100

100 to 91

90

90 to 81

80

80 to 71

70

70 to 61

60

60 to 51

50

50 to 41

40

40 to 31

30

30 to 21

20

20 to 16

15

15 to 11

10

10 to 6

5

5 to 1

0

0

* Not available on all models

506

uu

Maintenance Minder

TM

u

To Use Maintenance Minder

TM

Main

tenan

ce

To switch the display, press the 

 (Select/Reset) knob.

Maintenance Minder Messages on the Information Display

Oil Life Display

Explanation

Information

Maintenance Minder Indicator

The engine oil life indicator starts 
to appear along with other due 
soon maintenance item codes 
when the remaining oil life 
becomes 15 percent.

The engine oil is approaching the 
end of its service life.

Starts to come on when the 
remaining engine oil life becomes 
15 percent.
It goes off when the display is 
switched.

The SERVICE message also starts 
to appear along with the engine oil 
life indicator and the maintenance 
item codes.

The engine oil has almost reached 
the end of its service life, and the 
maintenance items should be 
inspected and serviced as soon as 
possible.

The remaining engine oil life has 
passed its service life, and a 
negative distance appears after 
driving over 10 miles (U.S. models) 
or 10 km (Canadian models). The 
negative distance on the display 
blinks.

The engine oil life has passed.
The maintenance items must be 
inspected and serviced 
immediately.

Stays on as a reminder even when 
the display is switched.

507

uu

Maintenance Minder

TM

u

To Use Maintenance Minder

TM

Continued

Main

tenan

ce

Maintenance Service Items

1

Maintenance Service Items

Independent of the Maintenance Minder 
information, replace the brake fluid every 3 years.

Inspect idle speed every 160,000 miles (256,000 
km).

Adjust the valves during services A, B, 1, 2, or 3 if 
they are noisy.

Maintenance Minder 
Message

Maintenance 
Minder Indicator

Sub Items

Main Item

*1: If a message SERVICE does not appear more than 12 months after the display is reset, change the 

engine oil every year.

# : See information on maintenance and emissions warranty.

CODE

Maintenance Main Items

A

Replace engine oil

*1

B

Replace engine oil

*1

 and oil filter

Inspect front and rear brakes/service as necessary

Check parking brake adjustment

Inspect tie rod ends, steering gearbox, and boots

Inspect suspension components

Inspect driveshaft boots

Inspect brake hoses and lines (Including ABS/VSA)

Inspect all fluid levels and condition of fluids

Inspect exhaust system

#

Inspect fuel lines and connections

#

*2: If you drive in dusty conditions, replace the air cleaner element every 15,000 miles (24,000 km).
*3: If you drive primarily in urban areas that have high concentrations of soot in the air from industry and 

from diesel-powered vehicles, replace the dust and pollen filter every 15,000 miles (24,000 km).

*4: Continuously variable transmission (CVT) models
*5: Driving in mountainous areas at very low vehicle speeds or trailer towing results in higher transmission 

temperatures. This requires transmission fluid changes more frequently than recommended by the 
Maintenance Minder. If you regularly drive your vehicle under these conditions, have the transmission 
fluid changed every 25,000 miles (40,000 km).

*6: 6-cylinder models
*7: If you drive regularly in very high temperatures (over 110 °F, 43 °C), in very low temperatures (under 

-20 °F, -29 °C), or tow a trailer, replace every 60,000 miles/100,000 km.

CODE

Maintenance Sub Items

1

Rotate tires

2

Replace air cleaner element

*2

Replace dust and pollen filter

*3

Inspect drive belt

3

Replace transmission fluid

*4,*5

4

Replace spark plugs

Replace timing belt and inspect water pump

*6,*7

Inspect valve clearance

5

Replace engine coolant

uu

Maintenance Minder

TM

u

To Use Maintenance Minder

TM

508

Main

tenan

ce

Reset the maintenance minder information display if you have performed the 
maintenance service.

1. Turn the ignition switch to ON 

(

w

*1

.

2. Display the engine oil life by repeatedly 

pressing the 

 (Select/Reset) knob.

3. Press and hold the 

 knob for ten seconds 

or more.

u

The engine oil life indicator and the 
maintenance item codes blink.

4. Press the 

 knob for five seconds or more.

u

The displayed maintenance items 
disappear, and the engine oil life display 
returns to 100%.

*1: Models with the smart entry system have an ENGINE START/STOP button instead of an 
ignition switch.

Resetting the Display

1

Resetting the Display

NOTICE

Failure to reset the Maintenance Minder

TM

 display 

after a maintenance service results in the system 
showing incorrect maintenance intervals, which can 
lead to serious mechanical problems.

The dealer will reset the Maintenance Minder

TM


display after completing the required maintenance 
service. If someone other than a dealer performs 
maintenance service, reset the Maintenance 
Minder

TM

 display yourself.

You can reset the Maintenance Minder

TM

 display 

using the audio/information screen

*

 or audio/

information touch screen

*

.

Customized Features P. 298, 316

* Not available on all models

509

uu

Maintenance Minder

TM

u

To Use Maintenance Minder

TM

Continued

Main

tenan

ce

To Use Maintenance Minder

TM

Maintenance items, which should be serviced at the same time that you replace the 
engine oil, appear on the multi-information display.
You can view them on the engine oil life screen at any time.
1. Turn the ignition switch to ON 

(

w

*1

.

2. Press the 

 (Information) button repeatedly until the engine oil life appears 

on the multi-information display.

*1: Models with the smart entry system have an ENGINE START/STOP button instead of an 
ignition switch.

Displaying the Maintenance Minder Information

Models with multi-information display

1

Displaying the Maintenance Minder Information

Based on the engine operating conditions, the 
remaining engine oil life is calculated and displayed 
as a percentage.

There is a list of maintenance main and sub items you 
can view on the information display.

Maintenance Service Items P. 511

Displayed Engine Oil 

Life (%)

Calculated Engine Oil 

Life (%)

100

100 to 91

90

90 to 81

80

80 to 71

70

70 to 61

60

60 to 51

50

50 to 41

40

40 to 31

30

30 to 21

20

20 to 16

15

15 to 11

10

10 to 6

5

5 to 1

0

0


Button

Maintenance 
Item Codes

Remaining 
Engine Oil 
Life

510

uu

Maintenance Minder

TM

u

To Use Maintenance Minder

TM

Main

tenan

ce

The system message indicator (

) comes on along with the Maintenance Minder message.

Maintenance Minder Messages on the Multi-Information 
Display

Maintenance Message

Oil Life Display

Explanation

Information

Maintenance Due Soon

15 %

The remaining engine oil life is 15 to 
6 percent. Once you switch the 

display by pressing the 


(Information) button, this message 
will go off.

The engine oil is approaching the end 
of its service life, and the maintenance 
items should be inspected and serviced 
soon.

Maintenance Due Now

5 %

The remaining engine oil life is 5 to 1 

percent. Press the 

 button to 

switch to another display.

The engine oil has almost reached the 
end of its service life, and the 
maintenance items should be inspected 
and serviced as soon as possible.

Maintenance Past Due

Negative Distance

The remaining engine oil life has 
passed its service life, and a negative 
distance appears after driving over 
10 miles (U.S. models) or 10 km 
(Canadian models). Press the 

 button to switch to another 

display.

The engine oil life has passed.
The maintenance items must be 
inspected and serviced immediately.

511

uu

Maintenance Minder

TM

u

To Use Maintenance Minder

TM

Continued

Main

tenan

ce

Maintenance Service Items

1

Maintenance Service Items

Independent of the Maintenance Minder 
information, replace the brake fluid every 3 years.

Inspect idle speed every 160,000 miles (256,000 
km).

Adjust the valves during services A, B, 1, 2, or 3 if 
they are noisy.

Maintenance Minder 
Message

System Message 
Indicator

Sub Items

Main Item

*1: If a message Service does not appear more than 12 months after the display is reset, change the 

engine oil every year.

# : See information on maintenance and emissions warranty.

CODE

Maintenance Main Items

A

Replace engine oil

*1

B

Replace engine oil

*1

 and oil filter

Inspect front and rear brakes/service as necessary

Check parking brake adjustment

Inspect tie rod ends, steering gearbox, and boots

Inspect suspension components

Inspect driveshaft boots

Inspect brake hoses and lines (Including ABS/VSA)

Inspect all fluid levels and condition of fluids

Inspect exhaust system

#

Inspect fuel lines and connections

#

*2: If you drive in dusty conditions, replace the air cleaner element every 15,000 miles (24,000 km).
*3: If you drive primarily in urban areas that have high concentrations of soot in the air from industry and 

from diesel-powered vehicles, replace the dust and pollen filter every 15,000 miles (24,000 km).

*4: Continuously variable transmission (CVT) models
*5: Driving in mountainous areas at very low vehicle speeds or trailer towing results in higher transmission 

temperatures. This requires transmission fluid changes more frequently than recommended by the 
Maintenance Minder. If you regularly drive your vehicle under these conditions, have the transmission 
fluid changed every 25,000 miles (40,000 km).

*6: 6-cylinder models
*7: If you drive regularly in very high temperatures (over 110 °F, 43 °C), in very low temperatures (under -

20 °F, -29 °C), or tow a trailer, replace every 60,000 miles/100,000 km.

CODE

Maintenance Sub Items

1

Rotate tires

2

Replace air cleaner element

*2

Replace dust and pollen filter

*3

Inspect drive belt

3

Replace transmission fluid

*4, *5

4

Replace spark plugs

Replace timing belt and inspect water pump

*6, *7

Inspect valve clearance

5

Replace engine coolant


Content   ..  30  31  32  33   ..