Honda Accord Coupe (2017 year). Instruction - part 11


  Index      Honda     Honda Accord Coupe - instruction 2017 year in english


Search            


Content   ..  9  10  11  12   ..


Honda Accord Coupe (2017 year). Instruction - part 11


160

uu

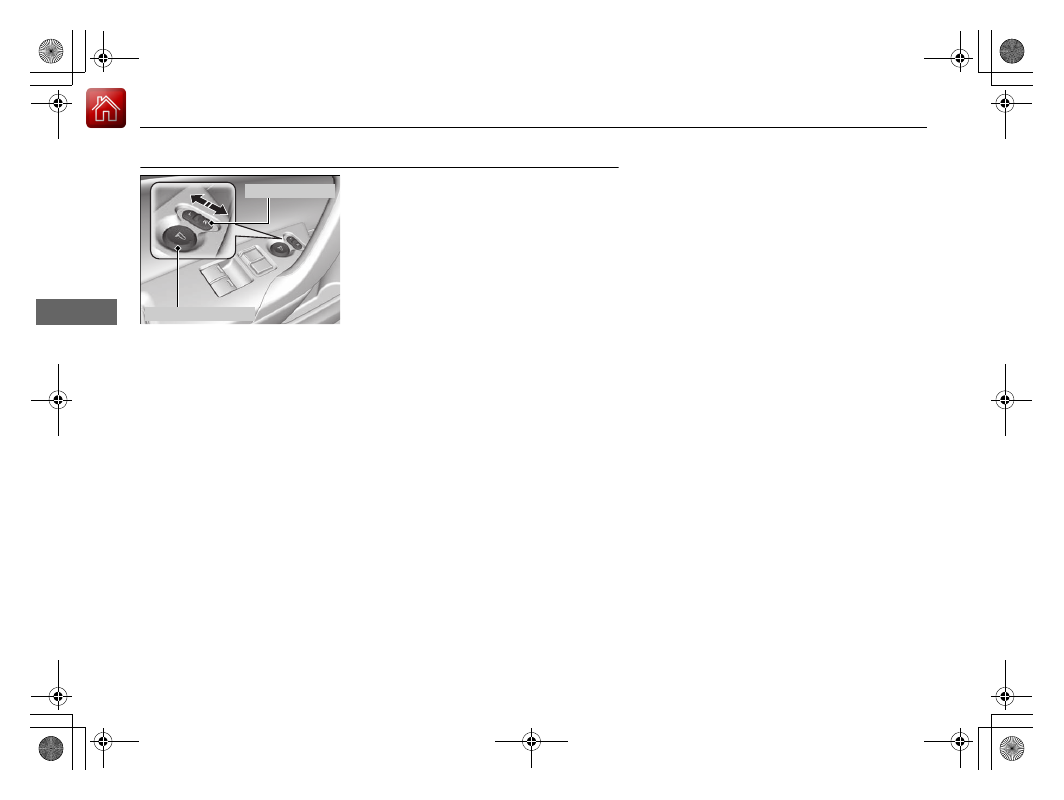
Adjusting the Mirrors

u

Power Door Mirrors

Co
ntrols

Power Door Mirrors

You can adjust the door mirrors when the 
ignition switch is in ON 

(

w

*1

.

Mirror position adjustment

L/R selector switch: Select the left or right
mirror. After adjusting the mirror, return the
switch to the center position.
Mirror position adjustment switch: Press
the switch left, right, up, or down to move the 
mirror.

*1: Models with the smart entry system have an ENGINE START/STOP button instead of an
ignition switch.

Selector Switch

Adjustment Switch

161

Continued

Co
ntrols

Adjusting the Seats

Adjusting the Seat Positions

Adjust the driver's seat as far back as possible 
while allowing you to maintain full control of 
the vehicle. You should be able to sit upright, 
well back in the seat and be able to 
adequately press the pedals without leaning 
forward, and grip the steering wheel 
comfortably. The passenger's seat should be 
adjusted in a similar manner, so that it is as far 
back from the front airbag in the dashboard 
as possible.

Adjusting the driver’s power seat

*

1

Adjusting the Seats

The National Highway Traffic Safety Administration 
and Transport Canada recommend that drivers allow 
at least 10 inches (25 cm) between the center of the 
steering wheel and the chest.

Always make seat adjustments before driving.

3

WARNING

Sitting too close to a front airbag can result 
in serious injury or death if the front 
airbags inflate.

Always sit as far back from the front 
airbags as possible while maintaining 
control of the vehicle.

Move back.

Allow sufficient 
space.

Horizontal Position 
Adjustment

Height Adjustment

Seat-back Angle 
Adjustment

Lumbar Support 
Adjustment

* Not available on all models

uu

Adjusting the Seats

u

Adjusting the Seat Positions

162

Co
ntrols

Adjusting the front manual seat(s)

1

Adjusting the front manual seat(s)

Once a seat is adjusted correctly, rock it back and 
forth to make sure it is locked in position.

Horizontal Position 
Adjustment
Pull up on the bar to move the 
seat, then release the bar.

Height Adjustment
(Driver side only)
Pull up or push down the lever 
to raise or lower the seat.

Seat-back Angle 
Adjustment
Pull up the lever to 
change the angle.

Driver’s seat is shown.

163

uu

Adjusting the Seats

u

Adjusting the Seat Positions

Co
ntrols

Adjust the driver's seat-back to a comfortable, 
upright position, leaving ample space 
between your chest and the airbag cover in 
the center of the steering wheel.

The front seat passenger should also adjust 
their seat-back to a comfortable, upright 
position.

Reclining a seat-back so that the shoulder part of the belt no longer rests against the 
occupant's chest reduces the protective capability of the belt. It also increases the 
chance of sliding under the belt in a crash and being seriously injured. The farther a 
seat-back is reclined, the greater the risk of injury.

Adjusting the Seat-Backs

1

Adjusting the Seat-Backs

Do not put a cushion, or other object, between the 
seat-back and your back.

Doing so may interfere with proper seat belt or airbag 
operation.

If you cannot get far enough away from the steering 
wheel and still reach the controls, we recommend 
that you investigate whether some type of adaptive 
equipment may help.

3

WARNING

Reclining the seat-back too far can result in 
serious injury or death in a crash.

Adjust the seat-back to an upright position, 
and sit well back in the seat.

164

uu

Adjusting the Seats

u

Head Restraints

Co
ntrols

Head Restraints

Your vehicle is equipped with head restraints 
in all seating positions.

Head restraints are most effective for 
protection against whiplash and other rear-
impact crash injuries when the center of the 
back of the occupant's head rests against the 
center of the restraint. The tops of the 
occupant's ears should be level with the 
center height of the restraint.
To raise the head restraint: Pull it upward.
To lower the head restraint: Push it down 
while pressing the release button.

Adjusting the Front and Rear Outer Head Restraint Positions

1

Head Restraints

In order for the head restraint system to work 
properly:

Do not hang any items on the head restraints, or 
from the restraint legs.

Do not place any object between an occupant and 
the seat-back.

Install each restraint in its proper location.

3

WARNING

Improperly positioning head restraints 
reduces their effectiveness and increases 
the likelihood of serious injury in a crash.

Make sure head restraints are in place and 
positioned properly before driving.

Position head in the center 
of the head restraint.

165

uu

Adjusting the Seats

u

Head Restraints

Co
ntrols

A passenger sitting in the center back seating 
position should adjust the height of their head 
restraint to an appropriate position before the 
vehicle begins moving.
To raise the head restraint:
Pull it upward.
To lower the head restraint:
Push it down while pressing the release 
button.

Head restraints can be removed for cleaning or repair.

To remove a head restraint:
Pull the restraint up as far as it will go. Then push the release button, and pull the 
restraint up and out.

To reinstall a head restraint:
Insert the legs back in place, then adjust the head restraint to an appropriate height 
while pressing the release button. Pull up on the restraint to make sure it is locked 
in position.

Changing the Rear Center Seat Head Restraint Positions

Removing and Reinstalling the Head Restraints

1

Removing and Reinstalling the Head Restraints

To remove the rear outer head restraints, fold down 
the seat-back first.

Folding Down the Rear Seat P. 168

3

WARNING

Failure to reinstall, or correctly reinstall, the 
head restraints can result in severe injury 
during a crash.

Always replace the head restraints before 
driving.

166

uu

Adjusting the Seats

u

Maintain a Proper Sitting Position

Co
ntrols

Maintain a Proper Sitting Position

After all occupants have adjusted their seats and head restraints, and put on their 
seat belts, it is very important that they continue to sit upright, well back in their 
seats, with their feet on the floor, until the vehicle is safely parked and the engine is 
off.

Sitting improperly can increase the chance of injury during a crash. For example, if 
an occupant slouches, lies down, turns sideways, sits forward, leans forward or 
sideways, or puts one or both feet up, the chance of injury during a crash is greatly 
increased.

In addition, an occupant who is out of position in the front seat can be seriously or 
fatally injured in a crash by striking interior parts of the vehicle or being struck by an 
inflating front airbag.

1

Maintain a Proper Sitting Position

3

WARNING

Sitting improperly or out of position can 
result in serious injury or death in a crash.

Always sit upright, well back in the seat, 
with your feet on the floor.

167

uu

Adjusting the Seats

u

Maintain a Proper Sitting Position

Co
ntrols

Pulling up the fold-down lever tilts the seat-
back forward.

Pulling up on the seat-back angle adjustment 
lever tilts the seat-back forward.

Pulling up on the seat-back angle adjustment 
lever, or pushing down the front passenger 
seat-back release lever tilts the seat-back 
forward.
You can also use these levers to move the seat 
forward.

Rear Seat Access

1

Maintain a Proper Sitting Position

When you enter the rear seat, be careful not to trip 
over the front seat belt.
If necessary, move the seat forward after tilting the 
seat-back forward.

Fold-down 
Lever

Driver side

Models with driver’s power seat

Seat-back Angle 
Adjustment Lever

Models with driver’s manual seat

Seat-back Angle 
Adjustment Lever

Release Lever

Passenger side

168

uu

Adjusting the Seats

u

Rear Seats

Co
ntrols

Rear Seats

1. Remove the center shoulder belt from the 

guide.

2. Pull the release lever in the trunk to release 

the lock.

3. Fold the seat-back down.

If the rear head restraints get caught on the 
front seat-backs, remove the head restraints.

Removing and Reinstalling the Head 

Restraints P. 165

Folding Down the Rear Seat

1

Folding Down the Rear Seat

The rear seat-back can be folded down to 
accommodate bulkier items in the trunk.

Never drive with the seat-back folded down and the 
trunk lid open.

Exhaust Gas Hazard P. 66

To lock a seat-back upright, push it backwards until it 
locks.
When returning the seat-back to its original position, 
push it firmly back. Also, make sure all rear shoulder 
belts are positioned in front of the seat-back, and the 
center shoulder belt is re-positioned in the guide.

Make sure that the folded seat-back does not press 
against the front passenger seat, as this can cause the 
weight sensors in the front passenger seat to work 
improperly.

Passenger Airbag Off Indicator P. 52

Make sure all items in the trunk or items 
extending through the opening into the rear 
seat is properly secured. Loose items can fly 
forward if you have to brake hard.

The front seat(s) must be far enough forward so they 
do not interfere with the rear seats as they fold 
down.

Guide

Center 
Shoulder Belt

Release 
Lever

169

Continued

Co
ntrols

Interior Lights/Interior Convenience Items

Interior Lights

ON

The interior lights come on regardless of 
whether the doors are open or closed.

Door activated

The interior lights come on in the following 
situations:
• When either of the doors are opened.
• You unlock the driver's door.

• You remove the key from the ignition 

switch.

• When the power mode is set to VEHICLE 

OFF (LOCK).

OFF

The interior lights remain off regardless of 
whether the doors are open or closed.

Interior Light Switches

1

Interior Light Switches

In the door activated position, the interior lights fade out 
and go off about 30 seconds after the doors are closed.
The lights go off after 30 seconds in the following 
situations:

When you unlock the driver's door but do not open it.

When you remove the key from the ignition switch 
but do not open a door.

When you set the power mode to VEHICLE OFF 
(LOCK) but do not open a door.

You can change the interior lights dimming time.

Customized Features P. 106, 298, 316

The interior lights go off immediately in the following 
situations:

When you lock the driver's door.

When you turn the ignition switch to ON 

(

w

*1

.

When you close the driver's door with the key in 
the ignition switch.

When you close the driver's door in ACCESSORY 
mode.

If you leave either door open without the key in the 
ignition switch

*1

, the interior lights go off after about 

15 minutes.

*1: Models with the smart entry system have an ENGINE 
START/STOP
 button instead of an ignition switch.

Models without smart entry system

Models with smart entry system

Models without smart entry system

Models with smart entry system

Door Activated Position

Off

Door Activated 
Position

On

Off

Models without smart entry system

Models with smart entry system

uu

Interior Lights/Interior Convenience Items

u

Interior Lights

170

Co
ntrols

The map lights can be turned on and off by 
pressing the lenses.

Map Lights

1

Map Lights

When the ceiling light switch is in the door activated 
position and either door is open, the map light will 
not go off when you press the lens.

171

uu

Interior Lights/Interior Convenience Items

u

Interior Convenience Items

Continued

Co
ntrols

Interior Convenience Items

Pull the handle to open the glove box.

You can lock the glove box with the master 
key or the built-in key.

Pull the handle to open the console 
compartment.

Glove Box

1

Glove Box

3

WARNING

An open glove box can cause serious injury 
to your passenger in a crash, even if the 
passenger is wearing the seat belt.

Always keep the glove box closed while 
driving.

Glove Box

Handle

To Lock

Console Compartment

172

uu

Interior Lights/Interior Convenience Items

u

Interior Convenience Items

Co
ntrols

Pull the handle to open the pocket.

Center Pocket

Handle

Continued

173

uu

Interior Lights/Interior Convenience Items

u

Interior Convenience Items

Co
ntrols

Front seat beverage holders

Door beverage holders

Rear seat beverage holders

Beverage Holders

1

Beverage Holders

NOTICE

Spilled liquids damage the upholstery, carpeting, and 
electrical components in the interior.

Be careful when you are using the beverage holders. 
Hot liquid can scald you.

uu

Interior Lights/Interior Convenience Items

u

Interior Convenience Items

174

Co
ntrols

The accessory power sockets can be used when the ignition switch is in ACCESSORY 

(

q or ON 

(

w

*1

.

Accessory power socket (console panel)

Open the cover to use it.

Accessory power socket (console 
compartment)

Open the console lid and the cover to use it.

*1: Models with the smart entry system have an ENGINE START/STOP button instead of an 
ignition switch.

Accessory Power Sockets

1

Accessory Power Sockets

NOTICE

Do not insert an automotive type cigarette lighter 
element.
This can overheat the power socket.

The accessory power socket is designed to supply 
power for 12-volt DC accessories that are rated 180 
watts (15 amps) or less.

To prevent battery drain, only use the power socket 
with the engine running.

When both sockets are being used, the combined 
power rating of the accessories should not exceed 
180 watts (15 amps).

Continued

175

uu

Interior Lights/Interior Convenience Items

u

Interior Convenience Items

Co
ntrols

To use the wireless charger, the ignition switch must be in ACCESSORY 

(

q or ON 

(

w

*1

.

Charge a compatible device on the area indicated by the 

 mark as follows:

1. To turn the system on and off, press and 

hold the 

 (power) button.

u

When the system is activated, the green 
indicator light comes on.

2. Place the device you want to charge on the 

charging area.

u

The system will automatically start 
charging the device, and the amber 
indicator light will come on.

u

Make sure that the device is compatible 
with the system, and placed with the 
chargeable side in the center of the 
charging area.

3. When charging is completed, the green 

indicator light will come on.

u

Depending on the device, the amber 
indicator light will stay on.

*1:Models with the smart entry system have an ENGINE START/STOP button instead of an 
ignition switch.

Wireless Charger

*

1

Wireless Charger

*

This system consumes a lot of power, so do not use 
the system for a long time when the engine is not 
running. This may weaken the battery, making it 
difficult to start the engine.

When using the wireless charger, check the user’s manual that 
came with to the compatible device you want to charge.

3

CAUTION

Metal objects between the charge pad 
and the device to be charged will get 
hot and can burn you.
• Always remove foreign objects from 

the charge pad before charging the 
device.

• Be sure the surface is clear of dust and 

other debris before charging.

• Do not spill liquids (i. e. water, drinks, 

etc.) on the charger and the device.

• Do not use oil, grease, alcohol, 

benzine or thinner for cleaning the 
charge pad.

• Do not cover the system with towels, 

clothing, or other objects while 
charging etc.

• Avoid using spraying hair spray, 

insecticides, etc, that may contact the 
charge pad surface.

Green Indicator

Amber Indicator

Charging Area

 (Power) 

Button

* Not available on all models


Content   ..  9  10  11  12   ..