Honda Ridgeline. Manual - part 374


  Index      Honda     Honda Ridgeline - service repair manual 2006-2008 year


Search            


Content   ..  372  373  374  375   ..


Honda Ridgeline. Manual - part 374


01

SJC8A00J18513415092KBAT00

Special Tools Required

20-134

Bumpers

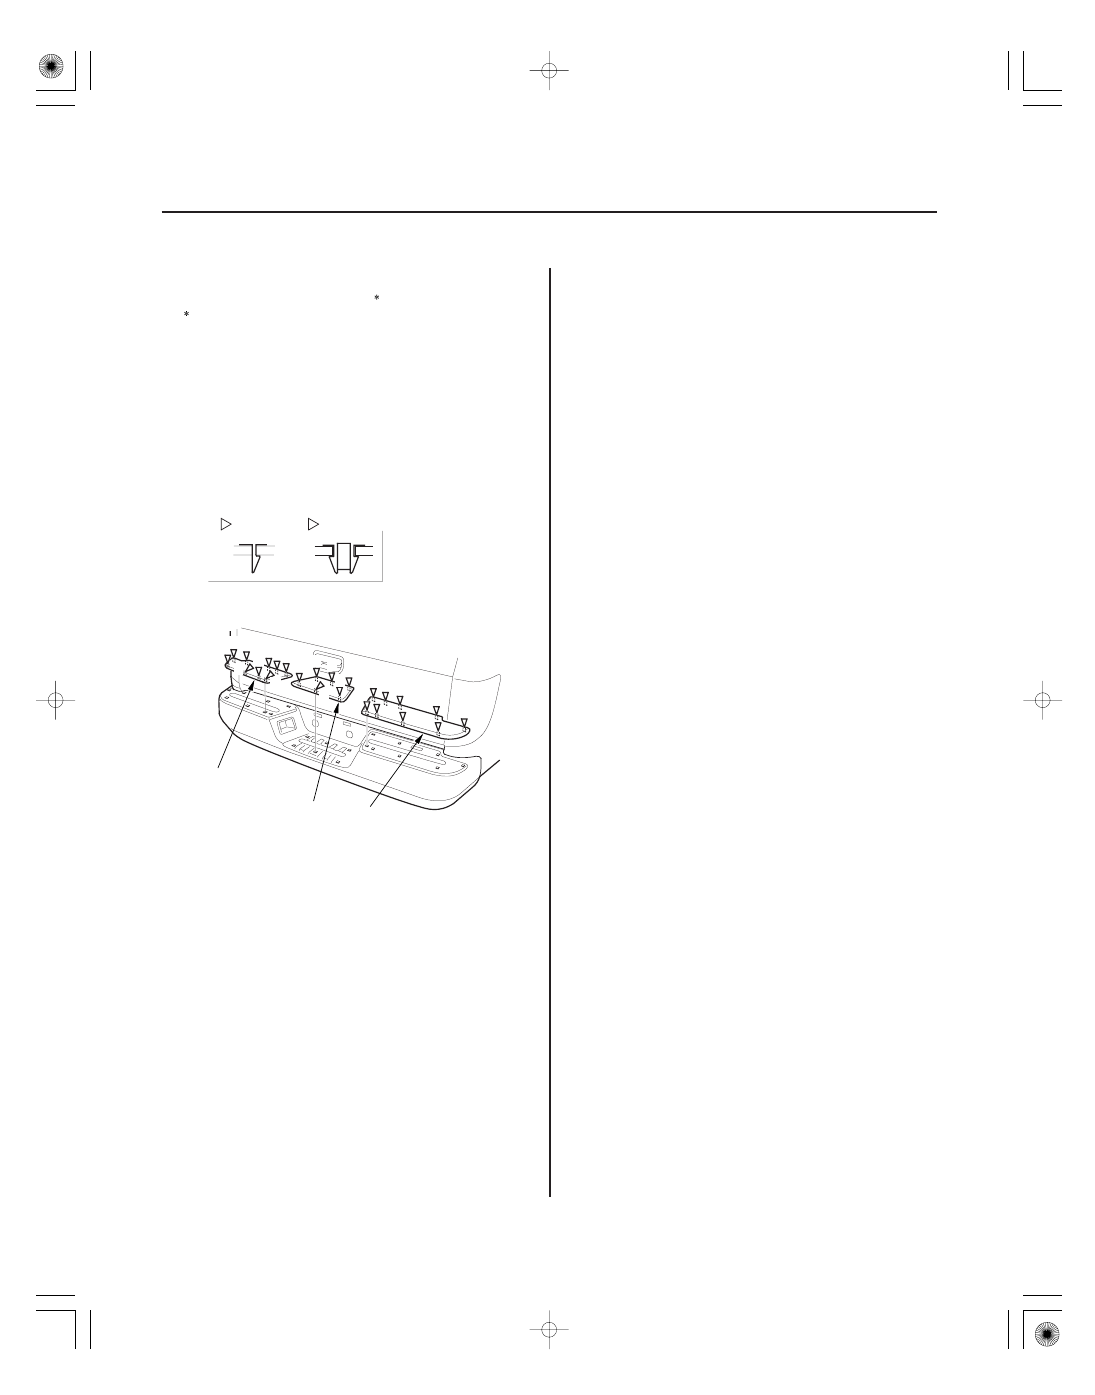
Rear Bumper Step Replacement

Fastener Locations

: Hook, 4

A

: Hook, 20

B

B

B

B B A

B

B

A

B B B B

B

B

A

A

B

B

B B

B

B

B

C

D

E

B

KTC trim tool set SOJATP2014

Available through the American Honda Tool and
Equipment Program; call 888-424-6857

NOTE:

• Use the appropriate tool from the KTC trim tool set to

avoid damage when prying components.

• Take care not to scratch the bumper.

1. Using a trim tool, detach the hooks (A, B), then

remove the left rear bumper step (C), center rear
bumper step (D), and right rear bumper step (E).

2. Install the bumper step by pushing on the hook

portions until the hooks snap into place.

01

SJC8A00J18533200000MBAT00

20-135

Hood

Hood Adjustment

6 x 1.0 mm
18 N·m
(1.8 kgf·m, 13 lbf·ft)

6 x 1.0 mm
9.8 N·m
(1.0 kgf·m, 7.2 lbf·ft)

A

B

C

D

E

D

1. Remove the front bulkhead cover (see page 20-171).

2. Slightly loosen each hood hinge bolt.

3. Adjust the hood alignment (A) in this sequence.

• Adjust the hood right and left, as well as forward and rearward, by using the elongated holes in the hood hinges

(B).

• Turn the hood edge cushions (C), as necessary, to make the hood fit flush with the body at the front and side

edges.

4. Adjust the hood latch (D) to obtain the proper height at the forward edge, and move the hood latch right or left

until the striker (E) is centered in the hood latch.

5. Tighten the bolts to the specified torque, and recheck the hood alignment.

(cont’d)

02

03

01

SJC8A00J18533232201KBAT02

20-136

20-136

Hood

Hood Adjustment (cont’d)

Hood Seal Replacement

A

B

Fastener Locations

: Clip, 17

A

: Clip, 10

B

C

A

D

A

B

C

6. Check that the hood opens properly and closes

securely.

7. Apply touch-up paint to the hinge mounting bolts

and around the hinges, and let the paint dry.

8. Apply multipurpose grease to the hood latch (A)

and hood hinges (B) as indicated by the arrows.

9. Reinstall all of the removed parts.

1. Using a clip remover, detach the clips (A, B), then

remove the hood seals (C, D). Take care not to
scratch the hood.

2. Install the hood seals in the reverse order of

removal, and note these items:

• Check if the clips are damaged or stress-

whitened, if necessary, replace them with new
ones.

• Push the clips into place securely.

*01

SJC8A00J18573900000DAAT00

20-137

Tailgate

Component Location Index

TAILGATE TRIM PANEL

TAILGATE TOP TRIM

TAILGATE SUPPORT CABLE

TAILGATE
CUSHION

REAR EMBLEM (HONDA)

REAR EMBLEM (4WD)

REAR EMBLEM (RIDGELINE)

TAILGATE

(cont’d)

Removal/Installation, page 20-140

Replacement, page 20-149

Replacement, page 20-177

Replacement, page 20-177

Replacement, page 20-177

Lock-out Override, page 20-139
Removal, page 20-149
Installation/Adjustment, page 20-151


Content   ..  372  373  374  375   ..