Honda Element. Manual - part 641
 

  Index      Honda     Honda Element - service repair manual 2007-2008 year


Search            


Content   ..  639  640  641  642   ..


Honda Element. Manual - part 641


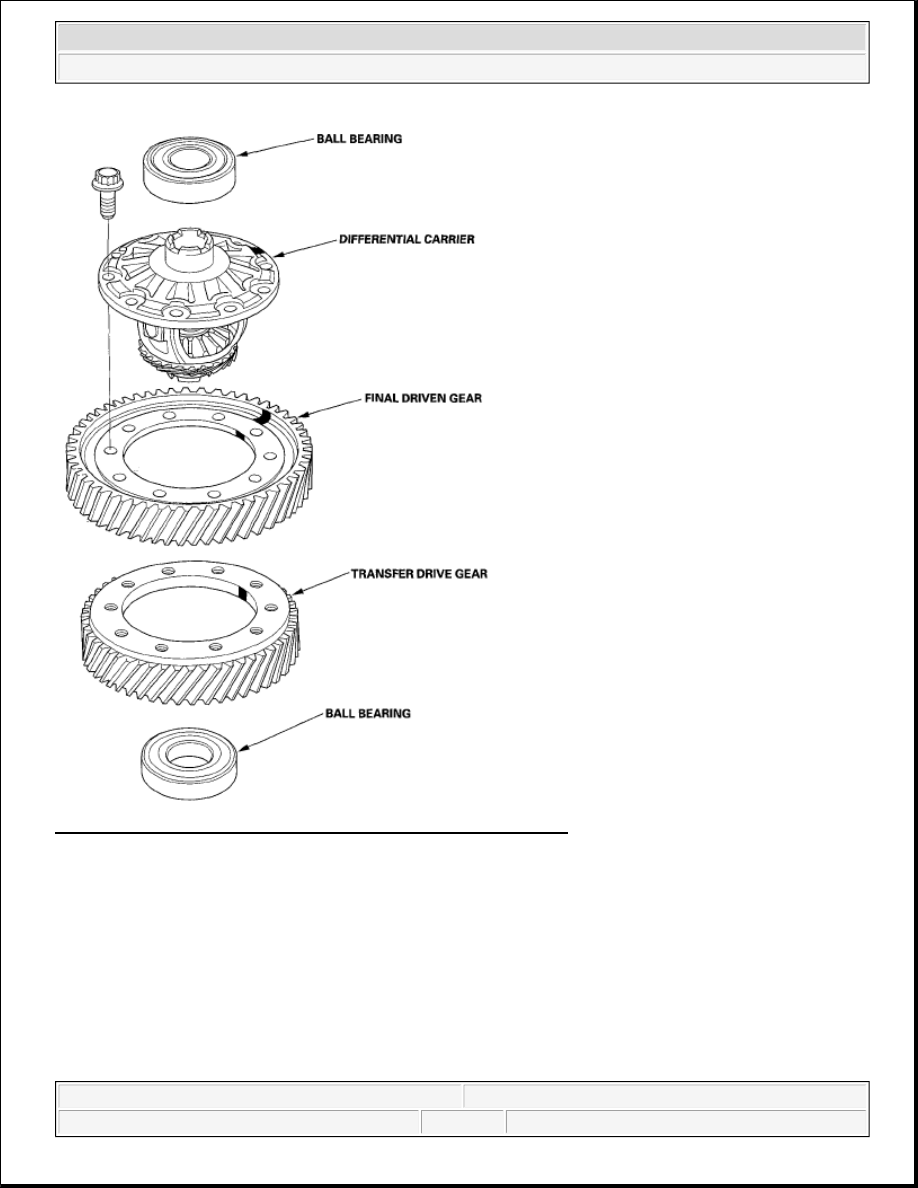
Fig. 157: Identifying M/T Differential Component Location (4WD) 
Courtesy of AMERICAN HONDA MOTOR CO., INC. 

BACKLASH INSPECTION 

1. Place the differential assembly on V-blocks (A), and install the intermediate shaft (B) and left driveshaft 

(C). 


2007 Honda Element EX 

2007-2008 TRANSMISSION Manual Transmission - Element


Fig. 158: Identifying Differential Assembly On V-Blocks, Intermediate Shaft And Left Driveshaft 
Courtesy of AMERICAN HONDA MOTOR CO., INC. 

2. Measure the backlash of both pinion gears (D) with a dial indicator (E). If the backlash is not within the 

standard, replace the differential carrier. 

Standard (New): 0.05-0.15 mm (0.002-0.006 in.)  

DIFFERENTIAL CARRIER, FINAL DRIVEN GEAR REPLACEMENT 

2WD 

1. Remove the bolts (left-hand threads) in a crisscross pattern in several steps, then remove the final driven 

gear (A) from the differential carrier (B). 

Fig. 159: Identifying Final Driven Gear And Differential Carrier With Torque Specification 
Courtesy of AMERICAN HONDA MOTOR CO., INC.


2007 Honda Element EX 

2007-2008 TRANSMISSION Manual Transmission - Element


2. Install the final driven gear with the chamfer on the inside diameter facing the carrier. Align the marks on 

the driven gear and the carrier. Tighten the bolts in a crisscross pattern in several steps.  

DIFFERENTIAL CARRIER, FINAL DRIVEN GEAR, TRANSFER DRIVE GEAR 
REPLACEMENT 

4WD 

1. Remove the bolts (left-hand threads) in a crisscross pattern in several steps, then remove the transfer drive 

gear (A) and final driven gear (B) from the differential carrier (C). 

Fig. 160: Identifying Transfer Drive Gear, Final Driven Gear And Differential Carrier With 
Torque Specification
 
Courtesy of AMERICAN HONDA MOTOR CO., INC. 

2. Install the final driven gear and transfer drive gear with the chamfer on the inside diameter facing the 

carrier. Align the marks on the driven gear, the transfer drive gear and the carrier. Tighten the bolts in a 
crisscross pattern in several steps.  

CARRIER BEARING REPLACEMENT 

Special Tools Required  

Driver handle 07746-0030100 

1. Check the carrier bearings for wear and rough rotation. If they rotate smoothly and their rollers show no 

signs of wear, the bearings are OK.  

2. Remove the carrier bearings (A) with a commercially available bearing puller (B). 


2007 Honda Element EX 

2007-2008 TRANSMISSION Manual Transmission - Element


Fig. 161: Identifying Carrier Bearings And Bearing Puller 
Courtesy of AMERICAN HONDA MOTOR CO., INC. 

3. Install the new bearings (A) with the driver handle (B) and a press. Press on each bearing until it bottoms. 

There should be no clearance between the bearings and the carrier. 

NOTE:

Place the seal (C) part of the bearing toward the outside of the differential, 
then install it.


2007 Honda Element EX 

2007-2008 TRANSMISSION Manual Transmission - Element


Content   ..  639  640  641  642   ..