Honda Element. Manual - part 583
 

  Index      Honda     Honda Element - service repair manual 2007-2008 year


Search            


Content   ..  581  582  583  584   ..


Honda Element. Manual - part 583


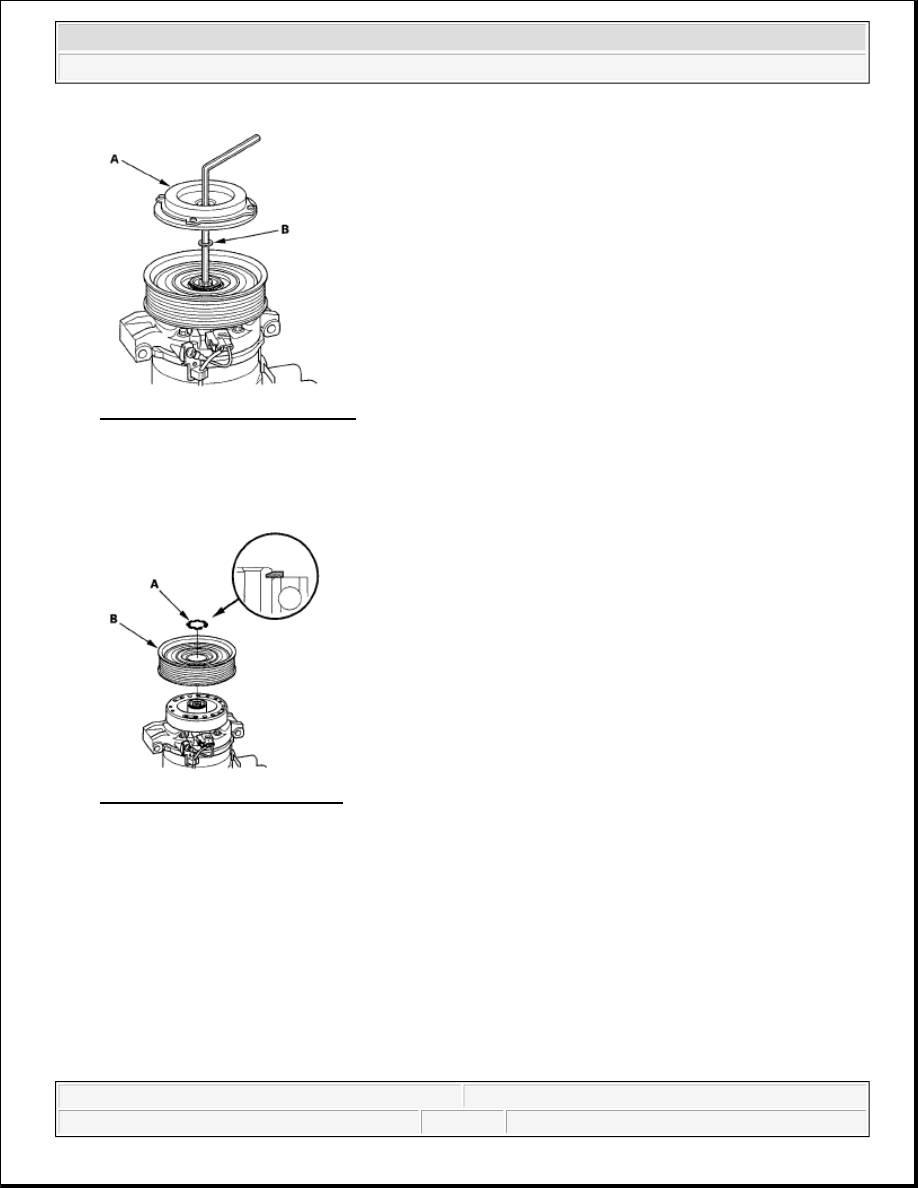
Fig. 97: Removing Pressure Plate 
Courtesy of AMERICAN HONDA MOTOR CO., INC. 

3. If you are replacing the field coil, remove the snap ring (A) with snap ring pliers, then remove the rotor 

pulley (B). Be careful not to damage the rotor pulley and A/C compressor. 

Fig. 98: Removing Rotor Pulley 
Courtesy of AMERICAN HONDA MOTOR CO., INC. 

4. Remove the screw, the wire harness clip (A), and holder (B), then disconnect the field coil connector (C). 

Remove the snap ring (D) with snap ring pliers, then remove the field coil (E). Be careful not to damage 
the field coil and A/C compressor. 


2007 Honda Element EX 

2007-2008 HVAC HVAC - Element


Fig. 99: Identifying Wire Harness Clip, Holder, Field Coil Connector And Field Coil With Torque 
Specification
 
Courtesy of AMERICAN HONDA MOTOR CO., INC. 

5. Reassemble the clutch in the reverse order of disassembly, and note these items: 

Install the field coil with the wire side facing down, and align the boss on the field coil with the 
hole in the A/C compressor.  

Clean the rotor pulley and A/C compressor sliding surfaces with contact cleaner or other non-
petroleum solvent.  

Install new snap rings, note the installation direction, and make sure they are fully seated in the 
groove.  

Make sure that the rotor pulley turns smoothly after it's reassembled.  

Route and clamp the wires properly or they can be damaged by the rotor pulley.  

A/C COMPRESSOR RELIEF VALVE REPLACEMENT 

1. Recover the refrigerant with a recovery/recycling/charging station (see REFRIGERANT 

RECOVERY ).  

2. Remove the relief valve (A), and the O-ring (B). Plug the opening to keep foreign matter from entering 

the system and the A/C compressor oil from running out. 


2007 Honda Element EX 

2007-2008 HVAC HVAC - Element


Fig. 100: Identifying Relief Valve With Torque Specification 
Courtesy of AMERICAN HONDA MOTOR CO., INC. 

3. Clean the mating surfaces.  

4. Replace the O-ring with a new one at the relief valve, and apply a thin coat of refrigerant oil before 

installing it.  

5. Remove the plug, and install and tighten the relief valve.  

6. Charge the system (see SYSTEM CHARGING ).  

A/C CONDENSER REPLACEMENT 

1. Recover the refrigerant with a recovery/recycling/charging station (see REFRIGERANT 

RECOVERY ).  

2. Remove the front bumper (see FRONT BUMPER REMOVAL/INSTALLATION ).  

3. Remove the bolts, then disconnect the discharge line (A) and the A/C condenser line (B) from the A/C 

condenser. Plug or cap the lines immediately after disconnecting them to avoid moisture and dust 
contamination. 


2007 Honda Element EX 

2007-2008 HVAC HVAC - Element


Fig. 101: Identifying Discharge Line And A/C Condenser Line With Torque Specification 
Courtesy of AMERICAN HONDA MOTOR CO., INC. 

4. Remove the bolts and mounting brackets (A), then remove the A/C condenser (B) by lifting it up. Be 

careful not to damage the radiator and A/C condenser fins when removing the A/C condenser. 

Fig. 102: Identifying Mounting Brackets And A/C Condenser With Torque Specification 
Courtesy of AMERICAN HONDA MOTOR CO., INC. 

5. Install the A/C condenser in the reverse order of removal, and note these items: 

If you're installing a new A/C condenser, add refrigerant oil (DENSO ND-OIL 8) (see A/C 
REFRIGERANT OIL REPLACEMENT
 ).  

Replace the O-rings with new ones at each fitting, and apply a thin coat of refrigerant oil before 


2007 Honda Element EX 

2007-2008 HVAC HVAC - Element


Content   ..  581  582  583  584   ..