Honda Element. Manual - part 410
 

  Index      Honda     Honda Element - service repair manual 2007-2008 year


Search            


Content   ..  408  409  410  411   ..


Honda Element. Manual - part 410


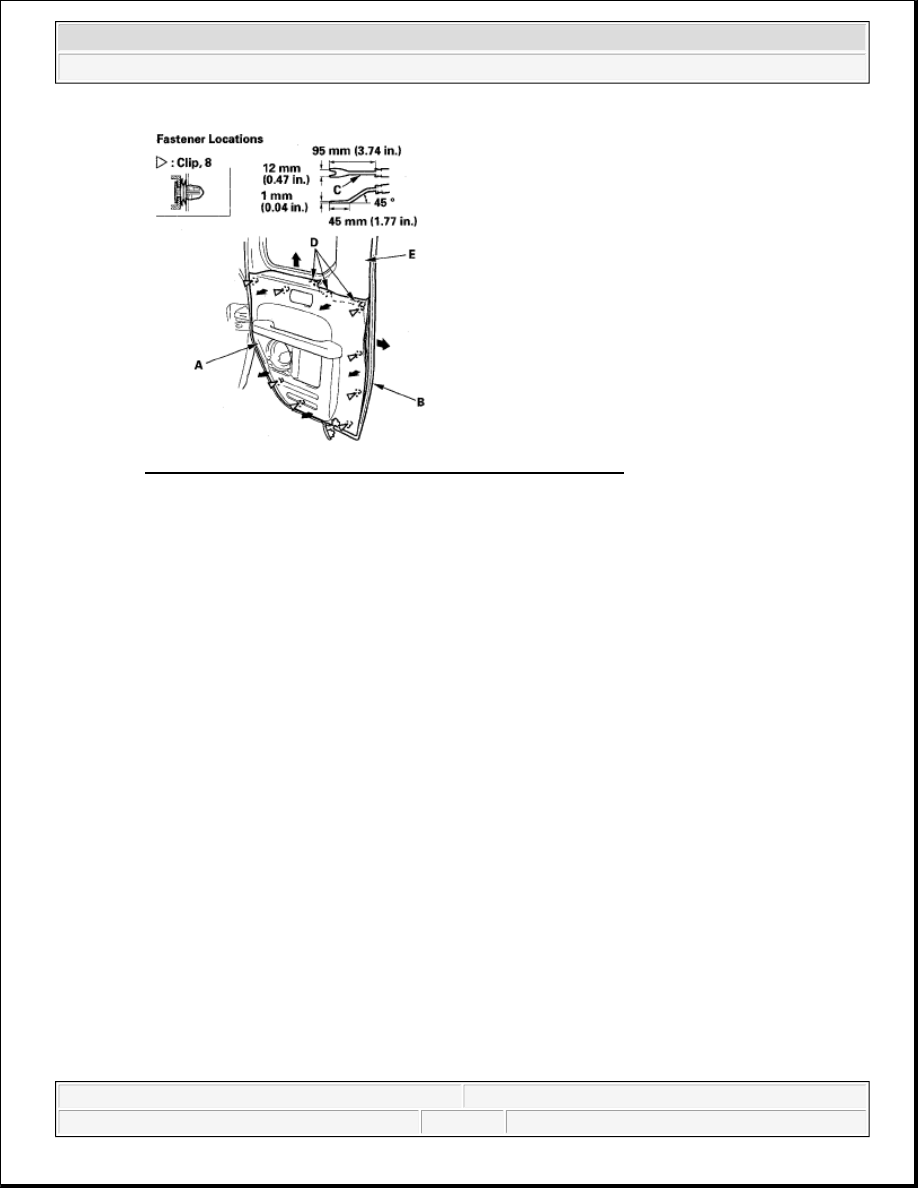
Fig. 41: Pulling Out On Top Of Door Panel With Specification 
Courtesy of AMERICAN HONDA MOTOR CO., INC. 

10. Install the door panel in the reverse order of removal, and note these items: 

Make sure the inner handle cable is connected properly.  

Check if the clips are damaged or stress-whitened, and if necessary, replace them with new ones.  

Push the clips and hooks into place securely.  

When reinstalling the door panel, make sure the plastic cover is installed properly and sealed 
around its perimeter to seal out water.  

Check for water leaks (see step 7 ).  

REAR DOOR TRIM REMOVAL/INSTALLATION 

1. Remove the rear door trim (A). 

-1 Pull the door weatherstrip (B) out as necessary.  

-2 Pull out on the top of the rear door panel (C) to release the hooks (D).  

-3 Pull out on the rear door trim to detach the clips (E, F). 


2007 Honda Element EX 

2007-08 ACCESSORIES AND EQUIPMENT Doors - Element


Fig. 42: Removing Rear Door Trim 
Courtesy of AMERICAN HONDA MOTOR CO., INC. 

2. Install the trim in the reverse order of removal, and note these items: 

Check if the clips are damaged or stress-whitened, and if necessary, replace them with new ones.  

Push the clips and hooks into place securely.  

Apply liquid thread lock to the anchor bolt before reinstallation.  

Before installing the anchor bolt, make sure there are no twists or kinks in the seat belt.  

REAR DOOR HANDLE REPLACEMENT 

1. Remove these items: 

Door panel (see REAR DOOR PANEL REMOVAL/INSTALLATION )  

Plastic cover, as necessary (see COMPONENT LOCATION INDEX - REAR DOOR )  

2. Disconnect the cancel rod (A) from the rear door latch synchronizer (B). 

NOTE:

Put on gloves to protect your hands.


2007 Honda Element EX 

2007-08 ACCESSORIES AND EQUIPMENT Doors - Element


Fig. 43: Disconnecting Cancel Rod From Rear Door Latch Synchronizer 
Courtesy of AMERICAN HONDA MOTOR CO., INC. 

3. Remove the screws, then pull the rear door handle (A) out. Disconnect the handle rod (B), then remove 

the handle. 

Fig. 44: Disconnecting Handle Rod With Torque Specification 
Courtesy of AMERICAN HONDA MOTOR CO., INC. 

4. Install the handle in the reverse order of removal, and note these items: 

Make sure each rod is connected securely.  

Make sure the door locks and opens properly.  

When reinstalling the door panel, make sure the plastic cover is installed properly and sealed 
around its perimeter to seal out water.  

Check for water leaks.  

REAR DOOR UPPER LATCH REPLACEMENT 

NOTE:

Put on gloves to protect your hands.


2007 Honda Element EX 

2007-08 ACCESSORIES AND EQUIPMENT Doors - Element


1. Remove these items: 

Door panel (see REAR DOOR PANEL REMOVAL/INSTALLATION )  

Plastic cover, as necessary (see COMPONENT LOCATION INDEX - REAR DOOR )  

Door trim (see REAR DOOR TRIM REMOVAL/INSTALLATION )  

2. Detach the harness clips (A). Disconnect the upper latch switch connector (B), and detach it. 

Fig. 45: Disconnecting Upper Latch Switch Connector 
Courtesy of AMERICAN HONDA MOTOR CO., INC. 

3. Disconnect the upper latch cable (A) in the sequence shown. Take care not to bend the cable. 

Fig. 46: Disconnecting Upper Latch Cable 
Courtesy of AMERICAN HONDA MOTOR CO., INC. 

4. Remove the bolts, then remove the upper latch (A). 


2007 Honda Element EX 

2007-08 ACCESSORIES AND EQUIPMENT Doors - Element


Content   ..  408  409  410  411   ..