Honda Element. Manual - part 385
 

  Index      Honda     Honda Element - service repair manual 2007-2008 year


Search            


Content   ..  383  384  385  386   ..


Honda Element. Manual - part 385


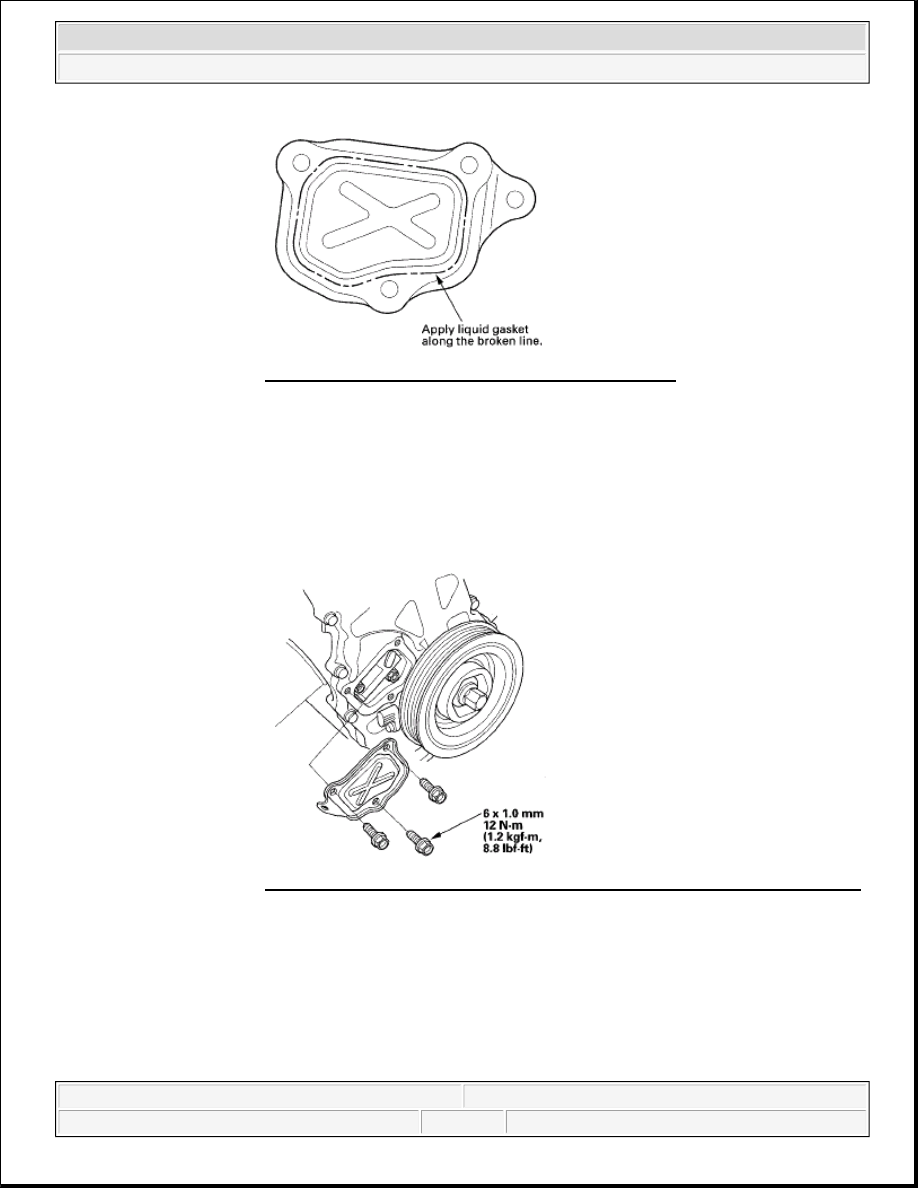
6. Install the chain case cover. 

CHAIN CASE OIL SEAL INSTALLATION 

Special Tools Required  

Handle driver 07749-0010000  

Attachment, 52 x 55 mm 07746-0010400 

Fig. 57: Identifying Liquid Gasket Applying Area 
Courtesy of AMERICAN HONDA MOTOR CO., INC. 

NOTE:

Wait for at least 30 minutes before filling the engine with oil.  

Do not run the engine for at least 3 hours after installing the chain 
case cover. 

Fig. 58: Identifying Chain Case Cover Bolts With Torque Specification
Courtesy of AMERICAN HONDA MOTOR CO., INC. 


2007 Honda Element EX 

2007-2008 ENGINE Cylinder Head - Element


1. Use the handle driver and attachment to drive a new oil seal squarely into the chain case to the specified 

installed height. 

Fig. 59: Driving Oil Seal 
Courtesy of AMERICAN HONDA MOTOR CO., INC. 

2. Measure the distance between the chain case surface (A) and oil seal (B). 

Fig. 60: Measuring Distance Between Chain Case Surface And Oil Seal 
Courtesy of AMERICAN HONDA MOTOR CO., INC. 

CAM CHAIN INSPECTION 

1. Remove the right front wheel.  

2. Remove the splash shield (see step 26 in ENGINE REMOVAL ). 


2007 Honda Element EX 

2007-2008 ENGINE Cylinder Head - Element


3. Remove the drive belt (see DRIVE BELT INSPECTION ).  

4. Remove the cylinder head cover (see CYLINDER HEAD COVER REMOVAL ).  

5. Remove the crankshaft pulley (see CRANKSHAFT PULLEY REMOVAL AND INSTALLATION ). 

6. Disconnect the crankshaft position (CKP) sensor connector and variable valve timing control (VTC) oil 

control solenoid valve connector (see step 8 ).  

7. Remove the VTC oil control solenoid valve (see VTC OIL CONTROL SOLENOID VALVE 

REMOVAL/TEST/INSTALLATION ).  

8. Support the engine with a jack and wood block under the oil pan.  

9. Remove the ground cable, and remove the upper bracket (see step 11 ).  

10. Remove the side engine mount bracket (see step 12 ).  

11. Remove the chain case (see step 13 ).  

12. Measure the tensioner rod length between the tensioner body and bottom of the flat surface section on the 

tensioner rod. If the length is more than the service limit, replace the cam chain and oil pump chain. 

Fig. 61: Identifying Tensioner Rod Length Dimension 
Courtesy of AMERICAN HONDA MOTOR CO., INC. 

13. Check the chain case oil seal for damage. If the oil seal is damaged, replace the chain case oil seal (see 

CHAIN CASE OIL SEAL INSTALLATION ).  

14. Remove all of the old liquid gasket from the chain case mating surfaces, bolt and bolt holes.  

15. Clean and dry the chain case mating surfaces.  

16. Apply liquid gasket, P/N 08717-0004,08718-0001, 08718-0003, or 08718-0009, evenly to the engine 

block mating surface of the chain case. Install the component within 5 minutes of applying the liquid 
gasket (see step 16 ). 

NOTE:

If you apply liquid gasket P/N 08718-0012, the component must be 
installed within 4 minutes.  


2007 Honda Element EX 

2007-2008 ENGINE Cylinder Head - Element


17. Apply liquid gasket to the engine block upper surface contact areas on the chain case and lower block 

upper surface contact areas on the chain case (see step 17 ).  

18. Apply liquid gasket, P/N 08717-0004,08718-0001, 08718-0003, or 08718-0009, evenly to the oil pan 

mating surface of the chain case. Install the component within 5 minutes of applying the liquid gasket 
(see step 18 ). 

19. Install the new O-ring on the chain case. Set the edge of the chain case to the edge of the oil pan, then 

install the chain case on the engine block (see step 19 ). Wipe off the excess liquid gasket on the oil pan 
and chain case mating surface. 

20. Install the side engine mount bracket (see step 20 ).  

21. Install the upper bracket and the ground cable (see step 21 ).  

22. Install the VTC oil control solenoid valve (see VTC OIL CONTROL SOLENOID VALVE 

REMOVAL/TEST/INSTALLATION ).  

23. Connect the CKP sensor connector and VTC oil control solenoid valve connector (see step 24 ).  

24. Install the crankshaft pulley (see INSTALLATION ).  

25. Install the cylinder head cover (see CYLINDER HEAD COVER INSTALLATION ).  

26. Install the drive belt (see DRIVE BELT INSPECTION ).  

27. Install the splash shield (see step 24 in ENGINE INSTALLATION ).  

28. Install the right front wheel.  

29. Do the CKP pattern clear/CKP learn procedure (see CRANK (CKP) PATTERN CLEAR/CRANK 

(CKP) PATTERN LEARN ).  

CKP PULSE PLATE REPLACEMENT 

1. Remove the right front wheel.  

2. Remove the splash shield (see step 26 in ENGINE REMOVAL ). 

If too much time has passed after applying the liquid gasket, remove 
the old liquid gasket and residue, then reapply new liquid gasket.  

NOTE:

If you apply liquid gasket P/N 08718-0012, the component must be 
installed within 4 minutes.  

If too much time has passed after applying the liquid gasket, remove 
the old liquid gasket and residue, then reapply new liquid gasket.  

NOTE:

When installing the chain case, do not slide the bottom surface onto 
the oil pan mounting surface.  

Wait at least 30 minutes before filling the engine with oil.  

Do not run the engine for at least 3 hours after installing the chain 
case.  


2007 Honda Element EX 

2007-2008 ENGINE Cylinder Head - Element


Content   ..  383  384  385  386   ..