Harley Davidson 1940-58 45" SV & SERI-CAR. Service manual - page 3


  Index      Harley Davidson     Harley Davidson 1940-58 45" SV & SERI-CAR. Service manual


Search            copyright infringement  


Content      ..     1      2      3     


Harley Davidson 1940-58 45" SV & SERI-CAR. Service manual - page 3
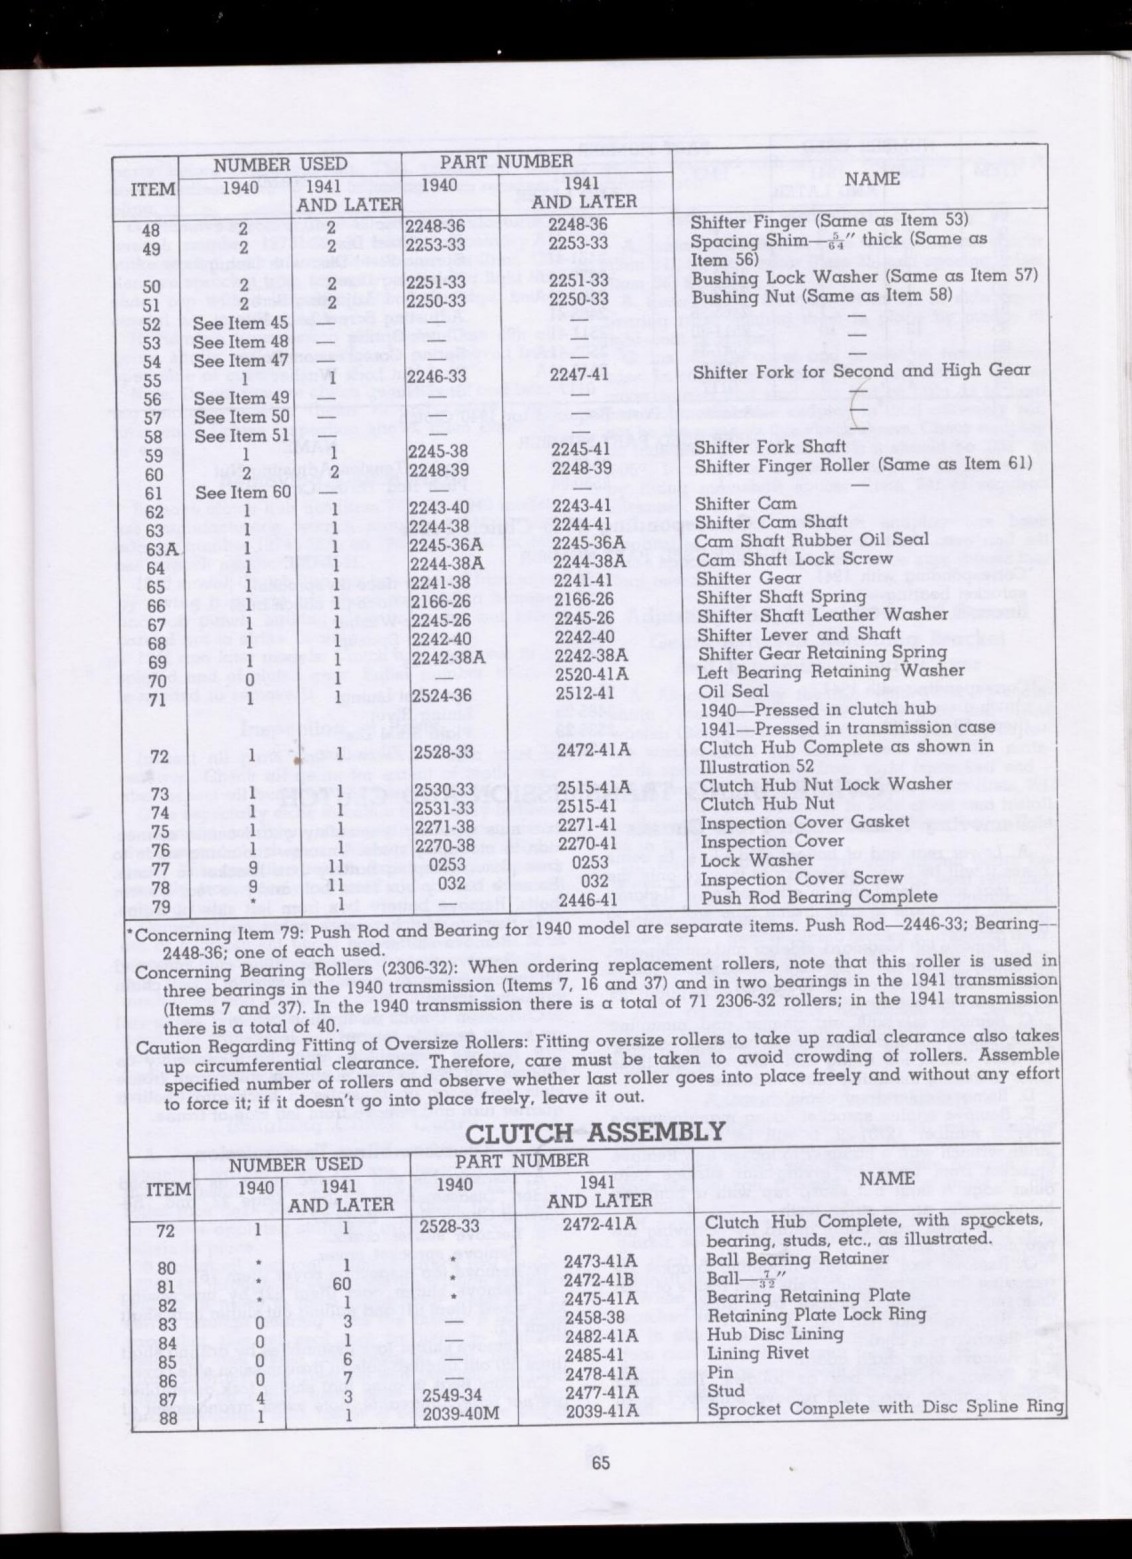


parts before disassembling. This precaution can save needless gauging and adjusting when reassembling.

G. Remove sprocket (Item 42) using manufacturer's wrench number 12731-29. It will be necessary to strike wrench with a hammer to loosen nut (Item 44). Remove sprocket from taper by giving it a light but sharp rap with a hammer, near outer edge, being careful not to strike teeth.

H. Remove transmission side cover (Item 40); all gears, shafts, etc., are now free to be removed from open side of case.

Note: Do not remove clutch gear oil seal and bearing retaining washer (Items 70 and 71—1941 and later only) unless inspection shows them damaged or worn.

Removing Clutch Hub

Remove clutch hub nut (Item 74). On 1940 models use manufacturer's wrench number 12745-26 with adapter number 12745-26A; on 1941 and later models use wrench number 12745-41.

1940 model: Clutch hub can be removed from taper by giving it a light but sharp rap with a hammer and soft punch, striking close to center but being careful not to strike bearing.

1941 and later models: Clutch hub is a press fit on splined end of clutch gear. Puller number 12022-41 is needed to remove it.

Inspection of Parts

Inspect all parts *and determine which must be renewed. Check all gears for extent of tooth wear; also inspect all bushings and bearing races.

Give especially close attention to possibly battered or rounded condition of engaging dogs on shifter clutches and clutch gear and engaging slots in other gears. This condition results from shifting abuses or possibly from poorly adjusted clutch that does not release fully.

Damaged engaging dogs and slots try to creep out of engagement under steady driving load. This creeping action develops tremendous side pressure that finally results in serious damage to shifting mechanism and all thrust points along the  main shaft assembly. Therefore, in doing a thorough and dependable transmission overhaul, it is of prime importance that all gears and shifter clutches with badly rounded engaging dogs and slots be replaced with new.

Installing Clutch Gear

A. Assuming that oil seal (Item 71) and bearing retaining washer (Item 70) are already assembled in case, install roller bearing end washer (Item 17) in roller race next. Assemble rollers (Item 16) in roller race after applying sufficient grease to race to hold rollers in place.

B. Insert oil seal tool (manufacturer's tool number 12747-41) through oil seal from the outside so that it will be in place to meet clutch gear when it is inserted through bearing from the inside. It is necessary that this oil seal tool be used to facilitate assembly and avoid damaging oil seal. Assemble thrust bearing race (Item 14) and retainer and balls (Item 15) on clutch gear. Now insert clutch gear through bearing from inside of case. Be sure end of


Content      ..     1      2      3