Harley Davidson Dyna evolution 1991-1998. Service manual - page 5
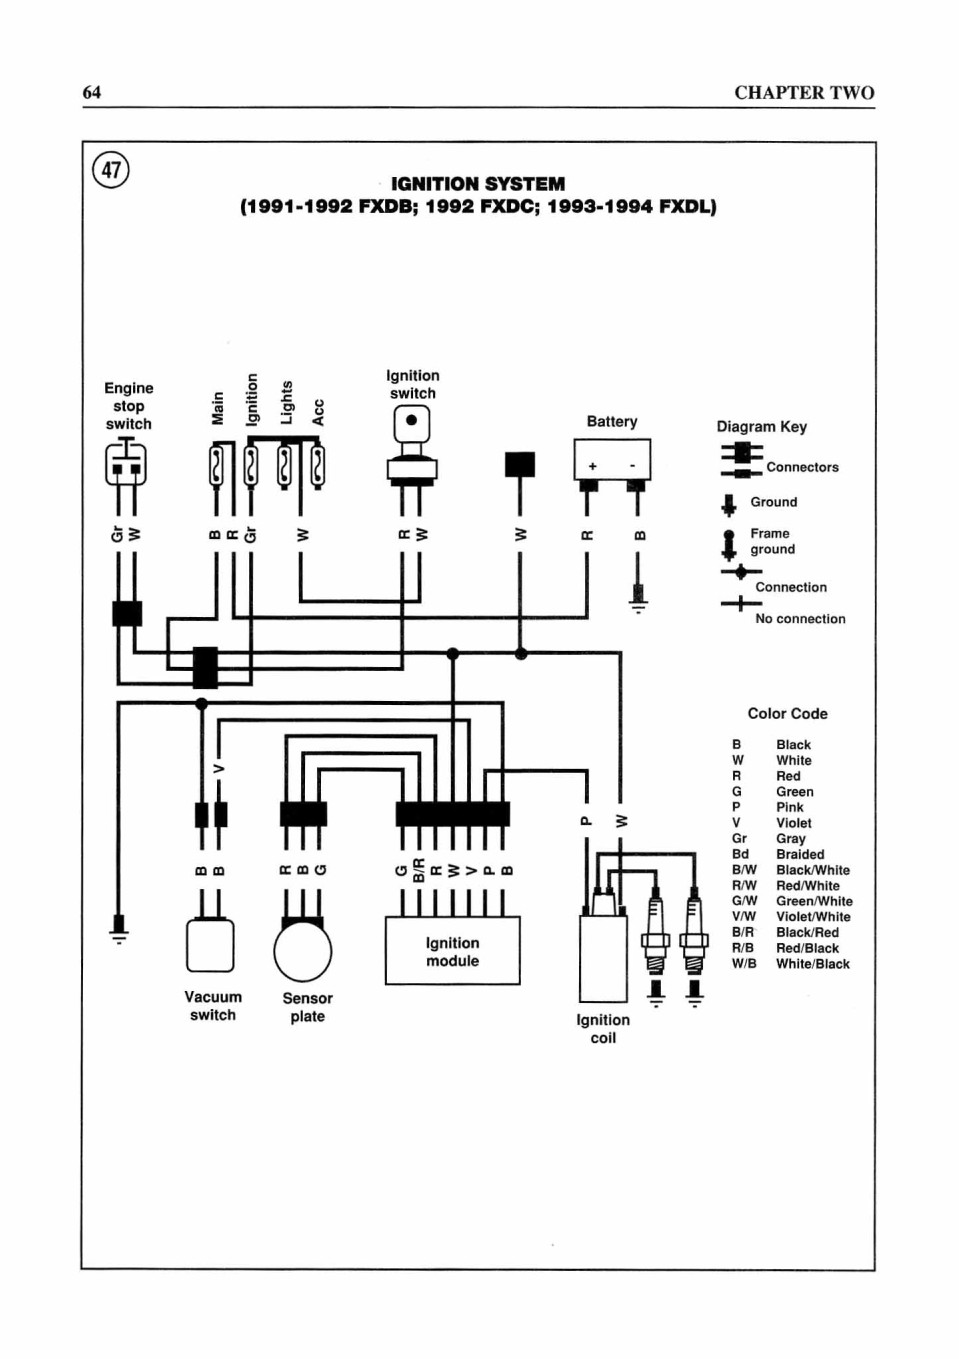
When troubleshooting the ignition system, refer to
the system diagram for your model:
a.All 1991-1992 models and 1993-1994 FXDL: Figure 47.
b. 1993-1994 FXDWG: Figure 48.
c. 1995: Figure 49.
Most problems involving failure to start, poor driveability or rough
running are caused by trouble in the ignition system.
Note the following symptoms:
a. An engine misfire.
b. Stumbles on acceleration (misfiring).
c. Loss of power at high speed (misfiring).
d. Hard starting or failure to start.
e. Rough idle.
Precautions
When testing the ignition system, observe the following precautions to
prevent damage to the system or one of its components.
1. Do not reverse the battery connections. This reverses polarity and
can damage the ignition components.
2. Do not “spark” the battery terminals with the battery cable
connections to check polarity.
3. Do not disconnect the battery cables with the engine running. A
voltage surge will occur which will damage the ignition components and
possibly bum out the lights. A spark may occur which can cause the
battery to explode.
4. Do not crank the engine if the ignition module (Figure 50) is not
securely grounded to the frame. The black wire leading from the ignition
module wiring harness is the ground wire. Check the end of the wire for
corrosion or damage.
5. Whenever working on any part of the ignition system, first turn the
ignition switch off, then disconnect the negative battery lead. This
will prevent damage to the ignition system components from an accidental
short circuit.
6. Keep all connections between the various units clean and tight. Push
the wiring connections together firmly to keep out moisture.
7. Check that all ground wires are attached and free of all oil and
corrosion residues.
Troubleshooting Preparation
If you suspect a problem with the ignition system, perform the following
procedures in order.
1. Check the wiring harness and all plug-in connections to make sure
that all terminals are free of corrosion, all connectors are tight and
the wiring insulation is in good condition.
2. Check all electrical components grounded to the engine for a good
ground. For ground locations, see Figure 47, Figure 48 or Figure 49 for
your model. These includes the ignition module, battery-to-frame, and
engine-to-frame ground wires and straps.
3. Check that all ground wires are properly connected and that the
connections are clean and tight. Clean connectors with electrical
contact cleaner.
4. Check all other wiring and connectors for disconnected wires and
short or open circuits.
5. Check for a damaged ignition circuit breaker (Figure 51).
NOTE
The ignition circuit breaker mounts behind the electric panel.
6. The fuel tank must have an adequate supply of fuel that is reaching
the carburetor.
7. Check spark plug cable routing and their connections at the spark
plugs. If cable routing is correct, perform the Engine Fails to Start
(Spark Test) in this chapter. If there is no spark or only a weak one,
repeat the test with new spark plugs. If the condition remains the same
with new spark plugs and if all external wiring connections are good,
the problem is most likely in the ignition system; perform the following
tests. If a strong spark is noted, the problem is probably not in the
ignition system. Check the fuel system.
Ignition Test
(No Spark at Spark Plug)
Refer to Figure 47, Figure 48 or Figure 49 when performing these
procedures.
1. This test requires a fully charged 12-volt battery.
2. The black ignition module ground lead must be fastened securely.
Check also that the battery ground lead is fastened and in good
condition.